Spring Framework支持透明地向应用程序添加缓存。从本质上讲,抽象将缓存应用于方法,从而根据缓存中可用的信息减少执行次数。缓存逻辑应用透明,不会对调用者造成任何干扰。只要通过@EnableCaching 注释启用了缓存支持,Spring Boot就会自动配置缓存基础结构。下面我就介绍两个我比较常用的缓存。
JSR-107
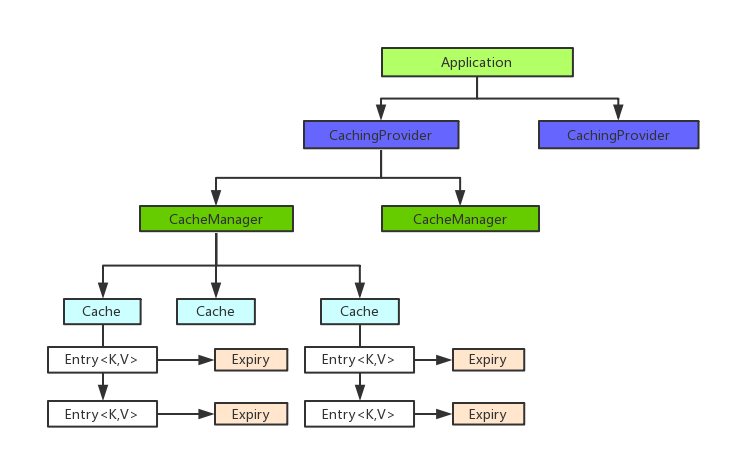
为了统一缓存的开发规范,以及我们系统的扩展性。java发布了JSR-107缓存规范。Java Caching定义了5个核心接口,分别是CachingProvider、CacheManager、Cache和Expiry。
- CachingProvider 定义了创建,配置,获取,管理和控制多个CacheManager。一个应用可以在运行期间访问多个CachingProvider。
- CacheManager定义了创建,配置,获取,管理和控制多个唯一命名的Cache,这些Cache存在于CacheManager 的上下文中,一个CacheManager仅被一个CachingProvider所拥有。
- Cache是一个类似Map的数据结构,并临时存储Key为索引的值。一个Cache仅被一个CacheManager 所拥有。
- Entry是一个存储在Cache中的key-value对
- Expirt每一个存储在Cache中的条目有一个定义的有效期,一旦超过这个有效期,条目就为过期状态,一旦过期,条目不可访问,更新,和删除。缓存有效期可以通过ExpiryPolicy设置。
但是呢实现JSR107对于我们快速开发项目,遇到没有实现JSR-107接口的功能时,此时集成难度较大,也并不是所有框架都集成JSR-107。
Spring缓存抽象
所以呢我们更多使用的是Spring的缓存抽象,Spring的缓存抽象的概念,基本和JSR-107是通用的。Spring从3.1开始定义了Cache和CacheManager接口来同意不同的缓存技术;并且支持使用JSR-107注解来简化我们的开发。
- Cache接口为缓存的组件规范定义,包含缓存的各种操作集合。
- Cache接口下Spring提供了各种缓存的实现,比如RedisCache,EhCacheCache,
- ConcurrentMapCache等。
- 每次调用需要缓存功能的方法的时候,Spring会检查制定参数的制定目标方法,是否被调用过,如果有,就直接从缓存中获取方法调用后的结果,如果没有就调用方法并缓存结构后返回给用户,下次在调用的时候直接从缓存中获取。
- 使用Spring缓存抽象的时候我们需要注意,确定方法需要缓存以及他们的缓存策略,从缓存中读取之前缓存存储的数据。
缓存注解
这里列出常用的几个概念和注解
| 名称 | 概念 |
|---|---|
| Cache | 缓存接口,定义缓存操作,实现有RedisCache,EhCacheCache,ConcurrentMapCache等等 |
| CacheManager | 缓存管理器,管理各种缓存组件 |
| @Cacheable | 主要针对方法配置,能够根据方法的请求参数对其返回的结果尽心缓存 |
| @CacheEvict | 情况缓存 |
| @CachePut | 保证方法被调用,又希望结果被缓存 |
| @EnableCaching | 开启基于缓存的注解 |
| serialize | 缓存数据时value序列化策略 |
| keyGenerator | 缓存数据时key的生成策略 |
| @CacheConfig | 统一配置本类的缓存注解的属性 |
这里列出其中几个注解的主要参数
| 参数名 | 主要作用 | 栗子 |
|---|---|---|
| value | 缓存的名称,在spring配置文件中定义,必须制定至少一个 | @Cacheable(value=“mycache”) @Cacheable(value={“cache1”,“cache2”}) |
| key | 缓存的key,可以为空,如果制定要按照SpEL表达式编写,如果不制定,则按照方法的所有参数进行组合 | @Cacheable(value=“mycache”,key="#userName") |
| condition | 缓存的条件,可以为空,使用SpEL编写,返回true或者false,只有为true才能进行缓存/清除操作,在调用方法之前之后都能进行判断 | @Cacheable(value=“mycache”,condition="#userName.length()>2") |
| allEntries (@CacheEvict) | 是否清空所有缓存内容,缺省为fasle,如果指定为true,则方法调用后将立即清空所有缓存 | @CacheEvict(value=“mycache”,allEntries=true) |
| beforeInvocation (@CacheEvict) | 是否在方法执行前就清空,缺省为fasle,如果制定为true,则在方法还没有执行的时候就会清空缓存,缺省情况下,如果方法执行抛出异常,则不会清空缓存 | @CacheEvict(value=“mycache”,beforeInvocation=true) |
| unless (@CachePut)(@Cacheable) | 用于否决缓存的,不等同于condition,该表达式只在方法执行之后判断,此时可以拿到返回值result进行判断,条件为true不会缓存,fasle才缓存 | @Cacheable(value=“mycache”,unless="#result==null") |
SpEL
其中提到了SpEL,SpEL表达式可基于上下文并通过使用缓存抽象,提供与root独享相关联的缓存特定的内置参数
| 名称 | 位置 | 描述 | 示例 |
|---|---|---|---|
| methodName | root对象 | 当前被调用的方法名 | #root.methodname |
| method | root对象 | 当前被调用的方法 | #root.method.name |
| target | root对象 | 当前被调用的目标对象实例 | #root.target |
| targetClass | root对象 | 当前被调用的目标对象的类 | #root.targetClass |
| args | root对象 | 当前被调用的方法的参数列表 | #root.args[0] |
| caches | root对象 | 当前方法调用使用的缓存列表 | #root.caches[0].name |
| Argument Name | 执行上下文 | 当前被调用的方法的参数,如findArtisan(Artisan artisan),可以通过#artsian.id获得参数 | #artsian.id |
| result | 执行上下文 | 方法执行后的返回值(仅当方法执行后的判断有效,如 unless cacheEvict的beforeInvocation=false) | #result |
1.当我们要使用root对象的属性作为key时我们也可以将“#root”省略,因为Spring默认使用的就是root对象的属性。 如
@Cacheable(key = "targetClass + methodName +#p0")
2.使用方法参数时我们可以直接使用“#参数名”或者“#p参数index”。 如:
@Cacheable(value="users", key="#id")
@Cacheable(value="users", key="#p0")
SpEL提供了多种运算符
| 类型 | 运算符 |
|---|---|
| 关系 | <,>,<=,>=,==,!=,lt,gt,le,ge,eq,ne |
| 算术 | +,- ,* ,/,%,^ |
| 逻辑 | &&,||,!,and,or,not,between,instanceof |
| 条件 | ?: (ternary),?: (elvis) |
| 正则表达式 | matches |
| 其他类型 | ?.,?[…],![…],1,$[…] |
开始使用
首先呢加入添加依赖
<dependency>
    <groupId>org.springframework.boot</groupId>
    <artifactId>spring-boot-starter-cache</artifactId>
</dependency>
然后在启动或者配置类上加入 @EnableCaching注解来开启缓存注解。
创建一个Service来模拟对数据库的操作
package com.maoxs.service;

import com.maoxs.pojo.User;
import lombok.extern.slf4j.Slf4j;
import org.springframework.stereotype.Service;

import java.util.HashMap;
import java.util.Map;

@Service
@Slf4j
public class UserService {

   public static final Map<Integer, User> users = new HashMap<>();

    static {
        users.put(1, new User("我是快乐鱼"));
        users.put(2, new User( "我是忧郁猫"));
        users.put(3, new User( "我是昴先生"));
    }
}
然后是操作的实体类
@Data
public class User implements Serializable {
    private Integer id;
    private String name;

    public User() {
    }

    public User(String name) {
        this.name = name;
    }

    public User(Integer id, String name) {
        this.id = id;
        this.name = name;
    }
}
@Cacheable
在调用方法之前,首先应该在缓存中查找方法的返回值,如果这个值能够找到,就会返回缓存的值。否则,这个方法就会被调用,返回值会放到缓存之中。
@Cacheable(cacheNames = "user",key = "targetClass + methodName +#p0")
public User getUser(int id) {
    log.info("缓存中没有,从map中获取");
    User user = users.get(id);
    return user;
}
此处的value是必需的,它指定了你的缓存存放在哪块命名空间。
此处的key是使用的spEL表达式,参考上章。这里有一个小坑,如果你把methodName换成method运行会报错,观察它们的返回类型,原因在于methodName是String而methoh是Method。
此处的User实体类一定要实现序列化public class User implements Serializable,否则会报java.io.NotSerializableException异常。
到这里,你已经可以运行程序检验缓存功能是否实现。
试着写一个controller 来调用此方法
@RequestMapping("/user/{id}")
public User getUser(@PathVariable int id) {
	return userService.getUser(id);
}
此时注意控制台,第一次访问的时候日志打印 缓存中没有,从map中获取 第二次则什么也没有显示,说明此时缓存已经生效了,结果是从缓存中取的。默认呢是使用SimpleCacheConfiguration,它在容器中注册了一个ConcurrentMapCacheManager,将缓存数据存储在了ConcurrentMap中。
深入源码,查看它的其它属性
我们打开@Cacheable注解的源码,可以看到该注解提供的其他属性,如:
String[] cacheNames() default {}; //和value注解差不多,二选一
String keyGenerator() default ""; //key的生成器。key/keyGenerator二选一使用
String cacheManager() default ""; //指定缓存管理器
String cacheResolver() default ""; //或者指定获取解析器
String condition() default ""; //条件符合则缓存
String unless() default ""; //条件符合则不缓存
boolean sync() default false; //是否使用异步模式
这里key中提到了keyGenerator,默认是使用SimplekeyGenerator 来生成的,他的默认策略为
如果没有参数:key=new SimpleKey();
如果有一个参数: key=参数的值
如果有多个参数的方法: key=new SimpleKey(params);
当然你也可以按照自己的规则去生成key,这里我自己提供了一个自定义的使用起来呢只需要在注解中加入@Cacheable(keyGenerator = "wiselyKeyGenerator") 即可。
    /**
     * 设置统一的生成key的方式
     *
     * @return
     */
    @Bean
    public KeyGenerator wiselyKeyGenerator() {
        return new KeyGenerator() {
            @Override
            public Object generate(Object target, Method method, Object... params) {
                StringBuilder sb = new StringBuilder();
                sb.append(target.getClass().getName());
                sb.append("-");
                sb.append(method.getName());
                for (Object obj : params) {
                    sb.append(obj.toString());
                }
                return sb.toString();
            }
        };
    }
@CachePut
@CachePut注解的作用 主要针对方法配置,能够根据方法的请求参数对其结果进行缓存,和 @Cacheable 不同的是,它每次都会触发真实方法的调用 。简单来说就是用户更新缓存数据。但需要注意的是该注解的value 和 key 必须与要更新的缓存相同,也就是与@Cacheable 相同。
@Cacheable(cacheNames = "user", key = "#id")
public User getUser(int id) {
    log.info("缓存中没有,从map中获取");
    User user = users.get(id);
    return user;
}
@CachePut(cacheNames = "user", key = "#user.id")
public User updateUser(User user) {
    users.put(user.getId(), user);
    return user;
}
弄个controller测试下
@RequestMapping("/user/{id}")
public User getUser(@PathVariable int id) {
	return userService.getUser(id);
}
@RequestMapping("/user/{id}/{name}")
public User updateUser(@PathVariable int id, @PathVariable String name) {
	User user = new User(id, name);
	return userService.updateUser(user);
}
首先呢按id查询一个user 然后通过url更新这个用户,在根据id访问下这个用户,这是注意日志是不是没有打印
缓存中没有,从map中获取 没有打印则缓存更新成功
查看它的其它属性
String[] cacheNames() default {}; //与value二选一
String keyGenerator() default "";  //key的生成器。key/keyGenerator二选一使用
String cacheManager() default "";  //指定缓存管理器
String cacheResolver() default ""; //或者指定获取解析器
String condition() default ""; //条件符合则缓存
String unless() default ""; //条件符合则不缓存
@CacheEvict
@CachEvict 的作用 主要针对方法配置,能够根据一定的条件对缓存进行清空 。
这里需要注意两个属性
| 属性 | 解释 | 示例 |
|---|---|---|
| allEntries | 是否清空所有缓存内容,缺省为 false,如果指定为 true,则方法调用后将立即清空所有缓存 | @CachEvict(value=”testcache”,allEntries=true) |
| beforeInvocation | 是否在方法执行前就清空,缺省为 false,如果指定为 true,则在方法还没有执行的时候就清空缓存,缺省情况下,如果方法执行抛出异常,则不会清空缓存 | @CachEvict(value=”testcache”,beforeInvocation=true) |
给个栗子
    @Cacheable(cacheNames = "user", key = "#id")
    public User getUser(int id) {
        log.info("缓存中没有,从map中获取");
        User user = users.get(id);
        return user;
    }

    //清除一条缓存,key为要清空的数据
    @CacheEvict(value = "user", key = "#id")
    public void delect(int id) {
        users.remove(id);
    }

    //方法调用后清空所有缓存
    @CacheEvict(value = "accountCache", allEntries = true)
    public void delectAll() {
        users.clear();
    }

    //方法调用前清空所有缓存
    @CacheEvict(value = "accountCache", beforeInvocation = true)
    public void delectAllBefore() {
        users.clear();
    }
其他属性
String[] cacheNames() default {}; //与value二选一
String keyGenerator() default "";  //key的生成器。key/keyGenerator二选一使用
String cacheManager() default "";  //指定缓存管理器
String cacheResolver() default ""; //或者指定获取解析器
String condition() default ""; //条件符合则清空
@CacheConfig
当我们需要缓存的地方越来越多,你可以使用@CacheConfig(cacheNames = {"myCache"})注解来统一指定value的值,这时可省略value,如果你在你的方法依旧写上了value,那么依然以方法的value值为准。
@Service
@Slf4j
@CacheConfig(cacheNames = {"user"})
public class UserService {
//    @Cacheable(cacheNames = "user", key = "#id")
    @Cacheable(key = "#id")
    public User getUser(int id) {
        log.info("缓存中没有,从map中获取");
        User user = users.get(id);
        return user;
    }
}
查看它的其它属性
String keyGenerator() default "";  //key的生成器。key/keyGenerator二选一使用
String cacheManager() default "";  //指定缓存管理器
String cacheResolver() default ""; //或者指定获取解析器
@Caching
有时候我们可能组合多个Cache注解使用,此时就需要@Caching组合多个注解标签了。
@Caching(cacheable = {
            @Cacheable(value = "emp",key = "#p0"),
            ...
    },
    put = {
            @CachePut(value = "emp",key = "#p0"),
            ...
    },evict = {
            @CacheEvict(value = "emp",key = "#p0"),
            ....
    })
    public User save(User user) {
        ....
    }
整合EHCACHE3.x
Ehcache是一种广泛使用的开源Java分布式缓存。主要面向通用缓存,Java EE和轻量级容器。它具有内存和磁盘存储,缓存加载器,缓存扩展,缓存异常处理程序,一个gzip缓存servlet过滤器,支持REST和SOAP api等特点。ehcache3.x与2.x的差距还是非常大的,主要区别在于3.x后使用了java的缓存规范JSR107!!!
依赖
引入jar包
<!-- JSR107 API -->
<dependency>
    <groupId>javax.cache</groupId>
    <artifactId>cache-api</artifactId>
</dependency>
<dependency>
    <groupId>org.ehcache</groupId>
    <artifactId>ehcache</artifactId>
</dependency>
<dependency>
    <groupId>org.springframework.boot</groupId>
    <artifactId>spring-boot-starter-cache</artifactId>
</dependency>
yml配置
需要说明的是默认路径为config: classpath:/ehcache.xml 入过在这个目录下这个配置可以不用写,但ehcache.xml必须有。
spring:
  cache:
    type: jcache
    jcache:
      config: classpath:/cache/ehcache.xml
配置文件
在resources的cache目录下新建ehcache.xml
<?xml version="1.0" encoding="UTF-8"?>
<config
    xmlns:xsi='http://www.w3.org/2001/XMLSchema-instance'
    xmlns='http://www.ehcache.org/v3'
    xmlns:jsr107='http://www.ehcache.org/v3/jsr107'
    xsi:schemaLocation="
        http://www.ehcache.org/v3 http://www.ehcache.org/schema/ehcache-core-3.0.xsd
        http://www.ehcache.org/v3/jsr107 http://www.ehcache.org/schema/ehcache-107-ext-3.0.xsd">

    <cache-template name="heap-cache">
        <resources>
            <heap unit="entries">2000</heap>
            <offheap unit="MB">100</offheap>
        </resources>
    </cache-template>

    <cache alias="myuser" uses-template="heap-cache">
        <expiry>
            <ttl unit="seconds">40</ttl>
        </expiry>
    </cache>

</config>
然后呢使用的时候@CacheConfig(cacheNames = {"myuser"}) 中的cacheNames 的名字,xml中的alias必须也有,不然会报找不到缓存名。
整合EHCACHE2.x
整合原理跟ehcache3.x一样,需要稍微改动下
依赖
 <dependency>
     <groupId>net.sf.ehcache</groupId>
     <artifactId>ehcache</artifactId>
 </dependency>

<dependency>
    <groupId>org.springframework.boot</groupId>
    <artifactId>spring-boot-starter-cache</artifactId>
</dependency>
yml配置
spring:
  cache:
    type: ehcache
    ehcache:
      config: classpath:/cache/ehcache.xml
配置文件
<ehcache>
    <!--
        磁盘存储:将缓存中暂时不使用的对象,转移到硬盘,类似于Windows系统的虚拟内存
        path:指定在硬盘上存储对象的路径
        path可以配置的目录有:
            user.home(用户的家目录)
            user.dir(用户当前的工作目录)
            java.io.tmpdir(默认的临时目录)
            ehcache.disk.store.dir(ehcache的配置目录)
            绝对路径(如:d:\\ehcache)
        查看路径方法:String tmpDir = System.getProperty("java.io.tmpdir");
     -->
    <diskStore path="java.io.tmpdir" />
    <!--
        defaultCache:默认的缓存配置信息,如果不加特殊说明,则所有对象按照此配置项处理
        maxElementsInMemory:设置了缓存的上限,最多存储多少个记录对象
        eternal:代表对象是否永不过期 (指定true则下面两项配置需为0无限期)
        timeToIdleSeconds:最大的发呆时间 /秒
        timeToLiveSeconds:最大的存活时间 /秒
        overflowToDisk:是否允许对象被写入到磁盘
        说明:下列配置自缓存建立起600秒(10分钟)有效 。
        在有效的600秒(10分钟)内,如果连续120秒(2分钟)未访问缓存,则缓存失效。
        就算有访问,也只会存活600秒。
     -->
    <defaultCache maxElementsInMemory="10000" eternal="false"
                  timeToIdleSeconds="600" timeToLiveSeconds="600" overflowToDisk="true" />
    <cache name="myCache" maxElementsInMemory="10000" eternal="false"
                  timeToIdleSeconds="120" timeToLiveSeconds="600" overflowToDisk="true" />
</ehcache>
同样呢也是这样使用@CacheConfig(cacheNames = {"myCache"}) 中的cacheNames 的名字,xml中的alias必须也有,不然会报找不到缓存名。
整合Redis
- 性能极高 – Redis能读的速度是110000次/s,写的速度是81000次/s 。
- 丰富的数据类型 – Redis支持二进制案例的 Strings, Lists, Hashes, Sets 及 Ordered Sets 数据类型操作。
- 原子 – Redis的所有操作都是原子性的,意思就是要么成功执行要么失败完全不执行。单个操作是原子性的。多个操作也支持事务,即原子性,通过MULTI和EXEC指令包起来。
- 丰富的特性 – Redis还支持 publish/subscribe, 通知, key 过期等等特性
依赖
<dependency>
    <groupId>org.springframework.boot</groupId>
    <artifactId>spring-boot-starter-data-redis</artifactId>
</dependency>
<dependency>
    <groupId>org.springframework.boot</groupId>
    <artifactId>spring-boot-starter-cache</artifactId>
</dependency>
当你导入这一个依赖时,SpringBoot的CacheManager就会使用RedisCache。
存入redis呢默认的缓存序列化策略为jdk序列化如果想更改怎么办呢,这里呢我们注入了一个RedisTemplate 设置了里面的序列化,然后呢把他注入到redisCacheManger里就可以了。
    @Bean
    public RedisTemplate<Object, Object> redisTemplate(RedisConnectionFactory connectionFactory) {
        RedisTemplate<Object, Object> template = new RedisTemplate<>();
        template.setConnectionFactory(connectionFactory);
        //使用Jackson2JsonRedisSerializer来序列化和反序列化redis的value值(默认使用JDK的序列化方式)
        Jackson2JsonRedisSerializer serializer = new Jackson2JsonRedisSerializer(Object.class);
        ObjectMapper mapper = new ObjectMapper();
        mapper.setVisibility(PropertyAccessor.ALL, JsonAutoDetect.Visibility.ANY);
        mapper.enableDefaultTyping(ObjectMapper.DefaultTyping.NON_FINAL);
        serializer.setObjectMapper(mapper);
        template.setValueSerializer(serializer);
        //使用StringRedisSerializer来序列化和反序列化redis的key值
        template.setKeySerializer(new StringRedisSerializer());
        template.afterPropertiesSet();
        return template;
    }

    @Bean
    public RedisCacheManager redisCacheManager(RedisTemplate redisTemplate) {
        RedisCacheWriter redisCacheWriter = RedisCacheWriter.nonLockingRedisCacheWriter(redisTemplate.getConnectionFactory());
        RedisCacheConfiguration redisCacheConfiguration = RedisCacheConfiguration.defaultCacheConfig()
                .entryTtl(Duration.ofHours(1))
                .serializeValuesWith(RedisSerializationContext.SerializationPair.fromSerializer(redisTemplate.getValueSerializer()));
        return new RedisCacheManager(redisCacheWriter, redisCacheConfiguration);
    }
当然也可以这样
    @Bean
    public RedisCacheManager redisCacheManager(RedisConnectionFactory redisConnectionFactory) {
        Jackson2JsonRedisSerializer serializer = new Jackson2JsonRedisSerializer(Object.class);
        ObjectMapper mapper = new ObjectMapper();
        mapper.setVisibility(PropertyAccessor.ALL, JsonAutoDetect.Visibility.ANY);
        mapper.enableDefaultTyping(ObjectMapper.DefaultTyping.NON_FINAL);
        RedisCacheConfiguration redisCacheConfiguration = RedisCacheConfiguration.defaultCacheConfig()
                .entryTtl(Duration.ofHours(1))   // 设置缓存有效期一小时
                .serializeValuesWith(RedisSerializationContext.SerializationPair.fromSerializer(serializer))
        ;
        return RedisCacheManager
                .builder(RedisCacheWriter.nonLockingRedisCacheWriter(redisConnectionFactory))
                .cacheDefaults(redisCacheConfiguration).build();
    }
代码形势
除了注解之外呢,想自己用代码的形势来使用缓存,其实是可以的,只用注入响应的cacheManager就可以啦,然后调用。举个栗子
public class RedisCacheTest extends SpringbootCacheApplicationTests {

    @Autowired
    private RedisCacheManager redisCacheManager;

    @Test
    public void managerTest() {
        Cache cache = redisCacheManager.getCache("fulin");
        cache.put("1", "我看不清楚");
        Cache.ValueWrapper valueWrapper = cache.get("1");
        System.out.println(valueWrapper.get());

    }
}
这样可以的,自己用代码控制缓存。
这里顺便说一下那个啥 jcache和ehcache的cacaheManager 的个性化注入
    @Bean
    public JCacheCacheManager jCacheCacheManager() throws URISyntaxException {
        CachingProvider provider = Caching.getCachingProvider();
        JCacheCacheManager jCacheCacheManager = new JCacheCacheManager();
        javax.cache.CacheManager eh107CacheManager = provider.getCacheManager(getClass().getResource("/cache/ehcache.xml").toURI(), getClass().getClassLoader());
        jCacheCacheManager.setCacheManager(eh107CacheManager);
        return jCacheCacheManager;
    }
/**
  * ehcache 主要的管理器
  * @param bean
  * @return
  */
@Bean
public EhCacheCacheManager ehCacheCacheManager(EhCacheManagerFactoryBean bean){
    return new EhCacheCacheManager(bean.getObject());
}
@Bean
public EhCacheManagerFactoryBean ehCacheManagerFactoryBean(){
    EhCacheManagerFactoryBean factoryBean = new EhCacheManagerFactoryBean();
    factoryBean.setConfigLocation(new ClassPathResource("/cache/ehcache.xml"));
    factoryBean.setShared(true);
    return factoryBean;
}
好了代码和注解看你取舍了,这边我给个工具类,能省略不少操作
package com.maoxs;

import org.springframework.cache.Cache;

/**
 * fulin缓存抽象类
 */
public abstract class AbstractCacheSupport {

    /**
     * 获取缓存内容
     *
     * @param cache
     * @param key
     * @return
     */
    protected Object getFromCache(Cache cache, String key) {
        final Cache.ValueWrapper valueWrapper = cache.get(key);
        return null == valueWrapper ? null : valueWrapper.get();
    }

    /**
     * 设置缓存数据
     *
     * @param cache
     * @param key
     * @param value
     * @return
     */
    protected boolean putCache(Cache cache, String key, Object value) {
        if (null == value) {
            return false;
        }
        cache.put(key, value);

        return true;
    }

    /**
     * 删除缓存数据
     *
     * @param cache
     * @param key
     * @return
     */
    protected boolean evictFromCache(Cache cache, Object key) {
        if (null == key) {
            return false;
        }
        cache.evict(key);

        return true;
    }
}
本博文是基于springboot2.x 如果有什么不对的请在下方留言。
相关连接:
个人博客地址 : www.fulinlin.com
csdn博客地址:https://blog.csdn.net/qq_32867467
集合源码地址 : https://gitee.com/Maoxs/springboot-test
注:如果不对联系本宝宝及时改正~~
… ↩︎