在youtube上看到的教程,翻墙可访问链接:https://www.youtube.com/watch?v=DJ6PD_jBtU0&t=1188s
ps:如果想学习vue基础,建议在b站搜”表严肃”的课程。
本文中,我们以用laravel+vue做一个导航栏为案例。
搭建环境
用composer下载好laravel项目后,composer update。如果用的xampp或wamp,搭建好虚拟服务器,这是常规操作不多说。因为laravel默认有vue的,所以直接 npm install,再npm run watch(每次打开项目都要执行,不执行看不到vue组件的效果)
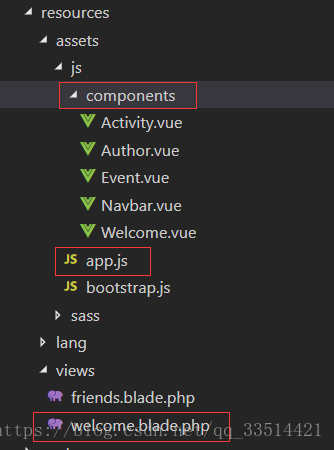
目录结构主要看三个重要文件:
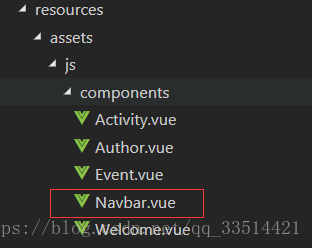
1、vue组件。在 resource /assets /js /components 中(下面的5个组件是我自己写好的)。
2、app.js。在 resource /assets /js 中,用于声明组件。
3、模板引擎。在 resource /views 下。
一、模板引擎引入app.js
为了能够使用vue组件,需要引入app.js,因此修改welcome.blade.php如下:
<!doctype html>
<html lang="{{ app()->getLocale() }}">
    <head>
        <meta charset="utf-8">
        <meta http-equiv="X-UA-Compatible" content="IE=edge">
        <meta name="viewport" content="width=device-width, initial-scale=1">
        <title>Laravel</title>
    </head>
    <body>
        <div id="app">
            <!-- 加入vue组件 -->
        </div>
        <script src="{{ asset('js/app.js') }}"></script>
    </body>
</html>
二、添加vue组件
1、在welcome.blade.php中,在id为app的div中加入vue组件名。此处举例的是导航栏组件。
<div id="app">
    <navbar></navbar>
</div>
2、在app.js中声明vue组件
require("./bootstrap");

window.Vue = require("vue");

//声明组件navbar
Vue.component("navbar", require("./components/Navbar.vue"));

const app = new Vue({
  el: "#app"
});
3、在 components 文件夹中添加 Navbar.vue 文件(导航组件)
Navbar.vue 内容主要为三部分:
1、template:模板,html
<template>
    <div class="myNav">
        <div class="left">LanYue</div>
        <div class="center">
            <a href="/">首页</a>
            <a href="/store">商城</a>
            <a href="/find">发现</a>
            <a href="/artists">艺术家</a>
            <a href="/activities">活动</a>
        </div>
        <div class="right">
            <img :src="avatar" />
        </div>
    </div>
</template>
2、script:脚本
<script>
export default {
  data() {
    return {
      avatar: "http://lanyue.ink/images/avatar.jpg",
    };
  },
};
</script>
3、scss:类似css,比css更高级
<style lang="scss">
.myNav {
  position: fixed;
  z-index: 10;
  top: 0;
  width: 100%;
  height: 50px;
  background-color: #000;
  color: white;
  display: flex;
  align-items: center;
  justify-content: space-between;
}
.left,
.center,
.right {
  height: 50px;
  display: flex;
  align-items: center;
}
.left {
  margin: 0 50px;
  width: 100px;
}
.center {
  a {
    margin: 0 20px;
    text-decoration: none;
    color: white;
  }
}
.right {
  width: 100px;
  margin: 0 50px;
  justify-content: flex-end;
  img {
    $a: 30px;
    width: $a;
    height: $a;
    border-radius: 100%;
  }
}
</style>
保存好这三个文件后,刷新网页即可看到导航栏。
三、添加跳转页面
点击导航栏上的按钮可以跳转页面。此次我们没有使用vue的单页应用,所以依然使用laravel的路由。
在 routes/web.php 中添加路由,在 resource/views 中添加模板引擎,再按照上述的操作添加另一个vue页面。