文章目录
概述
当使用银行卡消费的时候,银行往往会通过微信、短信或邮件通知用户这笔交易的信
息,这便是一种发布订阅模式, 1这里的发布是交易信息的发布,订阅则是各个渠道。这在实际工作中十分常用, Redis 支持这样的一个模式。
Redis 发布订阅(pub/sub)是一种消息通信模式:发送者(pub)发送消息,订阅者(sub)接收消息。观察者模式就是这个模式的典型应用。
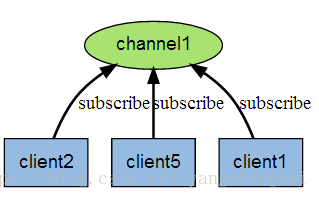
Redis 客户端可以订阅任意数量的频道。
下图展示了频道 channel1 , 以及订阅这个频道的三个客户端 —— client2 、 client5 和 client1 之间的关系:
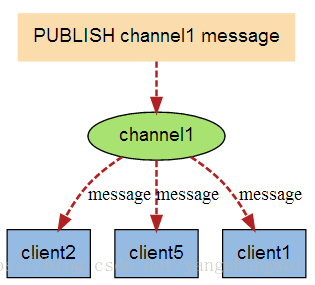
当有新消息通过 PUBLISH 命令发送给频道 channel1 时, 这个消息就会被发送给订阅它的三个客户端:
客户端操作
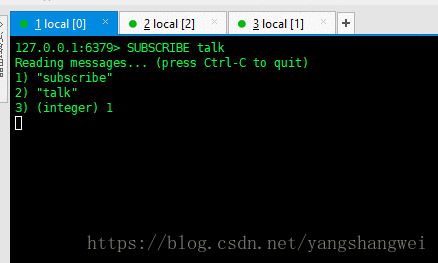
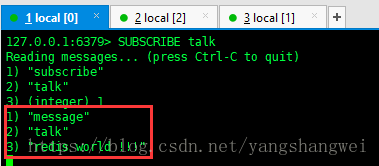
首先来注册一个订阅的客户端 , 这个时候使用 SUBSCRIBE命令 。
比如监昕一个叫作 talk 的渠道 , 这个时候我们需要先打开一个客户端 ,这里记为客户
端1 ,然后输入命令
127.0.0.1:6379> SUBSCRIBE talk
Reading messages... (press Ctrl-C to quit)
1) "subscribe"
2) "talk"
3) (integer) 1
这个时候客户端 1 就会订阅了一个叫作 talk渠道的消息了
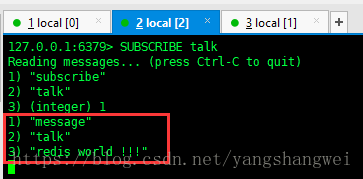
打开另外一个客户端 ,记为客户端 2订阅 talk渠道的消息
127.0.0.1:6379> SUBSCRIBE talk
Reading messages... (press Ctrl-C to quit)
1) "subscribe"
2) "talk"
3) (integer) 1
最后打开另外一个客户端,发布消息给这两个订阅者
127.0.0.1:6379> PUBLISH talk "redis world !!!"
(integer) 2
127.0.0.1:6379>
观察客户端 1 和客户端2 ,就可以发现已经收到了消息 , 井有对应的信息打印出来。
Spring配置发布订阅模式
首先提供接收消息的类 , 它将实现 org.springframework.data.redis.connection.MessageListener 接口, 并实现接口定义的方法 public void onMessage(Message message, byte[] pattern)
package com.artisan.redis.publish;

import org.springframework.data.redis.connection.Message;
import org.springframework.data.redis.connection.MessageListener;
import org.springframework.data.redis.core.RedisTemplate;

public class RedisMessageListener implements MessageListener {

	private RedisTemplate redisTemplate;

	public RedisTemplate getRedisTemplate() {
		return redisTemplate;
	}

	public void setRedisTemplate(RedisTemplate redisTemplate) {
		this.redisTemplate = redisTemplate;
	}

	@Override
	public void onMessage(Message message, byte[] bytes) {
		// 获取消息
		byte[] body = message.getBody();
		// 使用值序列化器转换
		String msgBody = (String) getRedisTemplate().getValueSerializer().deserialize(body);
		System.out.println("RedisMessageListener:" + msgBody);
		// 获取 channel
		byte[] channel = message.getChannel();
		// 使用字符串序列化器转换
		String channelStr = (String) getRedisTemplate().getStringSerializer().deserialize(channel);
		System.out.println("RedisMessageListener:" + channelStr);
		// 渠道名称转换
		String bytesStr = new String(bytes);
		System.out.println("RedisMessageListener:" + bytesStr);
	}

}
package com.artisan.redis.publish;

import org.springframework.data.redis.connection.Message;
import org.springframework.data.redis.connection.MessageListener;
import org.springframework.data.redis.core.RedisTemplate;

public class RedisMessageListener2 implements MessageListener {

	private RedisTemplate redisTemplate;

	public RedisTemplate getRedisTemplate() {
		return redisTemplate;
	}

	public void setRedisTemplate(RedisTemplate redisTemplate) {
		this.redisTemplate = redisTemplate;
	}

	@Override
	public void onMessage(Message message, byte[] bytes) {
		// 获取消息
		byte[] body = message.getBody();
		// 使用值序列化器转换
		String msgBody = (String) getRedisTemplate().getValueSerializer().deserialize(body);
		System.out.println("RedisMessageListener2:" + msgBody);
		// 获取 channel
		byte[] channel = message.getChannel();
		// 使用字符串序列化器转换
		String channelStr = (String) getRedisTemplate().getStringSerializer().deserialize(channel);
		System.out.println("RedisMessageListener2:" + channelStr);
		// 渠道名称转换
		String bytesStr = new String(bytes);
		System.out.println("RedisMessageListener2:" + bytesStr);
	}

}
为了在 Spring 中使用这两个监听类,需要对其进行配置。这样就在 Spring 上下文中定义了监昕类。
<?xml version="1.0" encoding="UTF-8"?>
<beans xmlns="http://www.springframework.org/schema/beans"
	xmlns:xsi="http://www.w3.org/2001/XMLSchema-instance"
	xmlns:context="http://www.springframework.org/schema/context"
	xmlns:p="http://www.springframework.org/schema/p"
	xsi:schemaLocation="http://www.springframework.org/schema/beans
		http://www.springframework.org/schema/beans/spring-beans.xsd
		http://www.springframework.org/schema/context
		http://www.springframework.org/schema/context/spring-context.xsd">

    <context:property-placeholder location="classpath:redis/redis.properties" />

    <!--2,注意新版本2.3以后,JedisPoolConfig的property name,不是maxActive而是maxTotal,而且没有maxWait属性,建议看一下Jedis源码或百度。 -->
    <!-- redis连接池配置 -->
    <bean id="jedisPoolConfig" class="redis.clients.jedis.JedisPoolConfig">
        <!--最大空闲数 -->
        <property name="maxIdle" value="${redis.maxIdle}" />
        <!--连接池的最大数据库连接数 -->
        <property name="maxTotal" value="${redis.maxTotal}" />
        <!--最大建立连接等待时间 -->
        <property name="maxWaitMillis" value="${redis.maxWaitMillis}" />
        <!--逐出连接的最小空闲时间 默认1800000毫秒(30分钟) -->
        <property name="minEvictableIdleTimeMillis" value="${redis.minEvictableIdleTimeMillis}" />
        <!--每次逐出检查时 逐出的最大数目 如果为负数就是 : 1/abs(n), 默认3 -->
        <property name="numTestsPerEvictionRun" value="${redis.numTestsPerEvictionRun}" />
        <!--逐出扫描的时间间隔(毫秒) 如果为负数,则不运行逐出线程, 默认-1 -->
        <property name="timeBetweenEvictionRunsMillis" value="${redis.timeBetweenEvictionRunsMillis}" />
   		<property name="testOnBorrow" value="true"></property>
		<property name="testOnReturn" value="true"></property>
		<property name="testWhileIdle" value="true"></property>
    </bean>

	<!--redis连接工厂 -->
    <bean id="jedisConnectionFactory"
        class="org.springframework.data.redis.connection.jedis.JedisConnectionFactory"
        destroy-method="destroy">
        <property name="poolConfig" ref="jedisPoolConfig"></property>
        <!--IP地址 -->
        <property name="hostName" value="${redis.host.ip}"></property>
        <!--端口号 -->
        <property name="port" value="${redis.port}"></property>
        <!--如果Redis设置有密码 -->
        <property name="password" value="${redis.password}" />
        <!--客户端超时时间单位是毫秒 -->
        <property name="timeout" value="${redis.timeout}"></property>
        <property name="usePool" value="true" />
        <!--<property name="database" value="0" /> -->
    </bean>

	<!-- 键值序列化器设置为String 类型 -->
	<bean id="stringRedisSerializer" class="org.springframework.data.redis.serializer.StringRedisSerializer"/>

	<!-- redis template definition -->
	<bean id="redisTemplate" class="org.springframework.data.redis.core.RedisTemplate"
		p:connection-factory-ref="jedisConnectionFactory"
		p:keySerializer-ref="stringRedisSerializer"
		p:valueSerializer-ref="stringRedisSerializer">
	</bean>

	<!-- 自定义 发布订阅监听类 -->
	<bean id="redisMessageListener" class="com.artisan.redis.publish.RedisMessageListener"
		p:redisTemplate-ref="redisTemplate"/>
	<bean id="redisMessageListener2" class="com.artisan.redis.publish.RedisMessageListener2"
		p:redisTemplate-ref="redisTemplate"/>

	<!-- 监听容器 -->
	<bean id="topicContainer"
		class="org.springframework.data.redis.listener.RedisMessageListenerContainer"
		destroy-method="destroy">
		<!--Redis 连接工厂 -->
		<property name="connectionFactory" ref="jedisConnectionFactory"></property>
		<!-- 连接池,这里只要线程池生存 , 才能继续监昕 -->
		<property name="taskExecutor">
			<bean
				class="org.springframework.scheduling.concurrent.ThreadPoolTaskExecutor">
				<property name="corePoolSize" value="3"></property>
			</bean>
		</property>
		<!-- 消息监听 Map -->
		<property name="messageListeners">
			<map>
				<!--一配置监听者, key-ref 和 bean id 定义一致 -->
				<entry key-ref="redisMessageListener">
					<!--监听类 -->
					<bean class="org.springframework.data.redis.listener.ChannelTopic">
						<constructor-arg value="talk" />
					</bean>
				</entry>
				<entry key-ref="redisMessageListener2">
					<!--监听类 -->
					<bean class="org.springframework.data.redis.listener.ChannelTopic">
						<constructor-arg value="talk" />
					</bean>
				</entry>
			</map>
		</property>
	</bean>
</beans>
有了监听类还不能进行测试。为了进行测试 , 要给一个监昕容器 , 在 Spring 中己有类org.springframework.data . redi s. li stener.RedisMessageListenerContainer。它可 以用于监听 Redis的发布订阅消息,上面配置的topicContainer就是为了实现这个功能。
这里配置了线程池,这个线程池将会持续的生存 以等待消息传入 , 而这里配置了容器用id 为 redisMessageListener 和 redisMessageListener2的 Bean 进行对渠道 talk的监听 。当消息通过渠道 talk发送的时候,就会使用 id 为 redisMessageListener和redisMessageListener2 的 Bean 进行处理消息。
测试类
package com.artisan.redis.publish;

import org.springframework.context.ApplicationContext;
import org.springframework.context.support.ClassPathXmlApplicationContext;
import org.springframework.data.redis.core.RedisTemplate;

public class PublishSubscribeTest {

	public static void main(String[] args) {
		ApplicationContext ctx = new ClassPathXmlApplicationContext("classpath:spring/spring-redis-publish.xml");
		RedisTemplate redisTemplate = ctx.getBean(RedisTemplate.class);

		String channel = "talk";
		redisTemplate.convertAndSend(channel, "artisan-talk");
	}
}
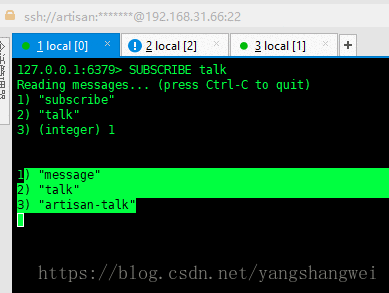
convertAndSend 方法就是向渠道 talk发送消息的, 当发送后对应的监听者就能监听到消息了。运行它,后台就会打出对应的消息:
INFO : org.springframework.context.support.ClassPathXmlApplicationContext - Refreshing org.springframework.context.support.ClassPathXmlApplicationContext@73a8dfcc: startup date [Thu Sep 27 23:55:12 CST 2018]; root of context hierarchy
INFO : org.springframework.beans.factory.xml.XmlBeanDefinitionReader - Loading XML bean definitions from class path resource [spring/spring-redis-publish.xml]
INFO : org.springframework.context.support.DefaultLifecycleProcessor - Starting beans in phase 2147483647
RedisMessageListener:artisan-talk
RedisMessageListener2:artisan-talk
RedisMessageListener2:talk
RedisMessageListener:talk
RedisMessageListener:talk
RedisMessageListener2:talk
客户端中肯定也有对应的输出,如果打开了客户端的话