前期准备
申请一个ssl证书免费的就可以
阿里云:https://common-buy.aliyun.com/?commodityCode=cas#/buy

然后下载证书
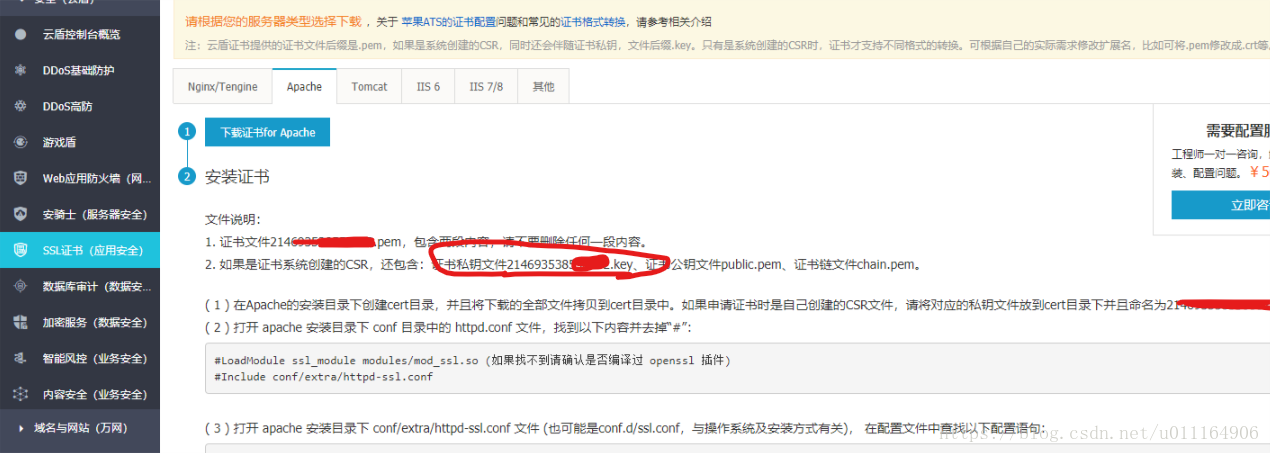
我们需要这个 .key 文件,把该文件放在spring boot项目resources目录下,配置文件中添加
application.yml
server:
port: 443
servlet:
context-path: /
ssl:
key-store: classpath:21427867.pfx
key-store-password: 21427867
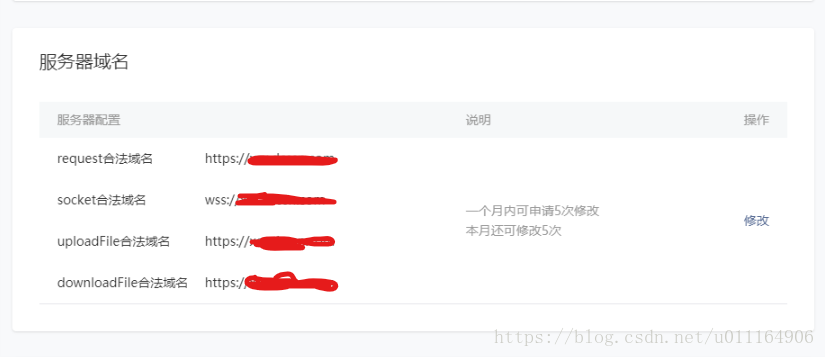
key-store-type: PKCS12登陆微信公众平台 小程序后台 设置-》开发设置-》服务器域名
本机调试,我们还需要做一个内网映射,花生壳,路由器端口映射,dmz主机,都可以。
dmz主机可以利用阿里云的域名解析接口,自己写一个服务,实时更新A记录的值为我们本机的公网ip,这就实现了动态解析的功能。
开始
可以参考spring官网案例创建websocket服务端
网址:https://spring.io/guides/gs/messaging-stomp-websocket/
我的是这么写的
WebSocketConfig.java
package com.huayu.config;

import org.springframework.context.annotation.Configuration;
import org.springframework.messaging.simp.config.MessageBrokerRegistry;
import org.springframework.web.socket.config.annotation.EnableWebSocketMessageBroker;
import org.springframework.web.socket.config.annotation.StompEndpointRegistry;
import org.springframework.web.socket.config.annotation.WebSocketMessageBrokerConfigurer;

@Configuration
@EnableWebSocketMessageBroker
public class WebSocketConfig implements WebSocketMessageBrokerConfigurer {

    /**
     * 配置了一个简单的消息代理,如果不重载,默认情况下回自动配置一个简单的内存消息代理,用来处理以"/topic"为前缀的消息。这里重载configureMessageBroker()方法,
     * 消息代理将会处理前缀为"/topic"和"/queue"的消息。
     */
    @Override
    public void configureMessageBroker(MessageBrokerRegistry config) {
        // 这句话表示在topic和user这两个域上可以向客户端发消息。
        config.enableSimpleBroker("/topic", "/user");
        // 这句话表示客户单向服务器端发送时的主题上面需要加"/app"作为前缀。
        config.setApplicationDestinationPrefixes("/app");
        // 这句话表示给指定用户发送一对一的主题前缀是"/user"。
        config.setUserDestinationPrefix("/user");
    }

    /**
     * 将"/gs-guide-websocket"路径注册为STOMP端点,这个路径与发送和接收消息的目的路径有所不同,这是一个端点,客户端在订阅或发布消息到目的地址前,要连接该端点,
     * 即用户发送请求url="/gs-guide-websocket"与STOMP server进行连接。之后再转发到订阅url;
     * PS:端点的作用——客户端在订阅或发布消息到目的地址前,要连接该端点。
     */
    @Override
    public void registerStompEndpoints(StompEndpointRegistry registry) {
        /*
         * 在网页上可以通过"/gs-guide-websocket"来和服务器的WebSocket连接
         *这个和客户端创建连接时的url有关,其中setAllowedOrigins()方法表示允许连接的域名,withSockJS()方法表示支持以SockJS方式连接服务器。
         */
        registry.addEndpoint("/gs-guide-websocket").setAllowedOrigins("*");
    }

}
WebSocketTestController.java
package com.huayu.config;

import org.springframework.beans.factory.annotation.Autowired;
import org.springframework.messaging.handler.annotation.MessageMapping;
import org.springframework.messaging.simp.SimpMessageSendingOperations;
import org.springframework.scheduling.annotation.Scheduled;
import org.springframework.stereotype.Controller;
import org.springframework.web.bind.annotation.RequestMapping;
import org.springframework.web.bind.annotation.RequestMethod;
import org.springframework.web.bind.annotation.ResponseBody;

import java.text.DateFormat;
import java.text.SimpleDateFormat;
import java.util.Date;

/**
 * webSocket测试
 *
 * @author lihy
 * @version 2018/6/15
 */
@Controller
public class WebSocketTestController {

    @Autowired
    SimpMessageSendingOperations simpMessageSendingOperations;

    /**
     * 定时推送消息
     *
     * @author lihy
     */
    @Scheduled(fixedRate = 1000)
    public void callback() {
        // 发现消息
        DateFormat df = new SimpleDateFormat("yyyy-MM-dd HH:mm:ss");
        simpMessageSendingOperations.convertAndSend("/topic/greetings", "广播消息" + df.format(new Date()));
    }

    /**
     * 发送给单一客户端
     * 客户端接收一对一消息的主题应该是“/user/” + 用户Id + “/message” ,这里的用户id可以是一个普通的字符串,只要每个用户端都使用自己的id并且服务端知道每个用户的id就行。
     *
     * @return java.lang.String
     * @author lihy
     */
    @RequestMapping(path = "/sendToUser", method = RequestMethod.GET)
    @ResponseBody
    public String sendToUser() {
        String openid = "oO1Yu5Tlih1Lxqi7yh1qc7fZJE9M";
        simpMessageSendingOperations.convertAndSendToUser(openid, "/message", "你好" + openid);
        return "success";
    }

    /**
     * 接收客户端发来的消息
     *
     * @author lihy
     */
    @MessageMapping("/helloServer")
    public void receiver(String msg) {
        System.out.println("msg = [" + msg + "]");
    }
}
小程序
引入stomp模块, 官网下载就可以了,地址:https://raw.githubusercontent.com/jmesnil/stomp-websocket/master/lib/stomp.js
js这样写
initSocket: function () {

    var socketOpen = false

    function sendSocketMessage(msg) {
      console.log('send msg:')
      console.log(msg);
      if (socketOpen) {
        wx.sendSocketMessage({
          data: msg
        })
      } else {
        socketMsgQueue.push(msg)
      }
    }


    var ws = {
      send: sendSocketMessage
    }

    wx.connectSocket({
      url: 'wss://***.**.com/gs-guide-websocket'
    })
    wx.onSocketOpen(function (res) {
      socketOpen = true
      ws.onopen()
    })

    wx.onSocketMessage(function (res) {
      ws.onmessage(res)
    })

    var Stomp = require('../../utils/stomp.min.js').Stomp;
    Stomp.setInterval = function () { }
    Stomp.clearInterval = function () { }
    var stompClient = Stomp.over(ws);

    stompClient.connect({}, function (sessionId) {
      stompClient.subscribe('/topic/greetings', function (body, headers) {
        console.log('From MQ:', body);
      });
      let openid = 'oO1Yu5Tlih1Lxqi7yh1qc7fZJE9M';
      stompClient.subscribe('/user/' + openid + '/message', function (body, headers) {
        wx.vibrateLong()
        console.log('From MQ to user:', body);
      });
      stompClient.send("/app/helloServer", {}, JSON.stringify({ 'msg': '我是客户端' }));
    })

  }
小程序输出

springboot输出

访问:https://你的域名/sendToUser

小程序客户端也接收到了