其他的不多说,直奔主题:

本次是以微信注册中所遇到滑块验证码为例,主要的目的就是让脚本实现自动识别阴影部分的位置,然后计算出距离拖动滑块完成验证操作
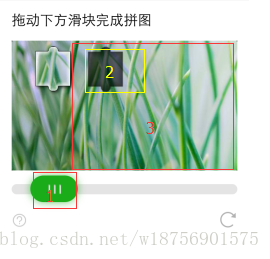
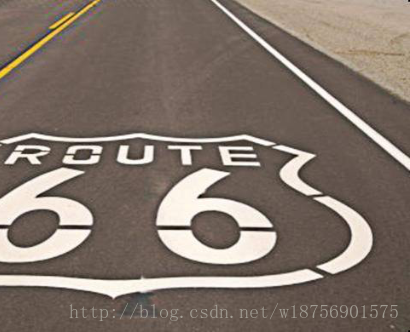
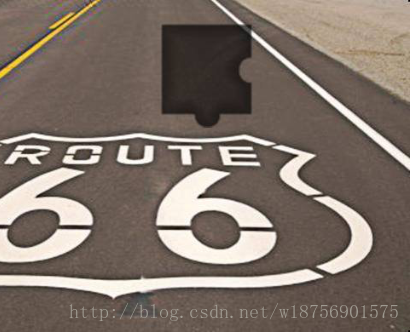
想要从1处滑动到2处,就需要知道1处和2处的中间点的x轴坐标位置,1点的坐标基本是固定的,2点的坐标是不断在变化的.我的方法也是在网上查到的,思路就是得出原图,然后和有阴影的图片进行对比从而得出阴影部分的位置.图片只需要得到3位置的部分就可以了.左边的部分不需要.
获取原图的方式还是比较麻烦的,我尝试了抓包,但是失败了,第一次抓iOS的包,微信的这些数据是https的,数据是加密后的.当然也有可能是我比较水. 我最终获取的方式是截取3中除去2的右边部分,然后在不断刷新,直至刷出2在3的右边的时候,截取左边的部分,然后将2张截图合并在一起.获取完整图片.脚本端我是使用触动精灵来做的,触动精灵有提供屏幕截取以及图片合并的api
下面是我收集原图的代码,比较笨,如果有人有更好的方法,欢迎交流
require("TSLib")
require("sz")


--[[
(200,232)    (609,232)
(200,563)    (609,563)
]]--

name="马路"
--i的值为你需要的位置
i=0
--snapshot( name.."前.png",200,232,i-1,563);
--snapshot( name.."后.png",i,232,609,563);

--图片合成
--imageOperMerge({name.."前.png",name.."后.png"},name..".png", 0);
--滑块图截取
--snapshot("测试1.png",200,232,609,563)

nLog("执行完成")滑块验证的图片都是固定的几张图片,在我写这篇博客的时候微信的滑块验证共13张图片.
获取到我们需要的原图之后.因为触动没有直接提供对本地图片像素的提取访问,而我对lua的库第三方库也不是很熟悉,所以图片对比的代码我是用我最熟悉的Java来完成的
package com.wkk.test;

import javax.imageio.ImageIO;
import javax.imageio.ImageWriter;
import javax.imageio.stream.ImageOutputStream;
import java.awt.*;
import java.awt.image.BufferedImage;
import java.io.File;
import java.io.IOException;
import java.util.Iterator;

public class Test {
    public static void main(String[] arg) {
        String path1 = "D:\\马路.png";
        String path2 = "D:\\测试1.png";
        int dv = getDifferenceValue(path1, path2);
        System.out.println(dv);
    }


    /**
     * 通过像素对比来计算偏差值
     *
     * @param path1 原图位置
     * @param path2 滑块图位置
     * @return 偏差值
     */
    public static int getDifferenceValue(String path1, String path2) {
        int result = 0;
        File file = new File(path1);
        File file1 = new File(path2);
        if (!file.exists() || !file1.exists()) {
            System.out.println("文件不存在");
            return 0;
        }

        try {
            BufferedImage image = ImageIO.read(file);
            BufferedImage image1 = ImageIO.read(file1);
            int height = image.getHeight();
            int width = image.getWidth();

            //遍历每一个像素点,对比,相同为0,不同为1
            int[][] ints = new int[height][width];
            for (int x = 1; x < width; x++) {
                for (int y = 1; y < height; y++) {
                    int color = image.getRGB(x, y);
                    int color1 = image1.getRGB(x, y);
                    if (color == color1) {
                        ints[y - 1][x - 1] = 0;
                    } else {
                        ints[y - 1][x - 1] = 1;
                    }
                }
            }

            //通过上下左右像素的对比来去除杂色,并且计算最大值最小值
            int maxX = -1;
            int minX = 999;
            for (int y = 0; y < ints.length; y++) {
                int is[] = ints[y];
                for (int x = 0; x < is.length; x++) {
                    if (is[x] == 1) {
                        ints[y][x] = checkPixel(x, y, ints);
                        if (ints[y][x] == 1) {
                            if (x > maxX) {
                                maxX = x;
                            }
                            if (x < minX) {
                                minX = x;
                            }
                        }
                    }
                }
            }
            //此处只是为了生成效果图方便观察,实际操作中不必执行
            createImage(width,height,ints);
            result = (maxX + minX) / 2;

        } catch (Exception e) {
            e.printStackTrace();
        }
        return result;
    }

    /**
     * 通过上下左右像素的对比来检测像素点是否是杂色
     *
     * @param x
     * @param y
     * @param ints
     * @return
     */
    public static int checkPixel(int x, int y, int[][] ints) {
        boolean result1 = true;
        boolean result2 = true;

        int s1 = 0;
        for (int i = 0; i < 30; i++) {
            if ((x + i) < ints[1].length && ints[y][x + i] != 1) {
                s1++;
            }
        }
        if (s1 > 15) {
            result1 = false;
        }
        int s2 = 0;
        for (int i = 0; i < 30; i++) {
            if (x - i > 0 && ints[y][x - i] != 1) {
                s2++;
            }
        }
        if (s2 > 15) {
            result2 = false;
        }
        if (result1 || result2) {
            s1 = 0;
            for (int i = 0; i < 30; i++) {
                if (y + i < ints.length && ints[y + i][x] != 1) {
                    s1++;
                }
            }
            if (s1 > 15) {
                result1 = false;
            }

            s2 = 0;
            for (int i = 0; i < 30; i++) {
                if (y - i > 0 && ints[y - i][x] != 1) {
                    s2++;
                }
            }
            if (s2 > 15) {
                result2 = false;
            }
            if (result1 || result2) {
                return 1;
            }
        }
        return 0;
    }

    /**
     * 创建图片
     * @param width
     * @param height
     * @param ints
     * @throws IOException
     */
    public static void createImage(int width, int height, int ints[][]) throws IOException {
        BufferedImage bi = new BufferedImage(width, height, BufferedImage.TYPE_4BYTE_ABGR);
        Graphics2D graphic = bi.createGraphics();
        graphic.setColor(new Color(0xffffff));

        graphic.fillRect(0, 0, width, height);

        for (int y = 0; y < ints.length; y++) {
            int is[] = ints[y];
            for (int x = 0; x < is.length; x++) {
                if (is[x] == 1) {
                    bi.setRGB(x, y, 0x0000ff);
                }
            }
        }

        Iterator<ImageWriter> it = ImageIO.getImageWritersByFormatName("png");
        ImageWriter writer = it.next();
        File f = new File("c://img.png");
        ImageOutputStream ios = ImageIO.createImageOutputStream(f);
        writer.setOutput(ios);

        writer.write(bi);
    }


}
这个程序的重点就在像素的对比上,脚本的代码很简单没有放上去的必要,上面的代码就是核心的代码,整个流程就是脚本截取图片上传到服务器上,服务器对图片进行对比操作过后返回2点的中间位置x轴的坐标.然后脚本计算转化过后进行滑动操作.整个过程从开始到滑动结束,网络正常的情况下所需时间在3秒以内,贴一下效果图:
对比图:

不知道这样的操作叫不叫图片二值化-_-
上面代码中有去除杂色的部分,因为截图和原图的像素除了滑块部分外并非完全相同,所以需要上下对比15个像素来确定是不是滑块中的点,下面这一张是没有去除杂色的图片:

因为是计算滑块区域的x轴最大值最小值,所以杂色会对计算造成干扰.
关于如何确定当前滑块图对应的哪一张原图问题,我采取的方法,也是比较笨的方法,每一张图都截取图片左下角的一小片位置然后循环区域找图,找到了就知道对应关系了.如果有更好的方法欢迎交流.
脚本的代码只是关于点色的判断,都很简单就不贴了.看下最终效果图:

实时桌面反应没那么快,将就着看吧.
本文中的滑块验证码只是以微信的为例子,实际很多其他平台的滑块验证码也可以通过这种方式去解决,当前这种方式,这是解决方案的一种.如果有更好的思路,欢迎评论交流.
2017-12-21
上面对比像素的代码太乱了,而且还不大好用,现在重新整理优化下
 /**
     * 通过像素对比来计算偏差值
     *
     * @param path1 原图位置
     * @param path2 滑块图位置
     * @return 偏差值
     */
    public int getDifferenceValue(String path1, String path2) {
        int result = 0;
        File file = new File(path1);
        File file1 = new File(path2);

        try {
            BufferedImage image = ImageIO.read(file);
            BufferedImage image1 = ImageIO.read(file1);

            int width = image.getWidth();
            int height = image.getHeight();

            int[][] colors = new int[width][height];
            for (int x = 1; x < width; x++) {
                for (int y = 1; y < height; y++) {
                    int color1 = image.getRGB(x, y);
                    int color2 = image1.getRGB(x, y);
                    if (color1 == color2) {
                        colors[x - 1][y - 1] = 0;
                    } else {
                        colors[x - 1][y - 1] = 1;
                    }
                }
            }
            int min = 999;
            int max = -1;
            for (int x = 0; x < colors.length; x++) {
                for (int y = 0; y < colors[x].length; y++) {
                    if (colors[x][y] == 1) {
                        colors[x][y] = checkPixel(x, y, colors);
                        if (colors[x][y] == 1) {
                            if (x > max) {
                                max = x;
                            } else if (x < min) {
                                min = x;
                            }
                        }
                    }
                }
            }
            result = (max + min) / 2;
        } catch (IOException e) {
            e.printStackTrace();
        }
        return result;
    }

    public int checkPixel(int x, int y, int[][] colors) {
        int result = colors[x][y];
        int num = 0;
        if ((y + 30) < colors[x].length) {
            for (int i = 1; i <= 30; i++) {
                int color = colors[x][y + i];
                if (color == 0) {
                    num += 1;
                }
            }
            if (num > 15) {
                return 0;
            }
        }
        return result;
    }


    public static void createImage(int width, int height, int ints[][], String name) throws IOException {
        BufferedImage bi = new BufferedImage(width, height, BufferedImage.TYPE_INT_RGB);
        Graphics2D graphic = bi.createGraphics();
        graphic.setColor(new Color(0x003D1CFF));
        graphic.fillRect(0, 0, width, height);
        for (int x = 0; x < ints.length; x++) {
            for (int y = 0; y < ints[x].length; y++) {
                if (ints[x][y] == 1) {
                    bi.setRGB(x, y, 0xFF7F2E);
                }
            }
        }
        Iterator<ImageWriter> it = ImageIO.getImageWritersByFormatName("png");
        ImageWriter writer = it.next();
        File f = new File("c://" + name + ".png");
        ImageOutputStream ios = ImageIO.createImageOutputStream(f);
        writer.setOutput(ios);
        writer.write(bi);
    }