前言:只要在前行,梦想就不再遥远
系列文章:
Android自定义控件三部曲文章索引:http://blog.csdn.net/harvic880925/article/details/50995268
前面两节讲解了有关ViewGroup的onMeasure、onLayout的知识,这节我们深入性地探讨一下,如何实现经常见到的瀑布流容器,本节将实现的效果图如下:
从效果图中可以看出这里要完成的几个功能:
1、图片随机添加
2、在添加图片时,总是将新图片插入到当前最短的列中
3、每个Item后,会弹出当前Item的索引
一、初步实现WaterFallLayout
1.1 自定义控件WaterFallLayout
首先,我们自定义一个派生自ViewGroup的控件WaterFallLayout,然后再定义几个变量:
public class WaterfallLayout extends ViewGroup {
    private int columns = 3;
    private int hSpace = 20;
    private int vSpace = 20;
    private int childWidth = 0;
    private int top[];

    public WaterfallLayout(Context context, AttributeSet attrs, int defStyle) {
        super(context, attrs, defStyle);
        top = new int[colums];
    }

    public WaterfallLayout(Context context, AttributeSet attrs) {
        this(context, attrs, 0);
    }

    public WaterfallLayout(Context context) {
        this(context, null);
    }
    …………
}
这里定义了几个变量:int columns用于指定当前的列数,这里指定的是三列;hSpace与vSpace用于指定每个图片间的水平间距和垂直间距。由于控件的宽度是一定的,当指定了列数以后,每个图片的宽度都是相同的,所以childWidth表示当前每个图片的宽度;由于每个图片的宽高比不同,所以他们的宽度相同,而高度则不同的,需要单独计算,也就没必要写成全局变量了。在开篇时,我们已经提到,我们需要把新增的图片放在容器最靠上的空白处,所以要有个top[columns]来保存当前每列的高度,以实时找到最短的高度的位置,将新增的图片放在那里。
1.2 设定onMeasure结果
通过前两篇我们知道对于ViewGroup而言onMeasure和onLayout的作用,onMeasure是告诉当前控件的父控件,它要占用的大小,以便让它的父控件给它预留。而onLayout则是布局ViewGroup中的各个元素用的。
所以首先,我们需要先计算出整个ViewGroup所要占据的大小,然后通过setMeasuredDimension()函数通知ViewGroup的父控件以预留位置,所以我们需要先求出控件所占的宽和高。

1.2.1 计算每个图片所占的宽度
所以,我们需要先求出来控件所占的宽度:
protected void onMeasure(int widthMeasureSpec, int heightMeasureSpec) {
  int widthMode = MeasureSpec.getMode(widthMeasureSpec);
  int sizeWidth = MeasureSpec.getSize(widthMeasureSpec);
  measureChildren(widthMeasureSpec, heightMeasureSpec);

  childWidth = (sizeWidth - (columns - 1) * hSpace) / columns;
  …………
} 首先,需要利用measureChildren(widthMeasureSpec, heightMeasureSpec);让每个子控件先测量自己,只有测量过自己之后,再调用子控件的getMeasuredWidth()才会有值,所以我们在派生自ViewGroup的控件在onMeasure的时候,一般都会首先调用measureChildren()函数,以防在用到子控件的getMeasuredWidth方法的时候没值。
然后,我们需要先求个每个子控件的宽度。根据widthMeasureSpec得到的sizeWidth,是父控件建议摆放的宽度,一般也就是我们最大摆放的宽度。所以,我们根据这个宽度求出在图片摆放三列的情况下,每个控件的宽度,公式就是:
childWidth = (sizeWidth - (columns - 1) * hSpace) / columns;由于每个图片宽度相同,而且每两个图片间是有一定间距的,距离是hSpace;在columns列的情况下,有(columns - 1)个间距,因为每两个控件的间距是hSpace,所以总的间距就是(columns - 1) * hSpace;所以计算原理就是根据总宽度减去总间距得到的就是所有子控件的总宽度和,然后除以列数,就得到了每个item的宽度。
1.2.2 求得控件总宽度
然后我们就可以根据子控件的数量是不是超过设定的列数来得到总的宽度,由于我们设定的每行的有三列,所以,如果所有子控件数并没有超过三列,那么总的控件宽度就是当前个数子控件的宽度总和组成。如果子控件数超过了三个,那说明肯定能撑满一行了,宽度也就是父控件建议的sizeWidth宽度了
protected void onMeasure(int widthMeasureSpec, int heightMeasureSpec) {
    ………………
    int wrapWidth;
    int childCount = getChildCount();
    if (childCount < columns) {
        wrapWidth = childCount * childWidth + (childCount - 1) * hSpace;
    } else {
        wrapWidth = sizeWidth;
    }
    …………
}
1.2.3 求得控件总高度
在求得总宽度以后,我们要想办法得到控件的总高度,难点在于,我们在摆放控件时,总是先找到最短的列,然后把新的控件摆放在这列中,如:
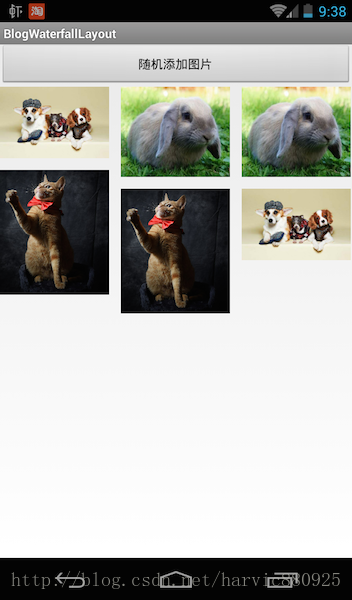
很明显,在这张图片中,第三列是最短的,所以我们在新插入图片时,会放在第三列中。
这就需要我们有一个数组来标识每列在添加图片后的高度,以便在每次插入图片时,找到当前最短的列。
protected void onMeasure(int widthMeasureSpec, int heightMeasureSpec) {
    …………

    clearTop();
    for (int i = 0; i < childCount; i++) {
        View child = this.getChildAt(i);
        int childHeight = child.getMeasuredHeight() * childWidth / child.getMeasuredWidth();
        int minColum = getMinHeightColum();
        top[minColum] += vSpace + childHeight;
    }
    int wrapHeight;
    wrapHeight = getMaxHeight();
    setMeasuredDimension(widthMode == MeasureSpec.AT_MOST ? wrapWidth : sizeWidth, wrapHeight);
}
首先,每次在计算高度之前,我们应该先把top[]数组清空,以防上次的数据影响这次的计算,clearTop()的实现为:
private void clearTop() {
    for (int i = 0; i < columns; i++) {
        top[i] = 0;
    }
}
然后就要开始计算每列的最大高度了,我们需要轮询每个控件,然后将每个控件按他所在的位置计算一遍,最后得到每列的最大高度。
for (int i = 0; i < childCount; i++) {
    View child = this.getChildAt(i);
    int childHeight = child.getMeasuredHeight() * childWidth / child.getMeasuredWidth();
    int minColum = getMinHeightColum();
    top[minColum] += vSpace + childHeight;
}首先得到当前要摆放控件的高度:int childHeight = child.getMeasuredHeight() * childWidth / child.getMeasuredWidth(),因为我们每张图片要摆放的宽度都是相同的,所以我们需要将图片伸缩到指定的宽度,然后得到对应的高度,才是它所摆放的高度。
然后通过getMinHeightColum()得到top[]数组的最短的列,getMinHeightColum()的实现如下:
private int getMinHeightColum() {
    int minColum = 0;
    for (int i = 0; i < columns; i++) {
        if (top[i] < top[minColum]) {
            minColum = i;
        }
    }
    return minColum;
}
实现很简单,直接能top数组轮询,得到它的最短列的索引;
在得到最短列以后,将当前控件放在最短列中:top[minColum] += vSpace + childHeight;然后再计算下一个控件所在位置,并且放到当前的最短列中,当所有控件轮询结束以后,top[]数组中所保留的数据就是所有图片摆放完以后各列的高度。
最后,通过getMaxHeight()得到最长列的高度就是整个控件应有的高度值,然后通过setMeasuredDimension函数将计算得到的wrapWdith和wrapHeight提交给父控件即可:
int wrapHeight;
wrapHeight = getMaxHeight();
setMeasuredDimension(widthMode == MeasureSpec.AT_MOST ? wrapWidth : sizeWidth, wrapHeight);
其中getMaxHieght()实现如下:
private int getMaxHeight() {
    int maxHeight = 0;
    for (int i = 0; i < columns; i++) {
        if (top[i] > maxHeight) {
            maxHeight = top[i];
        }
    }
    return maxHeight;
}
1.3 onLayout摆放子控件
在了解onMeasure中如何计算当前图片所在的列之后,摆放就容易多了,只需要计算每个Item所在位置的left,top,right,bottom值,然后利用layout(left,top,right,bottom)函数将控件摆放在指定位置即可:
protected void onLayout(boolean changed, int l, int t, int r, int b) {
    int childCount = getChildCount();
    clearTop();
    for (int i = 0; i < childCount; i++) {
        View child = this.getChildAt(i);
        int childHeight = child.getMeasuredHeight() * childWidth / child.getMeasuredWidth();
        int minColum = getMinHeightColum();
        int tleft = minColum * (childWidth + hSpace);
        int ttop = top[minColum];
        int tright = tleft + childWidth;
        int tbottom = ttop + childHeight;
        top[minColum] += vSpace + childHeight;
        child.layout(tleft, ttop, tright, tbottom);
    }
}同样是每个控件轮询,然后通过int childHeight = child.getMeasuredHeight() * childWidth / child.getMeasuredWidth()得到当前要摆放图片的高度,然后根据int minColum = getMinHeightColum()得到最短的列,准备将这个控件摆放在这个列中。
下面就是根据要摆放的列的位置,得到要摆放图片的left,top,right,bottom值;其中top很容易得到,top[minColum]就是当前要摆放图片的top值,bottom也容易,加上图片的自身高度就是bottom值;稍微有点难度的地方是left值,因为通过getMinHeightColum()得到的是当前最短列的索引,因为索引是从0开始的,所以,假设我们当前最短的是第三列,所以通过getMinHeightColum()得到的值是2;因为每个图片都是由图片本身和中间的间距组成,所以当前控件的left值就是2*(childWidth + hSpace);在计算出left、top、right、bottom以后,通过child.layout函数将它们摆放在当前位置即可。最后更新top[minColum]的高度:top[minColum] += vSpace + childHeight;
到这里,有关测量和摆放就全部结束了,但是我们自定义的布局,应该对每个Item添加上点击响应,这是布局控件最基本的特性。
1.4 添加Item点击响应
对自定义的ViewGroup中的子控件添加点击响应是非常简单的,首先,我人需要自定义一个接口来回调控件被点击的事件:
public interface OnItemClickListener {
    void onItemClick(View v, int index);
}
然后轮询所有的子控件,并且在每个子控件在点击的时候,回调出去即可:
public void setOnItemClickListener(final OnItemClickListener listener) {
    for (int i = 0; i < getChildCount(); i++) {
        final int index = i;
        View view = getChildAt(i);
        view.setOnClickListener(new OnClickListener() {
            @Override
            public void onClick(View v) {
                listener.onItemClick(v, index);
            }
        });
    }
}
二、使用WaterFallLayout
在使用时,首先在XML中引入:
<?xml version="1.0" encoding="utf-8"?>
<LinearLayout xmlns:android="http://schemas.android.com/apk/res/android"
              xmlns:app="http://schemas.android.com/apk/res/com.harvic.BlogWaterfallLayout"
              android:orientation="vertical"
              android:layout_width="fill_parent"
              android:layout_height="fill_parent">

    <Button
            android:id="@+id/add_btn"
            android:layout_alignParentTop="true"
            android:layout_width="match_parent"
            android:layout_height="wrap_content"
            android:text="随机添加图片"/>

    <ScrollView
            android:orientation="vertical"
            android:layout_width="match_parent"
            android:layout_height="match_parent">

        <com.harvic.BlogWaterfallLayout.WaterfallLayout
                android:id="@+id/waterfallLayout"
                android:layout_width="wrap_content"
                android:layout_height="match_parent"
                android:layout_below="@+id/add_btn"/>
    </ScrollView>
</LinearLayout>
因为WaterfallLayout是派生自ViewGroup的,所以当范围超出屏幕时,不会自带滚动,所以我们需要在外层包一个ScrollView来实现滚动。
然后在代码中,当点击按钮时,随便添加图片:
public class MyActivity extends Activity {
    private static int IMG_COUNT = 5;
    @Override
    public void onCreate(Bundle savedInstanceState) {
        super.onCreate(savedInstanceState);
        setContentView(R.layout.main);

        final WaterfallLayout waterfallLayout = ((WaterfallLayout)findViewById(R.id.waterfallLayout));
        findViewById(R.id.add_btn).setOnClickListener(new View.OnClickListener() {
            @Override
            public void onClick(View v) {
                addView(waterfallLayout);
            }
        });

    }
    …………
}
其中addView的实现为:
public void addView(WaterfallLayout waterfallLayout) {
    Random random = new Random();
    Integer num = Math.abs(random.nextInt());
    WaterfallLayout.LayoutParams layoutParams = new WaterfallLayout.LayoutParams(WaterfallLayout.LayoutParams.WRAP_CONTENT,
        WaterfallLayout.LayoutParams.WRAP_CONTENT);
    ImageView imageView = new ImageView(this);
    if (num % IMG_COUNT == 0) {
        imageView.setImageResource(R.drawable.pic_1);
    } else if (num % IMG_COUNT == 1) {
        imageView.setImageResource(R.drawable.pic_2);
    } else if (num % IMG_COUNT == 2) {
        imageView.setImageResource(R.drawable.pic_3);
    } else if (num % IMG_COUNT == 3) {
        imageView.setImageResource(R.drawable.pic_4);
    } else if (num % IMG_COUNT == 4) {
        imageView.setImageResource(R.drawable.pic_5);
    }
    imageView.setScaleType(ImageView.ScaleType.CENTER_CROP);

    waterfallLayout.addView(imageView, layoutParams);

    waterfallLayout.setOnItemClickListener(new com.harvic.BlogWaterfallLayout.WaterfallLayout.OnItemClickListener() {
        @Override
        public void onItemClick(View v, int index) {
            Toast.makeText(MyActivity.this, "item=" + index, Toast.LENGTH_SHORT).show();
        }
    });
}
代码很容易理解,首先随机生成一个数字,因为我们有五张图片,所以对生成的数字对图片数取余,然后指定一个图片资源,这样就实现了随机添加图片的效果,然后将ImageView添加到自定义控件waterfallLayout中,最后添加点击响应,在点击某个Item时,弹出这个Item的索引。
到这里,整个自定义控件部分和使用都讲完了,效果图就如开篇所示。
三、改进Waterfalllayout实现
从上面的实现中可以看出一个问题,就是需要在onMeasure和onLayout中都需要重新计算每列的高度,如果布局比较复杂的话,这种轮询的计算是非常耗性能的,而且onMeasure中已经计算过一次,我们如果在OnMeasure计算时,直接将每个item所在的位置保存起来,那么在onLayout中就可以直接使用了。
那么问题来了,怎么保存这些参数呢,难不成要生成一个具有数组来保存每个item的变量吗?利用数组来保存当然是一种解决方案,但并不是最优的,因为我们的item可能会有几千个,那当这个数组可能就已经非常占用内存,而且当数组很大的时候,存取也是比较耗费性能的。回想一下,我们在《自定义控件三部曲视图篇(一)——测量与布局》中在讲解MarginLayoutParams时,系统会把各个margin间距保存在MarginLayoutParams中:
public static class MarginLayoutParams extends ViewGroup.LayoutParams {
    public int leftMargin;
    public int topMargin;
    public int rightMargin;
    public int bottomMargin;
    …………
}
那方法来了,我们可不可以仿照MarginLayoutParams自定义一个LayoutParams,然后每次将计算后的left、top、right、bottom的值保存在这个自定义的LayoutParmas中,在布局的时候,取出来就可以了。
首先,我们自定义一个LayoutParams:
public static class WaterfallLayoutParams extends ViewGroup.LayoutParams {
      public int left = 0;
      public int top = 0;
      public int right = 0;
      public int bottom = 0;

      public WaterfallLayoutParams(Context arg0, AttributeSet arg1) {
          super(arg0, arg1);
      }

      public WaterfallLayoutParams(int arg0, int arg1) {
          super(arg0, arg1);
      }

      public WaterfallLayoutParams(android.view.ViewGroup.LayoutParams arg0) {
          super(arg0);
      }
}
这里相对原来的ViewGroup.LayoutParams,只添加几个变量来保存图片的各点位置。
然后仿照MarginLayoutParams的使用方法,重写generateLayoutParams()函数:
@Override
public ViewGroup.LayoutParams generateLayoutParams(AttributeSet attrs) {
  return new WaterfallLayoutParams(getContext(), attrs);
}

@Override
protected ViewGroup.LayoutParams generateDefaultLayoutParams() {
  return new WaterfallLayoutParams(WaterfallLayoutParams.WRAP_CONTENT, WaterfallLayoutParams.WRAP_CONTENT);
}

@Override
protected ViewGroup.LayoutParams generateLayoutParams(ViewGroup.LayoutParams p) {
  return new WaterfallLayoutParams(p);
}
然后在onMeasure时,将代码进行修改,在计算每列高度的时候,同时计算出每个Item的位置保存在WaterfallLayoutParams中:
protected void onMeasure(int widthMeasureSpec, int heightMeasureSpec) {

    …………

    clearTop();
    for (int i = 0; i < childCount; i++) {
        View child = this.getChildAt(i);
        int childHeight = child.getMeasuredHeight() * childWidth / child.getMeasuredWidth();
        int minColum = getMinHeightColum();

        WaterfallLayoutParams lParams = (WaterfallLayoutParams)child.getLayoutParams();
        lParams.left = minColum * (childWidth + hSpace);
        lParams.top = top[minColum];
        lParams.right = lParams.left + childWidth;
        lParams.bottom = lParams.top + childHeight;

        top[minColum] += vSpace + childHeight;
    }

    …………
}
然后在布局时,直接从布局参数中,取出来布局即可:
protected void onLayout(boolean changed, int l, int t, int r, int b) {
    int childCount = getChildCount();
    for (int i = 0; i < childCount; i++) {
        View child = getChildAt(i);
        WaterfallLayoutParams lParams = (WaterfallLayoutParams)child.getLayoutParams();
        child.layout(lParams.left, lParams.top, lParams.right, lParams.bottom);
    }
}
万事具备之后,直接运行,发现在点击添加图片Item时,报了Crash:
AndroidRuntime: FATAL EXCEPTION: main
java.lang.ClassCastException: android.view.ViewGroup$LayoutParams cannot be cast to com.harvic.BlogWaterfallLayout.WaterfallLayoutImprove$WaterfallLayoutParams
at com.harvic.BlogWaterfallLayout.WaterfallLayoutImprove.onMeasure(WaterfallLayoutImprove.java:92)
at android.view.View.measure(View.java:15518)
at android.widget.ScrollView.measureChildWithMargins(ScrollView.java:1217)
at android.widget.FrameLayout.onMeasure(FrameLayout.java:310)
at android.widget.ScrollView.onMeasure(ScrollView.java:321)
at android.view.View.measure(View.java:15518)
奇怪了,明明仿照MarginLayoutParams来自定义的布局参数,为什么并没有生效呢?
这是因为在,自定义ViewGroup的布局参数时,需要重写另一个函数:
@Override
protected boolean checkLayoutParams(ViewGroup.LayoutParams p) {
    return p instanceof WaterfallLayoutParams;
}
之所以需要重写checkLayoutParams,是因为在ViewGroup源码中在添加子控件时,有如下代码:
private void addViewInner(View child, int index, LayoutParams params,
        boolean preventRequestLayout) {

    …………
    if (!checkLayoutParams(params)) {
        params = generateLayoutParams(params);
    }
    …………
}
很明显,当checkLayoutParams返回false时才会调用generateLayoutParams,checkLayoutParams的默认实现是:
protected boolean checkLayoutParams(ViewGroup.LayoutParams p) {
    return  p != null;
}
即ViewGroup.LayoutParams不为空,就不会再走generateLayoutParams(params)函数,也就没办法使用我们自定义LayoutParams。所以我们必须重写,当LayoutParams不是WaterfallLayoutParams时,就需要进入generateLayoutParams函数,以使用自定义布局参数。
到此,整个自定义控件就结束了,在讲了原理之后,还需要对自定义的控件进行封装,比如这里的列数和每两个图片间的间距都是需要用户指定的,所以我们需要在自定义控件属性来实现这些功能。这些都是自定义控件的一部分,以前写的一篇文章已经写过了,这里就不再重写了,想了解的同学,参考下: 《PullScrollView详解(一)——自定义控件属性》
如果本文有帮到你,记得加关注哦
源码下载地址:http://download.csdn.net/detail/harvic880925/9807928转载请标明出处,http://blog.csdn.net/harvic880925/article/details/69787359谢谢
如果你喜欢我的文章,那么你将会更喜欢我的微信公众号,将定期推送博主最新文章与收集干货分享给大家(一周一次)
