第一步
在以下网址下载最新版的raspbian jessie,这里就不赘述了。
树莓派官网
然后开机,顺便装一下远程桌面
sudo apt-get install xrdp- 1
用户名是pi,密码是raspberry
然后更新一下(千万别改官方软件源,笔者用了一天的光阴作为代价)
在顺便改下键盘布局
修改键盘布局
sudo apt-get update
sudo apt-get upgrade
sudo rpi-update- 1
- 2
- 3
漫长的更新后reboot一下。
第二步
安装下面两个包
sudo apt-get install qt5-default
sudo apt-get install qtcreator- 1
- 2
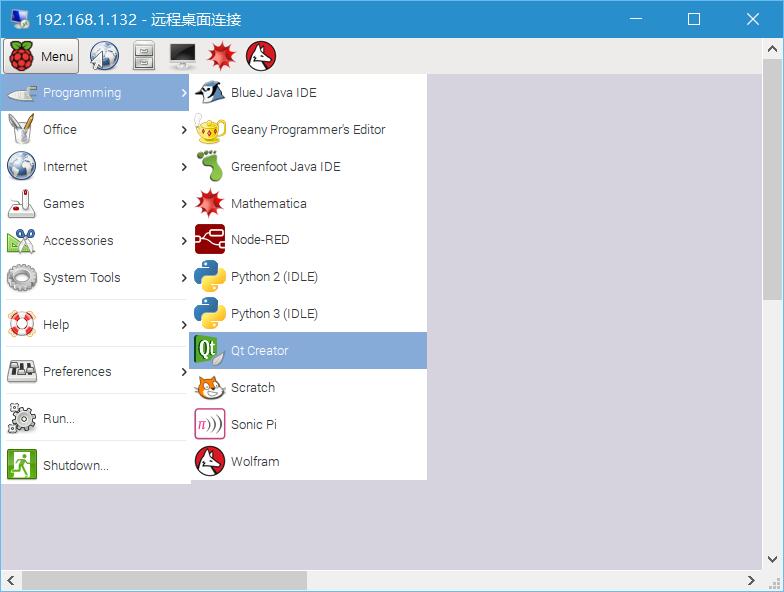
安装完成后,打开Menu -> Programming -> QtCreator就可以愉快地玩耍了。
第三步
由于Qt Creator不能自动识别树莓派上的工具链,因此需要手动添加。点击Tools -> Options打开配置对话框,在Build & Run -> Kits选项卡中点击Add。Compiler设置为/usr/bin/gcc,Debugger可设置为/usr/bin/gdb,Devices type选择Desktop,Device选择local,qt version选择/usr/bin/qmake。
PS:如果选择qt version时弹出qmake not exetuable,则说明qt4/qt5没有安装,需要
 sudo apt-get install qt-sdk
sudo apt-get install qt5-default- 1
- 2
然后漫长的等待即可。
第四步
马上尝试下hello word吧。
PS:1、QT编译生成的文件夹与源文件的文件夹在同一目录下,名字是build-xxx
2、若使用了wiringPi库,需打开源码.pro文件,在最后加上一行
LIBS += -lwiringPi- 1
附一份文件名为helloWP,类名称也是helloWP,使用wiringPi的小程序。在QT Creator的项目文件中双击界面文件.ui,拖一个label和两个push button出来。并修改hellowp.h为
#ifndef HELLOWP_H
#define HELLOWP_H

#include <QMainWindow>
#include <QtCore>

namespace Ui {
class helloWP;
}

class helloWP : public QMainWindow
{
    Q_OBJECT

public:
    explicit helloWP(QWidget *parent = 0);
    ~helloWP();

private slots:
    void on_pushButton_clicked();
    void on_pushButton_2_clicked();
    void timerUpDate();

private:
    Ui::helloWP *ui;
    QTimer *switch_timer;

};

#endif // HELLOWP_H
- 1
- 2
- 3
- 4
- 5
- 6
- 7
- 8
- 9
- 10
- 11
- 12
- 13
- 14
- 15
- 16
- 17
- 18
- 19
- 20
- 21
- 22
- 23
- 24
- 25
- 26
- 27
- 28
- 29
- 30
- 31
将hellowp.cpp修改为:
#include "hellowp.h"
#include "ui_hellowp.h"
#include "wiringPi.h"

helloWP::helloWP(QWidget *parent) :
    QMainWindow(parent),
    ui(new Ui::helloWP)
{
    ui->setupUi(this);
    wiringPiSetup();
    pinMode(0, OUTPUT);
    pinMode(1, INPUT);
    digitalWrite(0, HIGH);

    switch_timer = new QTimer();
    connect(switch_timer, SIGNAL(timeout()), this, SLOT(timerUpDate()));
    switch_timer->start(100);

}

helloWP::~helloWP()
{
    delete ui;
}

void helloWP::timerUpDate()
{
    if(digitalRead(1) == LOW)
        ui->label->setText("Switch is low!");
    else
        ui->label->setText("Switch is high!");
}

void helloWP::on_pushButton_clicked()
{
    digitalWrite(0, LOW);
}

void helloWP::on_pushButton_2_clicked()
{
    digitalWrite(0, HIGH);
}- 1
- 2
- 3
- 4
- 5
- 6
- 7
- 8
- 9
- 10
- 11
- 12
- 13
- 14
- 15
- 16
- 17
- 18
- 19
- 20
- 21
- 22
- 23
- 24
- 25
- 26
- 27
- 28
- 29
- 30
- 31
- 32
- 33
- 34
- 35
- 36
- 37
- 38
- 39
- 40
- 41
- 42
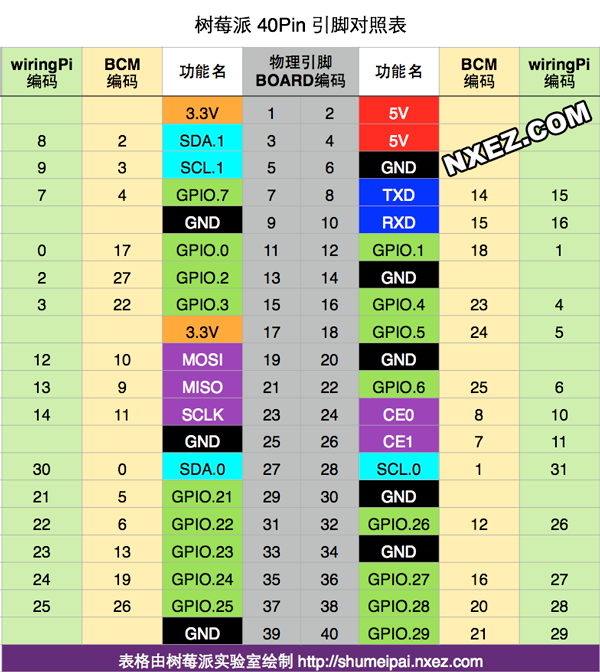
这个小程序控制了一盏LED,和通过定时器读取一个引脚的状态。LED是wiringPi的0引脚,开关是1引脚。由于使用了wiringPisetup而不是wiringPisetupsys,qt会提示需要root权限,这时在输出文件的目录中用以下命令运行即可。
sudo ./xxx- 1