1.wait和notify必须配合synchronized关键字使用
2.wait方法释放锁,notify方法不释放锁
例一:
public class ListAdd1 {
	private volatile static List list = new ArrayList();

	public void add() {
		list.add("hello");
	}

	public int size() {
		return list.size();
	}

	public static void main(String[] args) {
		final ListAdd1 lit1 = new ListAdd1();
		Thread t1 = new Thread(() -> {
			try {
				for (int i = 0; i < 10; i++) {
					lit1.add();
					System.out.println("当前线程:" + Thread.currentThread().getName() + "添加了一个元素");
					Thread.sleep(500);
				}
			} catch (InterruptedException e) {
				e.printStackTrace();
			}
		}, "t1");

		Thread t2 = new Thread(() -> {
			while (true) {
				if (lit1.size() == 5) {
					System.out.println("当前线程收到通知:" + Thread.currentThread().getName() + " list size=5线程停止...");
					throw new RuntimeException();
				}
			}
		}, "t2");

		t1.start();
		t2.start();
	}
}
这个例子想做的就是线程1执行过程中,如果添加了5次,线程2抛出一个异常。线程1继续执行。这就是一个线程间通信的场景。
这种方式不好,因为线程2不停的在轮询。
2.用wait和notify的方式改造:
public class ListAdd2 {
	private volatile static List list = new ArrayList();

	public void add() {
		list.add("hello");
	}

	public int size() {
		return list.size();
	}

	public static void main(String[] args) {
		final ListAdd2 list2 = new ListAdd2();

		final Object lock = new Object();

		Thread t1 = new Thread(() -> {
			try {
				synchronized (lock) {

					for (int i = 0; i < 10; i++) {
						list2.add();
						System.out.println("当前线程:" + Thread.currentThread().getName() + "添加了一个元素");
						Thread.sleep(500);
						if (list2.size() == 5) {
							System.out.println("已经发出通知..");
							lock.notify();
						}
					}
				}
			} catch (InterruptedException e) {
				e.printStackTrace();
			}
		}, "t1");

		Thread t2 = new Thread(() -> {
			synchronized (lock) {
				if (list2.size() != 5) {
					try {
						lock.wait();
					} catch (InterruptedException e) {
						e.printStackTrace();
					}
				}
				System.out.println("当前线程收到通知:" + Thread.currentThread().getName() + " list size=5线程停止...");
				throw new RuntimeException();
			}
		}, "t2");

		t2.start();
		t1.start();
	}
}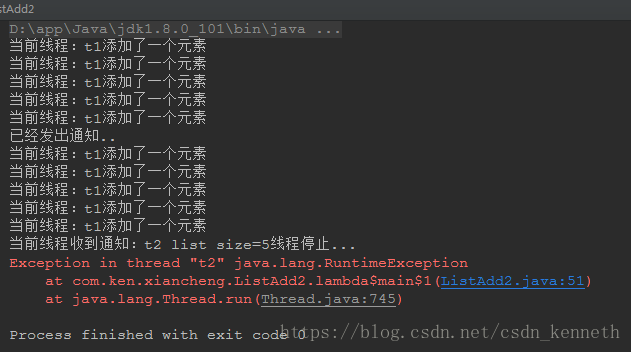
t2线程启动,获取到锁,执行到lock.wait()线程挂起,lock锁释放。t1线程启动,由于t2线程把锁释放了,所以,t1线程可以进入同步代码块。t1执行到lock.notify(),此时并没有释放锁。直到,执行完synchronized同步的代码块(10次添加操作)之后,才释放。此时,t2才能再次获得锁,执行抛出异常的代码。
这个方法的弊端是,notify没有释放锁,实时性不好。
3.CountDownLatch
public class ListAdd3 {
	private volatile static List list = new ArrayList();

	public void add() {
		list.add("hello");
	}

	public int size() {
		return list.size();
	}

	public static void main(String[] args) {
		final ListAdd3 list3 = new ListAdd3();

		final CountDownLatch latch = new CountDownLatch(1);

		Thread t1 = new Thread(() -> {
			try {

				for (int i = 0; i < 10; i++) {
					list3.add();
					System.out.println("当前线程:" + Thread.currentThread().getName() + "添加了一个元素");
					Thread.sleep(500);
					if (list3.size() == 5) {
						latch.countDown();
						System.out.println("已经发出通知..");
					}
				}
			} catch (InterruptedException e) {
				e.printStackTrace();
			}
		}, "t1");

		Thread t2 = new Thread(() -> {
			if (list3.size() != 5) {
				try {
					latch.await();
				} catch (InterruptedException e) {
					e.printStackTrace();
				}
			}
			System.out.println("当前线程收到通知:" + Thread.currentThread().getName() + " list size=5线程停止...");
			throw new RuntimeException();
		}, "t2");

		t2.start();
		t1.start();
	}
}
实现了实时的通知。
扫描二维码关注公众号,回复:
3280985 查看本文章
