一、说明:
前面介绍了使用axis2来发布Webservice服务,现在介绍一种更popular,更高效的Webservice服务发布技术:CXF
Apache CXF = Celtix + XFire,Apache CXF 的前身叫 Apache CeltiXfire,现在已经正式更名为 Apache CXF 了,以下简称为 CXF。CXF 继承了 Celtix 和 XFire 两大开源项目的精华,提供了对 JAX-WS 全面的支持,并且提供了多种 Binding 、DataBinding、Transport 以及各种 Format 的支持,并且可以根据实际项目的需要,采用代码优先(Code First)或者 WSDL 优先(WSDL First)来轻松地实现 Web Services 的发布和使用。目前它仍只是 Apache 的一个孵化项目。
Apache CXF 是一个开源的 Services 框架,CXF 帮助您利用 Frontend 编程 API 来构建和开发 Services ,像 JAX-WS 。这些 Services 可以支持多种协议,比如:SOAP、XML/HTTP、RESTful HTTP 或者 CORBA ,并且可以在多种传输协议上运行,比如:HTTP、JMS 或者 JBI,CXF 大大简化了 Services 的创建,同时它继承了 XFire 传统,一样可以天然地和 Spring 进行无缝集成。
CXF 框架是一种基于 Servlet 技术的 SOA 应用开发框架,要正常运行基于 CXF 应用框架开发的企业应用,除了 CXF 框架本身之外,还需要 JDK 和 Servlet 容器的支持。
二、利用CXF进行简单webservice服务的发布与调用
①. 新建一个Java Project ,CXFDemo ,并在工程下新建lib文件夹,加入CXF的jar包:
-
cxf-core-3.1.4.jar -
jaxb-core-2.2.11.jar -
jaxb-impl-2.2.11.jar -
neethi-3.0.3.jar -
wsdl4j-1.6.3.jar -
xmlschema-core-2.2.1.jar
然后build path ,将架包加入到类路径下。
②. 在src下,新建3个package ,并分别在各个包下创建对应的相关接口和类:
com.elgin.cxf.entities
com.elgin.cxf.service
com.elgin.cxf.service.impl
❶、在service包下新建接口 HelloService
-
package com.elgin.cxf.service; -
import javax.jws.WebParam; -
import javax.jws.WebService; -
import com.elgin.cxf.entities.User; -
@WebService -
public interface HelloService { -
public String sayHello(@WebParam(name="text")String text); -
public String sayHellloToUser(User user); -
}
❷、在service.impl 包下新建接口的实现类 HelloServiceImpl
-
package com.elgin.cxf.service.impl; -
import javax.jws.WebService; -
import com.elgin.cxf.entities.User; -
import com.elgin.cxf.service.HelloService; -
@WebService(endpointInterface="com.elgin.cxf.service.HelloService",serviceName="HelloService") -
public class HelloServiceImpl implements HelloService { -
@Override -
public String sayHello(String text) { -
System.out.println("param text is :" + text); -
return "hello " + text; -
} -
@Override -
public String sayHellloToUser(User user) { -
System.out.println("param user is :" +user); -
return "hello " + user.getName(); -
} -
}
❸、entities包下新建用到的User类:
-
package com.elgin.cxf.entities; -
public class User { -
private String name; -
public String getName() { -
return name; -
} -
public void setName(String name) { -
this.name = name; -
} -
public User(){} -
public User(String name) { -
super(); -
this.name = name; -
} -
@Override -
public String toString() { -
return "User [name=" + name + "]"; -
} -
}
③. 新建package :com.elgin.cxf.publish
并在此包下新建类: Server 用来发布webservice服务:
-
package com.elgin.cxf.publish; -
import javax.xml.ws.Endpoint; -
import com.elgin.cxf.service.impl.HelloServiceImpl; -
public class Server { -
public static void main(String[] args) { -
System.out.println("cxf service start.."); -
HelloServiceImpl serviceImpl=new HelloServiceImpl(); -
String address="http://localhost:8080/service/hello"; -
Endpoint.publish(address, serviceImpl); -
} -
}
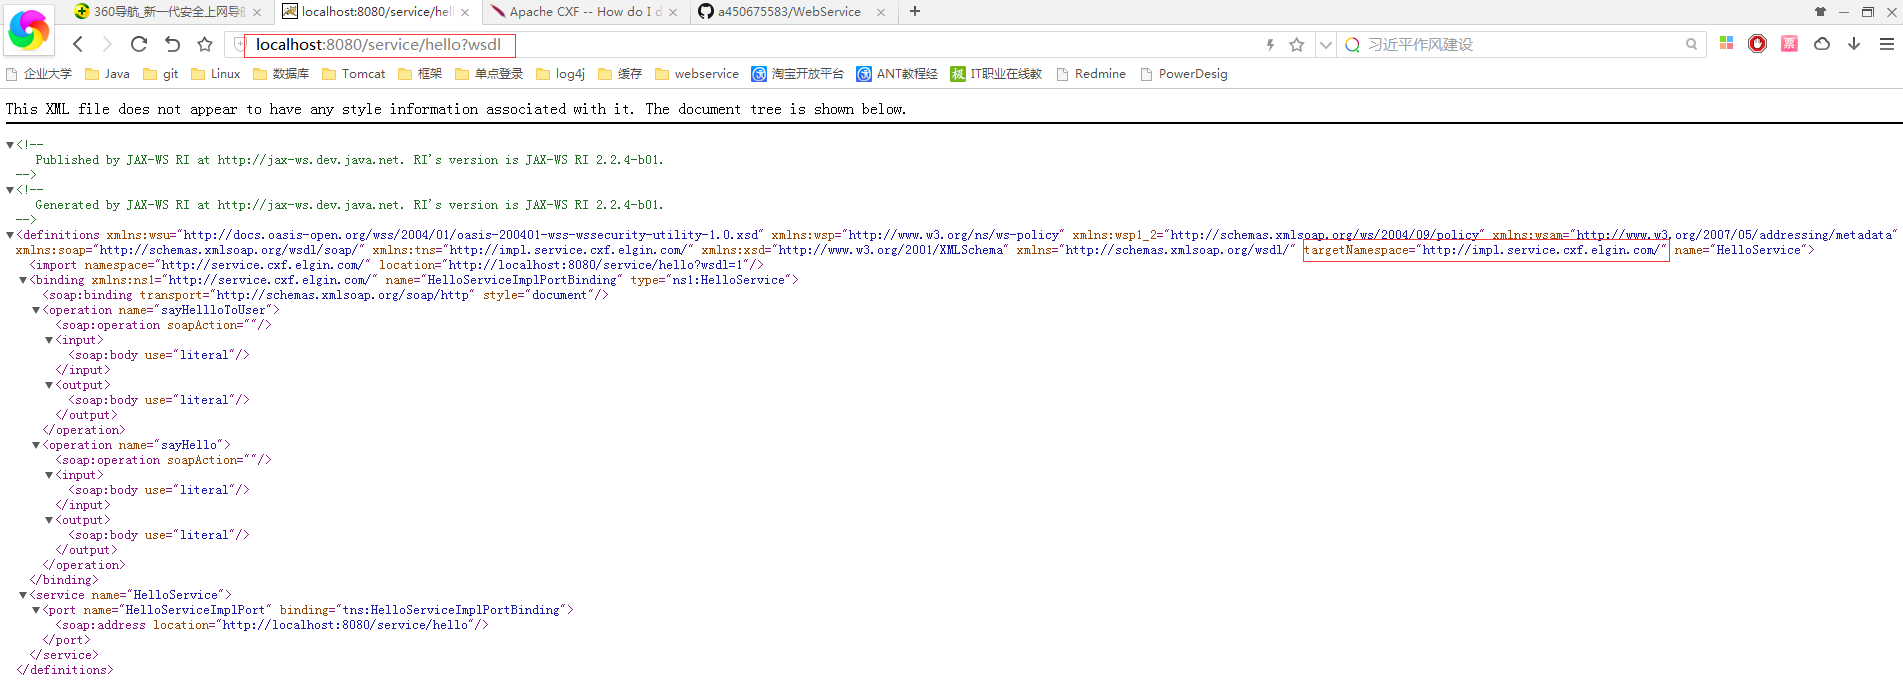
④ 运行查看发布情况:
在浏览器输入:http://localhost:8080/service/hello?wsdl ,出现下图所示数据,表示发布webservice服务成功
⑤ 服务调用代码以及结果:
-
package com.elgin.cxf.client; -
import java.net.URL; -
import javax.xml.namespace.QName; -
import javax.xml.ws.Service; -
import javax.xml.ws.soap.SOAPBinding; -
import com.elgin.cxf.entities.User; -
import com.elgin.cxf.service.HelloService; -
public class Client { -
private static final QName SERVICE_NAME -
= new QName("http://impl.service.cxf.elgin.com/", "HelloService"); -
private static final QName PORT_NAME -
= new QName("http://impl.service.cxf.elgin.com/", "HelloServicePort"); -
private Client() {} -
public static void main(String args[]) throws Exception { -
rightInvoker(); -
exceptionInvoker(); -
} -
/* -
* @Title: rightInvoker -
* @Description: 可成功调用,返回正确的结果 -
* @throws Exception 参数 -
*/ -
public static void rightInvoker() throws Exception { -
// Endpoint Address -
String endpointAddress = "http://localhost:8080/service/hello"; -
URL url=new URL(endpointAddress); -
Service service = Service.create(url,SERVICE_NAME); -
HelloService hs = service.getPort(HelloService.class); -
System.out.println(hs.sayHello("World")); -
User user = new User("Jack"); -
System.out.println(hs.sayHellloToUser(user)); -
} -
/* -
* @Title: exceptionInvoker -
* @Description: 调用时出现异常错误信息: -
* -
* Exception in thread "main" javax.xml.ws.WebServiceException: -
* WSDL Metadata not available to create the proxy, -
* either Service instance or ServiceEndpointInterface com.elgin.cxf.service.HelloService should have WSDL information -
* -
* 对于造成上述异常的具体原因尚不明确,很有可能是缺少CXF某个jar包引起 -
*/ -
public static void exceptionInvoker(){ -
// Endpoint Address -
Service service = Service.create(SERVICE_NAME); -
String endpointAddress = "http://localhost:8080/service/hello"; -
service.addPort(PORT_NAME, SOAPBinding.SOAP11HTTP_BINDING, endpointAddress); -
HelloService hs = service.getPort(HelloService.class); -
System.out.println(hs.sayHello("World")); -
User user = new User("Jack"); -
System.out.println(hs.sayHellloToUser(user)); -
} -
}
正确运行结果:
hello World