1 前言
CAS和 oauth2.0 不做介绍,自行查找资料。
在cas5 中,提供了集成第三方oauth登陆(如微信、qq等) 的方法,这些功能是基于 Pac4j 包实现的。
有一些文章提供了配置方法,本文将对流程做一些补充和分析。
参考:http://www.ibloger.net/article/3142.html
2 流程
基本流程图大致如下。一般会先在第三方网站得到appid app_secrete 等信息,然后在客户端引导用户跳转到第三方网站登录(图中A 流程)。
这个网站一般长这样:
这个是微博的,可以看到里面有redirect_uri 参数,当用户登录成功,会302到这里,并且携带 code 参数(流程B)
接下来分析cas-server 集成时都发生了什么。

3 CAS-server配置
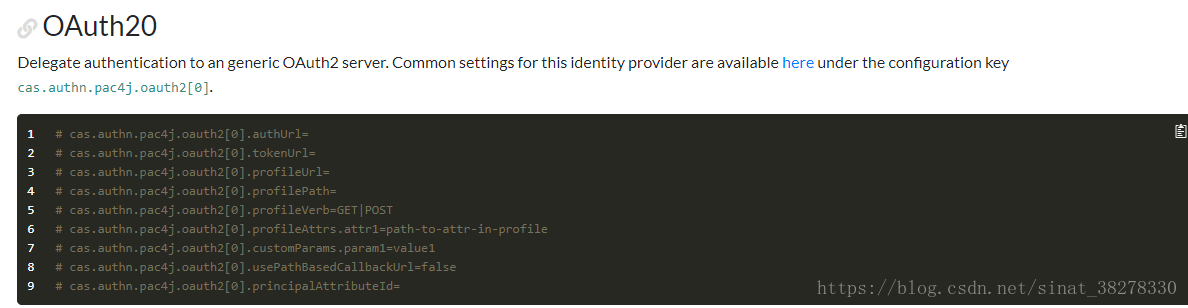
读cas官方文档链接 可知,需要引入相应依赖。cas已经做了github , google 等第三方登陆客户端集成。而对于自定义的OAuth2集成,需要在配置文件中使用字段,这些字段是数组形式,每个下标定义了一种 oauth2 client:

Cas5 是使用springboot 构建的,配置文件被映射为 配置类
org.apereo.cas.configuration.CasConfigurationProperties
然后在@Configuration 文件中初始化所有的 oauth2 client 实例 核心代码如下:
@Configuration("pac4jAuthenticationEventExecutionPlanConfiguration")
@EnableConfigurationProperties(CasConfigurationProperties.class)
@Slf4j
public class Pac4jAuthenticationEventExecutionPlanConfiguration implements AuditTrailRecordResolutionPlanConfigurer {
    @Autowired
    private CasConfigurationProperties casProperties;


    @Bean
    @ConditionalOnMissingBean(name = "pac4jDelegatedClientFactory")
    @RefreshScope
    public DelegatedClientFactory pac4jDelegatedClientFactory() {
        return new DelegatedClientFactory(casProperties.getAuthn().getPac4j());
    }

    @RefreshScope
    @Bean
    public Clients builtClients() {
        final Set<BaseClient> clients = pac4jDelegatedClientFactory().build();
        LOGGER.debug("The following clients are built: [{}]", clients);
        if (clients.isEmpty()) {
            LOGGER.warn("No delegated authentication clients are defined and/or configured");
        } else {
            LOGGER.info("Located and prepared [{}] delegated authentication client(s)", clients.size());
        }
        return new Clients(casProperties.getServer().getLoginUrl(), new ArrayList<>(clients));
    }
配置了 DelegatedClientFactory ,然后使用这个Factory 生成了 Clients 实例,这个实例可以看作Client的容器,里面放置了所有的Client 以便后期查询和使用。
看看在Factory build 时,发生了什么:
/**
     * Build set of clients configured.
     *
     * @return the set
     */
    public Set<BaseClient> build() {
        final Set<BaseClient> clients = new LinkedHashSet<>();

        configureCasClient(clients);
        configureFacebookClient(clients);
        configureOidcClient(clients);
        configureOAuth20Client(clients);
        configureSamlClient(clients);
        configureTwitterClient(clients);
        configureDropboxClient(clients);
        configureFoursquareClient(clients);
        configureGithubClient(clients);
        configureGoogleClient(clients);
        configureWindowsLiveClient(clients);
        configureYahooClient(clients);
        configureLinkedInClient(clients);
        configurePaypalClient(clients);
        configureWordpressClient(clients);
        configureBitbucketClient(clients);
        configureOrcidClient(clients);

        return clients;
    }
其中关于自定义auth2 的方法:
/**
     * Configure o auth 20 client.
     *
     * @param properties the properties
     */
    protected void configureOAuth20Client(final Collection<BaseClient> properties) {
        final AtomicInteger index = new AtomicInteger();
        pac4jProperties.getOauth2()
            .stream()
            .filter(oauth -> StringUtils.isNotBlank(oauth.getId()) && StringUtils.isNotBlank(oauth.getSecret()))
            .forEach(oauth -> {
                final GenericOAuth20Client client = new GenericOAuth20Client();
                client.setKey(oauth.getId());
                client.setSecret(oauth.getSecret());
                client.setProfileAttrs(oauth.getProfileAttrs());
                client.setProfileNodePath(oauth.getProfilePath());
                client.setProfileUrl(oauth.getProfileUrl());
                client.setProfileVerb(Verb.valueOf(oauth.getProfileVerb().toUpperCase()));
                client.setTokenUrl(oauth.getTokenUrl());
                client.setAuthUrl(oauth.getAuthUrl());
                client.setCustomParams(oauth.getCustomParams());
                final int count = index.intValue();
                if (StringUtils.isBlank(oauth.getClientName())) {
                    client.setName(client.getClass().getSimpleName() + count);
                }
                if (oauth.isUsePathBasedCallbackUrl()) {
                    client.setCallbackUrlResolver(new PathParameterCallbackUrlResolver());
                }
                configureClient(client, oauth);

                index.incrementAndGet();
                LOGGER.debug("Created client [{}]", client);
                properties.add(client);
            });
    }

/**
     * Sets client name.
     *
     * @param client the client
     * @param props  the props
     */
    protected void configureClient(final BaseClient client, final Pac4jBaseClientProperties props) {
        if (StringUtils.isNotBlank(props.getClientName())) {
            client.setName(props.getClientName());
        }
        client.getCustomProperties().put("autoRedirect", props.isAutoRedirect());
    }
可以看到, 就是把已实现的client (google facebook)和其他类型的都注册为client。我们关心的Oauth2 的注册过程也很明显。
其中需要注意的是, client.setName ,是设置client的名称,使用的实现类为GenericOAuth20Client 。 这个类和Clients 都是pac4j提供。
4 OAuth2 Redirect回调
接下来分析在流程B中发生了什么。
在CAS中使用SpringWebFlow 控制web流程,回调入口在DelegatedClientAuthenticationAction 中定义。
执行doExecute ,其中的逻辑为:
1先从request中得到ClientName,
2 findDelegatedClientByName 按照链接中的clientName 找到对应的Client
3 尝试用这个 Client.getCredentials 得到凭据
4 如果获取成功,则认证成功。
5 establishDelegatedAuthenticationSession 中将回调的Credentials 包装为ClientCredential ,建立认证上下文。
那么核心代码就在Client .getCredentials 方法中。Client 的具体实现类很多,自定义OAuth2使用的是
GenericOAuth20Client 。
@Override
    public Event doExecute(final RequestContext context) {
        final HttpServletRequest request = WebUtils.getHttpServletRequestFromExternalWebflowContext(context);
        final HttpServletResponse response = WebUtils.getHttpServletResponseFromExternalWebflowContext(context);

        final String clientName = request.getParameter(Pac4jConstants.DEFAULT_CLIENT_NAME_PARAMETER);
        LOGGER.debug("Delegated authentication is handled by client name [{}]", clientName);
        if (hasDelegationRequestFailed(request, response.getStatus()).isPresent()) {
            throw new IllegalArgumentException("Delegated authentication has failed with client " + clientName);
        }

        final J2EContext webContext = Pac4jUtils.getPac4jJ2EContext(request, response);
        if (StringUtils.isNotBlank(clientName)) {
            final Service service = restoreAuthenticationRequestInContext(context, webContext, clientName);
            final BaseClient<Credentials, CommonProfile> client = findDelegatedClientByName(request, clientName, service);

            final Credentials credentials;
            try {
                credentials = client.getCredentials(webContext);
                LOGGER.debug("Retrieved credentials from client as [{}]", credentials);
                if (credentials == null) {
                    throw new IllegalArgumentException("Unable to determine credentials from the context with client " + client.getName());
                }
            } catch (final Exception e) {
                LOGGER.info(e.getMessage(), e);
                throw new IllegalArgumentException("Delegated authentication has failed with client " + client.getName());
            }

            try {
                establishDelegatedAuthenticationSession(context, service, credentials, client);
            } catch (final AuthenticationException e) {
                LOGGER.warn("Could not establish delegated authentication session [{}]. Routing to [{}]", e.getMessage(), CasWebflowConstants.TRANSITION_ID_AUTHENTICATION_FAILURE);
                return new EventFactorySupport().event(this, CasWebflowConstants.TRANSITION_ID_AUTHENTICATION_FAILURE, new LocalAttributeMap<>(CasWebflowConstants.TRANSITION_ID_ERROR, e));
            }
            return super.doExecute(context);
        }

        prepareForLoginPage(context);

        if (response.getStatus() == HttpStatus.UNAUTHORIZED.value()) {
            return stopWebflow();
        }
        return error();
    }
5 GenericOAuth20Client
GenericOAuth20Client是paj4c 提供的类,

继承的OAuth20Client 有代码: 设置了各种组件,包括凭据解析器,认证器等。。
protected void clientInit() {
        this.defaultRedirectActionBuilder(new OAuth20RedirectActionBuilder(this.configuration, this));
        this.defaultCredentialsExtractor(new OAuth20CredentialsExtractor(this.configuration, this));
        this.defaultAuthenticator(new OAuth20Authenticator(this.configuration, this));
        this.defaultProfileCreator(new OAuth20ProfileCreator(this.configuration, this));
    }
其getCredentials方法为:可知,先初始化,然后 尝试解析凭据。
解析凭据时,先拿到凭据,然后authenticator 进行验证。
解析凭据使用的是 OAuth20CredentialsExtractor 而验证时使用 OAuth20Authenticator
public final C getCredentials(WebContext context) {
        this.init();
        C credentials = this.retrieveCredentials(context);
        if (credentials == null) {
            context.getSessionStore().set(context, this.getName() + "$attemptedAuthentication", "true");
        } else {
            this.cleanAttemptedAuthentication(context);
        }

        return credentials;
    }

protected C retrieveCredentials(WebContext context) {
        try {
            C credentials = this.credentialsExtractor.extract(context);
            if (credentials == null) {
                return null;
            } else {
                long t0 = System.currentTimeMillis();
                boolean var12 = false;

                try {
                    var12 = true;
                    this.authenticator.validate(credentials, context);
                    var12 = false;
                } finally {
                    if (var12) {
                        long t1 = System.currentTimeMillis();
                        this.logger.debug("Credentials validation took: {} ms", t1 - t0);
                    }
                }

                long t1 = System.currentTimeMillis();
                this.logger.debug("Credentials validation took: {} ms", t1 - t0);
                return credentials;
            }
        } catch (CredentialsException var14) {
            this.logger.info("Failed to retrieve or validate credentials: {}", var14.getMessage());
            this.logger.debug("Failed to retrieve or validate credentials", var14);
            return null;
        }
    }
6 凭据解析和验证
在解析时,发现回调里面的code,放入Cridential 里面
protected OAuth20Credentials getOAuthCredentials(WebContext context) {
        String stateParameter;
        String message;
        if (((OAuth20Configuration)this.configuration).isWithState()) {
            stateParameter = context.getRequestParameter("state");
            if (!CommonHelper.isNotBlank(stateParameter)) {
                message = "Missing state parameter: session expired or possible threat of cross-site request forgery";
                throw new OAuthCredentialsException("Missing state parameter: session expired or possible threat of cross-site request forgery");
            }

            message = ((OAuth20Configuration)this.configuration).getStateSessionAttributeName(this.client.getName());
            String sessionState = (String)context.getSessionStore().get(context, message);
            context.getSessionStore().set(context, message, (Object)null);
            this.logger.debug("sessionState: {} / stateParameter: {}", sessionState, stateParameter);
            if (!stateParameter.equals(sessionState)) {
                String message = "State parameter mismatch: session expired or possible threat of cross-site request forgery";
                throw new OAuthCredentialsException("State parameter mismatch: session expired or possible threat of cross-site request forgery");
            }
        }

        stateParameter = context.getRequestParameter("code");
        if (stateParameter != null) {
            message = OAuthEncoder.decode(stateParameter);
            this.logger.debug("code: {}", message);
            return new OAuth20Credentials(message);
        } else {
            message = "No credential found";
            throw new OAuthCredentialsException("No credential found");
        }
    }
验证时:通过
((OAuth20Service)((OAuth20Configuration)this.configuration).buildService(context, this.client, (String)null)).getAccessToken(code);使用code 拿到accessToken,并设置在Cridential里面。
protected void retrieveAccessToken(WebContext context, OAuthCredentials credentials) {
        OAuth20Credentials oAuth20Credentials = (OAuth20Credentials)credentials;
        String code = oAuth20Credentials.getCode();
        this.logger.debug("code: {}", code);

        OAuth2AccessToken accessToken;
        try {
            accessToken = ((OAuth20Service)((OAuth20Configuration)this.configuration).buildService(context, this.client, (String)null)).getAccessToken(code);
        } catch (InterruptedException | ExecutionException | IOException var7) {
            throw new HttpCommunicationException("Error getting token:" + var7.getMessage());
        }

        this.logger.debug("accessToken: {}", accessToken);
        oAuth20Credentials.setAccessToken(accessToken);
    }
如果流程都成功,则拿到accessToken 验证成功。
注意:这里返回的Cridentials 实现类是OAuth20Credentials ,在cas 中会转化为 ClientCredential
就可以自己实现CAS 的 AuthenticationHandler 接口,在里面拿到AccessToken ,,然后获取用户信息并实现业务了。推荐继承 AbstractPac4jAuthenticationHandler 进行自定义。
貌似CAS 里面这一步也做了部分工作,在配置文件中可以写,能得到userProfile 。
cas.authn.pac4j.oauth2[1].authUrl=https://open.weixin.qq.com/connect/qrconnect
cas.authn.pac4j.oauth2[1].tokenUrl=https://api.weixin.qq.com/sns/oauth2/access_token
cas.authn.pac4j.oauth2[1].profileUrl=https://api.weixin.qq.com/sns/userinfo
cas.authn.pac4j.oauth2[1].clientName=WeChat