数据通讯
数据通讯这最大的坑就是Google服务这一块,因为在国内是没办法使用Google服务的,所以这一点有点坑。也就是不使用谷歌服务就没办法实现手机与手表的数据交互(当然也不是绝对的)。这里找到了两个绝对权威的资料,这里跟大家分享一下。防止大家在这上面浪费太多的时间。
-
Android官网中有这样的资料创建面向中国市场的 Android Wear 应用,这里的资料说的非常清楚,而且还是中文的。通过这篇就能解决不能使用Google服务的问题。
-
华为官网中也有资料,叫做HUAWEI Watch开发指导书。这上面说的其实跟Google官网上说的基本是一样的。
我们只需要按照上面资料中的说明去下载google-play-services-7-8-87.zip就可以了(版本以官网提供的为准),上面两个网站都能下载到资料。我们先将资料先下载下来(暂时还用不到)。接下来我们先创建项目。
一、创建项目
创建项目与创建Phone项目稍微有点区别,这里我就将不同的地方以GIF来作为演示。
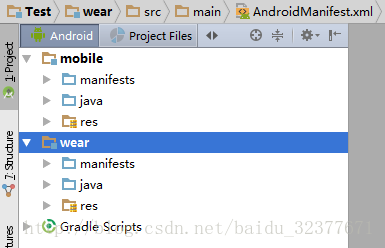
我们来看下创建项目的目录结构。结构非常清晰,这里有两个moudle,一个是手机应用,另一个就是穿戴应用。
二、修改Gradle中的依赖配置
在创建的项目中,AndroidStudio默认为开发者配置好的了一些依赖插件,但是有一个我们是没办法用的。是啥呢?就是google-play-services,为啥不能用呢?因为版本太高,我们只能使用google-play-services-7-8-87这个版本才行。这里我以wear的Gradle为例(moblie与wear的修改方法是一样的)。
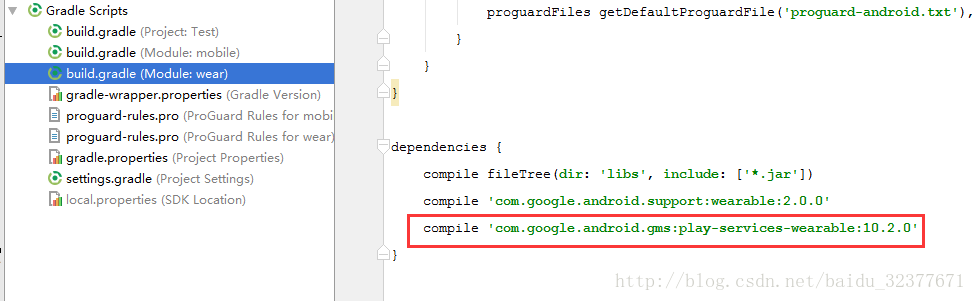
1.创建项目中的wear的Gradle配置:
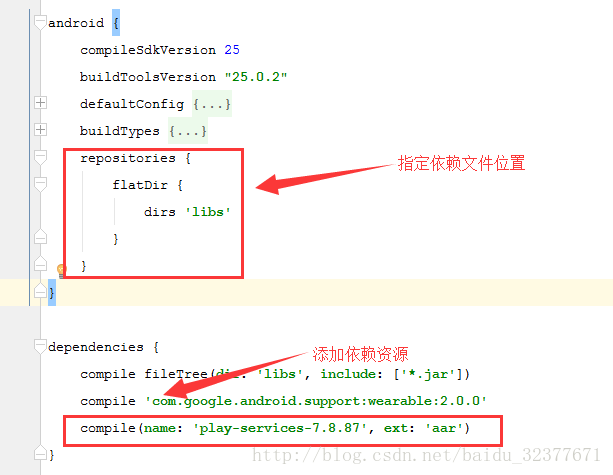
这是wear的Gradle配置,这里默认使用的google-play-services版本是10.2.0。我们需要将这个替换成google-play-services-7-8-87才行。
2.获取play-services-7.8.87.aar文件:
我们需要解压google-play-services-7-8-87.zip,随后找到play-services-7.8.87.aar这个文件。(解压后文件所在目录:google-play-services-7-8-87\com\google\android\gms\play-services\7.8.87)

3.导入play-services-7.8.87.aar文件:
1.首先将play-services-7.8.87.aar文件复制。

2.将复制的play-services-7.8.87.aar文件粘贴到wear的libs包中。
3.修改wear的Gradle的配置完成资源依赖
mobile导入play-services-7.8.87.aar文件只需按着这个操作步骤再做一遍就可以了。
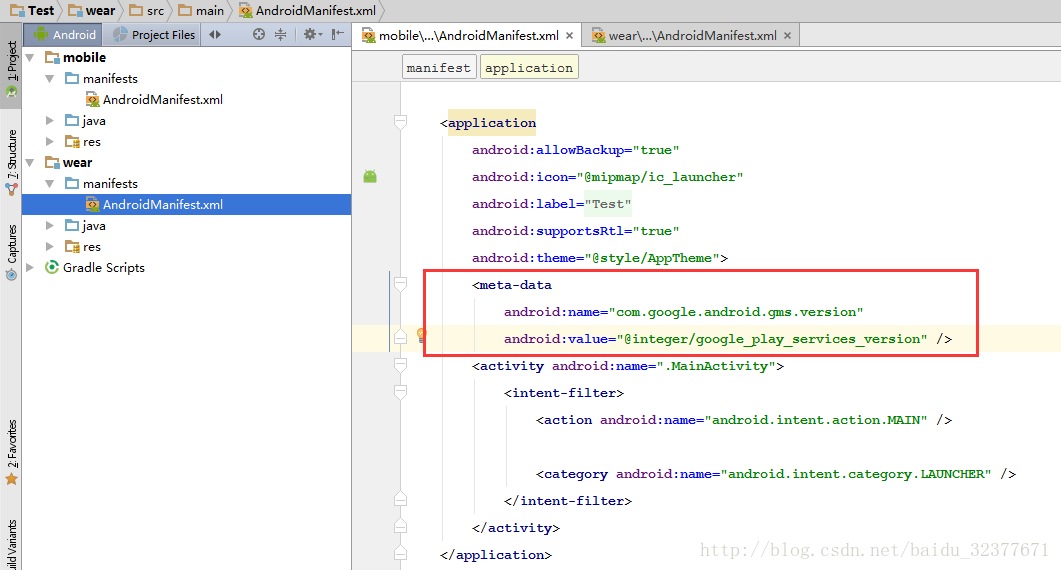
三、修改Manifest文件
无论是mobile还是wear都要这样修改(将图片中红框中的部分添加到你的配置文件中)。
四、通过手机向手表传递数据
这里将会使用DataApi.DataListener接收数据,用法跟WearableListenerService基本没啥区别。
moble应用发送数据:
当点击按钮后,手机端会发送出一条消息。
package com.lyan.test;

import android.os.Bundle;
import android.support.v7.app.AppCompatActivity;
import android.view.View;

import com.google.android.gms.common.api.GoogleApiClient;
import com.google.android.gms.wearable.DataMap;
import com.google.android.gms.wearable.PutDataMapRequest;
import com.google.android.gms.wearable.Wearable;

public class MainActivity extends AppCompatActivity {
    GoogleApiClient googleApiClient;//服务对象
    @Override
    protected void onCreate(Bundle savedInstanceState) {
        super.onCreate(savedInstanceState);
        setContentView(R.layout.activity_main);
        //创建服务对象
        googleApiClient = new GoogleApiClient.Builder(this)
                .addApi(Wearable.API)
                .build();
        googleApiClient.connect();//开始连接
    }

    /**
     * 发送消息到手表
     * @param view
     */
    public void send(View view){
        PutDataMapRequest dataMapRequest = PutDataMapRequest.create("/KEY");//使用KEY来过滤
        DataMap dataMap = dataMapRequest.getDataMap();//获取消息的载体
        dataMap.putLong("time" , System.currentTimeMillis());//传递点击按钮的时间
        Wearable.DataApi.putDataItem(googleApiClient,dataMapRequest.asPutDataRequest());//发送数据
    }
}
wear应用接收数据:
在手表端接收消息后,将时间格式化,并用Toast展示出来。
package com.lyan.test;

import android.app.Activity;
import android.net.Uri;
import android.os.Bundle;
import android.os.Handler;
import android.os.Message;
import android.support.wearable.view.WatchViewStub;
import android.widget.TextView;
import android.widget.Toast;

import com.google.android.gms.common.api.GoogleApiClient;
import com.google.android.gms.wearable.DataApi;
import com.google.android.gms.wearable.DataEvent;
import com.google.android.gms.wearable.DataEventBuffer;
import com.google.android.gms.wearable.DataMap;
import com.google.android.gms.wearable.DataMapItem;
import com.google.android.gms.wearable.Wearable;

import java.text.SimpleDateFormat;
import java.util.Date;

public class MainActivity extends Activity implements DataApi.DataListener{

    private TextView mTextView;
    private GoogleApiClient googleApiClient;
    private Handler handler = new Handler(new Handler.Callback() {
        @Override
        public boolean handleMessage(Message msg) {
            if (msg.what == 1){
                SimpleDateFormat format = new SimpleDateFormat("yy年MM月dd日 HH时mm分ss秒");
                String time = format.format(new Date((long) msg.obj));//格式化时间
                Toast.makeText(getApplicationContext(),"在" + time + ",来了条消息",Toast.LENGTH_SHORT).show();
            }
            return false;
        }
    });
    @Override
    protected void onCreate(Bundle savedInstanceState) {
        super.onCreate(savedInstanceState);
        setContentView(R.layout.activity_main);
        final WatchViewStub stub = (WatchViewStub) findViewById(R.id.watch_view_stub);
        stub.setOnLayoutInflatedListener(new WatchViewStub.OnLayoutInflatedListener() {
            @Override
            public void onLayoutInflated(WatchViewStub stub) {
                mTextView = (TextView) stub.findViewById(R.id.text);
            }
        });

        googleApiClient = new GoogleApiClient.Builder(this).addApi(Wearable.API).build();
        googleApiClient.connect();//开启连接
        Wearable.DataApi.addListener(googleApiClient,this);//添加消息变化的监听
    }

    @Override
    public void onDataChanged(DataEventBuffer dataEventBuffer) {
        for(DataEvent event : dataEventBuffer) {
            Uri uri = event.getDataItem().getUri();//获取消息的uri
            String path = uri!=null ? uri.getPath() : null;//获取标识

            if("/KEY".equals(path)) {
                DataMap map = DataMapItem.fromDataItem(event.getDataItem()).getDataMap();
                long time = map.getLong("time");//获取消息内容
                handler.obtainMessage(1,time).sendToTarget();
            }
        }
    }
}
【运行效果】
五、通过手表向手机发送数据
其实无论是手机向手表传递数据,还是手表向手机传递数据用法都是一样的。这里将会使用WearableListenerService来接收数据。
wear应用发送数据:
当点击文本后,手表端会发送出一条消息。
package com.lyan.test;

import android.app.Activity;
import android.graphics.Color;
import android.os.Bundle;
import android.support.wearable.view.WatchViewStub;
import android.view.View;
import android.widget.TextView;

import com.google.android.gms.common.api.GoogleApiClient;
import com.google.android.gms.wearable.DataMap;
import com.google.android.gms.wearable.PutDataMapRequest;
import com.google.android.gms.wearable.Wearable;

public class MainActivity extends Activity implements View.OnClickListener{

    private TextView mTextView;
    private GoogleApiClient googleApiClient;
    @Override
    protected void onCreate(Bundle savedInstanceState) {
        super.onCreate(savedInstanceState);
        setContentView(R.layout.activity_main);
        final WatchViewStub stub = (WatchViewStub) findViewById(R.id.watch_view_stub);
        stub.setOnLayoutInflatedListener(new WatchViewStub.OnLayoutInflatedListener() {
            @Override
            public void onLayoutInflated(WatchViewStub stub) {
                mTextView = (TextView) stub.findViewById(R.id.text);
                mTextView.setText("向手机发送数据");//设置文本内容
                mTextView.setBackgroundColor(Color.WHITE);//设置文本背景颜色
                mTextView.setTextColor(Color.BLACK);//设置文本字体颜色
                mTextView.setOnClickListener(MainActivity.this);//设置点击事件
            }
        });
        googleApiClient = new GoogleApiClient.Builder(this).addApi(Wearable.API).build();
        googleApiClient.connect();//开启连接
    }

    /**
     * 点击事件
     * @param v
     */
    @Override
    public void onClick(View v) {
        PutDataMapRequest dataMapRequest = PutDataMapRequest.create("/KEY");//使用KEY来过滤
        DataMap dataMap = dataMapRequest.getDataMap();//获取消息的载体
        dataMap.putLong("time" , System.currentTimeMillis());//传递点击按钮的时间
        Wearable.DataApi.putDataItem(googleApiClient,dataMapRequest.asPutDataRequest());//发送数据
    }
}
moble应用接收数据:
使用WearableListenerService服务来接收消息,随后通过本地广播将数据传递给主界面,最后在主界面的TextView中将接收的数据展示出来。
1.创建MyService用来接收数据,同时继承WearableListenerService,并重写onDataChanged()方法。
package com.lyan.test;

import android.content.Intent;
import android.net.Uri;
import android.support.v4.content.LocalBroadcastManager;

import com.google.android.gms.wearable.DataEvent;
import com.google.android.gms.wearable.DataEventBuffer;
import com.google.android.gms.wearable.DataMap;
import com.google.android.gms.wearable.DataMapItem;
import com.google.android.gms.wearable.WearableListenerService;

/**
 * 作者: LYJ
 * 功能: 接收穿戴设备传递过来的数据
 * 创建日期: 2017/3/29
 */

public class MyService extends WearableListenerService{
    @Override
    public void onDataChanged(DataEventBuffer dataEvents) {
        super.onDataChanged(dataEvents);
        for(DataEvent event : dataEvents) {
            Uri uri = event.getDataItem().getUri();//获取消息的uri
            String path = uri!=null ? uri.getPath() : null;//获取标识
            if("/KEY".equals(path)) {//判断标识
                DataMap map = DataMapItem.fromDataItem(event.getDataItem()).getDataMap();
                long time = map.getLong("time");//获取消息内容
                Intent localIntent = new Intent("phone.localIntent");//发送广播意图
                localIntent.putExtra("result", time);//添加附加内容
                //发送本地广播
                LocalBroadcastManager.getInstance(this).sendBroadcast(localIntent);
            }
        }
    }
}
2.在Manifest文件中,注册服务并设置服务的过滤条件。这里我将第二种过滤方式注释掉了,但在使用中请使用第二种过滤方式。因为第一种方式并不适用与我们下载的play-services-7.8.87。(因为第一种方式是在play-services-7.8.87之后的版本中才被加进来,所以有些功能我们是没办法使用的,比如取消延迟我们就没办法使用,因为play-services-7.8.87没用这样的开放接口)
<?xml version="1.0" encoding="utf-8"?>
<manifest xmlns:android="http://schemas.android.com/apk/res/android"
    package="com.lyan.test">

    <application
        android:allowBackup="true"
        android:icon="@mipmap/ic_launcher"
        android:label="@string/app_name"
        android:supportsRtl="true"
        android:theme="@style/AppTheme">
        <meta-data
            android:name="com.google.android.gms.version"
            android:value="@integer/google_play_services_version" />
        <activity android:name=".MainActivity">
            <intent-filter>
                <action android:name="android.intent.action.MAIN" />

                <category android:name="android.intent.category.LAUNCHER" />
            </intent-filter>
        </activity>
        <service android:name=".MyService">
            <intent-filter>
                <!-- 第一种,谷歌推荐的方式但是这种方式有延迟,而且使用版本
                需要高于play-services-7.8.87才行,这个pathPrefix就是过滤条件
                与发送数据的过滤条件要一致
                发送数据的过滤条件
                PutDataMapRequest dataMapRequest = PutDataMapRequest.create("/KEY");//使用KEY来过滤-->
                <action android:name="com.google.android.gms.wearable.DATA_CHANGED" />
                <data android:scheme="wear" android:host="*" android:pathPrefix="/KEY" />
                <!-- 第二种,谷歌不推荐但由于使用的是play-services-7.8.87,最好使用这种,因为没有延迟 -->
                <!--<action android:name="com.google.android.gms.wearable.BIND_LISTENER" />-->
            </intent-filter>
        </service>
    </application>

</manifest>
3.在主界面中添加广播接收器,用来接收本地广播,将本地广播中的数据展示在界面上。
package com.lyan.test;

import android.content.BroadcastReceiver;
import android.content.Context;
import android.content.Intent;
import android.content.IntentFilter;
import android.os.Bundle;
import android.support.v4.content.LocalBroadcastManager;
import android.support.v7.app.AppCompatActivity;
import android.widget.TextView;

import com.google.android.gms.common.api.GoogleApiClient;
import com.google.android.gms.wearable.Wearable;

import java.text.SimpleDateFormat;
import java.util.Date;

public class MainActivity extends AppCompatActivity {
    GoogleApiClient googleApiClient;//服务对象
    private TextView txt;
    private BroadcastReceiver mResultReceiver = new BroadcastReceiver() {
        @Override
        public void onReceive(Context context, Intent intent) {
            SimpleDateFormat format = new SimpleDateFormat("yy年MM月dd日 HH时mm分ss秒");
            String time = format.format(new Date((intent.getLongExtra("result",System.currentTimeMillis()))));//格式化时间
            txt.setText( "在" + time + ",来了条消息");
        }
    };//广播接收器

    @Override
    protected void onCreate(Bundle savedInstanceState) {
        super.onCreate(savedInstanceState);
        setContentView(R.layout.activity_main);
        txt = (TextView) findViewById(R.id.test);
        //创建服务对象
        googleApiClient = new GoogleApiClient.Builder(this).addApi(Wearable.API).build();
        googleApiClient.connect();//开始连接
        LocalBroadcastManager.getInstance(this).registerReceiver(//注册本地广播
                mResultReceiver, new IntentFilter("phone.localIntent"));
    }
    @Override
    protected void onDestroy() {
        LocalBroadcastManager.getInstance(this).unregisterReceiver(mResultReceiver);//解除注册广播
        super.onDestroy();
    }
}
【运行效果】
##※注意事项
- 每一次发送的数据要与之前的数据不一样,才会使onDataChanged()方法被调用。
- 使用DataItems发送数据,数据的大小是有限制的,数据的大小限制要在100KB以内。