分布式应用最大的缺点是难于管理,部署在不同的服务器上,监控、配置起来都是个麻烦事,上一节讲了注册中心Eureka,我们可以简单地监控各微服务的基本状态,当然啦,Eureka的功能绝对不止这么点啦,有空各位可以深入研究,一般的电商平台也会有自己的分布式服务部署、监控和管理方案,比如用docker+k8s等,这些技术也非常火热。
再举一个场景,运维人员要更换一批服务器,所有IP都变了,好几百个微服务的配置都要变,一个一个去改肯定是不现实的,spring cloud就有自己的配置方案spring cloud config,统一把配置文件都放到git仓库,根据不同环境写不同的配置就可以解决此类问题。
我们继续开始spring cloud config的开发,新建一个module命名为config,引入依赖:
<parent>
    <groupId>org.springframework.boot</groupId>
    <artifactId>spring-boot-starter-parent</artifactId>
    <version>1.4.0.RELEASE</version>
</parent>

<dependencyManagement>
    <dependencies>
        <dependency>
            <groupId>org.springframework.cloud</groupId>
            <artifactId>spring-cloud-dependencies</artifactId>
            <version>Camden.SR2</version>
            <type>pom</type>
            <scope>import</scope>
        </dependency>
    </dependencies>
</dependencyManagement>

<dependencies>
    <dependency>
        <groupId>org.springframework.cloud</groupId>
        <artifactId>spring-cloud-config-server</artifactId>
    </dependency>
    <dependency>
        <groupId>org.springframework.cloud</groupId>
        <artifactId>spring-cloud-starter-config</artifactId>
    </dependency>
    <dependency>
        <groupId>org.springframework.boot</groupId>
        <artifactId>spring-boot-starter-web</artifactId>
    </dependency>
    <dependency>
        <groupId>org.springframework.boot</groupId>
        <artifactId>spring-boot-devtools</artifactId>
        <optional>true</optional>
    </dependency>
</dependencies>
这里有一个坑要注意,spring cloud config跟Eureka一样,也是cs架构的,我在开发时发现两个问题:
1.config server的端口智能设置为8888,很多教程上说端口可以自定义,但是我试没成功过,可能没找对地方;
2.config server和客户端不能在同一个项目里,包会冲突,启动异常;
所以,config server的配置文件如下:
spring:
  application:
    name: config
  cloud:
    config:
      server:
        git:
          uri: https://gitee.com/jerrytang2015/configTest.git
          username:
          password:
      label: master
  profiles:
    active: dev
server:
  port: 8888
这里只解释spring.cloud下面的,server.git里面配置的是git远程仓库的信息,公开的仓库不用写用户名和密码,label下面的是分支,profiles.active下面是指启用那个配置,dev是指开发环境配置,http请求地址和配置资源文件关系如下:
- /{application}/{profile}[/{label}]
- /{application}-{profile}.yml
- /{label}/{application}-{profile}.yml
- /{application}-{profile}.properties
- /{label}/{application}-{profile}.properties
也就是说,你在git仓库中保存的文件要如此命名:
application是config client的spring.application.name
label是指配置文件在哪个分支,比如master
profile是指配置文件的后缀,代表了配置环境的版本,是开发环境、测试环境还是生产环境
例如我又创建一个微服务service-product,它的开发环境配置文件的命名就应该是service-product-dev.yml或service-product-dev.properties
配置OK后就要实现config server了,代码如下:
package com.tzy;

import org.springframework.boot.SpringApplication;
import org.springframework.boot.autoconfigure.SpringBootApplication;
import org.springframework.cloud.config.server.EnableConfigServer;

@SpringBootApplication
@EnableConfigServer
public class Main {
    public static void main(String[] args){
        SpringApplication.run(Main.class,args);
    }
}
@EnableConfigServer表示该应用是配置服务器
这样一个config server就做好了,启动该应用,在浏览器地址栏输入localhost:8888/service-product/dev/master/,会看到以下信息:

说明配置服务成功了。
我再用eclipse创建了一个maven项目,项目命名为service-produce,引入依赖
<modelVersion>4.0.0</modelVersion>
<groupId>com.tzy</groupId>
<artifactId>service-product</artifactId>
<version>0.0.1-SNAPSHOT</version>
<packaging>jar</packaging>
<name>service-product</name>
<url>http://maven.apache.org</url>
<properties>
<project.build.sourceEncoding>UTF-8</project.build.sourceEncoding>
</properties>
<parent>
<groupId>org.springframework.boot</groupId>
<artifactId>spring-boot-starter-parent</artifactId>
<version>1.4.0.RELEASE</version>
</parent>
<dependencyManagement>
<dependencies>
<dependency>
<groupId>org.springframework.cloud</groupId>
<artifactId>spring-cloud-dependencies</artifactId>
<version>Brixton.RELEASE</version>
<type>pom</type>
<scope>import</scope>
</dependency>
</dependencies>
</dependencyManagement>
<dependencies>
<dependency>
<groupId>org.springframework.boot</groupId>
<artifactId>spring-boot-starter-web</artifactId>
</dependency>
<dependency>
<groupId>org.springframework.cloud</groupId>
<artifactId>spring-cloud-starter-config</artifactId>
</dependency>
<dependency>
<groupId>org.springframework.cloud</groupId>
<artifactId>spring-cloud-starter-eureka</artifactId>
</dependency>
<dependency>
<groupId>org.springframework.boot</groupId>
<artifactId>spring-boot-starter-test</artifactId>
<scope>test</scope>
</dependency>
<dependency>
<groupId>junit</groupId>
<artifactId>junit</artifactId>
<scope>test</scope>
</dependency>
</dependencies>
<build>
<plugins>
<plugin>
<groupId>org.springframework.boot</groupId>
<artifactId>spring-boot-maven-plugin</artifactId>
</plugin>
</plugins>
</build>
配置文件application.properties(换个风格)如下:
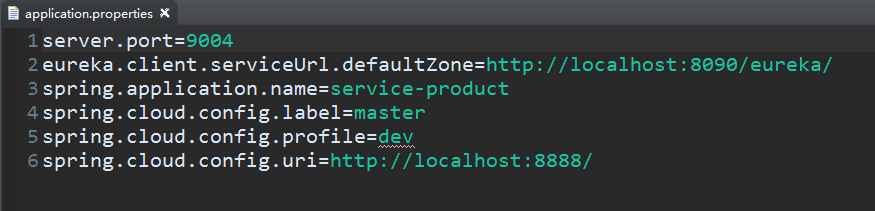
这里的含义和config server的是一样的,接下来是注程序文件App.java
package com.tzy.productService;
import org.springframework.boot.SpringApplication;
import org.springframework.boot.autoconfigure.SpringBootApplication;
import org.springframework.cloud.netflix.eureka.EnableEurekaClient;
/**
* Hello world!
*
*/
@SpringBootApplication
@EnableEurekaClient
public class App
{
public static void main( String[] args )
{
SpringApplication.run(App.class, args);
}
}
这里的没有写config client,跟一般的微服务是一样的,我们写个Controller测试一下我们能不能从config server中拿到参数
package com.tzy.productService;
import org.springframework.beans.factory.annotation.Value;
import org.springframework.web.bind.annotation.RequestMapping;
import org.springframework.web.bind.annotation.RestController;
@RestController
public class GetConfigController {
@Value("${password}")
private String str;
@RequestMapping(value="/getConfig")
public String getConfig() {
return str;
}
}
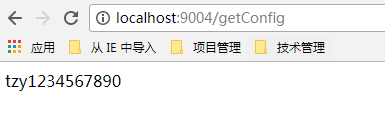
我们可以直接用@Value获取配置文件中的password配置项的内容,启动客户端应用,访问localhost:9004/getConfig,就可以得到配置文件中password的内容了。
这样的话,如果发生大规模更换配置的情况,运维人员只需提前把相应的配置文件做修改,然后推到git仓库就可以了。