本篇讲述如何在Android手机上截屏,比如用作分享、保存信息等。
此处的截屏操作可以截取当前屏幕显示的信息,包括当前屏幕中未显示的部分,也由此可见其并非是真正的截屏操作,他的原理是把要截取的内容写在一个view中,然后把该View转换成图片即可。
先看一下最终效果图
图中有3个控件:
一个TextView
一个ImageView
一个ListView
从图片长度可以看出,已经超过一屏的显示
开始写代码,首先看一下生成图片的代码
        contentLayout.setDrawingCacheEnabled(true);
        contentLayout.measure(
                MeasureSpec.makeMeasureSpec(0, MeasureSpec.UNSPECIFIED),
                MeasureSpec.makeMeasureSpec(0, MeasureSpec.UNSPECIFIED));
        contentLayout.layout(0, 0, contentLayout.getMeasuredWidth(),

        contentLayout.buildDrawingCache();
        Bitmap bitmap = contentLayout.getDrawingCache();
这就是view生成图片的代码。
然后看布局文件
<LinearLayout xmlns:android="http://schemas.android.com/apk/res/android"
    xmlns:tools="http://schemas.android.com/tools"
    android:layout_width="match_parent"
    android:layout_height="match_parent"
    android:orientation="vertical" >
    <ScrollView
        android:layout_width="match_parent"
        android:layout_height="match_parent" >
        <LinearLayout
            android:id="@+id/content"
            android:layout_width="match_parent"
            android:layout_height="match_parent"
            android:background="#456123"
            android:orientation="vertical" >
            <TextView
                android:id="@+id/imgSource1"
                android:layout_width="match_parent"
                android:layout_height="wrap_content"
                android:layout_margin="20dp"
                android:background="#123"
                android:gravity="center"
                android:padding="30dp"
                android:text="宇智波鼬"
                android:textColor="#FFF"
                android:textSize="25sp" />
            <ImageView
                android:id="@+id/imgSource2"
                android:layout_width="match_parent"
                android:layout_height="wrap_content"
                android:src="@drawable/img_test"
                android:text="@string/hello_world" />
            <com.example.generatebitmap.CommListView
                android:id="@+id/list_test_lv"
                android:layout_width="match_parent"
                android:layout_height="match_parent" />
        </LinearLayout>
    </ScrollView>
</LinearLayout>
以此为基础生成图片的效果是这样的
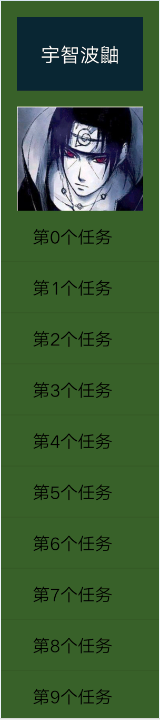
图片以view中最宽的子view为宽度截了图,显示有问题,还没研究原因,但是可以使用一个替代方案解决这个问题:
在布局中加入一个view,专门为占位使用,不影响正常布局,然后在代码中设置其宽度为屏幕宽度即可,如加入这个
            <TextView
                android:id="@+id/screen_width_tv"
                android:layout_height="1dp"
                android:layout_width="match_parent" />
然后在代码中
LinearLayout.LayoutParams params = new LinearLayout.LayoutParams(
                LinearLayout.LayoutParams.MATCH_PARENT,
                LinearLayout.LayoutParams.WRAP_CONTENT);
        params.width = screenWidth;
        screenTv.setLayoutParams(params);
其中screenWidth就是屏幕宽度,很容易获取,这样就正常了
有两个问题需要注意:
1、被转换的view必须设置背景色,且不能为透明背景色,否则获取的bitmap为空
2、布局中的listview没有使用原生的,因为原生的可能出现截图不全的问题