版权声明:本文为博主原创文章,未经博主允许不得转载。 https://blog.csdn.net/dogpig945/article/details/78739268
1. 本文测试环境
a) Elasticsearch版本5.2b) Python版本2.7.13
c) Vmware环境,操作系统SUSE12
2. 安装Elasticsearch
a) 安装java运行环境: sudo zipper in java-1_8_0-openjdkb) 下载并解压elasticsearch,下载地址https://www.elastic.co/downloads/elasticsearch
c) 修改elasticsearch配置文件config/elasticsearch.yml,添加
network.host: 0.0.0.0
http.cors.enabled: true
http.cors.allow-origin: "*"
d) 修改elasticsearch配置文件config/jvm.options,根据物理机内存大小调整这两个参数(其中的2048m表示2G的堆内存,直接写为2g亦可)
-Xmx2048m(-Xmx2g)
-Xms2048m(-Xms2g)
e) 启动elasticsearch: elasticsearch-5.5.2/bin/elasticsearch
f) 异常:ERROR: bootstrap checks failed
| 现象 |
解决办法 |
| max file descriptors [4096] for elasticsearch process likely too low, increase to at least [65536] |
修改/etc/security/limits.conf文件,添加或修改如下行: * hard nofile 65536 * soft nofile 65536 |
| max virtual memory areas vm.max_map_count [65530] likely too low, increase to at least [262144] |
修改/etc/sysctl.conf文件,添加 vm.max_map_count = 262144 |
修改完成后重启系统
3. 配置Elasticsearch集群
暂未研究。4. 安装mongo-connector
a) Pip2 install mongo-connectorb) Pip2 install elastic2-doc-manager[elastic5]
也有其他同步插件,本文选择mongo-connector做测试。
5. 配置mongodb
开启mongodb副本集(Replica Set)。开启副本集才会产生oplog,副本拷贝主分片的oplog并通过oplog与主分片进行同步。如果使用mongos作为入口,路由进程、各副本集节点需要配置相同的用户名和密码,此用户需配置backup和readAnyDatabase角色。该用户名和密码在使用mongo-connector导入数据时使用(即-a和-p两个参数)。
NOTE: With a sharded cluster, the mongo-connector user must be created on a mongos AND separately on each shard
6. 安装elasticsearch-head
a) git clone git://github.com/mobz/elasticsearch-head.gitb) sudo zipper in nmp6
c) cd elasticsearch-head
d) npm install 【比较耗时】
e) npm run start

f) 浏览器打开http://localhost:9100/验证是否安装成功

g) 连接至elasticsearch

(有另一款Elastisearch客户端工具:Chrome扩展程序sense)
扫描二维码关注公众号,回复:
3216169 查看本文章

7. 导入mongodb中的数据到Elasticsearch集群
mongo-connector -o icssa.icsdevice.timestamp --auto-commit-interval=0 -m 127.0.0.1:27017 -t 172.15.227.179:9200 -d elastic2_doc_manager -n icssa.icsdevice -a elastic -p elastic 【该命令表示只同步icssa.icsdevice集合,如果要同步所有数据,去掉-n icssa.icsdevice参数】mongo-connector –o scan.aiwen.timestamp --auto-commit-interval=0 -m 127.0.0.1:27017 -t 172.15.227.179:9200 -d elastic2_doc_manager -n scan.aiwen -a elastic -p elastic
注意:
① 执行命令后会在当前目录生成两个文件:mongo-connector.log和icssa.icsdevice.timestamp 【如果未指定-o参数,则默认为oplog.timestamp】。前者为同步的日志文件,后者存储了oplog的上一次同步时间戳。如果想重新同步全部数据,删除oplog.timestamp文件、elasticsearch中相关索引,再重新跑一次命令即可
② 当mongodb副本集节点的IP配置为127.0.0.1,如果是在远程主机上进行导入,导入时可能会报如下错误:

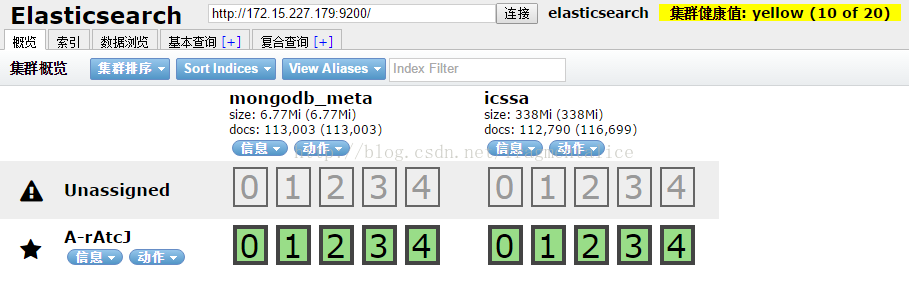
③ 同步完成后在head工具界面可以查看到相关索引信息:

8. 注意事项
使用mongo-connector命令同步数据时,mongo-connector的oplog(参照-o参数)不能随便删除,否则会引起重新同步所有数据的问题。该问题可以通过--no-dump选项关闭。生产环境下建议将mongo-connector配置为系统服务,运行mongo-connector时采用配置文件的方式。
9. 踩过的坑
1. 数据库A中有多个集合(A1, A2, A3),且已开启了副本集(Replica Set),但是集合A1可以同步,集合A2不能同步.原因:oplog中有A1的操作记录,没有A2的操作记录。
结论:开启副本集(Replica Set)并不能保证一定能同步,oplog中必须包含待同步集合的操作记录,才能通过mongo-connector同步到Elasticsearch集群。
2. mongodb3.x版本加强了安全机制,导致了在只拥有某个库的权限时不能同步数据的问题。
原因:拥有某个库的权限,并不能拥有oplog的读取权限,而mongo-connector需要读取oplog的权限。
结论:同步数据至少需要能够读取oplog的权限,确保当前mongodb用户的权限能够操作oplog,或者直接使用mongodb的管理员权限。
以下来自官方文档,包括MongoDB访问权限配置等问题:
• Authenticate with a username and password using the default MONGODB-CR (pre-MongoDB 2.8) or SCRAM-SHA-1 (2.8+) mechanisms:
• mongo-connector -m mongodb://username:password@localhost:27017 ...
• Authenticate using Kerberos (requires the pykerberos package to be installed):
• mongo-connector -m mongodb://[email protected]@localhost/?authMechanism=GSSAPI&authSource=$external&gssapiServiceName=mongodb ...
• Authenticate using the default mechanism over SSL:
• mongo-connector -m mongodb://username:password@localhost:27017/?ssl=true
• Connect over SSL to MongoDB. Require and validate the server's certificate:
mongo-connector --ssl-certfile client.pem --ssl-certificate-policy required ...
Required Permissions
Mongo Connector authenticates only as one user. The simplest way to get mongo-connector running is to create a user with the backup role:
$ mongo
replset:PRIMARY> db.getSiblingDB("admin").createUser({
user: "mongo-connector-username",
pwd: "password",
roles: ["backup"]
})
NOTE: With a sharded cluster, the mongo-connector user must be created on a mongos AND separately on each shard. This enables mongo-connector to authenticate to the cluster as a whole and to each shard individually.
The following table explains what privileges are needed and what the built-in role for MongoDB grants this privilege:
Privilege Needed Reason Built-in Role
find on theconfig.shardscollection Required if the source is a sharded cluster. backup or clusterMonitor
listDatabases
Required to determine what databases to read from if no --namespace-set is given. backup or readAnyDatabase
find on thelocal.oplog.rscollection Required for tailing the oplog. backup or clusterManagerand readAnyDatabase orread@local
find
Required to read the specified collections given in --namespace-set. backup or read orreadAnyDatabase
Note that in order to read the oplog, the user needs to be defined in the admin database.