Latex技巧:LaTex插图命令includegraphics参数详解
Latex插图的命令是\includegraphics[选项]{文件}
这里的选项在表 7.1, 7.2, 7.3 中列出。 因为 \includegraphics 不会结束 当前段落,所以它能够在文本中放置图形如 ![\includegraphics[width=12pt]{recycle.eps}](http://www.ctex.org/documents/latex/graphics/img16.gif) 和
和 ![\includegraphics[width=12pt]{illusion.eps}](http://www.ctex.org/documents/latex/graphics/img17.gif) 。
。
下面的命令将以 file.eps 的自然大小插入到 LATEX 文档中:
\documentclass{article}
\usepackage{graphicx}


如果加入的图形文件没有指明扩展名,那么 \includegraphics 会根据 \DeclareGraphicsExtensions 的扩展名列表自动为它加上扩展名(见第 9.1 节)。由于缺省的扩展名列表不包括空的扩展名, \includegraphics{file} 不会读入 file。除非空的扩展名 已被加到扩展名列表中。 命令
\includegraphics[width=3in]{file.eps}
将 file.eps 插入文档并且它的宽度被缩放到 3 英寸,高度也会 按相应的比例缩放。如果用 \textwidth 或 \em 等的函数来 指定宽度,而不是用像 3 英寸这样的固定尺寸,将会使你的 LATEX 文 档更具通用性。例如:
\includegraphics[width=\textwidth]{graphics.eps}
将所插入图形缩放到和文本行的宽度一样宽。而下面的命令
\includegraphics[width=0.80\textwidth]{graphics.eps}
使得插入图形的宽度为文本行宽的 80%。当与 calc 宏包配合使用 时,下面的命令可令图形的宽度比文本行宽少 2 英寸:
\includegraphics[width=\textwidth-2.0in]{graphics.eps}
to (需要 graphicx 12/95 或以后的 版本。) 下面是一些使用 \includegraphics 命令来插入图形的 例子。这里为方便起见,定义 \HR 如下:
\newcommand{\HR}{\rule{1em}{0.4pt}}
在下面的几个例子中,可以比较以下使用 scale,width,height,angle 以及 keepaspectratio 选项及其不同的顺序所得到的不同效果。
左 %
%
\includegraphics[scale=.5]{w.eps}}” align=”middle” height=”85” border=”0” width=”46”>右
左\HR\fbox{%
\includegraphics[scale=.5]{w.eps}%
\HR 右
左 %
%
\includegraphics[width=10mm]{w.eps}}” align=”middle” height=”70” border=”0” width=”38”>右
左\HR\fbox{%
\includegraphics%
[width=10mm]{w.eps}%
\HR 右
左 %
%
\includegraphics[height=20mm,width=30mm]%
%
{w.eps}}” align=”middle” height=”127” border=”0” width=”95”>右
左\HR\fbox{%
\includegraphics [height=20mm,width=30mm]%
{w.eps}}\HR 右
左 %
%
\includegraphics[height=20mm,width=30mm,%
%
keepaspectratio]{w.eps}}” align=”middle” height=”127” border=”0” width=”67”>右
左\HR\fbox{%
\includegraphics [height=20mm,width=30mm,%
keepaspectratio]{w.eps}}%
\HR 右
左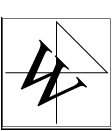 %
%
\includegraphics[angle=-45]{w.eps}}” align=”middle” height=”131” border=”0” width=”112”>右
左\HR\fbox{%
\includegraphics [angle=-45]{w.eps}}%
\HR 右
左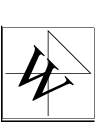 %
%
\includegraphics[angle=-45,width=30mm]%
%
{w.eps}}” align=”middle” height=”123” border=”0” width=”95”>右
左\HR\fbox{%
\includegraphics [angle=-45,width=30mm]%
{w.eps}}\HR 右
左 %
%
\includegraphics[width=30mm,angle=-45]%
%
{w.eps}}” align=”middle” height=”153” border=”0” width=”130”>右
左\HR\fbox{%
\includegraphics [width=30mm,angle=-45]%
{w.eps}}\HR 右
左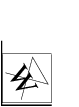 %
%
\includegraphics[angle=-60,totalheight=15mm]{w.eps}}446” align=”bottom” height=”107” border=”0” width=”79”>右
左\HR\fbox{%
\includegraphics [angle=-60,totalheight=15mm]%
{w.eps}}%
\HR 右
左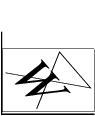 %
%
\includegraphics[angle=-60,totalheight=20mm,width=30mm]{w.eps}}452” align=”bottom” height=”116” border=”0” width=”95”>右
左\HR\fbox{%
\includegraphics [angle=-60,totalheight=20mm,%
width=30mm]{w.eps}}%
\HR 右
左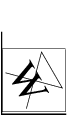 %
%
\includegraphics[angle=-60,totalheight=20mm,width=30mm,keepaspectratio]{w.eps}}458” align=”bottom” height=”116” border=”0” width=”79”>右
左\HR\fbox{%
\includegraphics [angle=-60,totalheight=20mm,%
width=30mm,keepaspectratio]%
{w.eps}}%
\HR 右
参考文献:http://chenli-0925.blog.163.com/blog/static/3408462920109802115554/

