版权声明:本文为博主原创文章,未经博主允许不得转载。 https://blog.csdn.net/a1533588867/article/details/52442349
Android蓝牙功能的开发一直是很多新手头疼的问题,网上虽然也有很多教程贴,但大多都写得不全面,不能让我们真正掌握蓝牙开发的基本知识。本教程主要讲解搜索蓝牙设备、蓝牙设备之间的连接和蓝牙之间的通讯三个主要模块。掌握了这三个,基本就能进行简单的蓝牙开发了。
先上效果图
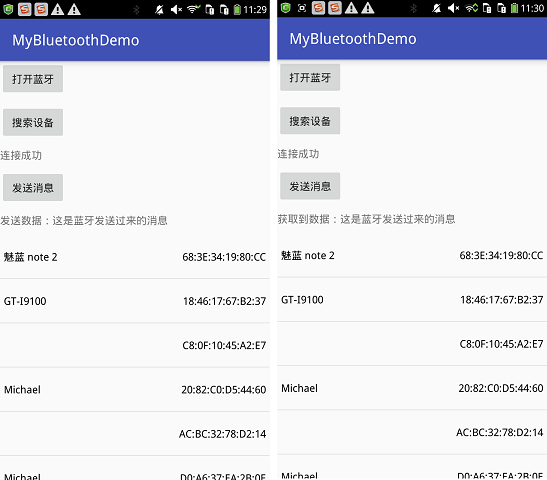
界面比较简单。主要有三个按钮,两个文本和一个列表。三个按钮主要对应打开蓝牙,搜索设备和发送信息三个功能。两个文本主要用于提示连接状态和发送的消息以及获取的消息。列表主要展示搜索到的蓝牙设备。源码在后面会提供。
要用到蓝牙的功能,需要先在manifest中声明一下蓝牙的使用权限
<uses-permission android:name="android.permission.BLUETOOTH"/>
    <uses-permission android:name="android.permission.BLUETOOTH_ADMIN"/>
    <uses-permission android:name="android.permission.ACCESS_COARSE_LOCATION"/>
打开蓝牙设备
BluetoothAdapter bTAdatper = BluetoothAdapter.getDefaultAdapter();
if(bTAdatper==null){
            Toast.makeText(this,"当前设备不支持蓝牙功能",Toast.LENGTH_SHORT).show();
        }
        if(!bTAdatper.isEnabled()){
           /* Intent i = new Intent(BluetoothAdapter.ACTION_REQUEST_ENABLE);
            startActivity(i);*/
            bTAdatper.enable();
        }
        //开启被其它蓝牙设备发现的功能
        if (bTAdatper.getScanMode() != BluetoothAdapter.SCAN_MODE_CONNECTABLE_DISCOVERABLE) {
            Intent i = new Intent(BluetoothAdapter.ACTION_REQUEST_DISCOVERABLE);
            //设置为一直开启
            i.putExtra(BluetoothAdapter.EXTRA_DISCOVERABLE_DURATION, 0);
            startActivity(i);
        }
开启蓝牙需要用到BluetoothAdapter,我们可以通过BluetoothAdapter.ACTION_REQUEST_ENABLE 提示用户开启,也可以bTAdatper.enable()直接开启蓝牙。
开启蓝牙后,需要设置蓝牙为可发现状态,让其他设备能够搜索到。
i.putExtra(BluetoothAdapter.EXTRA_DISCOVERABLE_DURATION, 0);
最后的参数设置为0,可以让蓝牙设备一直处于可发现状态。当我们需要设置具体可被发现的时间时,最多只能设置300秒。
i.putExtra(BluetoothAdapter.EXTRA_DISCOVERABLE_DURATION, 300);
搜索蓝牙设备
成功开启蓝牙设备后,调用蓝牙适配器的startDiscovery方法就可以搜索附近可连接的蓝牙设备。另外我们可以调用cancelDiscovery()来取消搜索。
 mBluetoothAdapter.startDiscovery();
 mBluetoothAdapter.cancelDiscovery()
当我们开始搜索附近蓝牙设备的时候,系统会发出三个搜索状态的广播:
BluetoothAdapter.ACTION_DISCOVERY_STARTED、
BluetoothDevice.ACTION_FOUND、
BluetoothAdapter.ACTION_DISCOVERY_FINISHED。
这三个分别对应开始搜索、搜索到设备、搜索结束。因此,我们可以定义一个广播,来获取这些状态。
private final BroadcastReceiver mReceiver = new BroadcastReceiver() {
        @Override
        public void onReceive(Context context, Intent intent) {
            String action = intent.getAction();
            if (BluetoothDevice.ACTION_FOUND.equals(action)) {
                BluetoothDevice device = intent.getParcelableExtra(BluetoothDevice.EXTRA_DEVICE);
                //避免重复添加已经绑定过的设备
                if (device.getBondState() != BluetoothDevice.BOND_BONDED) {
                    //此处的adapter是列表的adapter,不是BluetoothAdapter
                    adapter.add(device);
                    adapter.notifyDataSetChanged();
                }
            } else if (BluetoothAdapter.ACTION_DISCOVERY_STARTED.equals(action)) {
                Toast.makeText(MainActivity.this,"开始搜索",Toast.LENGTH_SHORT).show();
            } else if (BluetoothAdapter.ACTION_DISCOVERY_FINISHED.equals(action)) {
                Toast.makeText(MainActivity.this,"搜索完毕",Toast.LENGTH_SHORT).show();
            }
        }
    };
在这里,我将搜索到的设备添加到列表中进行展示。
if (device.getBondState() != BluetoothDevice.BOND_BONDED)
系统会保存之前配对过的蓝牙设备,这里我们对搜索到的设备进行过滤,判断是否设备是否已经配对过。因此,我们还可以直接获取之前配对过的设备。
获取配对过的蓝牙设备
Set<BluetoothDevice> pairedDevices = bTAdatper.getBondedDevices();
        if (pairedDevices.size() > 0) {
            for (BluetoothDevice device : pairedDevices) {
                adapter.add(device);
            }
        }