一.进程
1.进程的运行环境
每个运行的进程,系统都会分配一个相关的运行环境,一般的可以将该运行环境认为是进程环境变量的集合,当进程启动的时候,环境变量就确定了,只有当前进程才能够修改其环境变量。Python的os模块中提供了environ属性,来记录当前进程的运行环境,environ是字典数据结构,以key-value的方式存储环境变量(key是环境变量的变量名,一般要求字母全部大写),value是对应的环境变量的值:
import os

path = os.environ.get('PATH')
print pathimport os for key in os.environ.keys(): print key, os.environ[key]
2.1使用os模块创建进程
os模块中用来创建进程的函数有system和exec家族函数,使用system创建进程:
import os

os.system('ls')
上面的程序在当前进程中开启了一个新的进程,在相当于在命令行中执行ls操作(Mac和Linux中的ls,Windows中的dir命令)。
在开发中,有时需要运行其他的进程来处理一些事务,e.g.在Windows上运行一个exe文件转换图片的sRGB格式:
import os

# magick.exe是windows7上转换图片sRGB格式的工具
commandTool = os.getcwdu()+os.sep+'magick.exe'

# 处理tmp文件夹中的图片
def convertsRGBImageFromTmp(pngPath):
    command = "{0} {1} {2}".format(commandTool, pngPath, pngPath)
    statCode = os.system(command)
【说明】
在cocos2d/wxPython开发过程中,由于win7对图片格式审核升级的原因,有时会有sRGB警告的弹窗,此时可以使用magick.exe工具进行格式转换,上面的代码使用了os.system(command)开启新进程来处理。
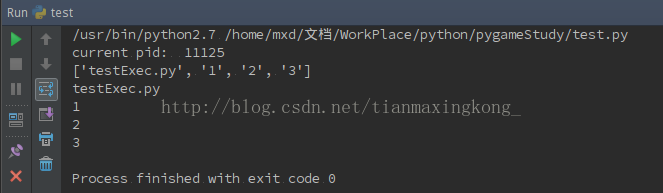
exec家族函数同样可以开启新进程,下面使用execl开启新的进程运行textExec.py文件中的代码:
import os

os.execl("testExec.py", '1', '2')
#coding=utf-8

import os,sys

print "current pid: ", os.getpid()

print sys.argv

len = len(sys.argv)
for i in range(len):
    print sys.argv[i]
【说明】
os.execl函数运行了testExec.py文件,并传递了两个参数,分别为,1,2。执行之后的结果:
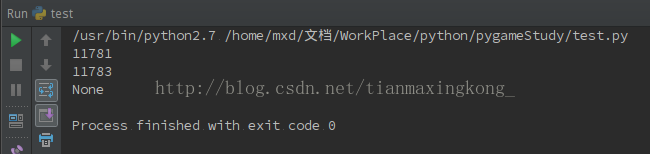
同样的,使用os.system也可以实现上面的效果:
import os

statCode = os.system("python testExec.py 1 2 3")
【说明】
os.system执行成功之后返回0,os.exec家族没有返回值,执行失败会触发OSError。
os.system是调用系统内置命令来执行操作,命令操作结束之后会将控制权返回到启动进程,os.exec家族函数在执行命令之后会接管启动进程,而不是返回控制权,这样启动新进程的进程在执行os.exec家族函数之后便终止。
2.2使用subprocess管理进程
import subprocess
import os

print os.getpid()

pingP = subprocess.Popen("ping www.baidu.com", shell=True)
print pingP.pid
print pingP.returncode
运行效果:
3. 进程终止
os和sys模块分别提供了os.abort和sys.exit方法来终止进程,sys.exit()方法较为温和,在退出之前会执行一些清理操作,同时将执行的返回值返回,如果返回0表示进程退出成功,os.abort函数回直接向进程发送终止信号,一般情况下进程会立即终止,并不会进行相关的清理操作。
二.线程
Python中对线程的支持有两种方式:
| 低级线程模块 thread
| 高级线程模块 threading
threading模块是基于thread的,Python中提供了Queue模块实现多线程数据同步,Queue使用了FIFO(first in first out)队列模型。
1.线程创建
使用thread模块创建多线程:
import thread
import time

def worker(index, create_time):
    print index, ' thread'

for i in range(5):
    time.sleep(1)
    # start_new_thread函数的第二个参数是一个元组
    thread.start_new_thread(worker, (i, time.time()))
【说明】
thread中还有其他的方法:
start_new_thread 生成一个新的线程,并返回其标示符
exit 退出当前线程,触发SystemError
get_ident 获取当前线程的标示符
stack_size 获取线程堆栈的大小
使用高级模块threading创建新的线程:
# coding=utf-8

import threading
import time

class ThreadE(threading.Thread):
    def __init__(self, index, time_create):
        threading.Thread.__init__(self)

        self.time_create = time_create
        self.index = index
    def run(self):
        time.sleep(1)
        print 'Thread Index:', self.index
        print 'Thread Name:', self.getName()
        pass

for i in range(5):
    thread = ThreadE(i, time.time())
    thread.start()
自定义一个类,需要继承自threading.Thread,需要实现run()方法,在run()方法中进行线程操作。
2.线程的私有变量
Java多线程中,每一个线程有一个ThreadLocal容器用来存储线程的私有变量,在Python中同样提供了类似的容器:
import threading
import time

class ThreadE():
    def __init__(self, index):
        self.local = threading.local()
        self.index = index
    def run(self):
        self.local.index = self.index
        time.sleep(1)
        print 'Thread Index:', self.local.index, self.index
        pass

e = ThreadE(2)
t = threading.Thread(target=e.run)
t.start()
【说明】
上面的代码除了演示threadinf.local的用法之外,还可以看出threading创建多线程的另外一种方法,和Java创建多线程中的Thread和Runnable相似。
3.Python线程的锁机制
Python多线程的低级模块和高级模块中分别提供了线程锁的机制:
| 低级模块thread -> thread.allocate_lock()
| 高级模块threading -> threading.Lock()
在thread中:
# coding=utf-8

import thread, time
import threading

class Counter():
    def __init__(self):
        self.value = 0
        self.lock = thread.allocate_lock()
        pass
    def increment(self):
        self.lock.acquire()
        self.value = self.value +1
        self.lock.release()
        v = self.value
        return v

couter = Counter()
class ThreadExample(threading.Thread):
    def __init__(self, index):
        threading.Thread.__init__(self)

        self.index = index
        pass
    def run(self):
        time.sleep(1)
        c = "{0} --- {1}".format(self.index, couter.increment())
        print c


for i in range(10):
    t = ThreadExample(i)
    t.start()
在threading中:
class Counter():
    def __init__(self):
        self.value = 0
        self.lock = threading.Lock()
        pass
    def increment(self):
        self.lock.acquire()
        self.value = self.value +1
        self.lock.release()
        v = self.value
        return v
运行的效果:
0 --- 1
1 --- 2
3 --- 3
2 --- 4
4 --- 5
7 --- 6
5 --- 7
6 --- 8
8 --- 9
9 --- 10
【说明】
上面运行的效果可以看到,虽然线程的index并不是按照顺序运行的,但是Counter的增长却是按照顺序增长的,可见两种锁机制都可以实现数据同步的功能。
4.Python的同步队列
Python提供了Queue模块,该模块中提供了一个FIFO的队列,可以实现数据的同步:
#coding=utf-8

import threading
import Queue, time

class WorkThread(threading.Thread):
    def __init__(self, index, queue):
        threading.Thread.__init__(self)

        self.index = index
        self.queue = queue
        pass
    def run(self):
        while True:
            time.sleep(1)
            item = self.queue.get()

            if item is None:
                break
                # 此处若为continue,线程将一直运行在后台
                # continue

            c = "{0} --- {1}".format(self.index, item)
            print c

queue = Queue.Queue(0)
for index in range(5):
    WorkThread(index, queue).start()


for i in range(10):
    queue.put(i)
运行的结果:
0 --- 0
1 --- 1
2 --- 2
3 --- 4
4 --- 3
0 --- 5
1 --- 6
2 --- 7
4 --- 8
3 --- 9
【说明】
Queue模块中的Queue构造函数可以实例化一个FIFO的同步队列,Queue的构造函数中有一个maxsize的参数,当maxsize=0表示队列长度无限制,Queue实例使用put(task)将任务task存储到同步队列中,使用get()方法获取并移除同步队列中的任务。