版权声明:转载请注明出处:https://blog.csdn.net/strugglein https://blog.csdn.net/Strugglein/article/details/82626667
项目地址:https://github.com/zhaopeng01/springboot-study/tree/master/study7
在我们开发的项目中,多多少少会遇到文件上传的问题,或者上传个图片亦或者是个文本,这篇就写写文件上传;
在这篇中我打算写2中方式,先来个简单方式的,再来个复杂方式的;
废话少说,代码走起
1.偷懒方式,简单处理
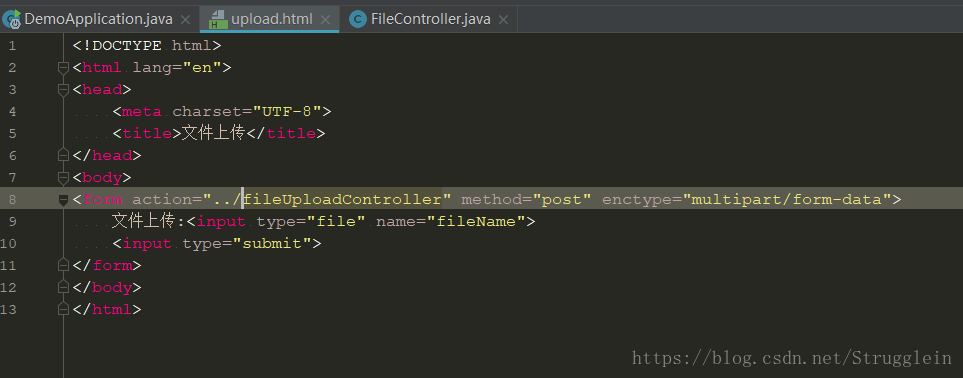
首先先写个简简单单的上传页面
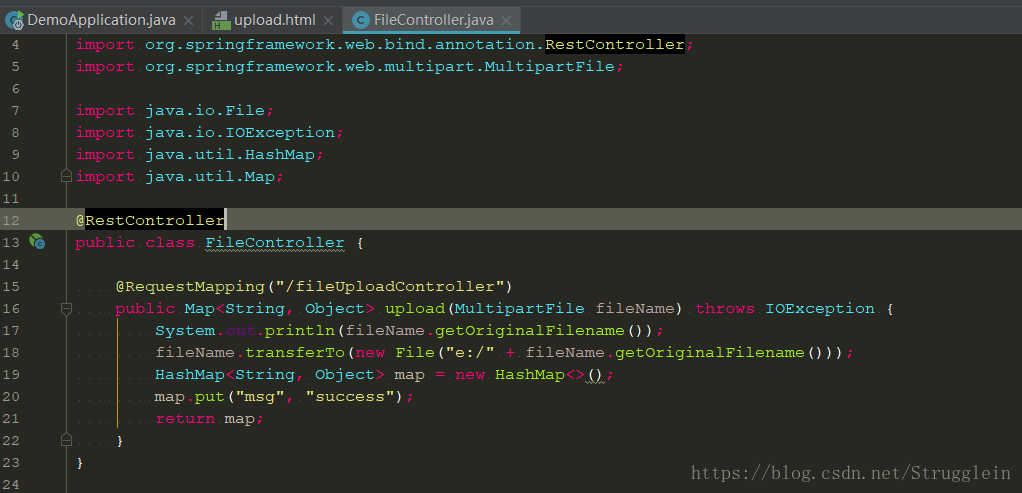
然后写文件上传的controller方法
来处理一些逻辑 比如获取文件名称 或者写入到哪里
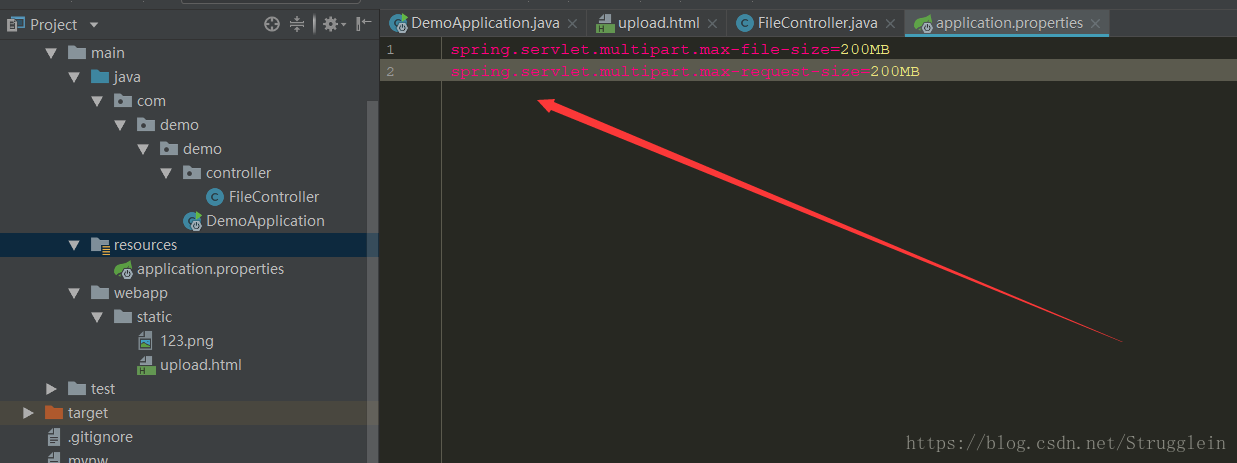
这时候如果上传大文件时候会报错 这时候要手动设置要上传的文件大小
2.相对上面复杂点处理
依赖
<?xml version="1.0" encoding="UTF-8"?>
<project xmlns="http://maven.apache.org/POM/4.0.0" xmlns:xsi="http://www.w3.org/2001/XMLSchema-instance"
         xsi:schemaLocation="http://maven.apache.org/POM/4.0.0 http://maven.apache.org/xsd/maven-4.0.0.xsd">
    <modelVersion>4.0.0</modelVersion>

    <groupId>com.zyc</groupId>
    <artifactId>study7</artifactId>
    <version>0.0.1-SNAPSHOT</version>
    <packaging>jar</packaging>

    <name>study7</name>
    <description>zyc study</description>

    <parent>
        <groupId>org.springframework.boot</groupId>
        <artifactId>spring-boot-starter-parent</artifactId>
        <version>2.0.4.RELEASE</version>
        <relativePath/> <!-- lookup parent from repository -->
    </parent>

    <properties>
        <project.build.sourceEncoding>UTF-8</project.build.sourceEncoding>
        <project.reporting.outputEncoding>UTF-8</project.reporting.outputEncoding>
        <java.version>1.8</java.version>
    </properties>

    <dependencies>
        <dependency>
            <groupId>org.springframework.boot</groupId>
            <artifactId>spring-boot-starter-web</artifactId>
        </dependency>

        <dependency>
            <groupId>org.springframework.boot</groupId>
            <artifactId>spring-boot-starter-test</artifactId>
            <scope>test</scope>
        </dependency>

        <dependency>
            <groupId>org.springframework.boot</groupId>
            <artifactId>spring-boot-starter-thymeleaf</artifactId>
        </dependency>
    </dependencies>

    <build>
        <plugins>
            <plugin>
                <groupId>org.springframework.boot</groupId>
                <artifactId>spring-boot-maven-plugin</artifactId>
            </plugin>
        </plugins>
    </build>


</project>
在这里使用了
thymeleaf,它 是一个跟 Velocity、FreeMarker 类似的模板引擎,它可以完全替代 JSP 。
在这里不对它做过多解释,想学习可以-> https://www.baidu.com/s?ie=UTF-8&wd=thymeleaf
controller
package com.zyc.controller;

import org.slf4j.Logger;
import org.slf4j.LoggerFactory;
import org.springframework.stereotype.Controller;
import org.springframework.web.bind.annotation.*;
import org.springframework.web.multipart.MultipartFile;

import java.io.File;
import java.io.IOException;

/**
 * 图片上传
 *
 * @author zhaopeng
 * @email [email protected]
 */


@Controller
@RequestMapping("/uploads")
public class FileUploadController {

    private static final Logger log = LoggerFactory.getLogger(FileUploadController.class);

    @GetMapping
    public String index() {
        return "index";
    }

    /**
     * @Description: 单文件
     * @author zhaopeng
     * @email [email protected]
     */
    @PostMapping("/uploadSing")
    @ResponseBody
    public Object uploadSing(@RequestParam("file") MultipartFile file) throws IOException {
        file.transferTo(new File("E:\\idea_workspace\\springboot-study\\" + file.getOriginalFilename()));
        return "SUCCESS";
    }

    /**
     * @Description: 多文件
     * @author zhaopeng
     * @email [email protected]
     */
    @PostMapping("/uploads")
    @ResponseBody
    public Object uploads(@RequestParam("file") MultipartFile[] files) throws IOException {
        if (files == null || files.length == 0) {
            return null;
        }
        for (MultipartFile file : files) {
            file.transferTo(new File("E:\\idea_workspace\\springboot-study\\" + file.getOriginalFilename()));
        }
        return "SUCCESS";
    }
}
创建一个FileUploadController,@PostMapping相关方法则是对应的 单文件上传和多文件上传。
@RequestParam(“file”) 此处的”file”对应的就是html 中 name=”file” 的 input 标签
index.html
<!DOCTYPE html>
<html xmlns="http://www.w3.org/1999/xhtml"
xmlns:th="http://www.thymeleaf.org">
<head>
<meta charset="UTF-8">
<title>文件上传</title>
</head>
<body>
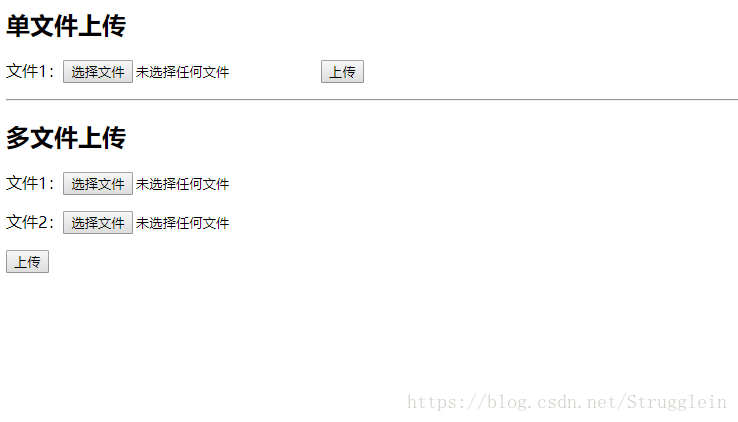
<h2>单文件上传</h2>
<div>
<form method="POST" enctype="multipart/form-data" action="/uploads/uploadSing">
<p>
文件1:<input type="file" name="file"/>
<input type="submit" value="上传"/>
</p>
</form>
</div>
<hr/>
<h2>多文件上传</h2>
<div>
<form method="POST" enctype="multipart/form-data"
action="/uploads/uploads">
<p>
文件1:<input type="file" name="file"/>
</p>
<p>
文件2:<input type="file" name="file"/>
</p>
<p>
<input type="submit" value="上传"/>
</p>
</form>
</div>
</body>
</html>主函数
package com.zyc;

import org.springframework.boot.SpringApplication;
import org.springframework.boot.autoconfigure.SpringBootApplication;

/*
 * @author zhaopeng
 */

@SpringBootApplication
public class Study7Application {

    public static void main(String[] args) {
        SpringApplication.run(Study7Application.class, args);
    }
}
测试
完成准备事项后,启动主函数,访问 http://localhost:8080/uploads 进入到文件上传页面
就可以自己搞搞搞了!
结果
好的到这里本篇文章就先到此了,创作不易,如果那里有不合适的地方还请大家多多指教,写这篇博的目的主要就是为了方便自己以后的一个回忆和朋友学习时的一个参考,希望为大家可以带来帮助 ~ ~&
虚心的去学习,自信的去工作~