版权声明:本文为博主原创文章,未经博主允许不得转载。 https://blog.csdn.net/XIAFYY/article/details/79865151
1.自己准备好公众号账号等东西,不懂的可以先百度一波
2.建立请求主体,微信会从这个入口来验证,是否token一致,一致才能配置成功
package com.lh.lfeel.until.weixin;

import java.io.IOException;
import java.io.PrintWriter;

import javax.servlet.ServletException;
import javax.servlet.annotation.WebServlet;
import javax.servlet.http.HttpServlet;
import javax.servlet.http.HttpServletRequest;
import javax.servlet.http.HttpServletResponse;

/**
 * 说明:
 *
 * @author 夏奕敏
 * @date 2018年4月8日 下午5:37:52
 * @JDK 1.8.0_161
 */
@WebServlet("/wechat")
public class WechatConService extends HttpServlet {

	private static final long serialVersionUID = 1L;

	/**
	 * 确认请求来自微信服务器
	 */
	public void doGet(HttpServletRequest request, HttpServletResponse response)
			throws ServletException, IOException {

		// 微信加密签名
		String signature = request.getParameter("signature");
		// 时间戳
		String timestamp = request.getParameter("timestamp");
		// 随机数
		String nonce = request.getParameter("nonce");
		// 随机字符串
		String echostr = request.getParameter("echostr");

		PrintWriter out = response.getWriter();

		System.out.println(signature);
		System.out.println(timestamp);
		System.out.println(nonce);
		System.out.println(echostr);

		// 通过检验signature对请求进行校验,若校验成功则原样返回echostr,表示接入成功,否则接入失败
		if (SignUtil.checkSignature(signature, timestamp, nonce)) {
			out.print(echostr);
		}

		out.close();
		out = null;
	}

	/**
	 * 处理微信服务器发来的消息
	 */
	public void doPost(HttpServletRequest request, HttpServletResponse response)
			throws ServletException, IOException {

	}
}3.写个工具类进行排序,和sha1加密
package com.lh.lfeel.until.weixin;

import java.security.MessageDigest;
import java.security.NoSuchAlgorithmException;

/**
 * 说明:
 *
 * @author 夏奕敏
 * @date 2018年4月8日 下午5:39:18
 * @JDK 1.8.0_161
 */
public class SignUtil {
	// 与接口配置信息中的Token要一致
	private static String token = "这里写你自己的服务器的token";

	public static boolean checkSignature(String signature, String timestamp,
			String nonce) {
		// 从请求中(也就是微信服务器传过来的)拿到的token, timestamp, nonce
		String[] arr = new String[] { token, timestamp, nonce };
		// 将token、timestamp、nonce三个参数进行字典序排序
		sort(arr);
		StringBuilder content = new StringBuilder();
		for (int i = 0; i < arr.length; i++) {
			content.append(arr[i]);
		}
		MessageDigest md = null;
		String tmpStr = null;

		try {
			md = MessageDigest.getInstance("SHA-1");
			// 将三个参数字符串拼接成一个字符串进行sha1加密
			byte[] digest = md.digest(content.toString().getBytes());
			// 将字节数组转成字符串
			tmpStr = byteToStr(digest);
		} catch (NoSuchAlgorithmException e) {
			e.printStackTrace();
		}

		content = null;
		// 将sha1加密后的字符串可与signature对比,标识该请求来源于微信
		return tmpStr != null ? tmpStr.equals(signature.toUpperCase()) : false;
	}

	// 将加密后的字节数组变成字符串
	private static String byteToStr(byte[] byteArray) {
		String strDigest = "";
		for (int i = 0; i < byteArray.length; i++) {
			strDigest += byteToHexStr(byteArray[i]);
		}
		return strDigest;
	}

	private static String byteToHexStr(byte mByte) {
		char[] Digit = { '0', '1', '2', '3', '4', '5', '6', '7', '8', '9', 'A',
				'B', 'C', 'D', 'E', 'F' };
		char[] tempArr = new char[2];
		tempArr[0] = Digit[(mByte >>> 4) & 0X0F];
		tempArr[1] = Digit[mByte & 0X0F];

		String s = new String(tempArr);
		return s;
	}

	// 用于字典排序
	public static void sort(String a[]) {
		for (int i = 0; i < a.length - 1; i++) {
			for (int j = i + 1; j < a.length; j++) {
				if (a[j].compareTo(a[i]) < 0) {
					String temp = a[i];
					a[i] = a[j];
					a[j] = temp;
				}
			}
		}
	}
}
4.把该项目仍到自己的服务器然后去公众号平台进行配置填写

这样就可以配置成功了。代码亲测有效。
--------------------------------------------------------------------------
接下来就做公众号登录授权认证
1.首先,在项目中准备个工具类
package com.lh.lfeel.until.weixin;

import java.io.IOException;

import org.apache.http.HttpEntity;
import org.apache.http.HttpResponse;
import org.apache.http.client.ClientProtocolException;
import org.apache.http.client.methods.HttpGet;
import org.apache.http.impl.client.DefaultHttpClient;
import org.apache.http.util.EntityUtils;

import com.alibaba.fastjson.JSON;
import com.alibaba.fastjson.JSONObject;

/**
 * 说明:微信公众号请求工具类
 *
 * @author 夏奕敏
 * @date 2018年4月8日 上午10:09:50
 * @JDK 1.8.0_161
 */
public class WXAuthUtil {

	public static final String APPID = "你的APPID";
	public static final String APPSECRET = "你的AASECRET";
	private static final String TOKEN = "你的TOKEN";

	public static JSONObject doGetJson(String url)
			throws ClientProtocolException, IOException {
		JSONObject jsonObject = null;
		DefaultHttpClient client = new DefaultHttpClient();
		HttpGet httpGet = new HttpGet(url);
		HttpResponse response = client.execute(httpGet);
		HttpEntity entity = response.getEntity();
		if (entity != null) {
			// 把返回的结果转换为JSON对象
			String result = EntityUtils.toString(entity, "UTF-8");
			jsonObject = JSON.parseObject(result);
		}

		return jsonObject;
	}
}
这个是在回调方法里把回调的结果转成JSON对象。
扫描二维码关注公众号,回复:
3176794 查看本文章

2.下面的类第一步是请求微信从而得到code,第二部用户点了授权确定的时候执行这个回调方法
package com.lh.app.controller;

import java.io.IOException;
import java.io.UnsupportedEncodingException;
import java.net.URLEncoder;
import java.util.Map;
import java.util.UUID;

import javax.servlet.ServletException;
import javax.servlet.http.HttpServletRequest;
import javax.servlet.http.HttpServletResponse;

import com.lh.cmsmanagement.service.VipManagementSer;
import com.lh.lfeel.until.Helper;
import com.lh.lfeel.until.RedisToken;
import com.lh.lfeel.until.weixin.WXAuthUtil;
import com.sun.org.apache.xerces.internal.impl.xpath.regex.ParseException;
import org.springframework.beans.factory.annotation.Autowired;
import org.springframework.stereotype.Controller;
import org.springframework.ui.ModelMap;
import org.springframework.web.bind.annotation.RequestMapping;
import org.springframework.web.bind.annotation.RequestMethod;

import com.alibaba.fastjson.JSONObject;


/**
 * 说明:
 *
 * @author 夏奕敏
 * @date 2018年4月8日 上午10:15:09
 * @JDK 1.8.0_161
 */
@Controller
@RequestMapping("/wx")
public class WXLoginController {
	@Autowired
	VipManagementSer vipSer;

	/**
	 * 公众号微信登录授权
	 *
	 * @param request
	 * @param response
	 * @return
	 * @throws ParseException
	 * @author 夏奕敏
	 * @throws UnsupportedEncodingException
	 * @date 2018年4月8日 上午10:15:09
	 */
	@RequestMapping(value = "/wxLogin", method = RequestMethod.GET)
	public String wxLogin(HttpServletRequest request,
			HttpServletResponse response) throws ParseException,
			UnsupportedEncodingException {

		// 这个url的域名必须要在公众号中进行注册验证,这个地址是成功后的回调地址
		String backUrl = "http://www.你的域名/lfeel/wx/callBack";

		// 第一步:用户同意授权,获取code
		String url = "https://open.weixin.qq.com/connect/oauth2/authorize?appid="
				+ WXAuthUtil.APPID
				+ "&redirect_uri="
				+ URLEncoder.encode(backUrl, "UTF-8")
				+ "&response_type=code"
				+ "&scope=snsapi_userinfo" + "&state=STATE#wechat_redirect";

		// response.sendRedirect(url);
		return "redirect:" + url;// 必须重定向,否则不能成功
	}

	/**
	 * 公众号微信登录授权回调函数
	 *
	 * @param modelMap
	 * @param req
	 * @param resp
	 * @return
	 * @throws ServletException
	 * @throws IOException
	 * @author 夏奕敏
	 * @date 2018年4月8日 上午10:15:09
	 */
	@RequestMapping(value = "/callBack", method = RequestMethod.GET)
	public void callBack(ModelMap modelMap, HttpServletRequest req,
			HttpServletResponse resp) throws ServletException, IOException {
		/*
		 * start 获取微信用户基本信息
		 */
		String code = req.getParameter("code");

		// 第二步:通过code换取网页授权access_token
		String url = "https://api.weixin.qq.com/sns/oauth2/access_token?appid="
				+ WXAuthUtil.APPID + "&secret=" + WXAuthUtil.APPSECRET
				+ "&code=" + code + "&grant_type=authorization_code";

		JSONObject jsonObject = WXAuthUtil.doGetJson(url);
		/*
		 * { "access_token":"ACCESS_TOKEN", "expires_in":7200,
		 * "refresh_token":"REFRESH_TOKEN", "openid":"OPENID", "scope":"SCOPE" }
		 */
		String openid = jsonObject.getString("openid");
		String access_token = jsonObject.getString("access_token");
		String refresh_token = jsonObject.getString("refresh_token");
		// 第五步验证access_token是否失效;展示都不需要这里可以注释掉
		// String chickUrl = "https://api.weixin.qq.com/sns/auth?access_token="
		// + access_token + "&openid=" + openid;
		//
		// JSONObject chickuserInfo = WXAuthUtil.doGetJson(chickUrl);
		// System.out.println(chickuserInfo.toString());
		// if (!"0".equals(chickuserInfo.getString("errcode"))) {
		// //
		// 第三步:刷新access_token(如果需要)-----暂时没有使用,参考文档https://mp.weixin.qq.com/wiki,
		// String refreshTokenUrl =
		// "https://api.weixin.qq.com/sns/oauth2/refresh_token?appid="
		// + openid
		// + "&grant_type=refresh_token&refresh_token="
		// + refresh_token;
		//
		// JSONObject refreshInfo = WXAuthUtil.doGetJson(chickUrl);
		// /*
		// * { "access_token":"ACCESS_TOKEN", "expires_in":7200,
		// * "refresh_token":"REFRESH_TOKEN", "openid":"OPENID",
		// * "scope":"SCOPE" }
		// */
		// System.out.println(refreshInfo.toString());
		// access_token = refreshInfo.getString("access_token");
		// }

		// 第四步:拉取用户信息(需scope为 snsapi_userinfo)
		String infoUrl = "https://api.weixin.qq.com/sns/userinfo?access_token="
				+ access_token + "&openid=" + openid + "&lang=zh_CN";
		JSONObject userInfo = WXAuthUtil.doGetJson(infoUrl);
		System.out.println(userInfo.toString());
		Object unionid = userInfo.get("userInfo");


		/*
		 * end 获取微信用户基本信息,这里就结束了,下面的可以写自己的逻辑代码或者重定向页面
		 */
		resp.sendRedirect("http://www.baidu.com/index.html" );
	}
}
3.到公众号平台填写域名
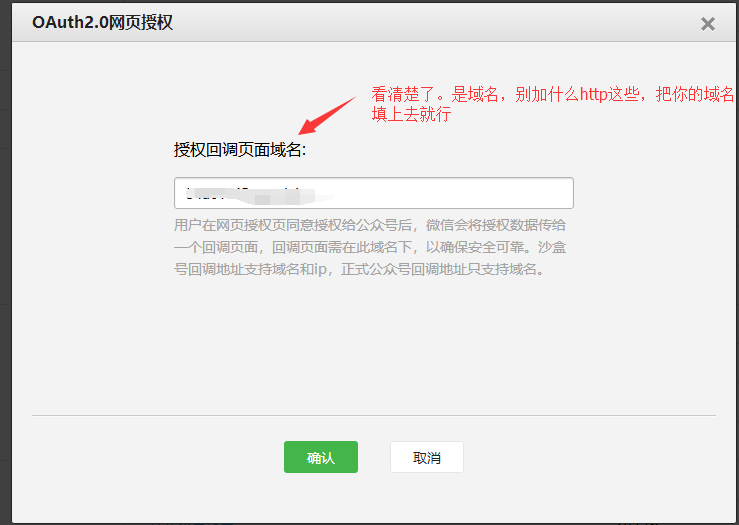
至此已经全部结束,如果有什么不懂可以下面留言