一、实验环境:
1.软件版本:
系统版本:CentOS Linux release 7.4.1708 (Core)
php版本:PHP 7.2
nginx版本:nginx-1.12.2
数据库版本:MariaDB 10
Varnish:4.0.1
关闭防火墙与selinux
2.实验架构及IP分配:
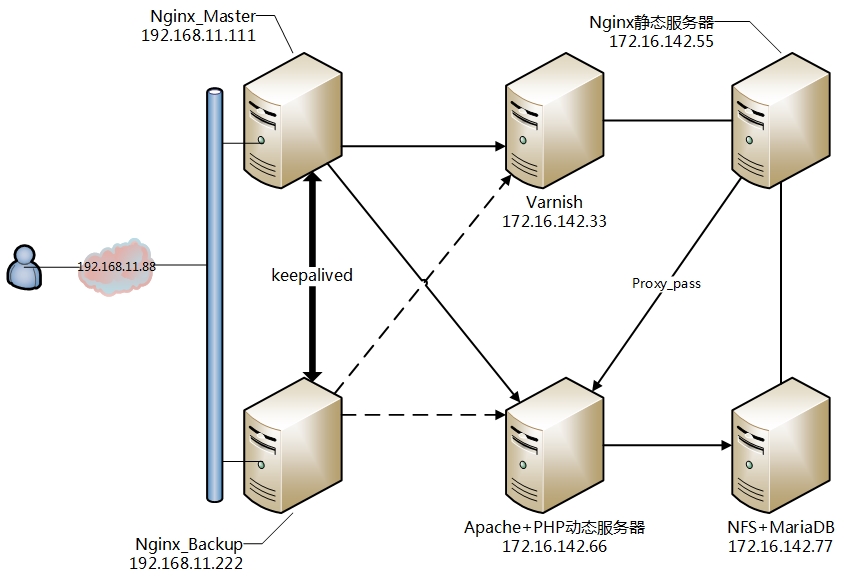
(为了简洁,图中省略了网络设备,请各位看官脑补)
3.架构设计思路
1.前端nginx做负载均衡服务器将用户请求反代至Varnish缓存服务器,
2.由Varnish判断是否以缓存响应至客户端,若缓存命中则直接响应,若无缓存响应,Varnish将请求代理至后端Nginx静态服务器。
3.若为请求为静态内容则由Nginx直接响应,并由Varnish判断是否建立缓存,若请求为动态内容则交由动态服务器处理响应。
4.静态服务器与动态服务器使用共享存储,保证用户数据同步。
5.静态服务器和动态服务器可以增加冗余,以保证架构的高可用性。
6.MariaDB可以单独出来并冗余。
7.NFS可以替换为分布式存储,提高整个架构的可用性。
8.前端Nginx将动态内容负载均衡至动态服务器。
二、基本配置
1.各服务器软件安装
以上所有服务器程序都为epel源yum安装,yum安装过程很方便快捷,这里不再赘述安装过程。
2.前端Nginx与keepalived配置HA
Nginx配置:

在Nginx默认配置中添加图中两项配置,Nginx作为负载均衡时,虽然实现负载均衡功能的配置很简单,但还有很多优化项需要深入理解与实践。博文链接:正在写...
keepalived配置
配置思路就是用keepalived将两台Nginx做主备高可用,通过vrrp_script监控Nginx的运行状态,并在必要时自动切换。也可以尝试做双主模型。
以下是主Nginx服务器的keepalived配置,备服务器只需将state与priority修改即可,keepalived原理与配置:http://blog.51cto.com/13322786/2162618
 1 global_defs {
 2    notification_email {
 3       root@localhost
 4    }
 5    notification_email_from keepalived@localhost
 6    smtp_server 127.0.0.1
 7    smtp_connect_timeout 30
 8  router_id n1 9 vrrp_mcast_group4 224.1.101.18 10 } 11 vrrp_script chk_ngx { 12 script "killall -0 nginx && exit 0 || exit 1" 13 weight -5 14 interval 1 15 fall 1 16 rise 1 17 } 18 19 vrrp_instance VI_1 { 20  state MASTER 21  interface ens33 22 virtual_router_id 22 23 priority 100 24 advert_int 1 25  authentication { 26  auth_type PASS 27 auth_pass 1111 28  } 29  virtual_ipaddress { 30 192.168.11.88/24 dev ens33 label ens33:0 31  } 32  track_script { 33  chk_ngx 34  } 35 }
两台Nginx主机配置相同。
配置完成后启动Nginx和keepalived服务。
systemctl start nginx
systemctl start keepalived
3.简单配置Varnish
这里配置Varnish不涉及VCL配置,目前先简单配置,使整个架构能正常运转后再做优化配置。
vim /etc/varnish/varnish.params
这是相当于是Varnish的全局配置,用于配置Varnish的链接状态、监听端口、VCL规则路径、缓存类型等
Varnish的另一个配置是VCL规则配置,这也是学习Varnish的主要任务。在再将整个系统架构搭建完成并能正常运行后会详细对Varnish的原理及VCL规则做详细介绍
 1 RELOAD_VCL=1
 2 # Main configuration file. You probably want to change it.
 3 VARNISH_VCL_CONF=/etc/varnish/default.vcl
 4 # Default address and port to bind to. Blank address means all IPv4
 5 # and IPv6 interfaces, otherwise specify a host name, an IPv4 dotted
 6 # quad, or an IPv6 address in brackets.
 7 #VARNISH_LISTEN_ADDRESS=192.168.1.5 #配置监听的IP,若不配置默认为所有IP 8 VARNISH_LISTEN_PORT=80 #监听端口 9 # Admin interface listen address and port 10 VARNISH_ADMIN_LISTEN_ADDRESS=127.0.0.1 #缓存管理的IP和端口 11 VARNISH_ADMIN_LISTEN_PORT=6082 12 # Shared secret file for admin interface 13 VARNISH_SECRET_FILE=/etc/varnish/secret 14 # Backend storage specification, see Storage Types in the varnishd(5) 15 # man page for details. 16 VARNISH_STORAGE="file,/data/varnish/cache,1g" #缓存格式、路径以及缓存文件最大容量 17 # User and group for the varnishd worker processes 18 VARNISH_USER=varnish 19 VARNISH_GROUP=varnish
VARNISH_STORAGE这项在Varnish4.0中可以设置三种缓存格式:file、malloc、persistent
malloc是定义将内容缓存在内存中,缓存速度和效率都较高,但是会受限于内存大小。
file是定义将内容缓存在磁盘中,可扩展性强,但缓存速度比不上malloc模式,不过随着固态硬盘的发展,会逐步突破磁盘IO慢的瓶颈。
在这两种缓存模式都是下,外部应用是不能查看缓存内容的,但一旦Varnish服务器重启缓存将会清空。
persistent是一种还在测试阶段的缓存格式,服务器重启时不会清空缓存。
配置完成后启动Varnish服务并查看端口是否已在监听状态。
systemctl start varnish
ss -lntup

4.配置后端Nginx静态服务器
修改默认配置
vim /etc/nginx/nginx.conf
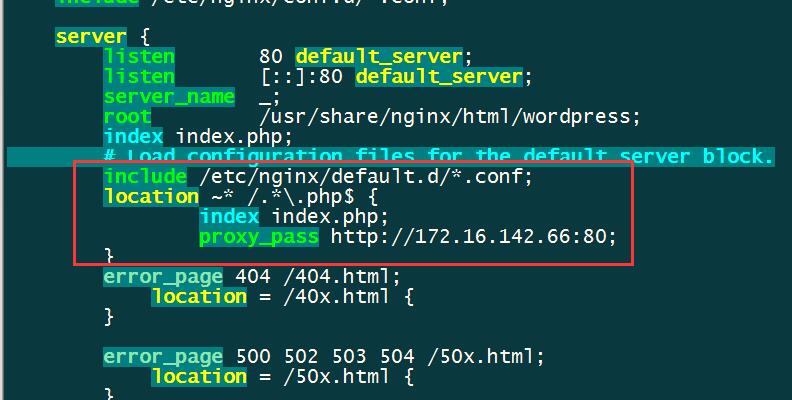
将结尾为php的动态内容代理至后端动态服务器。
配置完成后启动Nginx服务并查看端口是否正常监听
systemctl start nginx
5.配置后端Apache+PHP动态服务器
Apache不用做多余配置,安装完Apache和PHP后直接启动就可以了,但要注意一定要安装PHP中mod_php72w这个依赖包,Apache解析php文件就是依赖这个模块。
我安装的PHP依赖包:
yum install -y mod_php72w php72w-common php72w-fpm php72w-opcache php72w-gd php72w-mysqlnd php72w-mbstring php72w-pecl-redis php72w-pecl-memcached php72w-devel
启动httpd服务,并测试phpinfo()是否解析成功。
6.配置NFS
配置NFS服务器需要安装RPC和NFS
yum -y install nfs-utils rpcbind
安装完成后创建共享目录,修改共享目录属主和属组
mkrir -p /data/nfs
chown -R nfsnobody.nfsnobody /data/nfs
添加NFS挂载规则
vim /etc/exports
/data/nfs 172.16.142.*(rw,sync,all_squash)
启动RPC和NFS服务
systemctl start rpcbind
systemctl start nfs
将NFS共享目录挂载至静态和动态服务器
PS:在静态服务器和动态服务器上都要安装nfs-utils才能正常挂载。
静态(在Nginx上创建好目录wordpress):
mount -t nfs 172.16.142.77:/data/nfs /usr/share/nginx/html/wordpress
动态(Apache+PHP):
mount -t nfs 172.16.142.77:/data/nfs /var/www/html/
挂载完成后将WordPress4.9解压到NFS共享目录。
7.配置MariaDB
启动MariaDB后运行mysql_secure_installation初始化数据库,我这里配置root密码后全选择的yes。
登陆数据库创建管理账户并创建库
mysql -uroot -p123456 #登入数据库进行用户及库的创建与配置
GRANT ALL PRIVILEGES ON *.* TO 'mysql'@'%'IDENTIFIED BY '123456' WITH GRANT OPTION; #创建账户mysql,密码为123456,并允许任意IP访问此账户数据库,权限为ALL
CREATE DATABASE wordpress; #创建名为wordpress的库,安装完WordPress后会要求在数据库创建库,这里事先创建好
quit
在静态服务器和动态服务器上测试是否能连上MariaDB
mysql -umysql -p123456 -h 172.16.142.7
8.初始化WordPress,确保能正常访问
检查架构中各服务器的服务是否正常启动
然后在浏览器输入http://192.168.11.88/index.php进入WordPress初始化页面后,在数据库配置页面填上相关参数
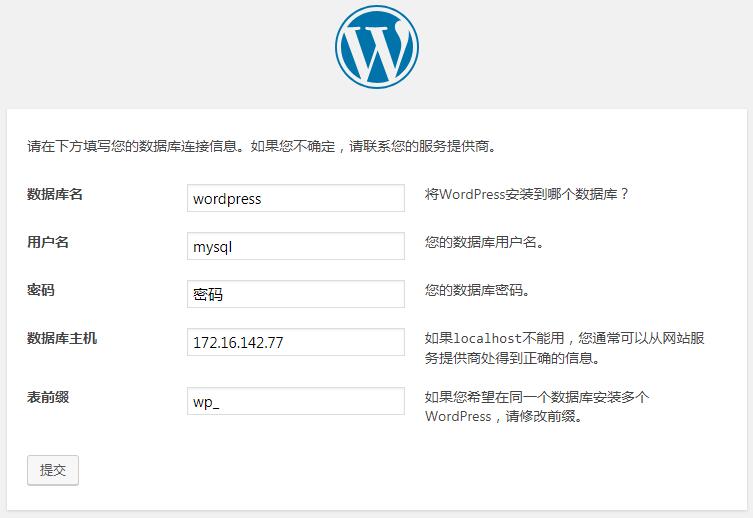
然后按提示步骤完成安装。
在完成以上步骤后,WordPress就能正常访问了。下面具体介绍一下Varnish中的VCL规则。
一、Varnish配置简介
varnish有两类配置文件,
一个是配置varnish全局工作模式的默认路径是/etc/varnish/varnish.params
另一个是配置varnish的缓存逻辑的,即VCL规则配置文件/etc/varnish/default.vcl
学习Varnish就是学习VCL规则的配置:
VCL规则配置分为两类状态引擎
1:Client Side:
vcl_recv:收到客户端请求后判定下一步流向
vcl_pass:不能查缓存的,直接pass到后端主机
vcl_hit:缓存命中
vcl_miss:缓存未命中
vcl_pipe:varnish无法理解的请求,或者说请求非WEB服务
vcl_purge:缓存清理
vcl_synth:缓存修剪
vcl_deliver:向客户端生成并发送响应报文
2:Backend Side:
vcl_backend_fetch:向后端主机发送请求前,调用此函数,可修改发往后端的请求
vcl_backend_response: 获得后端主机的响应后,调用此函数并生成规则
vcl_backend_error:后端主机响应错误后,调用此函数
Varnish4.0中两个特殊的引擎:
vcl_init:初始化varnish模块
vcl_fini:用于清理varnish模块
Varnish4.0中VCL默认配置文件为/etc/varnish/default.vcl
在这个文件中只有简单的几行信息,如下所示:
 1 # Marker to tell the VCL compiler that this VCL has been adapted to the
 2 # new 4.0 format.
 3 vcl 4.0;
 4
 5 # Default backend definition. Set this to point to your content server.
 6 backend default {
 7     .host = "172.16.142.55";
 8     .port = "80";
 9 }
10
11 sub vcl_recv {
12     # Happens before we check if we have this in cache already.
13     #
14     # Typically you clean up the request here, removing cookies you don't ne
15 ed,
16     # rewriting the request, etc.
17 }
18
19 sub vcl_backend_response {
20     # Happens after we have read the response headers from the backend.
21     #
22     # Here you clean the response headers, removing silly Set-Cookie headers
23     # and other mistakes your backend does.
24 }
25
26 sub vcl_deliver {
27     # Happens when we have all the pieces we need, and are about to send the
28     # response to the client.
29     #
30     # You can do accounting or modifying the final object here.
这里可以按需求自定义配置VCL的附加规则,这里的默认配置虽然没有信息,但Varnish4.0也有自己默认的内建配置,可用varnishadm命令来查看
varnish -S /etc/varnish/secret -T 127.0.0.1:6082 #在vanish全局配置文件中可设置端口号和IP
vcl.show -v boot


// VCL.SHOW 0 1222 input
#
# This is an example VCL file for Varnish.
#
# It does not do anything by default, delegating control to the
# builtin VCL. The builtin VCL is called when there is no explicit
# return statement.
#
# See the VCL chapters in the Users Guide at https://www.varnish-cache.org/docs/
# and http://varnish-cache.org/trac/wiki/VCLExamples for more examples.

# Marker to tell the VCL compiler that this VCL has been adapted to the
# new 4.0 format.
vcl 4.0;

# Default backend definition. Set this to point to your content server.
backend default {
    .host = "172.16.142.55";
    .port = "80";
}

sub vcl_recv {
    # Happens before we check if we have this in cache already.
    #
    # Typically you clean up the request here, removing cookies you don't need,
    # rewriting the request, etc.
}

sub vcl_backend_response {
    # Happens after we have read the response headers from the backend.
    #
    # Here you clean the response headers, removing silly Set-Cookie headers
    # and other mistakes your backend does.
}

sub vcl_deliver {
    # Happens when we have all the pieces we need, and are about to send the
    # response to the client.
    #
    # You can do accounting or modifying the final object here.
}

// VCL.SHOW 1 5479 Builtin
/*-
 * Copyright (c) 2006 Verdens Gang AS
 * Copyright (c) 2006-2014 Varnish Software AS
 * All rights reserved.
 *
 * Author: Poul-Henning Kamp <[email protected]>
 *
 * Redistribution and use in source and binary forms, with or without
 * modification, are permitted provided that the following conditions
 * are met:
 * 1. Redistributions of source code must retain the above copyright
 *    notice, this list of conditions and the following disclaimer.
 * 2. Redistributions in binary form must reproduce the above copyright
 *    notice, this list of conditions and the following disclaimer in the
 *    documentation and/or other materials provided with the distribution.
 *
 * THIS SOFTWARE IS PROVIDED BY THE AUTHOR AND CONTRIBUTORS ``AS IS'' AND
 * ANY EXPRESS OR IMPLIED WARRANTIES, INCLUDING, BUT NOT LIMITED TO, THE
 * IMPLIED WARRANTIES OF MERCHANTABILITY AND FITNESS FOR A PARTICULAR PURPOSE
 * ARE DISCLAIMED.  IN NO EVENT SHALL AUTHOR OR CONTRIBUTORS BE LIABLE
 * FOR ANY DIRECT, INDIRECT, INCIDENTAL, SPECIAL, EXEMPLARY, OR CONSEQUENTIAL
 * DAMAGES (INCLUDING, BUT NOT LIMITED TO, PROCUREMENT OF SUBSTITUTE GOODS
 * OR SERVICES; LOSS OF USE, DATA, OR PROFITS; OR BUSINESS INTERRUPTION)
 * HOWEVER CAUSED AND ON ANY THEORY OF LIABILITY, WHETHER IN CONTRACT, STRICT
 * LIABILITY, OR TORT (INCLUDING NEGLIGENCE OR OTHERWISE) ARISING IN ANY WAY
 * OUT OF THE USE OF THIS SOFTWARE, EVEN IF ADVISED OF THE POSSIBILITY OF
 * SUCH DAMAGE.
 *

 *
 * The built-in (previously called default) VCL code.
 *
 * NB! You do NOT need to copy & paste all of these functions into your
 * own vcl code, if you do not provide a definition of one of these
 * functions, the compiler will automatically fall back to the default
 * code from this file.
 *
 * This code will be prefixed with a backend declaration built from the
 * -b argument.
 */

vcl 4.0;

#######################################################################
# Client side

sub vcl_recv {
    if (req.method == "PRI") {
        /* We do not support SPDY or HTTP/2.0 */
        return (synth(405));
    }
    if (req.method != "GET" &&
      req.method != "HEAD" &&
      req.method != "PUT" &&
      req.method != "POST" &&
      req.method != "TRACE" &&
      req.method != "OPTIONS" &&
      req.method != "DELETE") {
        /* Non-RFC2616 or CONNECT which is weird. */
        return (pipe);
    }

    if (req.method != "GET" && req.method != "HEAD") {
        /* We only deal with GET and HEAD by default */
        return (pass);
    }
    if (req.http.Authorization || req.http.Cookie) {
        /* Not cacheable by default */
        return (pass);
    }
    return (hash);
}

sub vcl_pipe {
    # By default Connection: close is set on all piped requests, to stop
    # connection reuse from sending future requests directly to the
    # (potentially) wrong backend. If you do want this to happen, you can undo
    # it here.
    # unset bereq.http.connection;
    return (pipe);
}

sub vcl_pass {
    return (fetch);
}

sub vcl_hash {
    hash_data(req.url);
    if (req.http.host) {
        hash_data(req.http.host);
    } else {
        hash_data(server.ip);
    }
    return (lookup);
}

sub vcl_purge {
    return (synth(200, "Purged"));
}

sub vcl_hit {
    if (obj.ttl >= 0s) {
        // A pure unadultered hit, deliver it
        return (deliver);
    }
    if (obj.ttl + obj.grace > 0s) {
        // Object is in grace, deliver it
        // Automatically triggers a background fetch
        return (deliver);
    }
    // fetch & deliver once we get the result
    return (fetch);
}

sub vcl_miss {
    return (fetch);
}

sub vcl_deliver {
    return (deliver);
}

/*
 * We can come here "invisibly" with the following errors: 413, 417 & 503
 */
sub vcl_synth {
    set resp.http.Content-Type = "text/html; charset=utf-8";
    set resp.http.Retry-After = "5";
    synthetic( {"<!DOCTYPE html>
<html>
  <head>
    <title>"} + resp.status + " " + resp.reason + {"</title>
  </head>
  <body>
    <h1>Error "} + resp.status + " " + resp.reason + {"</h1>
    <p>"} + resp.reason + {"</p>
    <h3>Guru Meditation:</h3>
    <p>XID: "} + req.xid + {"</p>
    <hr>
    <p>Varnish cache server</p>
  </body>
</html>
"} );
    return (deliver);
}

#######################################################################
# Backend Fetch

sub vcl_backend_fetch {
    return (fetch);
}

sub vcl_backend_response {
    if (beresp.ttl <= 0s ||
      beresp.http.Set-Cookie ||
      beresp.http.Surrogate-control ~ "no-store" ||
      (!beresp.http.Surrogate-Control &&
        beresp.http.Cache-Control ~ "no-cache|no-store|private") ||
      beresp.http.Vary == "*") {
        /*
        * Mark as "Hit-For-Pass" for the next 2 minutes
        */
        set beresp.ttl = 120s;
        set beresp.uncacheable = true;
    }
    return (deliver);
}

sub vcl_backend_error {
    set beresp.http.Content-Type = "text/html; charset=utf-8";
    set beresp.http.Retry-After = "5";
    synthetic( {"<!DOCTYPE html>
<html>
  <head>
    <title>"} + beresp.status + " " + beresp.reason + {"</title>
  </head>
  <body>
    <h1>Error "} + beresp.status + " " + beresp.reason + {"</h1>
    <p>"} + beresp.reason + {"</p>
    <h3>Guru Meditation:</h3>
    <p>XID: "} + bereq.xid + {"</p>
    <hr>
    <p>Varnish cache server</p>
  </body>
</html>
"} );
    return (deliver);
}

#######################################################################
# Housekeeping

sub vcl_init {
    return (ok);
}

sub vcl_fini {
    return (ok);
}
操作符:
比较运算符:==,!=,~,>,>=,<,<=
逻辑运算符:&&,||,!
变量赋值:=
内建变量:
req.*:request,表示由客户端发来varnish的请求报文相关信息;
req.http.*:req.http.User-Agent,req.http.Referer,...
bereq.*:由varnish发往后端主机的http请求相关信息;
bereq.http.*
resp.*:由varnish响应给client的相关信息;
beresp.*:由后端主机响应给varnish的响应报文相关信息;
beresp.http.*
obj.*:存储在缓存空间中的缓存对象属性,只读。
内建命令中常用的变量:
req.*,bereq.*:定义请求的变量,包括客户端到varnish的请求,varnish到后端服务器的请求,(以下变量中req用法与bereq相同,所以只列出了bereq)
bereq.http.<各种HEADERS>
bereq.request:请求方法;
bereq.url:请求的URL;
bereq.proto:请求的协议版本;
bereq.backend:指明要调用的后端主机;
req专用:
req.http.Cookie:客户端的请求报文中Cookie首部的值;
req.http.User-Agent ~ "chrome"
beresp.*,resp.*:定义响应变量,包括varnish响应给客户端和后端
beresp.http.<各种HEADERS>
beresp.status:响应的状态码;
reresp.proto:协议版本
beresp.ttl:后端主机响应内容的余下的可缓存时长;
beresp.backend.name:后端主机的主机名;
obj.*:
obj.hits:缓存对象从缓存中命中的次数;
obj.ttl:缓存对象的ttl值
server.*
server.ip
server.hostname
client.*
client.ip
Varnish中的各类变量都有它们各自的适用位置,如下图所示:

简单示例:
1.obj.hits是内建变量,用于保存缓存项的被缓存命中的次数。
例:在sub vcl_deliver {}中配置
if (obj.hits>0) {
        set resp.http.X-Cache = "Hit via " + server.ip;
}
else {
        set resp.http.X-Cache = "Miss via " + server.ip;
}
2.对特定类型的资源,例如公开的图片等,取消私有标识,并强行其可以由varnish缓存的时长;
在sub vcl_backend_response {}中配置
if (beresp.http.Cache-Control !~"(?i)s-maxage") {
     if (bereq.url ~ "(?i)\.(jpg|jpeg|png|gif|css|js)") {
          unset beresp.http.Set-Cookie;
          set beresp.ttl = 3600s;
        }