LLVM是一个自由软件项目,它是一种编译器基础设施,以C++写成。其发端源于2000年伊利诺伊大学厄巴纳-香槟分校(UIUC)的维克拉姆·艾夫(Vikram Adve)与其第一个博士生克里斯·拉特纳(Chris Lattner)的研究,彼时他们想要为所有静态及动态语言创造出动态的编译技术。

LLVM的命名最早源自于底层虚拟机(Low Level Virtual Machine)的首字母缩写,但现在这个项目的范围早已大大超越其最初的意思。当前,LLVM已经发展成为被用于开发从编译器前端到后端的“一套模块及可重用的编译器及工具链技术的集合”("collection of modular and reusable compiler and toolchain technologies")。
----------------------------------------------------------------------------------------------------------------------------------------
在使用LLVM时,处于优化或分析的目的,我们会编写Pass完成从一个IR向另外一个IR的转换。在本系列的前面一些文章中,我们大体上是基于Function → BasicBlock → Instruction这样的一个框架来编写Pass的。而这里的Instructions其实指的就是IR Instructions。
但是在后端(BackEnd)部分,我们的分析框架将转为MachineFunction → MachineBasicBlock → MachineInstruction。
- The MachineFunction class contains a list of machine basic blocks ( MachineBasicBlock instances).
- The MachineBasicBlock class contains a list of machine instructions ( MachineInstr instances).
而这里的MachineInstruction,其实并不是最终的Assembly Code,而是一种Machine IR Instruction,关于Machine IR你可以参考文献【1】以了解更多。
本文主要介绍编写BackEnd Pass(或者说是Machine Pass)的基本方法。就像之前有FunctionPass类一样,现在我们有MachineFunctionPass类。 A MachineFunctionPass is also a FunctionPass, so all the restrictions that apply to a FunctionPass also apply to it.
编写Machine Pass跟我们之前编写普通Pass是有一定区别的。下面就通过一个具体的例子来进行演示。Machine passes are determined by the backend code. Therefore, we will modify an existing backend to run with our custom pass to see it in practice. We will choose X86 for that end. 于是,我们在已有的文件中,找到一个插入Pass的位置。例如,假设你的LLVM之安装目录为 ... .../llvm,那么你首先在路径... .../llvm/lib/Target/X86中,找到X86TargetMachine.cpp文件。但是,there are many more methods that we can override if we want to add a pass to other locations(这一点,我们会在后续文章中再来介绍)。We will run our pass before code emission; 因此,我们修改X86TargetMachine.cpp文件中的函数addPreEmitPass(),从而在其中加入我们自己的pass。具体内容如下所示:
void X86PassConfig::addPreEmitPass() {
  if (getOptLevel() != CodeGenOpt::None)
    addPass(new X86ExecutionDepsFix());

  if (UseVZeroUpper)
    addPass(createX86IssueVZeroUpperPass());

  if (getOptLevel() != CodeGenOpt::None) {
    addPass(createX86FixupBWInsts());
    addPass(createX86PadShortFunctions());
    addPass(createX86FixupLEAs());
    addPass(createX86EvexToVexInsts());
  }

  ////////////////
  //Add our new pass here
  addPass(createMyCustomMachinePass());
  ////////////////
}
新增加的那行代码 adds our pass by calling the createMyCustomMachinePass() 函数。然而,这个函数还没有被定义。We will add a new source file with the code of our pass and will take the opportunity to define this function as well. 为此,创建一个新的名为MachineCountPass.cpp 的文件(注意要保证它与X86TargetMachine.cpp在同一个文件夹下),并编辑该文件之内容如下:
#include "X86.h"
#include "llvm/Pass.h"
#include "llvm/CodeGen/MachineBasicBlock.h"
#include "llvm/CodeGen/MachineFunction.h"
#include "llvm/CodeGen/MachineFunctionPass.h"
#include "llvm/Support/raw_ostream.h"

#define DEBUG_TYPE "machinecount"

using namespace llvm;

namespace {
	class MachineCountPass : public MachineFunctionPass {

    public:
        static char ID;

        MachineCountPass() : MachineFunctionPass(ID) {}
        virtual bool runOnMachineFunction(MachineFunction &MF) {

            unsigned num_instr = 0;
            for (auto &MBB : MF) {

                for (MachineBasicBlock::const_iterator BBI = MBB.begin(), BBE = MBB.end();
                     BBI != BBE; ++BBI) {
                        ++num_instr;
                }

            }

            outs() << ">>>" << MF.getName() << " has " << num_instr << " instructions.\n";

            return false;
        }
    };
}

namespace llvm {
FunctionPass *createMyCustomMachinePass(){
    return new MachineCountPass();
}
}

char MachineCountPass::ID = 0;
static RegisterPass<MachineCountPass> X("machinecount", "Machine Count Pass");
Since we have defined the createMyCustomMachinePass() function, we must declare it in a header file. Let's edit the X86.h file to do this. 具体来说,就是把下面这句话加入到X86.h文件中:
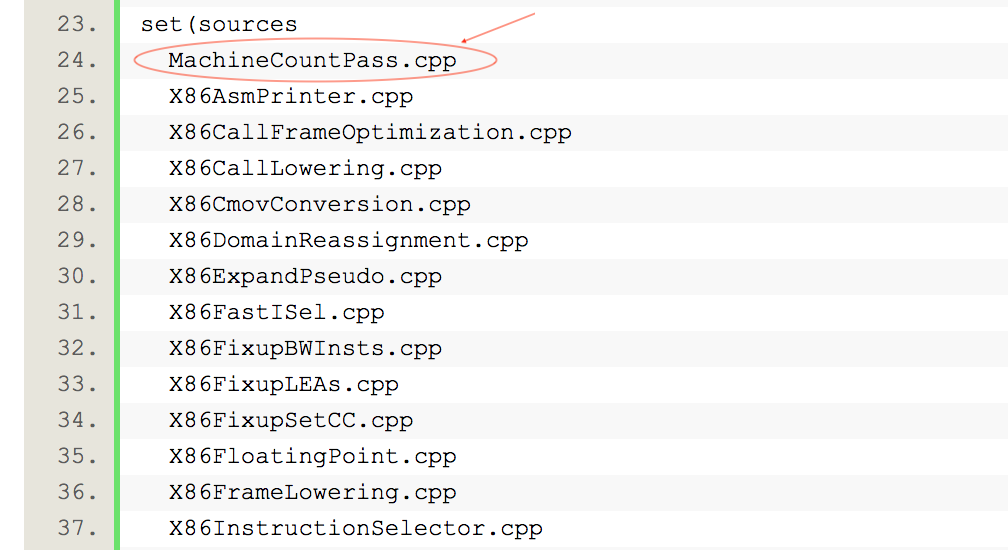
FunctionPass *createMyCustomMachinePass();Finally, add MachineCountPass.cpp to the CMakeLists.txt in lib/Target/X86.修改后的CMakeLists.txt 文件内容如下(注意限于篇幅,此处仅列出局部):
接下来要做的就是重新bulid LLVM。如果你是Xcode中进行LLVM项目的编辑,你可以直接单击IDE界面上的三角,参考《在Xcode中导入并使用LLVM》。同样,我们也使用该文中使用的测试文件test.c,你需要遵循之前的方法先用clang命令生成IR文件test.ll。
LLVM的官方文档中指明:A MachineFunctionPass is a part of the LLVM code generator that executes on the machine-dependent representation of each LLVM function in the program. Code generator passes are registered and initialized specially by TargetMachine::addPassesToEmitFile and similar routines, so they cannot generally be run from the opt or bugpoint commands. 这一点在文献【3】中也有类似描述:Differing from IR passes, you cannot run this pass with the opt tool, or load the pass and schedule it to happen via the command line. 可见,opt对于backend pass是无用的。现在,你只需要直接执行llc工具即可。如果你是Xcode中进行LLVM项目的编辑,那么你需要在下拉菜单中选择【Manage Schemes…】,取消其他的勾选,而只选择llc。并在Arguments passed on launch中,把执行参数改为:
- -O0 [此处需输入完整的路径]/test.ll -o [此处需输入完整的路径]/test-x86.s
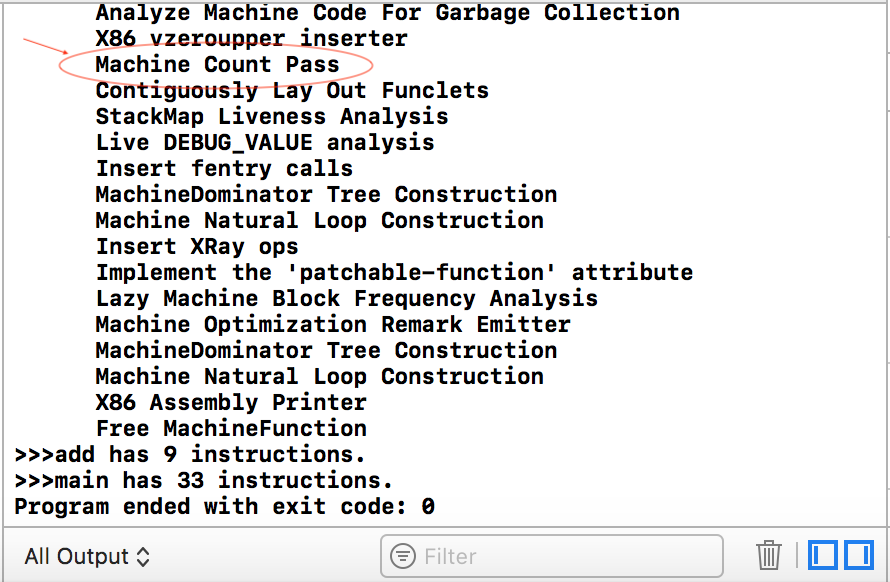
执行上述命令,在得到一个test-x86.s文件的同时,你还会得到如下输出,可见我们的backend pass统计了每个函数中的机器指令的数量。
>>>add has 9 instructions.
>>>main has 33 instructions.- -O0 [此处需输入完整的路径]/test.ll -o [此处需输入完整的路径]/test-x86.s -debug-pass=Structure
如此,你便会得到如下的输出结果,其中红圈框出的pass标记示出了我们自行编写的backend pass,在所以被用到的pass中的次序。
【参考文献与推荐阅读材料】
- LLVM中的Machine IR的一个简单介绍,https://www.youtube.com/watch?v=objxlZg01D0&feature=youtu.be (需自备梯子)
- Tutorial: Creating an LLVM Backend for the Cpu0 Architecture,http://jonathan2251.github.io/lbd/TutorialLLVMBackendCpu0.pdf
- 目前为数不多的三本可以用来学习LLVM的教材(本文中的例子主要改编自第三本书中P172之内容)
- http://llvm.org/docs/WritingAnLLVMPass.html#the-machinefunctionpass-class

【本系列文章目录】
- 在LLVM中编写Pass的详细教程(1):一个Hello World的Pass
- 在LLVM中编写Pass的详细教程(2):遍历一个函数中的Basic Blocks
- 在LLVM中编写Pass的详细教程(3):对程序中的OpCode进行计数
- 在LLVM中编写Pass的详细教程(4):def use 与 use def
- 在LLVM中编写Backend Pass的详细教程(1)
- 在LLVM中编写Backend Pass的详细教程(2)