1. 文件上传
SpringMVC 的文件上传非常简便,首先导入文件上传依赖的 jar:
1 <!-- 文件上传所依赖的 jar 包 -->
2 <dependency>
3 <groupId>commons-fileupload</groupId>
4 <artifactId>commons-fileupload</artifactId>
5 <version>1.3.1</version>
6 </dependency>
在 springMVC-servlet.xml 配置文件中配置文件解析器:
1 <!--1*1024*1024 即 1M resolveLazily 属性启用是为了推迟文件解析,以便捕获文件大小异常
2 -->
3 <!--文件上传解析器-->
4 <bean id="multipartResolver"
5 class="org.springframework.web.multipart.commons.CommonsMultipartResolver">
6 <property name="maxUploadSize" value="1048576"/>
7 <property name="defaultEncoding" value="UTF-8"/>
8 <property name="resolveLazily" value="true"/>
9 </bean>
注意解析器的 id 必须等于 multipartResolver,否则上传会出现异常:
1.1 单个文件上传
 1 @Controller
 2 public class FileController {
 3 /**
 4 * 上传单个文件操作
 5 * MultipartFile file 就是上传的文件
 6 * @return
 7 */
 8 @RequestMapping(value = "/upload1.html")
 9 public String fileUpload1(@RequestParam("file") MultipartFile file) {
10 try {
11 //将上传的文件存在 E:/upload/下
12 FileUtils.copyInputStreamToFile(file.getInputStream(),
13 new File("E:/upload/",
14 file.getOriginalFilename()));
15 } catch (Exception e) {
16 e.printStackTrace();
17 }
18 //上传成功返回原来页面
19 return "/file.jsp";
20 }
21 }上传文件时,Controller 的方法中参数类型是 MultipartFile 即可将文件映射到参数上。
页面file.jsp:
1 <form method="post" action="/upload1.html" enctype="multipart/form-data">
2 <input type="file" name="file"/>
3 <button type="submit" >提交</button>
4 </form>
另外上传的文件还可以映射成 CommonsMultipartFile,它是 MultipartFile 的子类:
 1 /**
 2 * CommonsMultipartFile 是 MultipartFile 的子类
 3 * @return
 4 */
 5 @RequestMapping("/upload2.html")
 6 public String fileUpload2(@RequestParam("file") CommonsMultipartFile file) {
 7 try {
 8 System. out .println("fileName:" + file.getOriginalFilename());
 9 String path = "E:/upload/" + file.getOriginalFilename();
10 File newFile = new File(path);
11 //通过 CommonsMultipartFile 的方法直接写文件
12 file.transferTo(newFile);
13 } catch (Exception e) {
14 e.printStackTrace();
15 }
16 return "/file.jsp";
17 }
页面:
1 <form method="post" action="/upload2.html" enctype="multipart/form-data">
2 <input type="file" name="file"/>
3 <button type="submit" >提交</button>
4 </form>
1.2 批量上传
 1 /**
 2 * 批量上传的时候参数是数组
 3 * @return
 4 */
 5 @RequestMapping("/upload3.html")
 6 public String fileUpload3(@RequestParam("file") CommonsMultipartFile[] file) {
 7 try {
 8 //批量上传时遍历文件数组
 9 for (CommonsMultipartFile f : file) {
10 System. out .println("fileName:" + f.getOriginalFilename());
11 String path = "E:/upload/" + f.getOriginalFilename();
12 File newFile = new File(path);
13 f.transferTo(newFile);
14 }
15 } catch (Exception e) {
16 e.printStackTrace();
17 }
18 return "/file.jsp";
19 }
页面:
1 <form method="post" action="/upload3.html" enctype="multipart/form-data">
2 <!--注意 name 都是 file,与 Controller 中方法的参数名对应-->
3 <input type="file" name="file"/>
4 <input type="file" name="file"/>
5 <input type="file" name="file"/>
6 <button type="submit" >提交</button>
7 </form>
2. 使用拦截器
模拟登陆拦截器:
 1 public class  LoginInterceptor  extends HandlerInterceptorAdapter { {
 2 @Override
 3 public bo olean preHandle(HttpServletRequest  request, HttpServletResponse  response,
 4 Object  handler)  throws  Exception { {
 5 System. out .println(" " 开始拦截" ");
 6 //  其他情况判断 n session  中是否有  key ,有的话继续用户的操作
 7 if ( request. getSession(). getAttribute( "user")  !=  null) { {
 8 return true;
 9 } }
10 //  最后的情况就是进入登录页面
11 response. sendRedirect( request. getContextPath()  +  "/login.jsp");
12 return false;
13 } }
14 @Override
15 public void postHandle(HttpServletRequest  request, HttpServletResponse  response,
16 Object  handler,  ModelAndView  modelAndView)  throws  Exception { {
17 System. out .println(" " 视图解析前  postHandle");
18 } }
19 @Override
20 public void afterConcurrentHandlingStarted(HttpServletRequest  request,
21 HttpServletResponse  response,  Object  handler)  throws  Exception { {
22 System. out .println(" " 处理异步请求" ");
23 } }
24 } }
配置拦截器:
扫描二维码关注公众号,回复:
3138812 查看本文章

1 <mvc:interceptors>
2 <mvc:interceptor><!--配置局部拦截器,需要满足下列路径条件-->
3 <mvc:mapping path="/**"/>
4 <mvc:exclude-mapping path="/login.html" />
5 <bean class="interceptor.LoginInterceptor"/><!--自定义拦截器注册-->
6 </mvc:interceptor>
7 </mvc:interceptors>
登陆的 Controller
1 @Controller
2 public class  LoginController { {
3 @RequestMapping( "login.html")
4 public  String login( String  username, HttpServletRequest  request){ {
5 // 模拟登陆
6 request. getSession(). setAttribute( "user", username);
7 return  "redirect:index.html";
8 } }
9 } }
登陆页面:
1 <form action="/login.html">
2 <input name="username"/><input type="submit">
3 </form>
3. 异常处理
3.1 集成异常处理
对 于 一 些 通用 的 ,不 需 要特 殊 处 理的 异 常,可 以 使 用统 一 的 异常 处 理器 , 在springMVC-servlet.xml 中加入配置:
 1 <!--集成异常处理-->
 2 <bean
 3 class="org.springframework.web.servlet.handler.SimpleMappingExceptionResolver">
 4 <!-- 定义默认的异常处理页面-->
 5 <property name="defaultErrorView" value="error.jsp"></property>
 6 <!-- 定义异常处理页面用来获取异常信息的变量名,默认名为 exception -->
 7 <property name="exceptionAttribute" value="ex"></property>
 8 <!-- 定义需要特殊处理的异常,用类名或完全路径名作为 key,异常也页名作为值 -->
 9 <property name="exceptionMappings">
10 <props>
11 <prop key="java.lang.NullPointerException">error.jsp</prop>
12 <prop key="java.lang.ClassCastException">error.jsp</prop>
13 <prop key="java.lang.IndexOutOfBoundsException">error.jsp</prop>
14 <!-- 这里还可以继续扩展对不同异常类型的处理 -->
15 </props>
16 </property>
17 </bean>
我们写一个 controller 专门抛出异常,用来模拟程序中可能出现的异常信息:
 1 @Controller
 2 public class ExceptionController {
 3 @RequestMapping("/ex.html")
 4 public String exceptionTest(Integer type) throws Exception {
 5 //手动抛出几个异常,模拟程序中可能出现的异常
 6 switch (type) {
 7 case 1:
 8 throw new NullPointerException("测试空指针异常");
 9 case 2:
10 throw new ClassCastException("测试类型转换异常");
11 case 3:
12 throw new IndexOutOfBoundsException("测试越界异常");
13 }
14 return "index.jsp";
15 }
16 }
测试页面:
1 <body>
2 <a href="/ex.html?type=1">空指针</a><br/>
3 <a href="/ex.html?type=2">类型转换</a><br/>
4 <a href="/ex.html?type=3">越界</a><br/>
5 ${ex}<!--就是 spring 异常处理器中配置的 exceptionAttribute-->
6 </body>
运行结果:
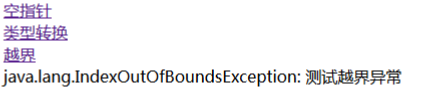
点击不同的链接可以看大不同的提示信息。
3.2 自定义异常处理
对于需要特殊处理的异常,可以自定义异常处理器自定义异常处理的类需要继承 HandlerExceptionResolver
1 public class  MyExceptionHandler  implements HandlerExceptionResolver { {
2 @Override
3 public  ModelAndView resolveException(HttpServletRequest  httpServletRequest,
4 HttpServletResponse  httpServletResponse,  Object o o,  Exception e e) { {
5 String  msg  = e e.getMessage();
6 httpServletRequest. setAttribute( "ex",  msg);
7 return new ModelAndView( "/error.jsp");
8 } }
9 } }
在 spring 配置文件中定义 bean:
1 <!--自定义异常处理-->
2 <bean id="exceptionHandler" class="exception.MyExceptionHandler"/>
注:自定义异常处理和前面的集成异常处理不能一起使用,需要将 前面例子的 bean 注释掉。如果需要处理 ajax 发送的请求,出现异常时返回 json 数据,可以增加处理 json 的代码。
修改 MyExceptionHandler 中的代码:
 1 public class MyExceptionHandler implements HandlerExceptionResolver {
 2 @Override
 3 public ModelAndView resolveException(HttpServletRequest httpServletRequest,
 4 HttpServletResponse httpServletResponse, Object o, Exception e) {
 5 String msg = e.getMessage();
 6 if (httpServletResponse.isCommitted()) {
 7 return null;
 8 }
 9 //如果是 ajax 请求就返回 json 数据
10 if (isAjax(httpServletRequest)) {
11 Map<String, String> result = new HashMap<>();
12 result.put("ex", msg);
13 MappingJackson2JsonView view = new MappingJackson2JsonView();
14 return new ModelAndView(view, "result", result);
15 } else {//不是 ajax 就返回错误页面
16 httpServletRequest.setAttribute("ex", msg);
17 return new ModelAndView("/error.jsp");
18 }
19 }
20 public static boolean isAjax(HttpServletRequest request) {
21 return
22 "XMLHttpRequest".equalsIgnoreCase(request.getHeader("X-Requested-With")) ||
23 request.getParameter("ajax") != null;
24 }
25 }
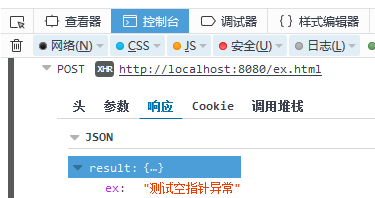
测试页面:
 1 <script type="text/javascript" src="jquery-1.10.1.min.js"></script>
 2 <input type="button" onclick=" testEx ()" value="测试自定义异常"/>
 3 <script type="text/javascript">
 4 function  testEx (){
 5 $.ajax({
 6 type: "POST",
 7 url: "/ex.html?type=1",
 8 success: function(data){
 9 alert(data.result.ex);//读取 json 数据
10 }
11 });
12 }
13 </script>
测试结果: