1.前言
本文讲述使用javaconfig的方式整合SpringMVC+Mybatis+SpringSecurity实现基于数据库的权限系统,包括对按钮的权限控制。
使用技术: springMVC、springsecurity4、mybatis、ehcache、前端使用dataTables表格、ztree。
2.表结构介绍
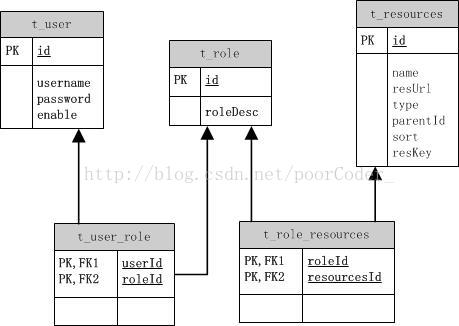
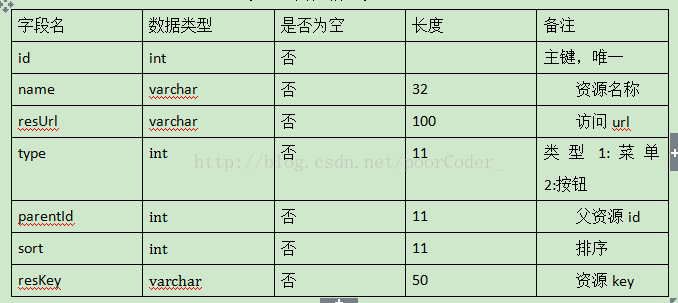
标准的五张表结构。其中t_resources包含了后台系统的菜单
五张表分别为用户表,角色表,资源表,用户角色表,角色资源表。
给用户分配角色,给角色配置权限。形成动态的权限控制。一个用户可以拥有多个角色,一个角色也可以拥有多个资源(即权限)。
3.mavne配置
<properties>
        <!-- spring版本号 -->
        <spring.version>4.3.5.RELEASE</spring.version>
        <springsecurity.version>4.2.1.RELEASE</springsecurity.version>
  </properties>

  <dependencies>
    <dependency>
        <groupId>org.springframework</groupId>
        <artifactId>spring-webmvc</artifactId>
        <version>${spring.version}</version>
    </dependency>
     <dependency>
           <groupId>org.springframework</groupId>
           <artifactId>spring-context-support</artifactId>
           <version>${spring.version}</version>
       </dependency>

    <dependency>
        <groupId>org.springframework.security</groupId>
        <artifactId>spring-security-web</artifactId>
        <version>${springsecurity.version}</version>
    </dependency>
    <dependency>
        <groupId>org.springframework.security</groupId>
        <artifactId>spring-security-config</artifactId>
        <version>${springsecurity.version}</version>
    </dependency>
    <dependency>
         <groupId>org.springframework.security</groupId>
         <artifactId>spring-security-taglibs</artifactId>
         <version>${springsecurity.version}</version>
     </dependency>

      <dependency>
        <groupId>mysql</groupId>
        <artifactId>mysql-connector-java</artifactId>
        <version>5.1.27</version>
        <type>jar</type>
        <scope>compile</scope>
    </dependency>

    <dependency>
        <groupId>javax.servlet</groupId>
        <artifactId>javax.servlet-api</artifactId>
        <version>3.1.0</version>
         <scope>provided</scope>
    </dependency>
    <!-- tomcat jstl -->
    <dependency>
        <groupId>jstl</groupId>
        <artifactId>jstl</artifactId>
        <version>1.2</version>
    </dependency>
    <dependency>
        <groupId>javax.servlet</groupId>
        <artifactId>jsp-api</artifactId>
        <version>2.0</version>
        <scope>provided</scope>
    </dependency>
    <dependency>
        <groupId>commons-logging</groupId>
        <artifactId>commons-logging</artifactId>
        <version>1.2</version>
    </dependency>
     <!-- mybatis核心包 -->
        <dependency>
            <groupId>org.mybatis</groupId>
            <artifactId>mybatis</artifactId>
            <version>3.3.0</version>
        </dependency>
        <!-- mybatis/spring包 -->
        <dependency>
            <groupId>org.mybatis</groupId>
            <artifactId>mybatis-spring</artifactId>
            <version>1.2.2</version>
        </dependency>

          <!--单元测试依赖 -->
        <dependency>
            <groupId>junit</groupId>
            <artifactId>junit</artifactId>
            <version>4.12</version>
            <scope>test</scope>
        </dependency>

        <!--spring单元测试依赖 -->
        <dependency>
            <groupId>org.springframework</groupId>
            <artifactId>spring-test</artifactId>
            <version>${spring.version}</version>
            <scope>test</scope>
        </dependency>
        <dependency>
           <groupId>com.alibaba</groupId>
           <artifactId>fastjson</artifactId>
           <version>1.2.15</version>
       </dependency>

        <dependency>
            <groupId>com.github.pagehelper</groupId>
            <artifactId>pagehelper</artifactId>
            <version>4.1.4</version>
        </dependency>
      <dependency>
        <groupId>commons-dbcp</groupId>
        <artifactId>commons-dbcp</artifactId>
        <version>1.4</version>
    </dependency>

    <!-- ehcache 相关依赖  -->
     <dependency>
         <groupId>net.sf.ehcache</groupId>
         <artifactId>ehcache</artifactId>
         <version>2.7.5</version>
     </dependency>

      <!-- 日志文件管理包 -->
         <!--ehcache依赖slf4j-->
            <dependency>
                <groupId>org.slf4j</groupId>
                <artifactId>slf4j-api</artifactId>
                <version>1.7.18</version>
            </dependency>
            <!--ehcache依赖slf4j-->

            <!--slf4j需要log4j-->
            <dependency>
                <groupId>org.slf4j</groupId>
                <artifactId>slf4j-log4j12</artifactId>
                <version>1.7.18</version>
            </dependency>
            <!--slf4j需要log4j-->

            <!--log4j-->
            <dependency>
                <groupId>org.apache.logging.log4j</groupId>
                <artifactId>log4j-core</artifactId>
                <version>2.5</version>
            </dependency>
            <!--log4j-->

  </dependencies>
4.搭建SpringMVC
首先配置DispatcherServlet:
package com.study.config;

import org.springframework.web.servlet.support.AbstractAnnotationConfigDispatcherServletInitializer;


public class WebProjectConfigInitializer extends AbstractAnnotationConfigDispatcherServletInitializer {

    /**
     *  加载驱动应用后端的中间层和数据层组件
     */
    @Override
    protected Class<?>[] getRootConfigClasses() {
        return new Class[]{RootConfig.class};
    }
    /** 指定配置类
     *  加载包含web组件的bean,如控制机器、视图解析器以及映射处理器
     */
    @Override
    protected Class<?>[] getServletConfigClasses() {
        return new Class[]{WebConfig.class};
    }

    //将DispatcherServlet 映射到“/”
    @Override
    protected String[] getServletMappings() {
         return new String[] { "/" };
    }


}
WebConfig:
主要加载包含WEB的组件bean。如控制器、视图解析器以及处理映射处理器
package com.study.config;

import java.util.List;

import org.springframework.context.annotation.Bean;
import org.springframework.context.annotation.ComponentScan;
import org.springframework.context.annotation.Configuration;
import org.springframework.http.converter.HttpMessageConverter;
import org.springframework.web.servlet.ViewResolver;
import org.springframework.web.servlet.config.annotation.DefaultServletHandlerConfigurer;
import org.springframework.web.servlet.config.annotation.EnableWebMvc;
import org.springframework.web.servlet.config.annotation.WebMvcConfigurerAdapter;
import org.springframework.web.servlet.view.InternalResourceViewResolver;
import org.springframework.web.servlet.view.JstlView;

import com.alibaba.fastjson.serializer.SerializerFeature;
import com.alibaba.fastjson.support.config.FastJsonConfig;
import com.alibaba.fastjson.support.spring.FastJsonHttpMessageConverter;

@Configuration
@EnableWebMvc
@ComponentScan("com.study.controller")
public class WebConfig extends WebMvcConfigurerAdapter {

    @Bean
    public ViewResolver viewResolver(){
        InternalResourceViewResolver resolver = new InternalResourceViewResolver();
        resolver.setPrefix("/jsp/");
        resolver.setSuffix(".jsp");
        resolver.setExposeContextBeansAsAttributes(true);
        resolver.setViewClass(JstlView.class);
        return resolver;
    }

    //配置静态资源的处理  使DispatcherServlet对静态资源的请求转发到Servlet容器默认的Servlet上,而不是使用DispatcherServlet本身来处理此类请求
     @Override
    public void configureDefaultServletHandling(DefaultServletHandlerConfigurer configurer) {
         configurer.enable();
    }

  /*  @Override
    public void addResourceHandlers(ResourceHandlerRegistry registry) {
        registry.addResourceHandler("/css/**").addResourceLocations("classpath:/css");
        registry.addResourceHandler("/js/**").addResourceLocations("classpath:/js");
        registry.addResourceHandler("/img/**").addResourceLocations("classpath:/img");
    }*/


     @Override
    public void configureMessageConverters(List<HttpMessageConverter<?>> converters) {
        super.configureMessageConverters(converters);

        FastJsonHttpMessageConverter fastConverter = new FastJsonHttpMessageConverter();

        FastJsonConfig fastJsonConfig = new FastJsonConfig();
        fastJsonConfig.setSerializerFeatures(
                SerializerFeature.PrettyFormat
        );
        fastConverter.setFastJsonConfig(fastJsonConfig);

        converters.add(fastConverter);
    }
}
RootConfig:
主要加载应用中其他bean。这些bean通常是驱动应用后端的中间层和数据层组件。
package com.study.config;

import org.springframework.context.annotation.ComponentScan;
import org.springframework.context.annotation.ComponentScan.Filter;
import org.springframework.context.annotation.Configuration;
import org.springframework.context.annotation.FilterType;
import org.springframework.web.servlet.config.annotation.EnableWebMvc;

@Configuration
@ComponentScan(basePackages={"com.study"},excludeFilters={@Filter(type=FilterType.ANNOTATION,value=EnableWebMvc.class)})
public class RootConfig {

}
5.配置Spring Security
配置Delegating-FilterProxy
package com.study.config;

import org.springframework.security.web.context.AbstractSecurityWebApplicationInitializer;
/**
 * 配置Delegating-FilterProxy
 * 继承AbstractSecurityWebApplicationInitializer会自动注册DelegatingFilterProxy
 * 等价于xml配置
 * <filter>
        <filter-name>springSecurityFilterChain</filter-name>
        <filter-class>org.springframework.web.filter.DelegatingFilterProxy</filter-class>
    </filter>
 *
 *
 */
public class SecurityWebApplicationInitializer extends AbstractSecurityWebApplicationInitializer{
}
Spring Security 安全配置
package com.study.config;

import javax.annotation.Resource;

import org.springframework.context.annotation.Configuration;
import org.springframework.security.authentication.encoding.Md5PasswordEncoder;
import org.springframework.security.config.annotation.authentication.builders.AuthenticationManagerBuilder;
import org.springframework.security.config.annotation.web.builders.HttpSecurity;
import org.springframework.security.config.annotation.web.builders.WebSecurity;
import org.springframework.security.config.annotation.web.configuration.EnableWebSecurity;
import org.springframework.security.config.annotation.web.configuration.WebSecurityConfigurerAdapter;
import org.springframework.security.core.userdetails.UserDetailsService;
import org.springframework.security.web.access.intercept.FilterSecurityInterceptor;
import org.springframework.security.web.util.matcher.AntPathRequestMatcher;

import com.study.security.MyFilterSecurityInterceptor;

@Configuration
@EnableWebSecurity
public class WebSecurityConfig extends WebSecurityConfigurerAdapter {

//  @Resource
//  private DataSource dataSource;

    @Resource(name="myUserDetailService")
    private UserDetailsService myUserDetailService;

    @Resource
    private MyFilterSecurityInterceptor myFilterSecurityInterceptor;


//  @Override
//    public AuthenticationManager authenticationManagerBean() throws Exception {
//      return super.authenticationManagerBean();
//    }

    @Override
    public void configure(WebSecurity web)throws Exception {
        // 设置不拦截规则
         web.ignoring().antMatchers("/css/**","/js/**","/img/**","/font-awesome/**");
    }

    @Override
    protected void configure(HttpSecurity http) throws Exception {
          http
            .addFilterBefore(myFilterSecurityInterceptor, FilterSecurityInterceptor.class)//在正确的位置添加我们自定义的过滤器
            .authorizeRequests()
            .anyRequest().authenticated()
//         .and().formLogin().and()
//          .httpBasic();
        // 自定义登录页面
            .and()
            .formLogin().loginPage("/jsp/login.jsp")
            .failureUrl("/jsp/login.jsp?error=1")
            .loginProcessingUrl("/spring_security_check")
            .usernameParameter("username")
            .passwordParameter("password").permitAll().defaultSuccessUrl("/index.do");

          //如果开启了CSRF 退出则需要使用POST访问,可以使用以下方式解决,但并不推荐
          http.logout().logoutRequestMatcher(new AntPathRequestMatcher("/logout"))
//        登陆成功后跳转的地址,以及删除的cookie名称
          .logoutSuccessUrl("/jsp/login.jsp?error=logout")
         .invalidateHttpSession(true);
    }


    @Override
    protected void configure(AuthenticationManagerBuilder auth)
            throws Exception {

        //启用内存用户存储
        /*auth.inMemoryAuthentication()
        .withUser("user1").password("123456").roles("USER").and()
        .withUser("admin").password("admin").roles("USER","ADMIN");*/
        //
        //给予数据库表认证
        /*auth.jdbcAuthentication().dataSource(dataSource)
        .usersByUsernameQuery("select username,password,enable from t_user where username=?")
        .authoritiesByUsernameQuery("select username,rolename from t_role where username=?");
        */
        //配置自定义的用户服务
        auth.userDetailsService(myUserDetailService).passwordEncoder(new Md5PasswordEncoder());

    }


}
解释:以上代码实现了Spring Security 安全配置。其中@EnableWebSecurity注解将会启用WEB安全功能。
configure(WebSecurity web) 通过重载,配置Spring Security 的Filter链。
configure(HttpSecurity http)通过重载,配置如何通过拦截器保护请求。以上代码配置了自定义的过滤器 、自定义登录页面、和退出功能。其中自定义的过滤器相当于配置了对资源的授权。
configure(AuthenticationManagerBuilder auth)通过重载,配置user_detail服务,其中可以使用基于内存用户存储、基于数据库表进行认证、基于LDAP进行认证,以及自定义的用户服务。以上代码没注释的就是本文基于数据库的自定义权限认证。
自定义认证:
就是在登录时的认证操作交给Spring Security.在此处需要提供给当前登录用户所拥有的权限。即根据用户名查询上面t_resources表中的resKey 拼凑成”ROLE_XXX“ 这样形式的字符串所组成的list ,交给spirngSecurity。
package com.study.security;

import java.util.HashSet;
import java.util.List;
import java.util.Set;

import javax.annotation.Resource;

import org.springframework.security.core.GrantedAuthority;
import org.springframework.security.core.authority.SimpleGrantedAuthority;
import org.springframework.security.core.userdetails.UserDetails;
import org.springframework.security.core.userdetails.UserDetailsService;
import org.springframework.security.core.userdetails.UsernameNotFoundException;
import org.springframework.stereotype.Component;

import com.study.model.Resources;
import com.study.model.User;
import com.study.service.ResourcesService;
import com.study.service.UserService;

@Component("myUserDetailService")
public class MyUserDetailServiceImpl implements UserDetailsService{

    @Resource
    private UserService userService;

    @Resource
    private ResourcesService resourcesService;
    @Override
    public UserDetails loadUserByUsername(String username)
            throws UsernameNotFoundException {
        User user = userService.findUserByName(username);
        if(user ==null)
            throw new UsernameNotFoundException(username+" not exist!");
        Set<GrantedAuthority> authSet = new HashSet<GrantedAuthority>();
        Resources resources = new Resources();
        resources.setUsername(username);
        List<Resources> list = resourcesService.loadMenu(resources);
        for (Resources r : list) {
            authSet.add(new SimpleGrantedAuthority("ROLE_" +r.getResKey()));
        }
        return new org.springframework.security.core.userdetails.User(user.getUsername(),
                user.getPassword(),
                user.getEnable()==1?true:false,
                true,
                true,
                true,
                authSet);
    }

}
自定义过滤器
使访问程序时,检查当前用户是否拥有当前url的权限
package com.study.security;

import java.io.IOException;

import javax.annotation.PostConstruct;
import javax.annotation.Resource;
import javax.servlet.Filter;
import javax.servlet.FilterChain;
import javax.servlet.FilterConfig;
import javax.servlet.ServletException;
import javax.servlet.ServletRequest;
import javax.servlet.ServletResponse;

import org.springframework.beans.factory.annotation.Autowired;
import org.springframework.security.access.SecurityMetadataSource;
import org.springframework.security.access.intercept.AbstractSecurityInterceptor;
import org.springframework.security.access.intercept.InterceptorStatusToken;
import org.springframework.security.config.annotation.authentication.configuration.AuthenticationConfiguration;
import org.springframework.security.web.FilterInvocation;
import org.springframework.stereotype.Component;


@Component
public class MyFilterSecurityInterceptor extends AbstractSecurityInterceptor implements Filter {
    @Autowired
    private MySecurityMetadataSource securityMetadataSource;
    @Autowired
    private MyAccessDecisionManager accessDecisionManager;
//  @Resource(name="myAuthenticationManager")
//    private AuthenticationManager authenticationManager;

    @Resource
    private AuthenticationConfiguration authenticationConfiguration;

//  @Autowired
//  public void setAuthenticationConfiguration(AuthenticationConfiguration authenticationConfiguration) {
//       this.authenticationConfiguration = authenticationConfiguration;
//  }

    @PostConstruct
    public void init() throws Exception{
        super.setAccessDecisionManager(accessDecisionManager);
        super.setAuthenticationManager(authenticationConfiguration.getAuthenticationManager());
    }

    @Override
    public SecurityMetadataSource obtainSecurityMetadataSource() {
        return this.securityMetadataSource;
    }

    public void doFilter(ServletRequest request, ServletResponse response,
            FilterChain chain) throws IOException, ServletException {
        FilterInvocation fi = new FilterInvocation(request, response, chain);
        invoke(fi);
    }

    private void invoke(FilterInvocation fi) throws IOException, ServletException {
        // object为FilterInvocation对象
                  //super.beforeInvocation(fi);源码
        //1.获取请求资源的权限
        //执行Collection<ConfigAttribute> attributes = SecurityMetadataSource.getAttributes(object);
        //2.是否拥有权限
        //this.accessDecisionManager.decide(authenticated, object, attributes);
//      System.err.println(" ---------------  MySecurityFilter invoke--------------- ");
        InterceptorStatusToken token = super.beforeInvocation(fi);
        try {
            fi.getChain().doFilter(fi.getRequest(), fi.getResponse());
        } finally {
            super.afterInvocation(token, null);
        }
    }

    public void init(FilterConfig arg0) throws ServletException {
    }

    public void destroy() {

    }

    @Override
    public Class<? extends Object> getSecureObjectClass() {
        //下面的MyAccessDecisionManager的supports方面必须放回true,否则会提醒类型错误
        return FilterInvocation.class;
    }
}
以上代码涉及到MySecurityMetadataSource和MyAccessDecisionManager
MyAccessDecisionManager
package com.study.security;
import java.util.Collection;
import java.util.Iterator;

import org.springframework.security.access.AccessDecisionManager;
import org.springframework.security.access.AccessDeniedException;
import org.springframework.security.access.ConfigAttribute;
import org.springframework.security.authentication.InsufficientAuthenticationException;
import org.springframework.security.core.Authentication;
import org.springframework.security.core.GrantedAuthority;
import org.springframework.stereotype.Component;
/**
 * <!-- 用户是否拥有所请求资源的权限 -->
 *
 */
@Component
public class MyAccessDecisionManager implements AccessDecisionManager {

    public void decide(Authentication authentication, Object object, Collection<ConfigAttribute> configAttributes) throws AccessDeniedException, InsufficientAuthenticationException {
        if(configAttributes == null) {
            return;
        }
        //所请求的资源拥有的权限(一个资源对多个权限)
        Iterator<ConfigAttribute> iterator = configAttributes.iterator();
        while(iterator.hasNext()) {
            ConfigAttribute configAttribute = iterator.next();
            //访问所请求资源所需要的权限
            String needPermission = configAttribute.getAttribute();
            System.out.println("needPermission is " + needPermission);
            //用户所拥有的权限authentication
            for(GrantedAuthority ga : authentication.getAuthorities()) {
                if(needPermission.equals(ga.getAuthority())) {
                    return;
                }
            }
        }
        //没有权限
        throw new AccessDeniedException(" 没有权限访问或未重新登录! ");
    }

    public boolean supports(ConfigAttribute attribute) {
        // TODO Auto-generated method stub
        return true;
    }

    public boolean supports(Class<?> clazz) {
        // TODO Auto-generated method stub
        return true;
    }

}
MySecurityMetadataSource
需要加载所有资源与权限的关系,即查询t_resources表中所有resKey与resUrl的对应关系。
package com.study.security;

import java.util.ArrayList;
import java.util.Collection;
import java.util.HashMap;
import java.util.List;
import java.util.Map;

import javax.annotation.PostConstruct;
import javax.annotation.Resource;

import org.springframework.security.access.ConfigAttribute;
import org.springframework.security.access.SecurityConfig;
import org.springframework.security.web.FilterInvocation;
import org.springframework.security.web.access.intercept.FilterInvocationSecurityMetadataSource;
import org.springframework.stereotype.Component;

import com.study.dao.ResourcesDao;
import com.study.model.Resources;

/**
 * 加载资源与权限的对应关系
 */
@Component
public class MySecurityMetadataSource implements FilterInvocationSecurityMetadataSource {

    @Resource
    private ResourcesDao resourcesDao;


    private static Map<String, Collection<ConfigAttribute>> resourceMap = null;

    public Collection<ConfigAttribute> getAllConfigAttributes() {
        return null;
    }

    public boolean supports(Class<?> clazz) {
        return true;
    }
    /**
     * @PostConstruct是Java EE 5引入的注解,
     * Spring允许开发者在受管Bean中使用它。当DI容器实例化当前受管Bean时,
     * @PostConstruct注解的方法会被自动触发,从而完成一些初始化工作,
     *
     * //加载所有资源与权限的关系
     */
    @PostConstruct
    private void loadResourceDefine() {
        if (resourceMap == null) {
            resourceMap = new HashMap<String, Collection<ConfigAttribute>>();
            List<Resources> list = resourcesDao.queryAll(new Resources());
            for (Resources resources : list) {
                Collection<ConfigAttribute> configAttributes = new ArrayList<ConfigAttribute>();
                // 通过资源名称来表示具体的权限 注意:必须"ROLE_"开头
                ConfigAttribute configAttribute = new SecurityConfig("ROLE_" + resources.getResKey());
                configAttributes.add(configAttribute);
                resourceMap.put(resources.getResUrl(), configAttributes);
            }
        }
    }
    //返回所请求资源所需要的权限
    public Collection<ConfigAttribute> getAttributes(Object object) throws IllegalArgumentException {
        String requestUrl = ((FilterInvocation) object).getRequestUrl();
    //  System.out.println("requestUrl is " + requestUrl);
        if(resourceMap == null) {
            loadResourceDefine();
        }
        //System.err.println("resourceMap.get(requestUrl); "+resourceMap.get(requestUrl));
        if(requestUrl.indexOf("?")>-1){
            requestUrl=requestUrl.substring(0,requestUrl.indexOf("?"));
        }
        Collection<ConfigAttribute> configAttributes = resourceMap.get(requestUrl);
        return configAttributes;
    }


}
6.配置对按钮的前台显示控制
因为基于了数据库的权限控制,无法通过使用Spring Security的标签来控制对按钮的条件性渲染。不过其实可以通过,来控制显示。但是按钮所对应的Role_XXX就被限定死,而无法修改了。但是在开发阶段,只有按钮所对应操作的url是可以确定的。于是采用自定义标签,使当前的按钮根据按钮的url来确定当前用户是否拥有该url的权限,进而控制按钮的显示。自定义标签如下所示:

AuthorizeTag
package com.study.tag;

import java.util.List;

import javax.servlet.http.HttpServletRequest;
import javax.servlet.jsp.tagext.BodyTagSupport;

import org.springframework.security.core.context.SecurityContextImpl;
import org.springframework.web.context.request.RequestContextHolder;
import org.springframework.web.context.request.ServletRequestAttributes;

import com.study.model.Resources;
import com.study.service.ResourcesService;
import com.study.util.SpringWiredBean;
/**
 * 自定义标签  用于前台判断按钮权限
 * @author A
 *
 */
public class AuthorizeTag extends BodyTagSupport {
    private static final long serialVersionUID = 1L;

    private String buttonUrl;

    public String getButtonUrl() {
        return buttonUrl;
    }


    public void setButtonUrl(String buttonUrl) {
        this.buttonUrl = buttonUrl;
    }


    @SuppressWarnings("static-access")
    @Override
    public int doStartTag() {
        HttpServletRequest request = ((ServletRequestAttributes)RequestContextHolder.getRequestAttributes()).getRequest();
        SecurityContextImpl securityContextImpl = (SecurityContextImpl) request
                .getSession().getAttribute("SPRING_SECURITY_CONTEXT");
        //获取当前登录名
        String name = securityContextImpl.getAuthentication().getName();

        //如果数据库里有该链接,并且该用户的权限拥有该链接,则显示 。如果数据库没有该链接则不显示
        ResourcesService resourcesService= (ResourcesService) SpringWiredBean.getInstance().getBeanById("resourcesService");
        List<Resources> queryAll = resourcesService.queryAll();
        boolean flag = true;
        for (Resources resources : queryAll) {
            if(resources.getResUrl().equals(buttonUrl))
                flag = false;
        }
        if(flag) //数据库中没有该链接,直接显示
            return EVAL_BODY_INCLUDE;
        else{
            Resources resources = new Resources();
            resources.setUsername(name);
            resources.setResUrl(buttonUrl);
            List<Resources> resourcesList = resourcesService.loadMenu(resources);
            if(resourcesList.size()>0)  return EVAL_BODY_INCLUDE;//数据库中有该链接,并且该用户拥有该角色,显示
        }
        return this.SKIP_BODY;  //不显示
    }
}
以上带有用到SpringWiredBean
SpringWiredBean
package com.study.util;


import org.springframework.beans.factory.BeanFactory;
import org.springframework.beans.factory.annotation.Autowired;
import org.springframework.web.context.support.SpringBeanAutowiringSupport;

public class SpringWiredBean extends SpringBeanAutowiringSupport {

    /**
     * 自动装配注解会让Spring通过类型匹配为beanFactory注入示例
     */
    @Autowired
    private BeanFactory beanFactory;

    private SpringWiredBean() {
    }

    private static SpringWiredBean instance;

    static {
        // 静态块,初始化实例
        instance = new SpringWiredBean();
    }

    /**
     * 实例方法
     * 使用的时候先通过getInstance方法获取实例
     *
     * @param beanId
     * @return
     */
    public Object getBeanById(String beanId) {
        return beanFactory.getBean(beanId);
    }

    public static SpringWiredBean getInstance() {
        return instance;
    }
}
在WEB-INF下加入authorize.tld
authorize.tld
<?xml version="1.0" encoding="UTF-8" ?>
<taglib xmlns="http://java.sun.com/xml/ns/javaee"
        xmlns:xsi="http://www.w3.org/2001/XMLSchema-instance"
        xsi:schemaLocation="http://java.sun.com/xml/ns/javaee
        http://java.sun.com/xml/ns/javaee/web-jsptaglibrary_2_1.xsd"
        version="2.1">
        <description>
        <![CDATA[security Tags]]>
        </description>
        <tlib-version>1.0</tlib-version>
        <short-name>security</short-name>
        <uri>http://www.springsecurity.org/jsp</uri>
        <tag>
            <description>
            <![CDATA[authorize Tag]]>
            </description>
            <name>authorize</name>
            <tag-class>
                com.study.tag.AuthorizeTag
            </tag-class>
            <body-content>JSP</body-content>
            <attribute>
                <name>buttonUrl</name>
                <required>false</required>
                <rtexprvalue>true</rtexprvalue>
                <type>java.lang.String</type>
            </attribute>
        </tag>
    </taglib>
则在前端使用时,引入上面定义的标签:
<%@ taglib uri="http://www.springsecurity.org/jsp" prefix="security"%>然后页面上控制:
 <security:authorize buttonUrl="/role/addRole.do">
     <button type="button" id="btn_search" onclick="$('#addRole').modal();" class="btn btn-info" style="float: right; margin-right: 1;">新增</button>
</security:authorize>
7.配置Mybatis
package com.study.config;

import java.util.Properties;

import javax.sql.DataSource;

import org.apache.commons.dbcp.BasicDataSource;
import org.apache.ibatis.plugin.Interceptor;
import org.apache.ibatis.session.SqlSessionFactory;
import org.apache.log4j.Logger;
import org.mybatis.spring.SqlSessionFactoryBean;
import org.mybatis.spring.annotation.MapperScan;
import org.springframework.beans.factory.annotation.Value;
import org.springframework.context.annotation.Bean;
import org.springframework.context.annotation.Configuration;
import org.springframework.context.annotation.PropertySource;
import org.springframework.context.support.PropertySourcesPlaceholderConfigurer;
import org.springframework.core.io.support.PathMatchingResourcePatternResolver;
import org.springframework.jdbc.datasource.DataSourceTransactionManager;
import org.springframework.transaction.PlatformTransactionManager;
import org.springframework.transaction.annotation.EnableTransactionManagement;

import com.github.pagehelper.PageHelper;

@Configuration
//加载资源文件
@PropertySource({"classpath:jdbc.properties"})
//加上这个注解,使得支持事务
@EnableTransactionManagement
@MapperScan(basePackages = {"com.study.dao"})
public class DataSourceConfig {
    private static final Logger logger = Logger.getLogger(DataSourceConfig.class);
    /*
     * 绑定资源属性
     */
    @Value("${jdbc.driver}")
    private String driverClass;
    @Value("${jdbc.url}")
    private String url;
    @Value("${jdbc.username}")
    private String userName;
    @Value("${jdbc.password}")
    private String passWord;
    @Value("${maxActive}")
    private int maxActive;
    @Value("${maxIdle}")
    private int maxIdle;
    @Value("${maxWait}")
    private long maxWait;


    /**
     * 必须加上static
     */
    public static PropertySourcesPlaceholderConfigurer placehodlerConfigurer() {
        logger.info("PropertySourcesPlaceholderConfigurer");
        return new PropertySourcesPlaceholderConfigurer();
    }

    @Bean(destroyMethod="close")
    public BasicDataSource dataSource() {
        logger.info("DataSource");
         BasicDataSource dataSource = new BasicDataSource();
        dataSource.setDriverClassName(driverClass);
        dataSource.setUrl(url);
        dataSource.setUsername(userName);
        dataSource.setPassword(passWord);
        dataSource.setMaxActive(maxActive);
        dataSource.setMaxIdle(maxIdle);
        dataSource.setMaxWait(maxWait);
        return dataSource;
    }

    @Bean
    public PlatformTransactionManager txManager(DataSource dataSource) {
        return new DataSourceTransactionManager(dataSource);
    }

   @Bean
    public SqlSessionFactory sqlSessionFactory(DataSource dataSource) throws Exception {
        SqlSessionFactoryBean sessionFactory = new SqlSessionFactoryBean();
        sessionFactory.setDataSource(dataSource);
        PathMatchingResourcePatternResolver resolver = new PathMatchingResourcePatternResolver();
        sessionFactory.setMapperLocations(resolver.getResources("classpath:mapping/*Mapping.xml"));
        //配置pageHelper
        sessionFactory.setPlugins(new Interceptor[]{pageHelper()});
        return sessionFactory.getObject();
    }

    /*@Bean
    public MapperScannerConfigurer scannerConfigurer(){
        MapperScannerConfigurer configurer = new MapperScannerConfigurer();
        configurer.setBasePackage("com.study.dao");
        configurer.setSqlSessionFactoryBeanName("sqlSessionFactory");
        return configurer;
    }*/
    /**
     * mybatis 分页插件配置
     * @return
     */
    @Bean
    public PageHelper pageHelper() {
        logger.info("MyBatisConfiguration.pageHelper()");
        PageHelper pageHelper = new PageHelper();
        Properties p = new Properties();
        p.setProperty("offsetAsPageNum", "true");
        p.setProperty("rowBoundsWithCount", "true");
        p.setProperty("reasonable", "true");
        pageHelper.setProperties(p);
        return pageHelper;
    }

}
以上代码,配置了dataSource、sqlSessionFactory、txManager。还配置了mybatis的分页插件pageHelper。
需要注意的是:上面代码注释了的部分,配置的MapperScannerConfigurer。当写上这段代码后,就会使因为@PropertySource注入的jdbc配置获取的值为null,导致datasource无法配置成功,后来找了一些资料,改成@MapperScan(basePackages = {“com.study.dao”})就可以了。但还在没找到原因,希望哪个大牛看到后可以给我解答,还有因为这个只是一个练习的项目,可能存在很多不妥或者欠缺的地方,各位对这个项目有建议的地方,希望留言或者发送到邮箱
[email protected],在此先谢谢大家。
再附上CachingConfig
CachingConfig
package com.study.config;

import org.apache.log4j.Logger;
import org.springframework.cache.CacheManager;
import org.springframework.cache.annotation.EnableCaching;
import org.springframework.cache.ehcache.EhCacheCacheManager;
import org.springframework.cache.ehcache.EhCacheManagerFactoryBean;
import org.springframework.context.annotation.Bean;
import org.springframework.context.annotation.Configuration;
import org.springframework.core.io.ClassPathResource;

@Configuration
@EnableCaching//<!-- 启用缓存注解 -->
public class CachingConfig {

     private static final Logger logger = Logger.getLogger(CachingConfig.class);

    @Bean
    public EhCacheManagerFactoryBean ehCacheManagerFactoryBean() {
        EhCacheManagerFactoryBean ehCacheManagerFactoryBean = new EhCacheManagerFactoryBean();
        ehCacheManagerFactoryBean.setConfigLocation(new ClassPathResource(
                "ehcache.xml"));
        return ehCacheManagerFactoryBean;
    }

    @Bean
    public CacheManager cacheManager() {
        logger.info("EhCacheCacheManager");
        EhCacheCacheManager cacheManager = new EhCacheCacheManager();
        cacheManager.setCacheManager(ehCacheManagerFactoryBean().getObject());
        return cacheManager;
    }
}
8.效果图
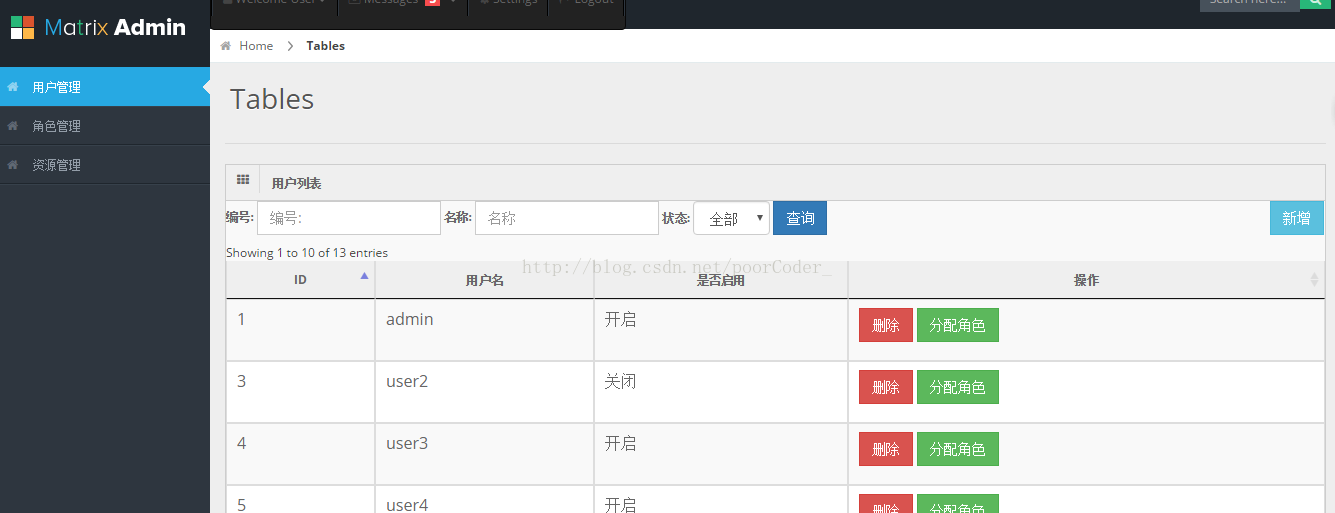
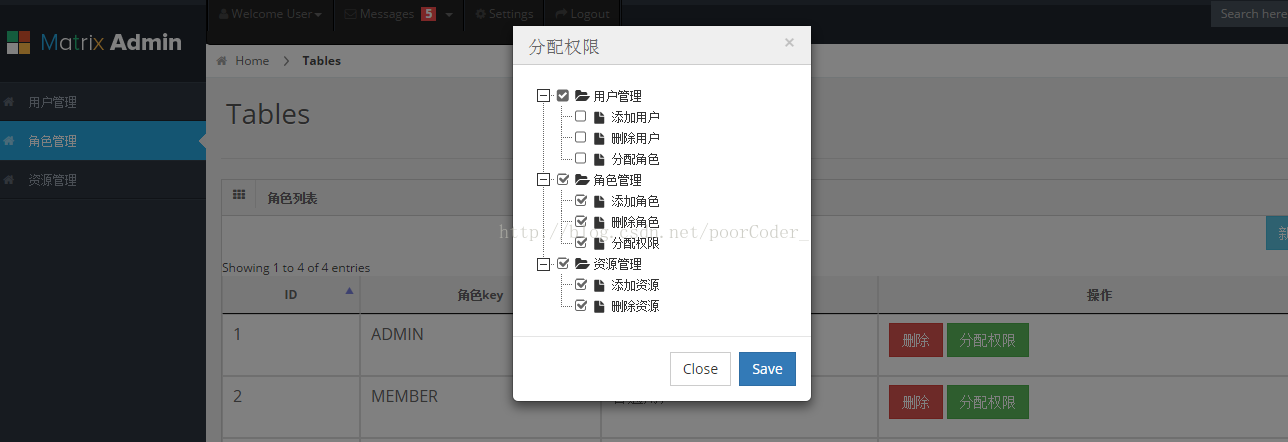
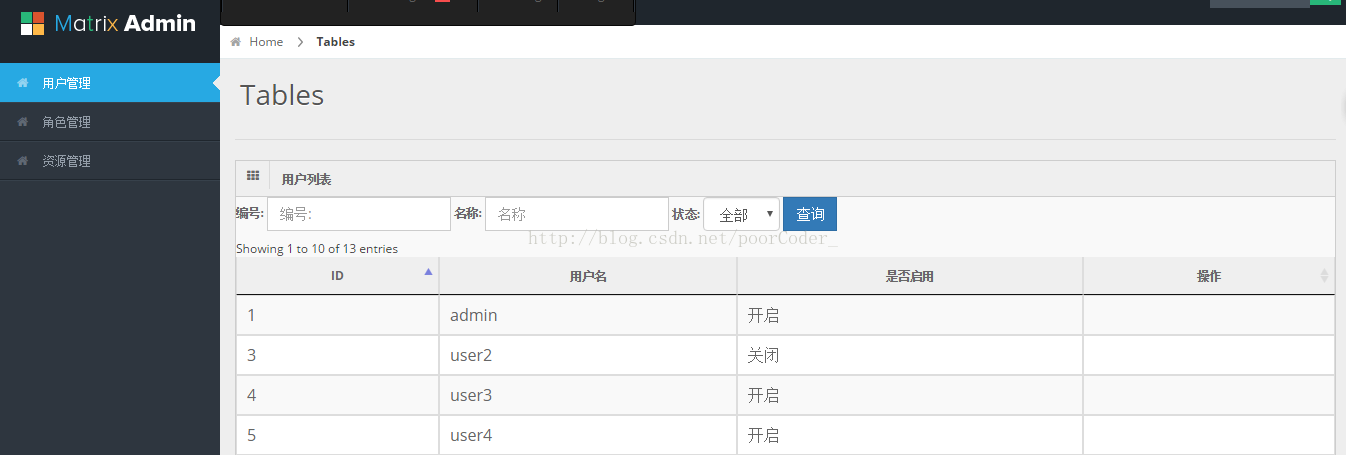
从图中可以看到,当勾选相应的权限后,界面上的按钮也跟着消失了。
套了模板,但是界面还是很丑,对前台操作不太擅长,就先这样了,还有对所有的修改操作都没有做,就做了增加和删除(好吧,有点懒的)。
第一次使用时导入mytest.sql
admin 的密码为admin ,因为密码的加密是后面加入的,所以现在库里只有admin可以登录。要想使用其他用户登录,请使用admin用户重新创建用户,
并分配相应的权限。
代码下载:
github 地址 :https://github.com/coder-yqj/springsecuritydemo
csdn 下载http://download.csdn.net/detail/poorcoder_/9818490
转载请标明出处:http://blog.csdn.net/poorcoder_/article/details/70231779