版权声明:转载请注明地址,谢谢配合 https://blog.csdn.net/pulong0748/article/details/82557958
前言
上一篇介绍了mybatis结合springboot的简单使用,这篇主要介绍springboot结合redis的简单使用。
准备工作:
jdk 1.8
maven 3.3.9
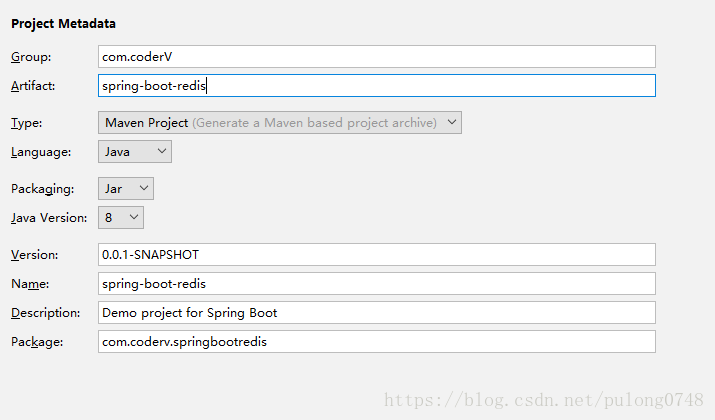
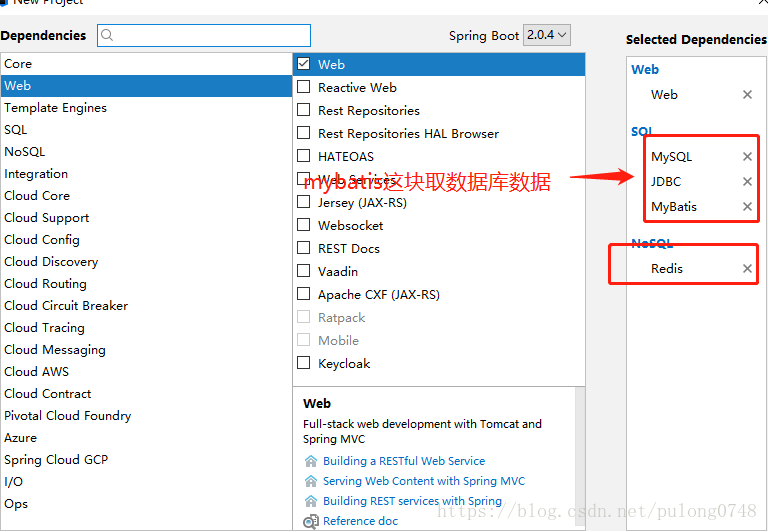
IDEA 初始化项目:

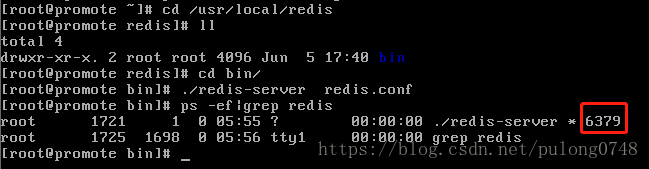
安装并启动redis:
目录结构:

application.yml文件配置:
#redis连接配置信息
spring:
  redis:
    port: 6379   #端口
    host: 192.168.25.136    #master的iP访问地址
    password: 123456   #redis认证时候的连接密码 如果requirepass没开,就不用写这个密码,一般都是默认关闭的。所以password的配置可以不写。
    jedis:
      pool:
        max-active: 6   #连接池中的最大连接数
  datasource:
    driver-class-name: com.mysql.jdbc.Driver
    url: jdbc:mysql://localhost:3306/spring_boot_study
    username: root
    password: root
    type: com.alibaba.druid.pool.DruidDataSource

mybatis:
  mapper-locations: classpath*:mapper/*.xml

//友情提醒:使用yml文件一定要注意层次跟空格的问题,因为它对文件格式
//校验十分严格,假如你碰到Caused by: org.yaml.snakeyaml.parser.ParserException: while parsing MappingNode
 in 'reader', line 2, column 1:
    spring:
    ^
一定要仔细检查yml文件,肯定是格式出错了。
从将数据存入到redis中:
@Autowired
private RedisTemplate redisTemplate;
@Autowired
private UserService userService;
@RequestMapping("/setUserIntoRedis")
public void setValueIntoRedis(){
List<User> userList = userService.getUserList();
redisTemplate.opsForValue().set("userList",userList);
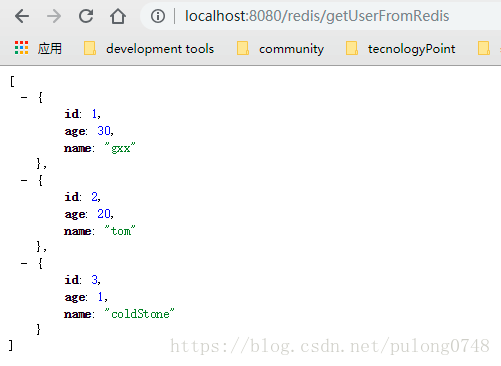
}从redis中拿出数据:
    @Autowired
    private RedisTemplate redisTemplate;
    @Autowired
    private UserService userService;
    //普通从redis中查询
    @GetMapping("/getUserFromRedis")
    public List<User> getValueFromRedis(){
        List<User> userList = (List<User>)redisTemplate.opsForValue().get("userList");
        //假如查不到会去数据库中查
        userList = userService.getUserList();
        return userList;
    }
上面的查询会有一个问题,假如一下子出现了100000个人同时查redis,但是redis没有,所以下一步就会去数据库中查询,那么这就是常见的缓存穿透问题,会造成数据库的雪崩,解决方法如下:
@GetMapping("/getUserFromRedisOrDb")
    public List<User> getValueFromRedisOrDb(){
        List<User> userList = (List<User>)redisTemplate.opsForValue().get("userList");
        //双重检测锁
        if(null == userList){
            synchronized (this){
                //从redis中获取一下
                userList = (List<User>)redisTemplate.opsForValue().get("userList");
                if(null == userList){
                    //缓存为空,查询一遍数据库
                    userList = userService.getUserList();
                    //再将数据库中的数据放入到redis中
                    redisTemplate.opsForValue().set("userList",userList);
                }
            }
        }
        return userList;
    }
结果显示:
到此为止,使用redis获取值以及设置值已经完成。详细的关于redis的教程我会在后面一段时间推出,这部分只是让你快速的搭建起redis所需的环境。真正想用好redis,这只是一点点的内容。
源码地址:spring-boot-redis
如果有小伙伴觉得我写的不错的话可以支持一下我的公众号哦:coldStone,主要会分享分布式系统相关的一系列技术,目前会推出springboot、springcloud和docker系列教程,后期会有关于中间件以及各个层面的性能优化的文章,同时还会分享一些赚钱理财的小套路哦,欢迎大家来支持,一起学习成长,程序员不仅仅是搬瓦工!