前言
在日常web开发中发生了异常,往往是需要通过一个统一的异常处理来保证客户端能够收到友好的提示。
接下来我们介绍一下SpringBoot2.X 的异常处理机制
1、 默认异常机制
默认异常处理(SpringBoot 默认提供了两种机制,一种是针对于web浏览器访问的错误页面响应,另一种则是针对于 接口测试工具等 的参数响应处理):
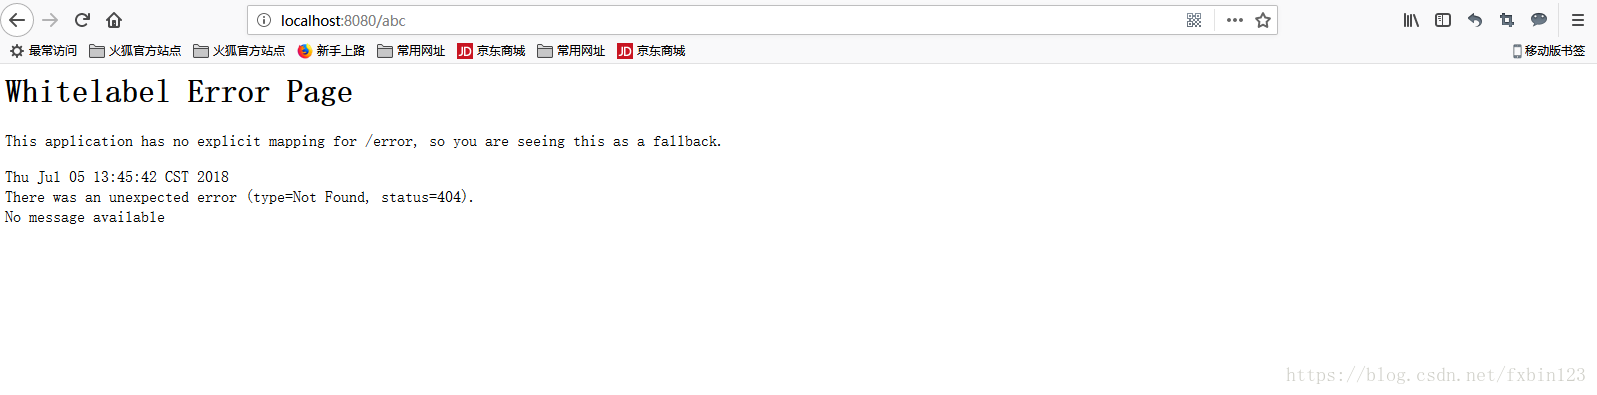
浏览器访问:
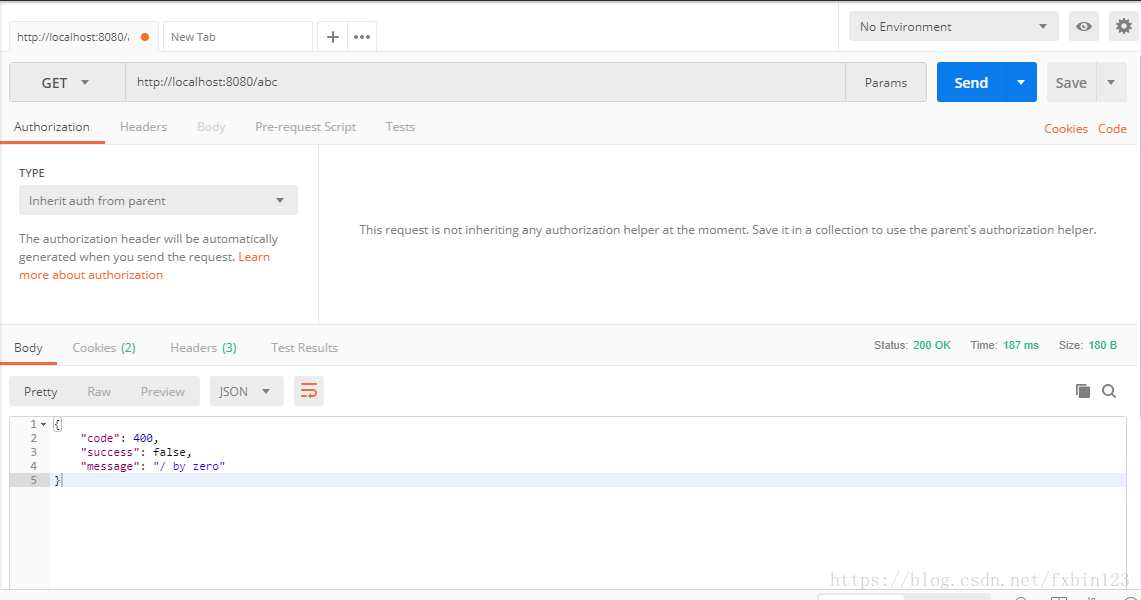
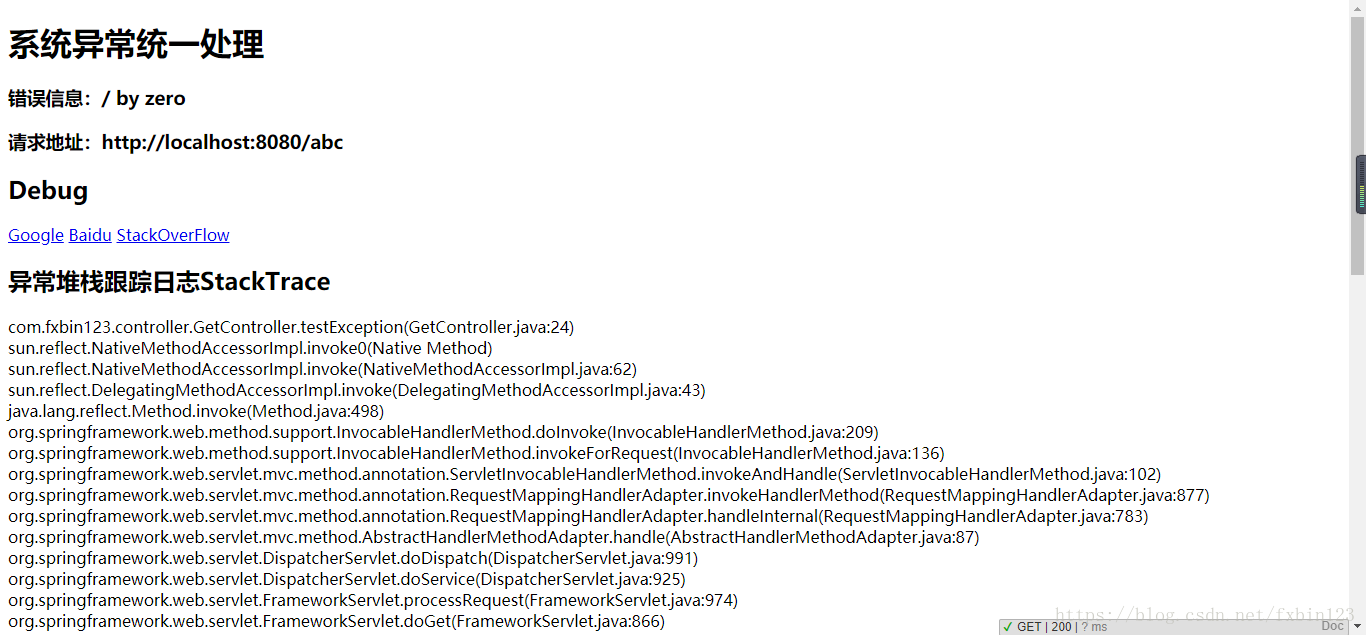
我们随意写一个不存在的请求 如:http://localhost:8080/abc
postman 接口测试:
http://localhost:8080/abc
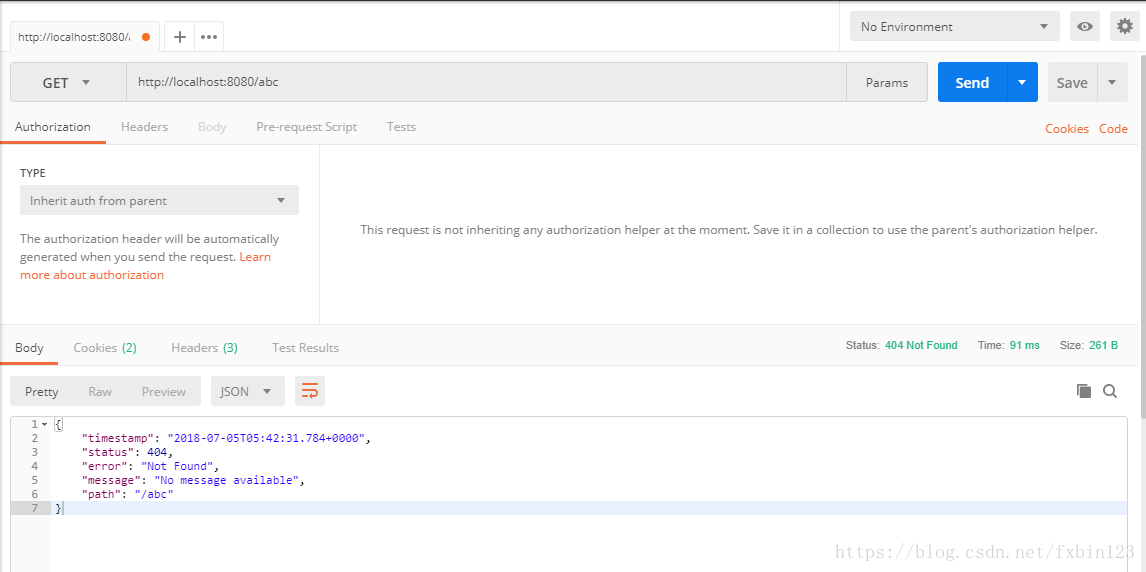
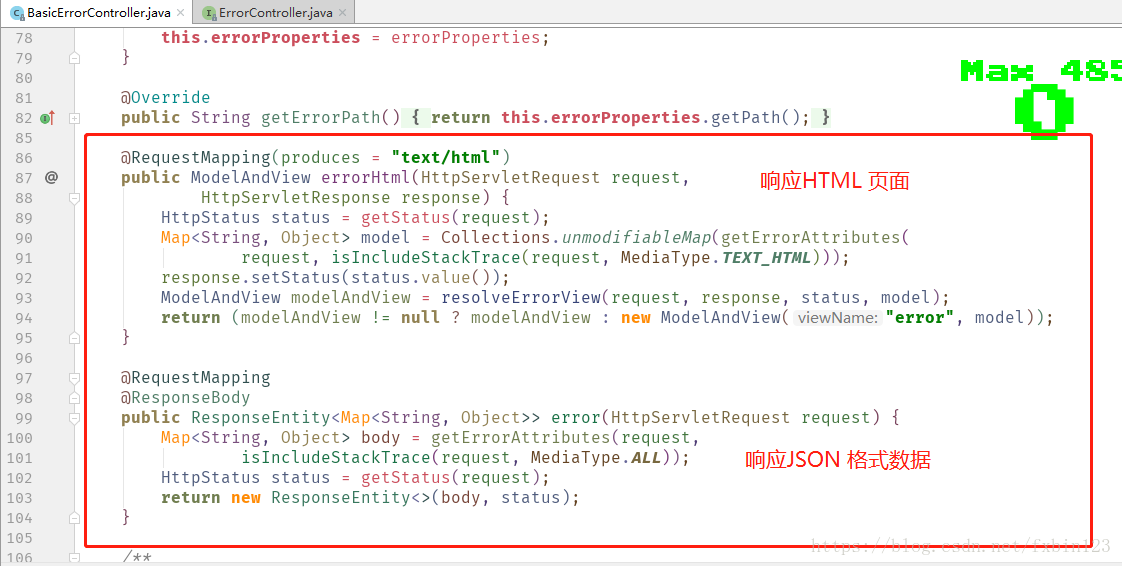
原理:SpringBoot默认提供了程序出错的结果映射路径/error。这个/error请求会在BasicErrorController中处理,其内部是通过判断请求头中的Accept的内容是否为text/html来区分请求是来自客户端浏览器(浏览器通常默认自动发送请求头内容Accept:text/html)还是客户端接口的调用,以此来决定返回页面视图还是 JSON 消息内容。
错误路径映射:
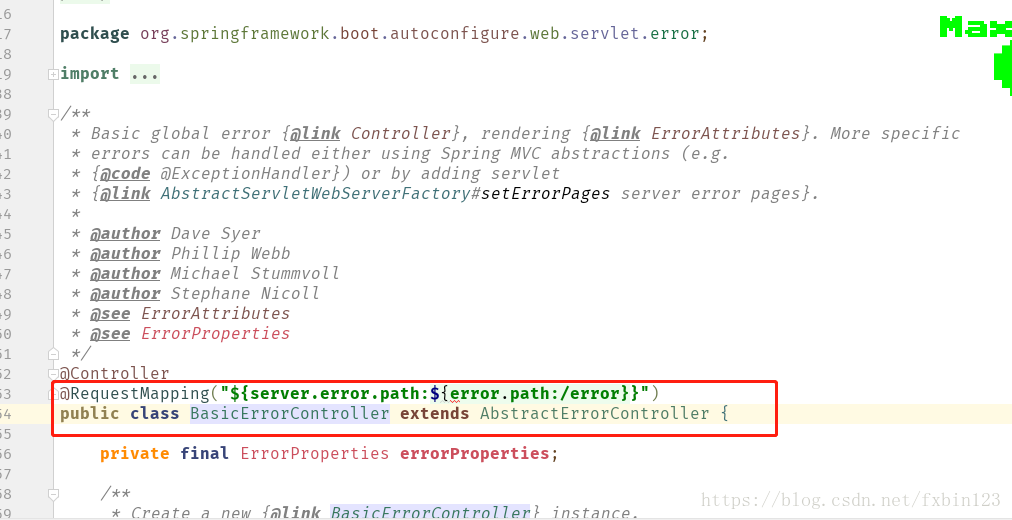
数据响应 BasicErrorController的相关代码:
2、自定义json格式异常响应
通过 @ControllerAdvice/@RestControllerAdvice 和 @ExceptionHandler 注解全局异常自定义响应类
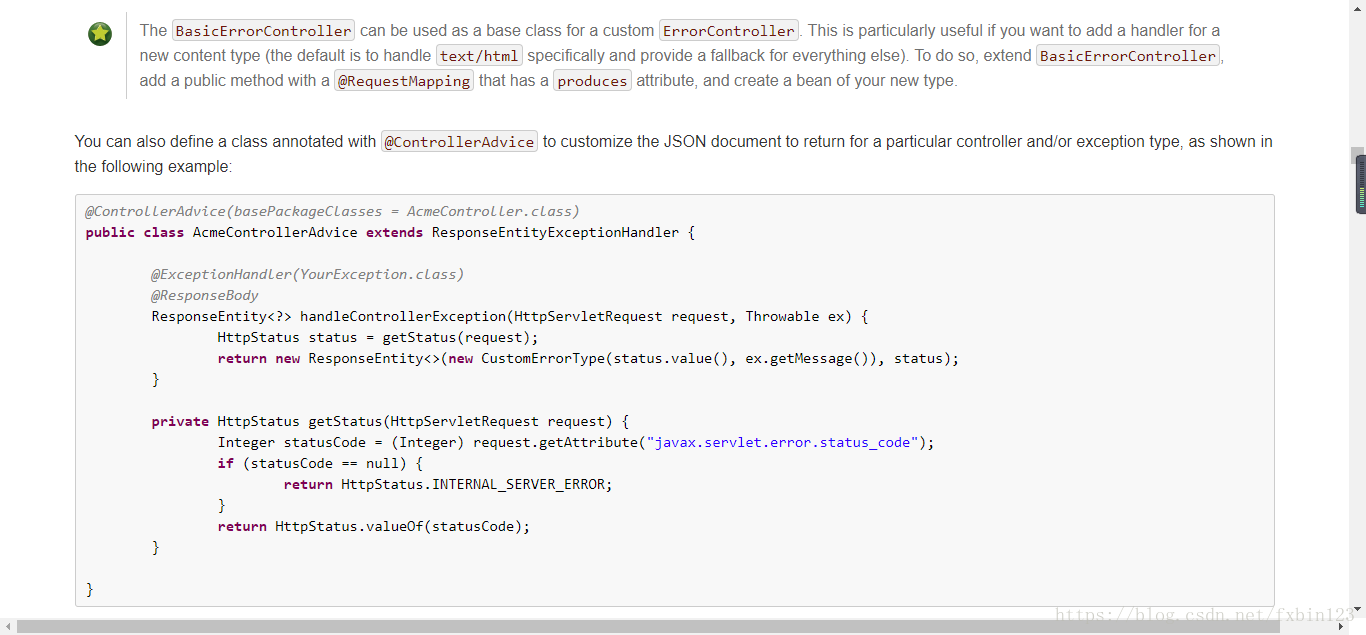
首先提供官网的 示例代码
接下来我们自定义我们自己的异常处理类
1> 首先定义响应状态码枚举类
 package com.fxbin123.dto;

/**
 * @author: fxbin
 * @datetime: 2018/7/5 18:36
 * @description:
 */
public enum ResultCode {
    SUCCESS(200),//成功
    FAIL(400),//失败
    UNAUTHORIZED(401),//未认证(签名错误)
    NOT_FOUND(404),//接口不存在
    INTERNAL_SERVER_ERROR(500);//服务器内部错误

    private final int code;

    ResultCode(int code) {
        this.code = code;
    }

    public int code() {
        return code;
    }
}
2> 定义 响应类
package com.fxbin123.dto;

import com.fasterxml.jackson.annotation.JsonInclude;
import lombok.Getter;
import lombok.Setter;
import lombok.ToString;

/**
 * @author: fxbin
 * @datetime: 2018/7/5 18:34
 * @description:
 */
public class Result {

    /**
     * 状态响应码
     */
    private int code;

    /**
     * 响应结果 成功/失败
     */
    private boolean success;

    /**
     * 响应信息
     */
    private String message;

    /**
     * 响应数据
     */
    @JsonInclude(JsonInclude.Include.NON_NULL)
    private Object data;

    public Result setCode(ResultCode resultCode) {
        this.code = resultCode.code();
        return this;
    }

    public int getCode() {
        return code;
    }

    public boolean isSuccess() {
        return success;
    }

    public Result setSuccess(boolean success) {
        this.success = success;
        return this;
    }

    public String getMessage() {
        return message;
    }

    public Result setMessage(String message) {
        this.message = message;
        return this;
    }

    public Object getData() {
        return data;
    }

    public Result setData(Object data) {
        this.data = data;
        return this;
    }
}
3> 对响应结果封装,做预处理
package com.fxbin123.dto;

/**
 * @author: fxbin
 * @datetime: 2018/7/5 18:36
 * @description:
 */
public class ResultGenerator {

    private static final String DEFAULT_SUCCESS_MESSAGE = "SUCCESS";

    public static Result genSuccessResult() {
        return new Result()
                .setCode(ResultCode.SUCCESS)
                .setSuccess(true)
                .setMessage(DEFAULT_SUCCESS_MESSAGE);
    }

    public static Result genSuccessResult(Object data) {
        return new Result()
                .setCode(ResultCode.SUCCESS)
                .setSuccess(true)
                .setMessage(DEFAULT_SUCCESS_MESSAGE)
                .setData(data);
    }

    public static Result genFailResult(String message) {
        return new Result()
                .setCode(ResultCode.FAIL)
                .setSuccess(false)
                .setMessage(message);
    }
}
4> 异常处理类
package com.fxbin123.advice;

import com.fxbin123.dto.Result;
import com.fxbin123.dto.ResultGenerator;
import org.springframework.web.bind.annotation.ExceptionHandler;
import org.springframework.web.bind.annotation.RestControllerAdvice;

import javax.servlet.http.HttpServletRequest;

/**
 * @author: fxbin
 * @datetime: 2018/7/5 18:29
 * @description:
 */
@RestControllerAdvice
public class ExceptionControllerAdvice {

    @ExceptionHandler(Exception.class)
    public Result jsonErrorHandler(HttpServletRequest req, Exception e){
        return ResultGenerator.genFailResult(e.getMessage());
    }
}
5> 接下来写一个测试类,对我们的全局异常配置进行测试
    @GetMapping(value="/abc")
    public Object testException(){
        int i = 5/0;
        return i;
    }
6> 测试结果
3、自定义异常处理页面
1> 添加*`thymeleaf`*依赖
      <dependency>
          <groupId>org.springframework.boot</groupId>
          <artifactId>spring-boot-starter-thymeleaf</artifactId>
      </dependency>
2> resource目录下新建templates,并新建error.html
  <!DOCTYPE HTML>
<html xmlns:th="http://www.thymeleaf.org" xmlns:layout="http://www.w3.org/1999/xhtml" layout:decorator="layout">
<head>
    <title>Spring Boot 自定义异常页面</title>
    <script type="text/javascript">
    </script>
</head>
<body>
<div layout:fragment="content" th:remove="tag">
    <div  id="navbar">
        <h1>系统异常统一处理</h1>
        <h3 th:text="'错误信息:'+${msg}"></h3>
        <h3 th:text="'请求地址:'+${url}"></h3>

        <h2>Debug</h2>
        <a th:href="@{'https://www.google.com/webhp?hl=zh-CN#safe=strict&hl=zh-CN&q='+${msg}}"
           class="btn btn-primary btn-lg" target="_blank" id="Google">Google</a>
        <a th:href="@{'https://www.baidu.com/s?wd='+${msg}}" class="btn btn-info btn-lg"  target="_blank" id="Baidu">Baidu</a>
        <a th:href="@{'http://stackoverflow.com/search?q='+${msg}}"
           class="btn btn-default btn-lg"  target="_blank" id="StackOverFlow">StackOverFlow</a>
        <h2>异常堆栈跟踪日志StackTrace</h2>
        <div th:each="line:${stackTrace}">
            <div th:text="${line}"></div>
        </div>
    </div>
</div>
<div layout:fragment="js" th:remove="tag">
</div>
</body>
</html>
3> 做错误页面异常处理 返回 ModelAndView
    @ExceptionHandler(Exception.class)
    public Object handleException(Exception e){
            ModelAndView modelAndView = new ModelAndView();
            modelAndView.addObject("msg", e.getMessage());
            modelAndView.addObject("url", req.getRequestURL());
            modelAndView.addObject("stackTrace", e.getStackTrace());
            modelAndView.setViewName("error");
            return modelAndView;
    }
4> 测试 结果如下
---end---