历经千辛万苦终于把这一关给过了,对一个菜鸟来说,终于算是松了一口气。。。
首先我想说明的一下是常见的tensorflow训练好的模型保存方式有两种:ckpt格式和pb格式,其中前者主要用于暂存我们训练的临时数据,避免发生意外导致训练终止,前面的努力全部白费掉了。而后者常用于将模型固化,提供离线预测,用户只要提供一个输入,通过模型就可以得到一个预测结果。很显然,我们想要的是后者。
下面就一个小栗子来详细说下具体的操作过程吧:
(1)训练生成pb文件
这里的图片是采用的猫狗识别的图片, ,先将图片转化成tfrecorder格式。
import os
import numpy as np
from PIL import Image
import tensorflow as tf


def get_files(file_dir):
    cat = []
    label_cat = []
    dog = []
    label_dog = []
    for file in os.listdir(file_dir):
        pp=os.path.join(file_dir,file)
        for pic in os.listdir(pp):
            pic_path=os.path.join(pp,pic)
            if file=="cat":
                cat.append(pic_path)#读取所在位置名称
                label_cat.append(0)#labels标签为0
            else:
                dog.append(pic_path)#读取所在位置名称
                label_dog.append(1)#labels标签为1
    print("There are %d cat \nThere are %d dod"%(len(cat),len(dog)))

    image_list = np.hstack((cat,dog))
    label_list = np.hstack((label_cat,label_dog))

    temp = np.array([image_list,label_list])
    temp = temp.transpose()#原来transpose的操作依赖于shape参数,对于一维的shape,转置是不起作用的.
    np.random.shuffle(temp)#随机排列  注意调试时不用

    image_list = list(temp[:,0])
    label_list = list(temp[:,1])
    label_list = [int(i) for i in label_list]

    return  image_list,label_list

def image2tfrecord(image_list,label_list,str_name):
    len2 = len(image_list)
    print("len=",len2)
    writer = tf.python_io.TFRecordWriter(str_name)
    for i in range(len2):
        #读取图片并解码
        image = Image.open(image_list[i])
        image = image.resize((224,224))
        #转化为原始字节
        image_bytes = image.tobytes()
        #创建字典
        features = {}
        #用bytes来存储image
        features['image_raw'] = tf.train.Feature(bytes_list=tf.train.BytesList(value=[image_bytes]))
        # 用int64来表达label
        features['label'] = tf.train.Feature(int64_list=tf.train.Int64List(value=[int(label_list[i])]))
        #将所有的feature合成features
        tf_features = tf.train.Features(feature=features)
        #转成example
        tf_example = tf.train.Example(features=tf_features)
        #序列化样本
        tf_serialized = tf_example.SerializeToString()
        #将序列化的样本写入rfrecord
        writer.write(tf_serialized)
    writer.close()


if __name__=="__main__":
    path="newdata"
    img_list,label_list=get_files(path)
    length=len(img_list )
    ratio = 0.8
    s = np.int(length * ratio)
    train_img_list=img_list[:s]
    train_lab_list=label_list[:s]
    val_img_list=img_list[s:]
    val_lab_list=label_list[s:]
    image2tfrecord(train_img_list,train_lab_list,"train.tfrecords")
    image2tfrecord(val_img_list,val_lab_list,"val.tfrecords")
接下来你会发现生成了两个文件,分别是train.tfrecorder和val.tfrecorder,这就是你的验证集和测试集,至于标签也包含在里面了。然后就是开始训练了:
import numpy as np
import math
import tensorflow as tf
from tensorflow.python.framework import graph_util

tra_data_dir = 'train.tfrecords'
val_data_dir = 'val.tfrecords'

max_learning_rate = 0.0002 #0.0002
min_learning_rate = 0.0001
decay_speed = 2000.0
lr = tf.placeholder(tf.float32)
learning_rate = lr
W = 224
H = 224
Channels = 3
n_classes = 2

def read_and_decode2stand(tfrecords_file, batch_size):
    '''read and decode tfrecord file, generate (image, label) batches
    Args:
        tfrecords_file: the directory of tfrecord file
        batch_size: number of images in each batch
    Returns:
        image_batch: 4D tensor - [batch_size, height, width, channel]
        label_batch: 2D tensor - [batch_size, n_classes]
    '''

    # make an input queue from the tfrecord file
    filename_queue = tf.train.string_input_producer([tfrecords_file])

    reader = tf.TFRecordReader()
    _, serialized_example = reader.read(filename_queue)
    img_features = tf.parse_single_example(
                                        serialized_example,
                                        features={
                                               'label': tf.FixedLenFeature([], tf.int64),
                                               'image_raw': tf.FixedLenFeature([], tf.string),
                                               })
    image = tf.decode_raw(img_features['image_raw'], tf.uint8)

    image = tf.reshape(image, [H, W,Channels])
    image = tf.cast(image, tf.float32) * (1.0 /255)
    image = tf.image.per_image_standardization(image)#standardization

    # all the images of notMNIST are 200*150, you need to change the image size if you use other dataset.
    label = tf.cast(img_features['label'], tf.int32)
    image_batch, label_batch = tf.train.batch([image, label],
                                                batch_size= batch_size,
                                                num_threads= 64,
                                                capacity = 2000)
    #Change to ONE-HOT
    label_batch = tf.one_hot(label_batch, depth= n_classes)
    label_batch = tf.cast(label_batch, dtype=tf.int32)
    label_batch = tf.reshape(label_batch, [batch_size, n_classes])
    print(label_batch)
    return image_batch, label_batch

def my_batch_norm(inputs):
    scale = tf.Variable(tf.ones([inputs.get_shape()[-1]]),dtype=tf.float32)
    beta = tf.Variable(tf.zeros([inputs.get_shape()[-1]]),dtype=tf.float32)
    batch_mean = tf.Variable(tf.zeros([inputs.get_shape()[-1]]), trainable=False)
    batch_var = tf.Variable(tf.ones([inputs.get_shape()[-1]]), trainable=False)

    batch_mean, batch_var = tf.nn.moments(inputs,[0,1,2])
    return inputs, batch_mean, batch_var, beta, scale

def build_network(height, width, channel):
    x = tf.placeholder(tf.float32, shape=[None, height, width, channel], name="input")  ####这个名称很重要!!!
    y = tf.placeholder(tf.int32, shape=[None, n_classes], name="labels_placeholder")

    def weight_variable(shape, name="weights"):
        initial = tf.truncated_normal(shape, stddev=0.1)
        return tf.Variable(initial, name=name)

    def bias_variable(shape, name="biases"):
        initial = tf.constant(0.1, shape=shape)
        return tf.Variable(initial, name=name)

    def conv2d(input, w):
        return tf.nn.conv2d(input, w, [1, 1, 1, 1], padding='SAME')

    def pool_max(input):
        return tf.nn.max_pool(input,
                               ksize=[1, 3, 3, 1],
                               strides=[1, 2, 2, 1],
                               padding='SAME',
                               name='pool1')

    def fc(input, w, b):
        return tf.matmul(input, w) + b

    # conv1
    with tf.name_scope('conv1_1') as scope:
        kernel = weight_variable([3, 3, Channels, 64])
        biases = bias_variable([64])
        conv1_1 = tf.nn.bias_add(conv2d(x, kernel), biases)
        inputs, pop_mean, pop_var, beta, scale = my_batch_norm(conv1_1)
        conv_batch_norm = tf.nn.batch_normalization(inputs, pop_mean, pop_var, beta, scale, 0.001)
        output_conv1_1 = tf.nn.relu(conv_batch_norm, name=scope)

    with tf.name_scope('conv1_2') as scope:
        kernel = weight_variable([3, 3, 64, 64])
        biases = bias_variable([64])
        conv1_2 = tf.nn.bias_add(conv2d(output_conv1_1, kernel), biases)
        inputs, pop_mean, pop_var, beta, scale = my_batch_norm(conv1_2)
        conv_batch_norm = tf.nn.batch_normalization(inputs, pop_mean, pop_var, beta, scale, 0.001)
        output_conv1_2 = tf.nn.relu(conv_batch_norm, name=scope)

    pool1 = pool_max(output_conv1_2)

    # conv2
    with tf.name_scope('conv2_1') as scope:
        kernel = weight_variable([3, 3, 64, 128])
        biases = bias_variable([128])
        conv2_1 = tf.nn.bias_add(conv2d(pool1, kernel), biases)
        inputs, pop_mean, pop_var, beta, scale = my_batch_norm(conv2_1)
        conv_batch_norm = tf.nn.batch_normalization(inputs, pop_mean, pop_var, beta, scale, 0.001)
        output_conv2_1 = tf.nn.relu(conv_batch_norm, name=scope)

    with tf.name_scope('conv2_2') as scope:
        kernel = weight_variable([3, 3, 128, 128])
        biases = bias_variable([128])
        conv2_2 = tf.nn.bias_add(conv2d(output_conv2_1, kernel), biases)
        inputs, pop_mean, pop_var, beta, scale = my_batch_norm(conv2_2)
        conv_batch_norm = tf.nn.batch_normalization(inputs, pop_mean, pop_var, beta, scale, 0.001)
        output_conv2_2 = tf.nn.relu(conv_batch_norm, name=scope)

    pool2 = pool_max(output_conv2_2)

    # conv3
    with tf.name_scope('conv3_1') as scope:
        kernel = weight_variable([3, 3, 128, 256])
        biases = bias_variable([256])
        conv3_1 = tf.nn.bias_add(conv2d(pool2, kernel), biases)
        inputs, pop_mean, pop_var, beta, scale = my_batch_norm(conv3_1)
        conv_batch_norm = tf.nn.batch_normalization(inputs, pop_mean, pop_var, beta, scale, 0.001)
        output_conv3_1 = tf.nn.relu(conv_batch_norm, name=scope)

    with tf.name_scope('conv3_2') as scope:
        kernel = weight_variable([3, 3, 256, 256])
        biases = bias_variable([256])
        conv3_2 = tf.nn.bias_add(conv2d(output_conv3_1, kernel), biases)
        inputs, pop_mean, pop_var, beta, scale = my_batch_norm(conv3_2)
        conv_batch_norm = tf.nn.batch_normalization(inputs, pop_mean, pop_var, beta, scale, 0.001)
        output_conv3_2 = tf.nn.relu(conv_batch_norm, name=scope)

#     with tf.name_scope('conv3_3') as scope:
#         kernel = weight_variable([3, 3, 256, 256])
#         biases = bias_variable([256])
#         output_conv3_3 = tf.nn.relu(conv2d(output_conv3_2, kernel) + biases, name=scope)

    pool3 = pool_max(output_conv3_2)

    # '''
    # # conv4
    # with tf.name_scope('conv4_1') as scope:
    #     kernel = weight_variable([3, 3, 256, 512])
    #     biases = bias_variable([512])
    #     output_conv4_1 = tf.nn.relu(conv2d(pool3, kernel) + biases, name=scope)
    #
    # with tf.name_scope('conv4_2') as scope:
    #     kernel = weight_variable([3, 3, 512, 512])
    #     biases = bias_variable([512])
    #     output_conv4_2 = tf.nn.relu(conv2d(output_conv4_1, kernel) + biases, name=scope)
    #
    # with tf.name_scope('conv4_3') as scope:
    #     kernel = weight_variable([3, 3, 512, 512])
    #     biases = bias_variable([512])
    #     output_conv4_3 = tf.nn.relu(conv2d(output_conv4_2, kernel) + biases, name=scope)
    #
    # pool4 = pool_max(output_conv4_3)
    #
    # # conv5
    # with tf.name_scope('conv5_1') as scope:
    #     kernel = weight_variable([3, 3, 512, 512])
    #     biases = bias_variable([512])
    #     output_conv5_1 = tf.nn.relu(conv2d(pool4, kernel) + biases, name=scope)
    #
    # with tf.name_scope('conv5_2') as scope:
    #     kernel = weight_variable([3, 3, 512, 512])
    #     biases = bias_variable([512])
    #     output_conv5_2 = tf.nn.relu(conv2d(output_conv5_1, kernel) + biases, name=scope)
    #
    # with tf.name_scope('conv5_3') as scope:
    #     kernel = weight_variable([3, 3, 512, 512])
    #     biases = bias_variable([512])
    #     output_conv5_3 = tf.nn.relu(conv2d(output_conv5_2, kernel) + biases, name=scope)
    #
    # pool5 = pool_max(output_conv5_3)
    # '''


    #fc6
    with tf.name_scope('fc6') as scope:
        shape = int(np.prod(pool3.get_shape()[1:]))
        kernel = weight_variable([shape, 120])
        #kernel = weight_variable([shape, 4096])
        #biases = bias_variable([4096])
        biases = bias_variable([120])
        pool5_flat = tf.reshape(pool3, [-1, shape])
        output_fc6 = tf.nn.relu(fc(pool5_flat, kernel, biases), name=scope)

    #fc7
    with tf.name_scope('fc7') as scope:
        #kernel = weight_variable([4096, 4096])
        #biases = bias_variable([4096])
        kernel = weight_variable([120, 100])
        biases = bias_variable([100])
        output_fc7 = tf.nn.relu(fc(output_fc6, kernel, biases), name=scope)

    #fc8
    with tf.name_scope('fc8') as scope:
        #kernel = weight_variable([4096, n_classes])
        kernel = weight_variable([100, n_classes])
        biases = bias_variable([n_classes])
        output_fc8 = tf.nn.relu(fc(output_fc7, kernel, biases), name=scope)

    finaloutput = tf.nn.softmax(output_fc8, name="softmax")   ####这个名称很重要!!

    cost = tf.reduce_mean(tf.nn.softmax_cross_entropy_with_logits(logits=finaloutput, labels=y))*1000
    optimize = tf.train.AdamOptimizer(lr).minimize(cost)

    prediction_labels = tf.argmax(finaloutput, axis=1, name="output")   ####这个名称很重要!!!
    read_labels = tf.argmax(y, axis=1)

    correct_prediction = tf.equal(prediction_labels, read_labels)
    accuracy = tf.reduce_mean(tf.cast(correct_prediction, tf.float32))

    correct_times_in_batch = tf.reduce_sum(tf.cast(correct_prediction, tf.int32))

    return dict(
        x=x,
        y=y,
        lr=lr,
        optimize=optimize,
        correct_prediction=correct_prediction,
        correct_times_in_batch=correct_times_in_batch,
        cost=cost,
        accuracy=accuracy,
    )


def train_network(graph, batch_size, num_epochs, pb_file_path):
    tra_image_batch, tra_label_batch = read_and_decode2stand(tfrecords_file=tra_data_dir,
                                                 batch_size= batch_size)
    val_image_batch, val_label_batch = read_and_decode2stand(tfrecords_file=val_data_dir,
                                                    batch_size= batch_size)
    init = tf.global_variables_initializer()
    with tf.Session() as sess:
        sess.run(init)
        coord = tf.train.Coordinator()
        threads = tf.train.start_queue_runners(sess=sess, coord=coord)
        epoch_delta = 20
        try:
            for epoch_index in range(num_epochs):
                learning_rate = min_learning_rate + (max_learning_rate - min_learning_rate) * math.exp(-epoch_index/decay_speed)
                tra_images,tra_labels = sess.run([tra_image_batch, tra_label_batch])
                accuracy,mean_cost_in_batch,return_correct_times_in_batch,_=sess.run([graph['accuracy'],graph['cost'],graph['correct_times_in_batch'],graph['optimize']], feed_dict={
                    graph['x']: tra_images,
                    graph['lr']:learning_rate,
                    graph['y']: tra_labels
                })
                if epoch_index % epoch_delta == 0:
                    # 开始在 train set上计算一下accuracy和cost
                    print("index[%s]".center(50,'-')%epoch_index)
                    print("Train: cost_in_batch:{},correct_in_batch:{},accuracy:{}".format(mean_cost_in_batch,return_correct_times_in_batch,accuracy))

                    # 开始在 test set上计算一下accuracy和cost
                    val_images, val_labels = sess.run([val_image_batch, val_label_batch])
                    mean_cost_in_batch,return_correct_times_in_batch = sess.run([graph['cost'],graph['correct_times_in_batch']], feed_dict={
                        graph['x']: val_images,
                        graph['y']: val_labels
                    })
                    print("***Val: cost_in_batch:{},correct_in_batch:{},accuracy:{}".format(mean_cost_in_batch,return_correct_times_in_batch,return_correct_times_in_batch/batch_size))


                if epoch_index % 50 == 0:
                    constant_graph = graph_util.convert_variables_to_constants(sess, sess.graph_def, ["output"])
                    with tf.gfile.FastGFile(pb_file_path, mode='wb') as f:
                        f.write(constant_graph.SerializeToString())
        except tf.errors.OutOfRangeError:
            print('Done training -- epoch limit reached')
        finally:
            coord.request_stop()
        coord.join(threads)
        sess.close()


if __name__=="__main__":
    batch_size = 30
    num_epochs = 1000

    pb_file_path = "catdog.pb"

    g = build_network(height=H, width=W, channel=3)
    train_network(g, batch_size, num_epochs, pb_file_path)
这个训练模型采用的vgg16,至于层数你可以自己调节,这个版本网上很多的。其中的模型参数,图片大小可以根据你的需要来进行调节,需要注意的是在训练中注意给输入输出起一个名字啦!!!
接下来就是漫长的等待,等训练完了,你会发现这就生成了一个pb格式的文件。接下来我们可以来测试一下模型性能怎么样,
import matplotlib.pyplot as plt
import tensorflow as tf
import  numpy as np
import PIL.Image as Image
from skimage import transform
W = 224
H = 224
def recognize(jpg_path):
    with tf.Graph().as_default():
        output_graph_def = tf.GraphDef()
        pb_file_path="catdog.pb"
        with open(pb_file_path, "rb") as f:
            output_graph_def.ParseFromString(f.read()) #rb
            _ = tf.import_graph_def(output_graph_def, name="")

        with tf.Session() as sess:
            tf.global_variables_initializer().run()

            input_x = sess.graph.get_tensor_by_name("input:0") ####这就是刚才取名的原因
            print (input_x)
            out_softmax = sess.graph.get_tensor_by_name("softmax:0")
            print (out_softmax)
            out_label = sess.graph.get_tensor_by_name("output:0")
            print (out_label)

            img = np.array(Image.open(jpg_path).convert('L'))
            img = transform.resize(img, (H, W, 3))

            plt.figure("fig1")
            plt.imshow(img)
            img = img * (1.0 /255)
            img_out_softmax = sess.run(out_softmax, feed_dict={input_x:np.reshape(img, [-1, H, W, 3])})

            print ("img_out_softmax:",img_out_softmax)
            prediction_labels = np.argmax(img_out_softmax, axis=1)
            print ("prediction_labels:",prediction_labels)

            plt.show()

recognize("C:\\Users\\Administrator\\Desktop\\处理效果图\\11.jpg")  ####修改成自己的图片路径
(2)调用
发现模型预测结果还不错,那就开始进入今天的主题啦!!!!!我们该怎样才能在Windows下通过c++来调用该模型呢?接下来就是见证奇迹开始的时候啦!!!别眨眼哦。
首先声明一下,我的电脑配置是win10,vs是10版本的,我的python3是通过anaconda来安装的。
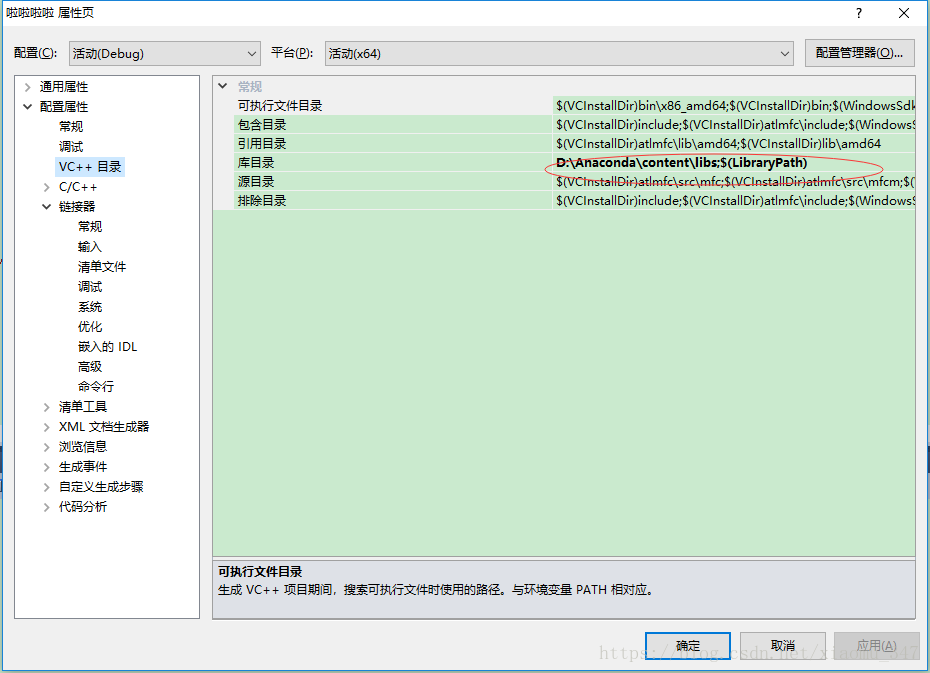
接下来我们首先做的当然是在vs里新建一个控制台程序或者MFC程序啦!然后再开始导入python库,这一步很重要,需要针对自己刚开始训练的环境来,由于我刚开始是在win64下训练的模型,下载的也是64位的tensorflow,所以我需要把我的vs环境切换到win64下,然后开始配置加载你电脑上的python库,具体操作如下图所示:
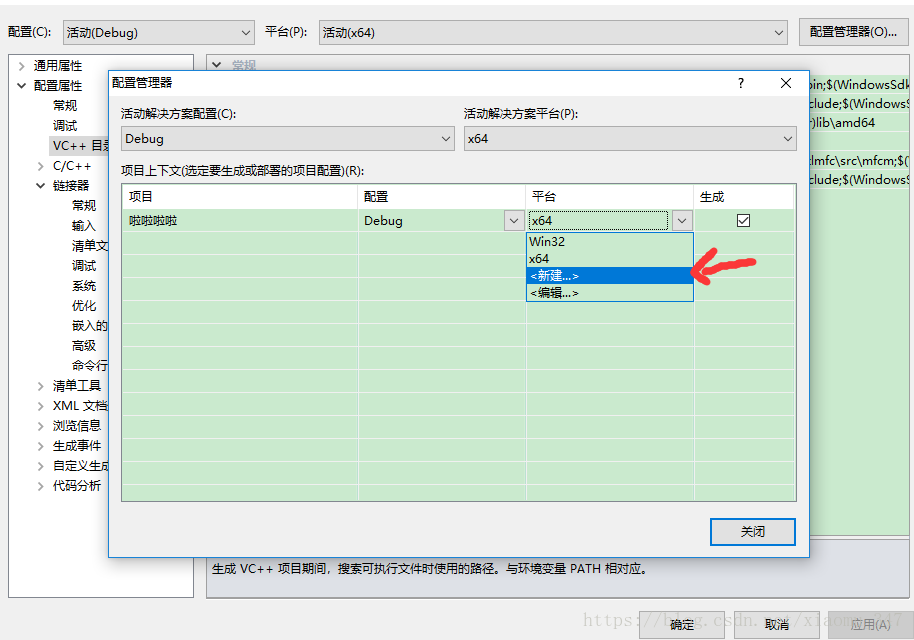
没有就选新建,然后你需要做的就是加载库
还有头文件
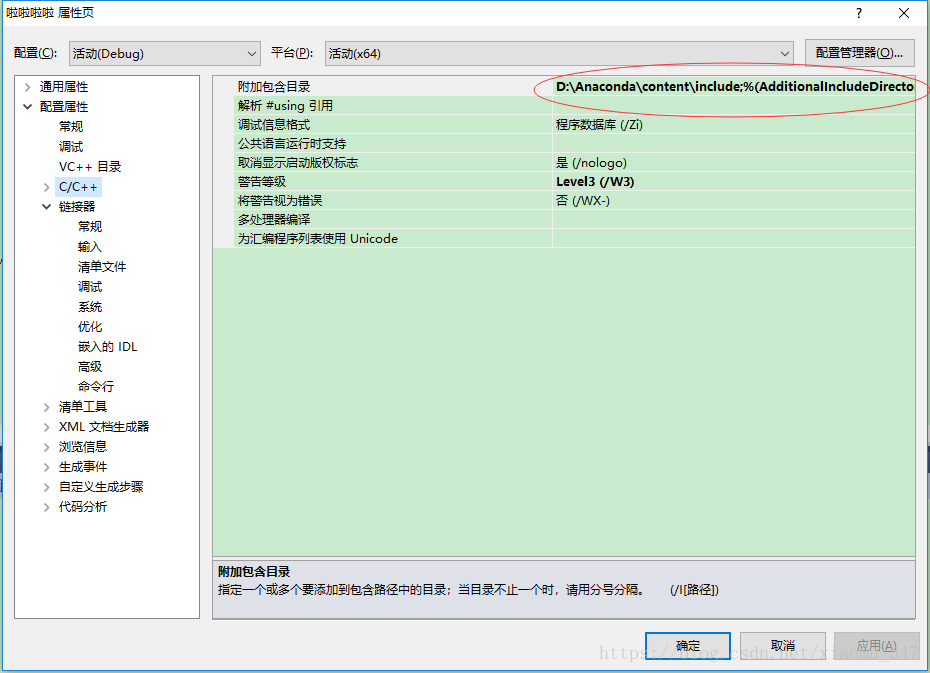
还有
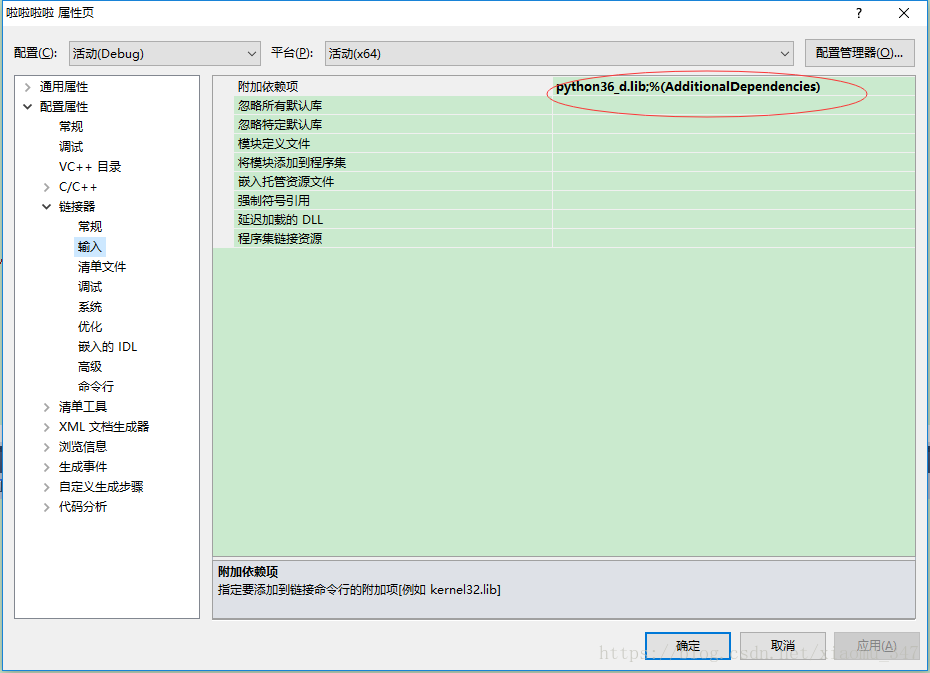
其实你打开自己的安装的python路径libs文件夹,你会发现你下面根本没有python36_d.lib文件,其实你需要做的就是将python36.lib拷贝重命名一份即可。
环境配置好了以后,你需要做的有两件事,那就是写一个cpp文件以及需要调用的py文件啦。其中cpp文件代码如下:
#include<iostream>
#include <Python.h>
#include<windows.h>
using namespace std;
void testImage(char * path)
{
try{
Py_Initialize();
PyEval_InitThreads();
PyObject*pFunc = NULL;
PyObject*pArg = NULL;
PyObject* module = NULL;
module = PyImport_ImportModule("catmodel");//myModel:Python文件名
if (!module) {
printf("cannot open module!");
Py_Finalize();
return ;
}
pFunc = PyObject_GetAttrString(module, "test_one_image");//test_one_image:Python文件中的函数名
if (!pFunc) {
printf("cannot open FUNC!");
Py_Finalize();
return ;
}
//开始调用model
pArg = Py_BuildValue("(s)", path);
if (module != NULL) {
PyGILState_STATE gstate;
gstate = PyGILState_Ensure();
PyEval_CallObject(pFunc, pArg);
PyGILState_Release(gstate);
}
}
catch (exception& e)
{
cout << "Standard exception: " << e.what() << endl;
}
}
int main()
{
char * path= "D:\\pycharm\\My-TensorFlow-tutorials-master\\01 cats vs dogs\\data\\train\\cat.1.jpg";
testImage(path);
system("pause");
return 0;
}
而py文件如下:(注意py文件名需要和cpp中对应)
import matplotlib.pyplot as plt
import tensorflow as tf
import  numpy as np
import PIL.Image as Image
from skimage import io, transform

def test_one_image(jpg_path):
    print("进入模型")
    with tf.Graph().as_default():
        output_graph_def = tf.GraphDef()
        pb_file_path="D:\\vs2010\\Project\\调用模型\\x64\\Release\\catdog.pb"
        with open(pb_file_path, "rb") as f:
            output_graph_def.ParseFromString(f.read()) #rb
            _ = tf.import_graph_def(output_graph_def, name="")
        print("2222")
        with tf.Session() as sess:
            tf.global_variables_initializer().run()

            input_x = sess.graph.get_tensor_by_name("input:0")
            print (input_x)
            out_softmax = sess.graph.get_tensor_by_name("softmax:0")
            print (out_softmax)
            out_label = sess.graph.get_tensor_by_name("output:0")
            print (out_label)
            print("开始读图")
            img = io.imread(jpg_path)
            img = transform.resize(img, (224, 224, 3))
            img_out_softmax = sess.run(out_softmax, feed_dict={input_x:np.reshape(img, [-1, 224, 224, 3])})

            print("234234")
            print ("img_out_softmax:",img_out_softmax)
            prediction_labels = np.argmax(img_out_softmax, axis=1)
            print ("prediction_labels:",prediction_labels)
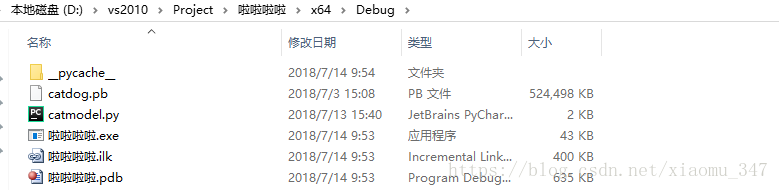
将py文件放入到你c++新建的工程x64文件下
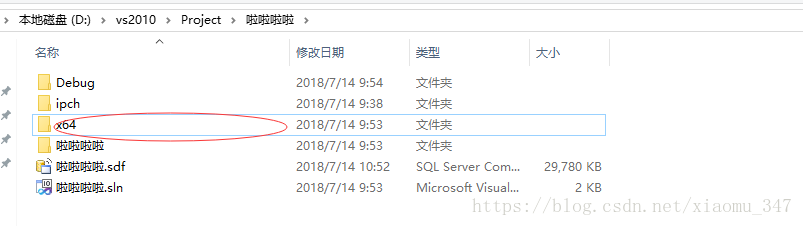
如果刚开始没有这个文件,你可以现在vs里面运行一下,无论报错,然后就可以看到这个文件了,至于是debug下还是release下就看你上面配置的环境了,为了方便你也可以将pb文件一起拷贝过来,虽然py文件里已经指定了pb的路径,这个需要保持一致。
接下来就是见证奇迹开始的时候啦,在vs下运行cpp文件,出现以下结果就表示你调用成功啦!

好的今天就先写到这了!!!