本文主要解析measure_pin.hdev中两段代码,说明0001文章中两个测量函数measure_pairs和measure_pos的使用。
1. measure_pairs的使用:
此段代码的作用:
测量该芯片引脚的个数、芯片引脚间的像素距离,以及芯片引脚的像素宽度。
基于此需求,因此此处必然的选择measure_pairs函数。
所有dev_或者是disp_开头的函数,咱们可以暂时不关注,因为都是和窗口显示相关的函数,主要关注和测量相关的两个函数,在如下的代码中用红色标识出来了。
测量的一般步骤为:
1)读图像
2)处理为灰度图像
3)形成测量矩形,从而能得到测量句柄
4)测量
5)显示测量结果
dev_close_window ()
read_image (Image, 'ic_pin')
get_image_size (Image, Width, Height)
dev_open_window (0, 0, Width / 2, Height / 2, 'black', WindowHandle)
set_display_font (WindowHandle, 14, 'mono', 'true', 'false')
dev_display (Image)
disp_continue_message (WindowHandle, 'black', 'true')
stop ()
* draw_rectangle2 (WindowHandle, Row, Column, Phi, Length1, Length2)
Row := 47
Column := 485
Phi := 0
Length1 := 420
Length2 := 10
dev_set_color ('green')
dev_set_draw ('margin')
dev_set_line_width (3)
gen_rectangle2 (Rectangle, Row, Column, Phi, Length1, Length2)
gen_measure_rectangle2 (Row, Column, Phi, Length1, Length2, Width, Height, 'nearest_neighbor', MeasureHandle)
disp_continue_message (WindowHandle, 'black', 'true')
stop ()
dev_update_pc ('off')
dev_update_var ('off')
n := 100
count_seconds (Seconds1)
for i := 1 to n by 1
measure_pairs (Image, MeasureHandle, 1.5, 30, 'negative', 'all', RowEdgeFirst, ColumnEdgeFirst, AmplitudeFirst, RowEdgeSecond, ColumnEdgeSecond, AmplitudeSecond, PinWidth, PinDistance)
endfor
count_seconds (Seconds2)
Time := Seconds2 - Seconds1
disp_continue_message (WindowHandle, 'black', 'true')
stop ()
dev_set_color ('red')
disp_line (WindowHandle, RowEdgeFirst, ColumnEdgeFirst, RowEdgeSecond, ColumnEdgeSecond)
avgPinWidth := sum(PinWidth) / |PinWidth|
avgPinDistance := sum(PinDistance) / |PinDistance|
numPins := |PinWidth|
dev_set_color ('yellow')
disp_message (WindowHandle, 'Number of pins: ' + numPins, 'image', 200, 100, 'yellow', 'false')
disp_message (WindowHandle, 'Average Pin Width: ' + avgPinWidth, 'image', 260, 100, 'yellow', 'false')
disp_message (WindowHandle, 'Average Pin Distance: ' + avgPinDistance, 'image', 320, 100, 'yellow', 'false')
* dump_window (WindowHandle, 'tiff_rgb', 'C:\\Temp\\pins_result')
disp_continue_message (WindowHandle, 'black', 'true')
stop ()
执行的结果如下图所示:

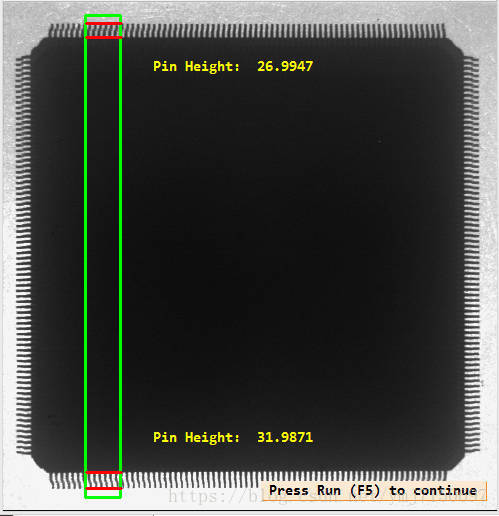
2. measure_pos的使用
此段代码的作用:
测量芯片引脚的长度
基于此需求,我们使用measure_pos是最好的选择。
使用measure_pos的测量步骤是一模一样的只是根据具体的需求,测量的时候,是选择measure_pairs,还是选择measure_pos而已。
Row := 508
Column := 200
Phi := -1.5708
Length1 := 482
Length2 := 35
gen_rectangle2 (Rectangle, Row, Column, Phi, Length1, Length2)
gen_measure_rectangle2 (Row, Column, Phi, Length1, Length2, Width, Height, 'nearest_neighbor', MeasureHandle)
stop ()
measure_pos (Image, MeasureHandle, 1.5, 30, 'all', 'all', RowEdge, ColumnEdge, Amplitude, Distance)
PinHeight1 := RowEdge[1] - RowEdge[0]
PinHeight2 := RowEdge[3] - RowEdge[2]
dev_set_color ('red')
disp_line (WindowHandle, RowEdge, ColumnEdge - Length2, RowEdge, ColumnEdge + Length2)
disp_message (WindowHandle, 'Pin Height: ' + PinHeight1, 'image', RowEdge[1] + 40, ColumnEdge[1] + 100, 'yellow', 'false')
disp_message (WindowHandle, 'Pin Height: ' + PinHeight2, 'image', RowEdge[3] - 120, ColumnEdge[3] + 100, 'yellow', 'false')
* dump_window (WindowHandle, 'tiff_rgb', 'C:\\Temp\\pins_height_result')
close_measure (MeasureHandle)
执行的结果如下图所示: