11.1 LAMP架构介绍
11.2 MySQL、MariaDB介绍
11.3/11.4/11.5 MySQL安装
11.6 MariaDB安装
11.7/11.8/11.9 Apache安装
11.10/11.11/11.12 安装PHP5
11.13 安装PHP7
11.14/11.15 Apache和PHP结合
1.LAMP架构介绍
LAMP(Linux-Apache-MySQL-PHP)网站架构是目前国际流行的Web框架,该框架包括:Linux操作系统,Apache网络服务器,MySQL数据库,Perl、PHP或者Python编程语言,所有组成产品均是开源软件,是国际上成熟的架构框架,很多流行的商业应用都是采取这个架构,LAMP具有通用、跨平台、高性能、低价格的优势,因此LAMP无论是性能、质量还是价格都是企业搭建网站的首选平台。
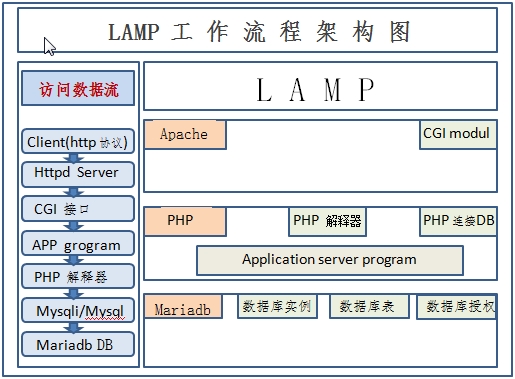
apache主要实现如下功能:
第一:处理http的请求、构建响应报文等自身服务;
第二:配置让Apache支持PHP程序的响应(通过PHP模块或FPM);
第三:配置Apache具体处理php程序的方法,如通过反向代理将php程序交给fcgi处理。
mariadb主要实现如下功能:
第一:提供PHP程序对数据的存储;
第二:提供PHP程序对数据的读取(通常情况下从性能的角度考虑,尽量实现数据库的读写分离)。
php主要实现如下功能:
第一:提供apache的访问接口,即CGI或Fast CGI(FPM);
第二:提供PHP程序的解释器;
第三:提供mairadb数据库的连接函数的基本环境。
由此可知,要实现LAMP在配置每一个服务时,安装功能需求进行配置,即可实现LAMP的架构,当然apache、mariadb(mysql)和php服务都可配置为独立服务,安装在不同电脑之上。
2.MySQL、MariaDB介绍
2.1 Mysql由于其体积小、速度快、总体拥有成本低,尤其是开放源码这一特点,许多中小型网站为了降低网站总体拥有成本而选择了MySQL作为网站数据库。MySQL是一个多用户、多线程的关系型数据库管理系统。 工作模式是基于客户机/服务器结构。目前它可以支持几乎所有的操作系统,同时也可以和php完美结合。
简单的来说 ,MySql是一个开放的、快速的、多线程的、多用户的SQL数据库服务器。
2.2 MariaDB数据库管理系统是MySQL的一个分支,主要由开源社区在维护,采用GPL授权许可。开发这个分支的原因之一是:甲骨文公司收购了MySQL后,有将MySQL闭源的潜在风险,因此社区采用分支的方式来避开这个风险。
MariaDB的目的是完全兼容MySQL,包括API和命令行,使之能轻松成为MySQL的代替品。在存储引擎方面,10.0.9版起使用XtraDB(名称代号为Aria(英语:Aria (storage engine)))来代替MySQL的InnoDB。
MariaDB由MySQL的创始人麦克尔·维德纽斯(英语:Michael Widenius)主导开发,他早前曾以10亿美元的价格,将自己创建的公司MySQL AB卖给了SUN,此后,随着SUN被甲骨文收购,MySQL的所有权也落入Oracle的手中。MariaDB名称来自麦克尔·维德纽斯的女儿玛丽亚(英语:Maria)的名字。
3. MySQL安装
3.1 首先我们要找到自已对应的版本,查看一下自已的操作系统
[root@localhost src]# uname -a
Linux localhost.localdomain 3.10.0-862.el7.x86_64 #1 SMP Fri Apr 20 16:44:24 UTC 2018 x86_64 x86_64 x86_64 GNU/Linux
//x86_64位系统
3.2那我们就到阿铭老师的网站里面找到相应的二进制包进行下载:
https://coding.net/u/aminglinux/p/resource/git/blob/master/README.md
3.3 我们这里一般都会把安装包放在/usr/local/src下面,这里我们看一下下载速度还是很快的!
[root@localhost ~]# cd /usr/local/src
[root@localhost src]# ls
apr-1.4.5  apr-1.4.5.tar.gz  apr-util-1.3.12  apr-util-1.3.12.tar.gz  httpd-2.4.34  httpd-2.4.34.tar.gz  pcre-8.10  pcre-8.10.zip
[root@localhost src]# wget http://mirrors.163.com/mysql/Downloads/MySQL-5.6/mysql-5.6.39-linux-glibc2.12-x86_64.tar.gz
--2018-08-25 05:55:22--  http://mirrors.163.com/mysql/Downloads/MySQL-5.6/mysql-5.6.39-linux-glibc2.12-x86_64.tar.gz
Resolving mirrors.163.com (mirrors.163.com)... 59.111.0.251
Connecting to mirrors.163.com (mirrors.163.com)|59.111.0.251|:80... connected.
HTTP request sent, awaiting response... 200 OK
Length: 328882304 (314M) [application/octet-stream]
Saving to: ‘mysql-5.6.39-linux-glibc2.12-x86_64.tar.gz’

100%[==============================================================================================>] 328,882,304 5.34MB/s   in 48s

2018-08-25 05:56:11 (6.49 MB/s) - ‘mysql-5.6.39-linux-glibc2.12-x86_64.tar.gz’ saved [328882304/328882304]
3.4下面是重点了:
3.4.1 首先我们把安装包解压出来
//解压安装包到当前目录
[root@localhost src]# tar xzvf mysql-5.6.39-linux-glibc2.12-x86_64.tar.gz
mysql-5.6.39-linux-glibc2.12-x86_64/mysql-test/suite/engines/iuds/t/strings_charsets_update_delete.test
mysql-5.6.39-linux-glibc2.12-x86_64/mysql-test/suite/engines/iuds/t/disabled.def
mysql-5.6.39-linux-glibc2.12-x86_64/mysql-test/suite/engines/iuds/t/delete_time.test
mysql-5.6.39-linux-glibc2.12-x86_64/mysql-test/suite/engines/iuds/t/strings_update_delete.test
mysql-5.6.39-linux-glibc2.12-x86_64/mysql-test/suite/engines/iuds/t/insert_number.test
mysql-5.6.39-linux-glibc2.12-x86_64/mysql-test/suite/engines/iuds/t/sample.txt
.................................................
3.4.2 将目录移动我们设定的目录并改名
[root@localhost src]# mv mysql-5.6.39-linux-glibc2.12-x86_64 /usr/local/mysql3.4.3 进入一下我们移动过来的目录是否正确,是不是这几个文件
[root@localhost src]# cd /usr/local/mysql
[root@localhost mysql]# ls
bin  COPYING  data  docs  include  lib  man  mysql-test  README  scripts  share  sql-bench  support-files
3.4.4 创建mysql用户,创建/data/目录
//创建用户
[root@localhost mysql]# adduser mysql
//创建目录发现已经存在,就不用再创建了
[root@localhost mysql]# mkdir /data/
mkdir: cannot create directory ‘/data/’: File exists
[root@localhost mysql]# ls
bin  COPYING  data  docs  include  lib  man  mysql-test  README  scripts  share  sql-bench  support-files
[root@localhost mysql]# cd data
[root@localhost data]# ls
test
3.4.5 我们开始安装mysql
//出现了错误没有这个命令,想一下应该是缺少了某个包 原因:缺 perl perl-devel包
[root@localhost mysql]# ./scripts/mysql_install_db --user=mysql --datadir=/data/mysql
-bash: ./scripts/mysql_install_db: /usr/bin/perl: bad interpreter: No such file or directory
[root@localhost mysql]# yum -y install perl perl-devel
.............................................
//又提示这个错误,没有dumper这个我们可以自已查一下或者百度一下都可以找到缺少这个包
perl-Data-Dumper.x86_64,不知道的情况下就一个一个安装
[root@localhost mysql]# ./scripts/mysql_install_db --user=mysql --datadir=/data/mysql
FATAL ERROR: please install the following Perl modules before executing ./scripts/mysql_install_db:
Data::Dumper
[root@localhost mysql]# yum search dumper
Loaded plugins: fastestmirror, priorities
Loading mirror speeds from cached hostfile
 * base: centos.ustc.edu.cn
 * extras: centos.ustc.edu.cn
 * updates: centos.ustc.edu.cn
========================================================= N/S matched: dumper ==========================================================
perl-Data-Dumper.x86_64 : Stringify perl data structures, suitable for printing and eval
perl-XML-Dumper.noarch : Perl module for dumping Perl objects from/to XML
perl-YAML-Syck.x86_64 : Fast, lightweight YAML loader and dumper

  Name and summary matches only, use "search all" for everything.
[root@localhost mysql]# yum install -y perl-Data-Dumper
...................................................
//现在终于可以安装了......
[root@localhost mysql]# ./scripts/mysql_install_db --user=mysql --datadir=/data/mysql
Installing MySQL system tables...2018-08-25 06:28:36 0 [Warning] TIMESTAMP with implicit DEFAULT value is deprecated. Please use --explicit_defaults_for_timestamp server option (see documentation for more details).
2018-08-25 06:28:36 0 [Note] Ignoring --secure-file-priv value as server is running with --bootstrap.
2018-08-25 06:28:36 0 [Note] ./bin/mysqld (mysqld 5.6.39) starting as process 2744 ...

...............................................

//验证一下,没有问题
[root@localhost mysql]# echo $?
0
3.4.5 拷贝mysql的配置文件到/etc/my.cnf目录下面,然后把启动脚本拷贝到系统启动里面/etc/init.d/
//这里可能我们之前装了mariddb有一个配置文件在里面,可以用之前的也可以覆盖它
[root@localhost mysql]# cp support-files/my-default.cnf /etc/my.cnf
cp: overwrite ‘/etc/my.cnf’? y
[root@localhost mysql]# cp support-files/mysql.server /etc/init.d/mysqld
3.4.6 修改配置文件
//修改这个配置文件找到这样两行
//baserdir指定mysql的安装目录
//datadir指定mysql数据存放目录
[root@localhost mysql]# vi /etc/init.d/mysqld

#!/bin/sh
# Copyright Abandoned 1996 TCX DataKonsult AB & Monty Program KB & Detron HB
# This file is public domain and comes with NO WARRANTY of any kind

# MySQL daemon start/stop script.
46 basedir=/usr/local/src
47 datadir=/data/mysql
3.4.7 将mysql服务加入开机启动
//将mysql服务加入开机启动,检查是否设置成功
[root@localhost mysql]# chkconfig --add mysqld
[root@localhost mysql]# chkconfig --list

Note: This output shows SysV services only and does not include native
      systemd services. SysV configuration data might be overridden by native
      systemd configuration.

      If you want to list systemd services use 'systemctl list-unit-files'.
      To see services enabled on particular target use
      'systemctl list-dependencies [target]'.

mysqld         	0:off	1:off	2:on	3:on	4:on	5:on	6:off
netconsole     	0:off	1:off	2:off	3:on	4:off	5:off	6:off
network        	0:off	1:off	2:on	3:on	4:on	5:on	6:off
3.4.8 启动mysql并检查是否启动成功
[root@localhost run]# /etc/init.d/mysqld start
Starting MySQL. SUCCESS!
[root@localhost run]# ps aux|grep mysql
root       2908  0.0  0.1 113304  1600 pts/0    S    05:03   0:00 /bin/sh /usr/local/mysql/bin/mysqld_safe --datadir=/data/mysql --pid-file=/data/mysql/localhost.localdomain.pid
mysql      3044  0.7 45.3 1302728 452280 pts/0  Sl   05:03   0:00 /usr/local/mysql/bin/mysqld --basedir=/usr/local/mysql --datadir=/data/mysql --plugin-dir=/usr/local/mysql/lib/plugin --user=mysql --log-error=localhost.localdomain.err --pid-file=/data/mysql/localhost.localdomain.pid
root       3230  0.0  0.0 112704   952 pts/0    R+   05:04   0:00 grep --color=auto mysql
4.MariaDB安装
4.1 这个安装过程基本上和mysql是一样的。首先下载我们安装包到/usr/local/src,并解压出来
[root@knightlai src]# ls
apr-1.6.3  apr-util-1.6.1  httpd-2.4.34  httpd-2.4.34.tar.gz  mariadb-10.2.6-linux-glibc_214-x86_64.tar.gz
4.2 将目录移动我们指定的目录下面
[root@knightlai mariadb]# mv mariadb-10.2.6-linux-glibc_214-x86_64 /usr/local/mariadb
4.3 编译安装mariadb
[root@knightlai src]# ./scripts/mysql_install_db --user=mysql --basedir=/usr/local/mariadb --datadir=/data/mariadb
...............................................................
4.4拷贝相关配置文件并配置basedir datadir
[root@knightlai mariadb]# cp support-files/my-small.cnf /usr/local/mariadb/my.cnf
[client]
port        = 3306 #客户端默认连接端口
socket      = /tmp/mysql.sock  #用于本地连接的socket套接字
[mysqld]  # 服务端基本配置
port        = 3306 # mysql监听端口
socket      = /tmp/mysql.sock #为MySQL客户端程序和服务器之间的本地通讯指定一个套接字文件
user    = mariadb # mysql启动用户
basedir = /usr/local/mariadb/ # 安装目录
datadir = /data/mariadb # 数据库数据文件存放目录
log_error = /data/mysql/mariadb.err #记录错误日志文件
pid-file = /data/mysql/mariadb.pid  #pid所在的目录
skip-external-locking  #不使用系统锁定,要使用myisamchk,必须关闭服务器
4.5 拷贝相关的自启动文件到/etc/init.d目录下面并配置basedir datadir 还有一个cron
[root@knightlai mariadb]# cp support-files/mysql.server /etc/init.d/mariadb
# If you change base dir, you must also change datadir. These may get
# overwritten by settings in the MySQL configuration files.

basedir=/usr/local/mariadb/
datadir=/data/mariadb
conf=/usr/local/mariadb/my.cnf

//这里是调用我们上面配置的conf
 # may be overwritten at next upgrade.
      $bindir/mysqld_safe  --defaults-file="$conf"    --datadir="$datadir" --pid-file="$mysqld_pid_file_path" "$@" &
4.6启动mariadb,并在进程中查看还有监听一下端口(mysqld 端口号是3306)是否启动成功
[root@knightlai mariadb]# /etc/init.d/mariadb start
[root@knightlai mariadb]# ps aux|grep mariadb
root       4737  0.0  0.1 115432  1744 ?        S    19:29   0:00 /bin/sh /usr/local/mariadb//bin/mysqld_safe --defaults-file=/usr/local/mariadb/my.cnf --datadir=/data/mariadb --pid-file=/data/mariadb/knightlai.pid
mysql      4859  0.2  4.9 1125084 49812 ?       Sl   19:29   0:12 /usr/local/mariadb/bin/mysqld --defaults-file=/usr/local/mariadb/my.cnf --basedir=/usr/local/mariadb/ --datadir=/data/mariadb --plugin-dir=/usr/local/mariadb//lib/plugin --user=mysql --log-error=/data/mariadb/knightlai.err --pid-file=/data/mariadb/knightlai.pid --socket=/tmp/mysql.sock --port=3306
root       5009  0.0  0.0 112704   956 pts/8    R+   20:38   0:00 grep --color=auto mariadb
[root@knightlai mariadb]# netstat -lnp
Active Internet connections (only servers)
Proto Recv-Q Send-Q Local Address           Foreign Address         State       PID/Program name
tcp        0      0 0.0.0.0:873             0.0.0.0:*               LISTEN      3167/rsync
tcp        0      0 0.0.0.0:22              0.0.0.0:*               LISTEN      810/sshd
tcp        0      0 127.0.0.1:25            0.0.0.0:*               LISTEN      894/master
tcp6       0      0 :::873                  :::*                    LISTEN      3167/rsync
tcp6       0      0 :::3306                 :::*                    LISTEN      4859/mysqld
5.Apache安装
5.1 下载相关的文件到指定的目录下面/usr/local/src
[root@knightlai src]# ls
apr-1.6.3  apr-util-1.6.1  httpd-2.4.34  httpd-2.4.34.tar.gz
5.2 安装apr-1.6.3
[root@knightlai apr-1.6.3]# ./configure --prefix=/usr/local/apr
checking build system type... x86_64-pc-linux-gnu
checking host system type... x86_64-pc-linux-gnu
checking target system type... x86_64-pc-linux-gnu
Configuring APR library
Platform: x86_64-pc-linux-gnu
checking for working mkdir -p... yes
APR Version: 1.6.3
checking for chosen layout... apr
checking for gcc... gcc
checking whether the C compiler works... yes
.................................................

[root@knightlai apr-1.6.3]# make &&make install
make[1]: Entering directory `/usr/local/src/apr-1.6.3'
/usr/local/src/apr-1.6.3/build/mkdir.sh tools
/bin/sh /usr/local/src/apr-1.6.3/libtool --silent --mode=compile gcc -g -O2 -pthread   -DHAVE_CONFIG_H  -DLINUX -D_REENTRANT -D_GNU_SOURCE   -I./include -I/usr/local/src/apr-1.6.3/include/arch/unix -I./include/arch/unix -I/usr/local/src/apr-1.6.3/include/arch/unix -I/usr/local/src/apr-1.6.3/include -I/usr/local/src/apr-1.6.3/include/private -I/usr/local/src/apr-1.6.3/include/private  -o tools/gen_test_char.lo -c tools/gen_test_char.c && touch tools/gen_test_char.lo
...................................................
5.3安装 apr-util-1.6.1
[root@knightlai apr-util-1.6.1]# ./configure --prefix=/usr/local/apr-util  --with-apr=/usr/local/apr
checking build system type... x86_64-pc-linux-gnu
checking host system type... x86_64-pc-linux-gnu
checking target system type... x86_64-pc-linux-gnu
checking for a BSD-compatible install... /usr/bin/install -c
checking for working mkdir -p... yes
APR-util Version: 1.6.1
checking for chosen layout... apr-util
checking for gcc... gcc
checking whether the C compiler works... yes
....................................
[root@knightlai apr-util-1.6.1]# echo $?
0
[root@knightlai apr-util-1.6.1]# make &&make install
make[1]: Entering directory `/usr/local/src/apr-util-1.6.1'
/bin/sh /usr/local/apr/build-1/libtool --silent --mode=compile gcc -g -O2 -pthread   -DHAVE_CONFIG_H  -DLINUX -D_REENTRANT -D_GNU_SOURCE   -I/usr/local/src/apr-util-1.6.1/include -I/usr/local/src/apr-util-1.6.1/include/private  -I/usr/local/apr/include/apr-1    -o xml/apr_xml.lo -c xml/apr_xml.c && touch xml/apr_xml.lo
....................................................
提示:在编译apr-util-1.6.0的时候遇到一个错误:
xml/apr_xml.c:35:19: fatal error: expat.h: No such file or directory
在网上查找说可能是少了expat库,yum install expat-devel安装该库,安装完再次编译。
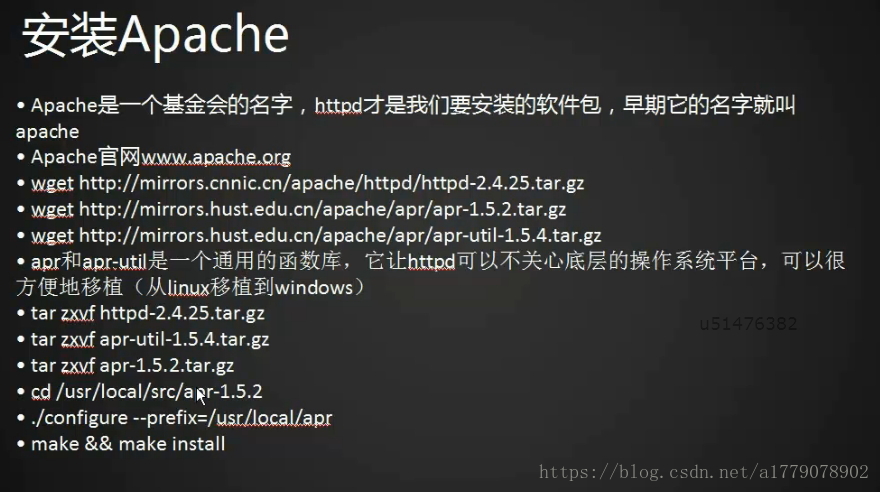
5.4 安装httpd
[root@knightlai httpd-2.4.34]# ./configure --prefix=/usr/local/apache2.4 --with-apr=/usr/local/apr --with-apr-util=/usr/local/apr-util --enable-so --enable-mods-shared=most
checking for chosen layout... Apache
checking for working mkdir -p... yes
checking for grep that handles long lines and -e... /usr/bin/grep
checking for egrep... /usr/bin/grep -E
checking build system type... x86_64-pc-linux-gnu
checking host system type... x86_64-pc-linux-gnu
checking target system type... x86_64-pc-linux-gnu
configure:
.......................................
[root@knightlai httpd-2.4.34]# echo $?
0
5.5编译文件
[root@knightlai httpd-2.4.34]# make && make install
/usr/local/apr/build-1/libtool --silent --mode=compile gcc -std=gnu99  -g -O2 -pthread      -DLINUX -D_REENTRANT -D_GNU_SOURCE     -I. -I/usr/local/src/httpd-2.4.34/os/unix -I/usr/local/src/httpd-2.4.34/include -I/usr/local/apr/include/apr-1 -I/usr/local/apr-util/include/apr-1 -I/usr/local/src/httpd-2.4.34/modules/aaa -I/usr/local/src/httpd-2.4.34/modules/cache -I/usr/local/src/httpd-2.4.34/modules/core -I/usr/local/src/httpd-2.4.34/modules/database -I/usr/local/src/httpd-2.4.34/modules/filters -I/usr/local/src/httpd-2.4.34/modules/ldap -I/usr/local/src/httpd-2.4.34/modules/loggers -I/usr/local/src/httpd-2.4.34/modules/lua -I/usr/local/src/httpd-2.4.34/modules/proxy -I/usr/local/src/httpd-2.4.34/modules/http2 -I/usr/local/src/httpd-2.4.34/modules/session -I/usr/local/src/httpd-2.4.34/modules/ssl -I/usr/local/src/httpd-2.4.34/modules/test -I/usr/local/src/httpd-2.4.34/server -I/usr/local/src/httpd-2.4.34/modules/md -I/usr/local/src/httpd-2.4.34/modules/arch/unix -I/usr/local/src/httpd-2.4.34/modules/dav/main -I/usr/local/src/httpd-2.4.34/modules/generators -I/usr/local/src/httpd-2.4.34/modules/mappers -prefer-pic -c mod_mime.c && touch mod_mime.slo
/usr/local/apr/build-1/libtool --silent --mode=link gcc -std=gnu99  -g -O2 -pthread           -o mod_mime.la -rpath /usr/local/apache2.4/modules -module -avoid-version  mod_mime.lo
.........................................
5.6 查看安装好的模块
[root@knightlai httpd-2.4.34]# ls /usr/local/apache2.4/modules
httpd.exp             mod_authz_dbd.so        mod_dir.so                  mod_log_debug.so       mod_proxy.so           mod_socache_memcache.so
mod_access_compat.so  mod_authz_dbm.so        mod_dumpio.so               mod_logio.so           mod_proxy_uwsgi.so     mod_socache_shmcb.so
mod_actions.so        mod_authz_groupfile.so  mod_env.so                  mod_macro.so           mod_proxy_wstunnel.so  mod_speling.so
mod_alias.so          mod_authz_host.so       mod_expires.so              mod_mime.so            mod_ratelimit.so       mod_status.so
mod_allowmethods.so   mod_authz_owner.so      mod_ext_filter.so           mod_negotiation.so     mod_remoteip.so        mod_substitute.so
mod_auth_basic.so     mod_authz_user.so       mod_file_cache.so           mod_proxy_ajp.so       mod_reqtimeout.so      mod_unique_id.so
mod_auth_digest.so    mod_autoindex.so        mod_filter.so               mod_proxy_balancer.so  mod_request.so         mod_unixd.so
mod_auth_form.so      mod_buffer.so           mod_headers.so              mod_proxy_connect.so   mod_rewrite.so         mod_userdir.so
mod_authn_anon.so     mod_cache_disk.so       mod_include.so              mod_proxy_express.so   mod_sed.so             mod_version.so
mod_authn_core.so     mod_cache.so            mod_info.so                 mod_proxy_fcgi.so      mod_session_cookie.so  mod_vhost_alias.so
mod_authn_dbd.so      mod_cache_socache.so    mod_lbmethod_bybusyness.so  mod_proxy_fdpass.so    mod_session_dbd.so     mod_watchdog.so
mod_authn_dbm.so      mod_cgid.so             mod_lbmethod_byrequests.so  mod_proxy_ftp.so       mod_session.so
mod_authn_file.so     mod_dav_fs.so           mod_lbmethod_bytraffic.so   mod_proxy_hcheck.so    mod_setenvif.so
mod_authn_socache.so  mod_dav.so              mod_lbmethod_heartbeat.so   mod_proxy_http.so      mod_slotmem_shm.so
mod_authz_core.so     mod_dbd.so              mod_log_config.so           mod_proxy_scgi.so      mod_socache_dbm.so
提示:这里出现一个错误排障了很久才解决
错误提示:
libtool:link:warnig:library '/usr/local/aprlib/libapr-1.la' was moved.
libtool:link:cannot find the library '/usr/local/httpd/lib/libapr-1.la' or unhandled argument '/usr/local/httpd/lib/libapr-1.la'
mkdir /usr/local/apache2.4/lib
cp /usr/local/aprlib/libapr-1.la /usr/local/apache2.4/lib/6. 安装PHP5
6.1 首先我们还是下载好php5.6到我们的/usr/local/src,并解压到当前文件夹
[root@knightlai src]# ls
apr-1.5.2         apr-util-1.5.2         httpd-2.2.27.tar.gz  mariadb-10.2.6-linux-glibc_214-x86_64.tar.gz.1  php-5.6.32
apr-1.5.2.tar.gz  apr-util-1.5.2.tar.gz  httpd-2.4.34         mysql-5.6.39-linux-glibc2.12-x86_64.tar.gz      php-5.6.32.tar.bz2
6.2 进入到php的解压目录,并编译安装好
[root@knightlai php-5.6.32]# ./configure --prefix=/usr/local/php --with-apxs2=/usr/local/apache2.4/bin/apxs --with-config-file-path=/usr/local/php/etc --with-mysql=/usr/local/mysql  --with-pdo-mysql=/usr/local/mysql --with-mysqli=/usr/local/mysql/bin/mysql_config --with-libxlml-dir --with-gd --with-jpeg-dir --with-png-dir --with-freetype-dir --with-iconv-dir --with-zlib-dir --with-bz2 --with-openssl --with-mycrypt --enable-soap --enable-gd-native-ttf --enable-sockets --enable-exif
......................................
Generating files
configure: creating ./config.status
creating main/internal_functions.c
creating main/internal_functions_cli.c
./config.status: line 619: test: : integer expression expected
+--------------------------------------------------------------------+
| License:                                                           |
| This software is subject to the PHP License, available in this     |
| distribution in the file LICENSE.  By continuing this installation |
| process, you are bound by the terms of this license agreement.     |
| If you do not agree with the terms of this license, you must abort |
| the installation process at this point.                            |
+--------------------------------------------------------------------+

Thank you for using PHP.
......................

//这个过程可能时间比较长,因为我们需要的模块有很多
[root@knightlai php-5.6.32]# make &&make install
/usr/local/src/php-5.6.32/ext/standard/string.c: In function ‘php_explode’:
/usr/local/src/php-5.6.32/ext/standard/string.c:1036:5: warning: assignment discards ‘const’ qualifier from pointer target type [enabled by default]
  p2 = php_memnstr(Z_STRVAL_P(str), Z_STRVAL_P(delim), Z_STRLEN_P(delim), endp);
     ^
/usr/local/src/php-5.6.32/ext/standard/string.c:1044:16: warning: assignment discards ‘const’ qualifier from pointer target type [enabled by default]
   } while ((p2 = php_memnstr(p1, Z_STRVAL_P(delim), Z_STRLEN_P(delim), endp)) != NULL &&
                ^
/usr/local/src/php-5.6.32/ext/standard/string.c: In function ‘php_explode_negative_limit’:
/usr/local/src/php-5.6.32/ext/standard/string.c:1063:5: warning: assignment discards ‘const’ qualifier from pointer target type [enabled by default]
.....................................
[root@knightlai php-5.6.32]# echo $?
0


[root@knightlai php-5.6.32]# cp php.ini-production /usr/local/php/etc/php.ini
提示:错误代码解决办法
https://blog.csdn.net/a1779078902/article/details/82502145
这里只提供一部分,可能有一些别的可以自已再去查找一下都可以找到解决办法。
7.php7
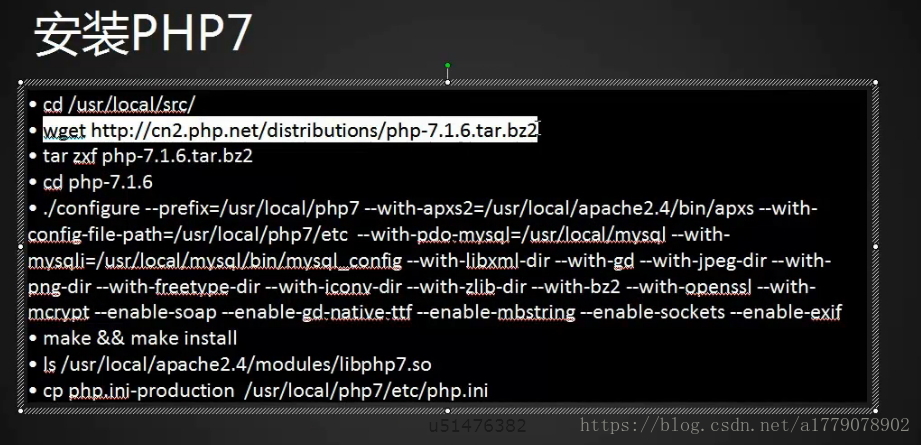
7.1 这个和php5是差不多的,我们还是将需要的php7下载下来,并解压到当前文件夹
[root@knightlai src]# ls
apr-1.5.2         apr-util-1.5.2         httpd-2.2.27.tar.gz  mariadb-10.2.6-linux-glibc_214-x86_64.tar.gz.1  php-5.6.32          usr
apr-1.5.2.tar.gz  apr-util-1.5.2.tar.gz  httpd-2.4.34         mysql-5.6.39-linux-glibc2.12-x86_64.tar.gz      php-5.6.32.tar.bz2
apr-1.6.3         apr-util-1.6.1         httpd-2.4.34.tar.gz  mysql-5.7.22.tar.gz                             php-7.1.6.tar.bz2
7.2 编译安装php7
[root@knightlai php-7.1.6]# ./configure --prefix=/usr/local/php7 --with-apxs2=/usr/local/apache2.4/bin/apxs --with-config-file-path=/usr/local/php7/etc --with-mysql=/usr/local/mysql  --with-pdo-mysql=/usr/local/mysql --with-mysqli=/usr/local/mysql/bin/mysql_config --with-libxlml-dir --with-gd --with-jpeg-dir --with-png-dir --with-freetype-dir --with-iconv-dir --with-zlib-dir --with-bz2 --with-openssl --with-mycrypt --enable-soap --enable-gd-native-ttf --enable-sockets --enable-exif

[root@knightlai php-7.1.6]# make &&make install
..........................................
7.3 查看安装完成后的相关模块
[root@knightlai src]# ls /usr/local/apache2.4/modules/libphp7.so
/usr/local/apache2.4/modules/libphp5.so
/usr/local/apache2.4/modules/libphp7.so

[root@knightlai php-7.1.6]# cp php.ini-production /usr/local/php/etc/php.ini
8. apache与php相结合
8.1 配置httpd支持php
- vim /usr/local/apache2.4/conf/httpd.conf //编辑主配置文件
- ServerRoot "/etc/httpd" //设置Apache的主目录
- Timeout 120 //设置请求超时
- Listen 80 //设置监听端口
- ServerAdmin [email protected] //设置管理员邮箱
- ServerName 192.168.0.3:80 //设置主机或IP
- DocumentRoot "/var/www/html" //设置Apache文档目录
- DirectoryIndex index.html //设置主页文件
- AddDefaultCharset GB2312 //设置网站编码
8.2 需要修改的几个地方:
# ServerName gives the name and port that the server uses to identify itself.
# This can often be determined automatically, but we recommend you specify
# it explicitly to prevent problems during startup.
#
# If your host doesn't have a registered DNS name, enter its IP address here.
#
ServerName www.example.com:80
//在这里我们需要改成allowed
<Directory />
    AllowOverride none
    Require all allowed
</Directory>
//在这里增加一行AddType application/x-httpd-php.php
# If the AddEncoding directives above are commented-out, then you
# probably should define those extensions to indicate media types:
#
AddType application/x-compress .Z
AddType application/x-gzip .gz .tgz
AddType application/x-httpd-php.php
//在这里也增加一行,DirectoryIndex index.html index.php使其对php的文件也支持
<IfModule dir_module>
    DirectoryIndex index.html
    DirectoryIndex index.html index.php
</IfModule>
如果成功了可以看到以下界面:

8.2 解析php文件,出现以下这个画面说明我们解析成功了!
//新建一个php测试文件,看是否可以解析出来
[root@knightlai src]# vim /usr/local/apache2.4/htdocs/1.php
<?php
phpinfo()
?>

提示:php不能解析出来排错
- 1. /usr/local/apache/bin/apachectl -M //查看有没有加载php5_module(shared)模块;
- 2. 在/usr/local/apache2/modules/ 目录下,查看有没有加载libphp5.so模块;
- 3. 复查编译的配置文件有否有误:/usr/local/apache2/conf/httpd.conf
- 修改apache的配置文件httpd.conf
- vim /usr/local/apache2/conf/httpd.conf
- 在httpd.conf中找到: “AddType application/x-gzip .gz .tgz” 在该行下面添加
- “AddType application/x-httpd-php .php”
- 再找继续找到:“DirectoryIndex index.html”,把此行修改成
- “DirectoryIndex index.html index.htm index.php”
- 再找到: “#ServerName www.example.com:80”把此行修改成
- “ServerName localhost:80” 保存后退
- 4. 使用命令查看主配置文件是否有误:/usr/local/apache2/bin/apachectl -t
- 5. 在编译安装apache时,建议加上两个参数(以后用到就不需要再编译):
- --enable-modes-shared=most //编译加载最多的模块
- --enalbe-modes-shared=all //编译加载所有模块