zynq_定时器中断
@(study)[大学生活, markdown_study, LaTex_study]
[TOC]
zynq的中断体系结构框图
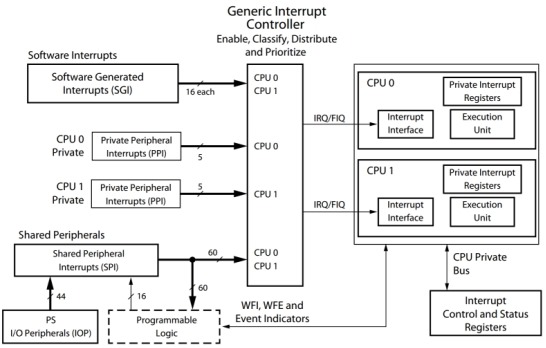
中断控制器(GIC)
在zynq中的中断控制比较复杂,主要是因为中断接收端有两个cpu,涉及到cpu的中断协同问题,中断的发起端除了常见的之外还有PL端哔哩吧啦一大推.
见官方文档chapter_8别慌,问题不大
All interrupt sources are identified by a unique interrupt ID number.All interrupt sources have their own configurable priority and list of targeted CPUs –chapter7_interrupt
SGI: Software Generated Interrupts 软件中断 16个
SPI: Shared Peripheral Interrupts 共享(PS/PL)外设中断 60个
PPI: Private Peripheral Interrupts 私有中断 每个cpu各5个,计数时钟为主频一半
FIQ: Fast inte
rrupt request 快速中断响应
IRQ: interrupt request 中断响应
实现一个简单的一秒PPI
正确认识下,一个PPI是纯PS端的,也就是说他只是我们说的简单的单片机的中断而已.
1. 新建一个纯PS工程,并导入SDK,挑选helloworld模板和生成bps(见前面的博客)
- 将heloworld.c
#include <stdio.h>

#include "xadcps.h"
#include "xil_types.h"
#include "Xscugic.h"
#include "Xil_exception.h"
#include "xscutimer.h"

#define TIMER_DEVICE_ID     XPAR_XSCUTIMER_0_DEVICE_ID
#define INTC_DEVICE_ID      XPAR_SCUGIC_SINGLE_DEVICE_ID
#define TIMER_IRPT_INTR     XPAR_SCUTIMER_INTR

//加载计数周期,私有定时器癿时钟为CPU癿一般,为333MHZ,如果计数1S,加载值为1sx(333x1000x1000)(1/s)-1=0x13D92D3F
#define TIMER_LOAD_VALUE 0x13D92D3F    //一秒

static XScuGic      Intc;

static XScuTimer    Timer;

static void SetupInterruptSystem(XScuGic *Gicptr , XScuTimer *timerptr ,u16 TimerIntrId);   //中断注册函数

static void TimerIntrHandler(void *CallBackRef);

//#include "platform.h"
//void print(char *str);

int main()
{
    XScuTimer_Config *TMRConfigPtr;

    printf("start/n");
    //PPI setup
    TMRConfigPtr = XScuTimer_LookupConfig(TIMER_DEVICE_ID);

    XScuTimer_CfgInitialize(&Timer, TMRConfigPtr,TMRConfigPtr->BaseAddr);

    XScuTimer_SelfTest(&Timer);

    //加载计数周期,私有定时器的时钟为CPU的一半,为333MHZ,
    //如果计数1S,加载值为1sx(333x1000x1000)(1/s)-1=0x13D92D3F
    XScuTimer_LoadTimer(&Timer, TIMER_LOAD_VALUE);

    //自劢装载
    XScuTimer_EnableAutoReload(&Timer);

    //启劢定时器
    XScuTimer_Start(&Timer);


    //set up the GIC
    SetupInterruptSystem(&Intc,&Timer,TIMER_IRPT_INTR);
    while(1){};

    return 0;

}

void SetupInterruptSystem(XScuGic *Gicptr , XScuTimer *timerptr ,u16 TimerIntrId)
{
    XScuGic_Config *IntcConfig; //GIC config
    Xil_ExceptionInit();
    IntcConfig = XScuGic_LookupConfig(INTC_DEVICE_ID);
    XScuGic_CfgInitialize(Gicptr, IntcConfig, IntcConfig->CpuBaseAddress);
    //connect to the hardware
    Xil_ExceptionRegisterHandler(XIL_EXCEPTION_ID_INT, (Xil_ExceptionHandler)XScuGic_InterruptHandler, Gicptr);
    //set up the timer interrupt
    XScuGic_Connect(Gicptr, TimerIntrId,
                   (Xil_ExceptionHandler)TimerIntrHandler,
                   (void *)timerptr);
    //enable the interrupt for the Timer at GIC
    XScuGic_Enable(Gicptr, TimerIntrId);
    //enable interrupt on the timer
    XScuTimer_EnableInterrupt(timerptr);
    // Enable interrupts in the Processor.
    Xil_ExceptionEnableMask(XIL_EXCEPTION_IRQ);
}

static void TimerIntrHandler(void *CallBackRef)
{
    static int sec=0;
    XScuTimer *timerptr = (XScuTimer *)CallBackRef;
    XScuTimer_ClearInterruptStatus(timerptr);

    sec++;
    printf(" %d Second\n\r",sec); //每秒打印输出一次

}- 下载到板子上面
做一点简单的解释
为什么gic和timer前面都会带有一个SCU
见手册第三章3.3
SCU: snoop control unit (窥探控制单元?)
再看回上一篇博客的block manager那张图,我们可以看到GIC和SCU是连在一起的!
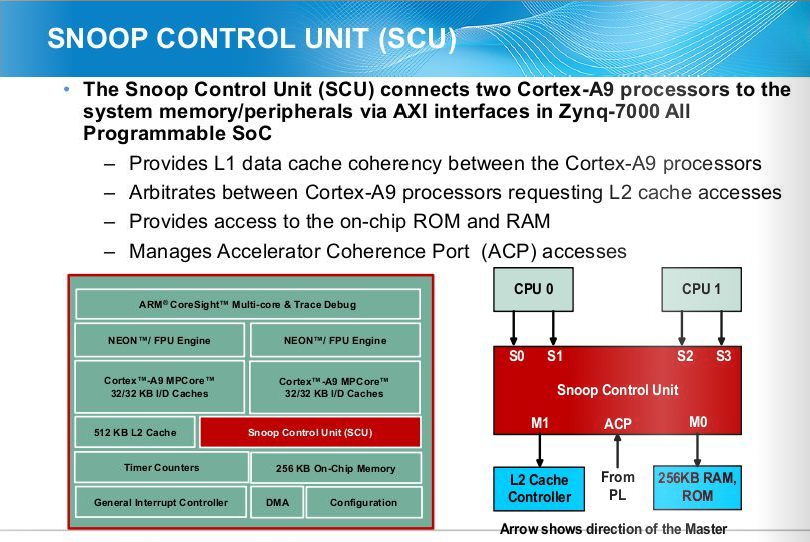
可以看到,SCU主要是解决ARM的L1和L2的缓存协调(因为两个processor的缓存是共用的)
和AXI总线的ACP存取的,也就是DMA等高速中断需求的外设
流程
- 设置定时器
通过ID号查配置->配置写入->初始化->加入预加载值->开启自动重载->开启定时 设置GIC
传入定时器配置->通过ID号查配置->配置写入->注册处理函数->定时器中断信号和中断函数连接->使能定时器中断
->使能中断->使能处理器处理中断差不多就是一个流程对应一个函数这样子
ID号可以在
xparameters.h里面找到- 函数(API)可以在bps里面的system.mss里面的每一个模块的docs里面找到
PS和PL共享中断
也就是图上所说的SPI(Shared Peripheral Interrupts)
同前面的PS-PL协同开发的项目新建
- 加入一个GPIO1,全部输入,使能中断
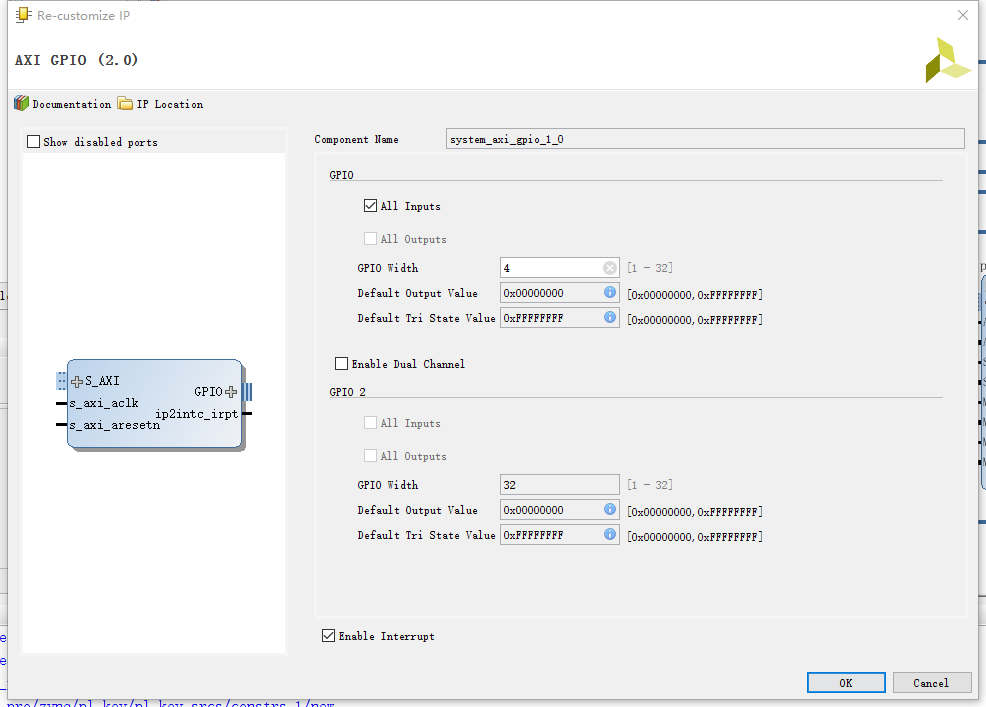
- 再加入一个gpio0作led灯用
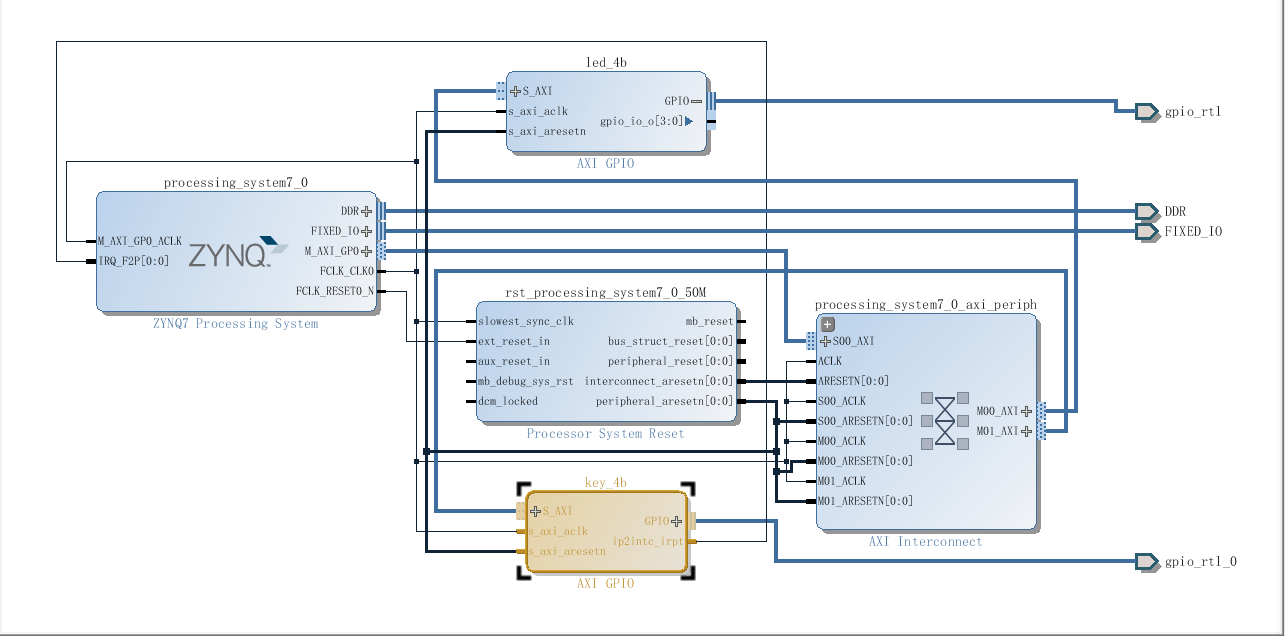
- 同协同项目流程一致,封装,生成bit~~~~~
- 导入sdk,新建bsp
hello源码
#include "xparameters.h"

#include "xscugic.h"

#include "xil_exception.h"

#include "xgpio.h"

// Parameter definitions

#define INTC_DEVICE_ID      XPAR_PS7_SCUGIC_0_DEVICE_ID

#define LED_DEVICE_ID       XPAR_GPIO_1_DEVICE_ID

#define BTNS_DEVICE_ID      XPAR_GPIO_0_DEVICE_ID

#define INTC_GPIO_INTERRUPT_ID XPAR_FABRIC_KEY_4B_IP2INTC_IRPT_INTR

#define BTN_INT             XGPIO_IR_CH1_MASK // This is the interrupt mask for channel one


XGpio   LED;

XGpio   BTNInst;

XScuGic INTCInst;

static u8 btn_value;

//----------------------------------------------------

// PROTOTYPE FUNCTIONS

//----------------------------------------------------

static void BTN_Intr_Handler(void *baseaddr_p);

static int InterruptSystemSetup(XScuGic *XScuGicInstancePtr);

static int IntcInitFunction(u16 DeviceId, XGpio *GpioInstancePtr);

//----------------------------------------------------

//  INTERRUPT SERVICE ROUTINE(ISR)

//also know as : INTERRUPT HANDLER FUNCTION

// - called by the buttons interrupt, performs push buttons read

//----------------------------------------------------

void BTN_Intr_Handler(void *InstancePtr)

{

unsigned char led_val = 0;

// Ignore additional button presses

if ((XGpio_InterruptGetStatus(&BTNInst) & BTN_INT) !=

            BTN_INT) {

return;

// Disable GPIO interrupts

    XGpio_InterruptDisable(&BTNInst, BTN_INT);

             }

    btn_value = ~XGpio_DiscreteRead(&BTNInst, 1)&0x0f;

switch (btn_value){

case 0x01: led_val = 0x01; break;

case 0x02: led_val = 0x02; break;

case 0x04: led_val = 0x04; break;

case 0x08: led_val = 0x08; break;


default:break;  }

    XGpio_DiscreteWrite(&LED,1,~led_val);

// Acknowledge GPIO interrupts

    (void)XGpio_InterruptClear(&BTNInst, BTN_INT);

// Enable GPIO interrupts

    XGpio_InterruptEnable(&BTNInst, BTN_INT);

}

//----------------------------------------------------

// MAIN FUNCTION

//----------------------------------------------------

int main (void)

{

int status;

// 初始化按键

  status = XGpio_Initialize(&BTNInst, BTNS_DEVICE_ID);

if(status != XST_SUCCESS) return XST_FAILURE;

//初始化LED

  status = XGpio_Initialize(&LED, LED_DEVICE_ID);

if(status != XST_SUCCESS) return XST_FAILURE;

// 设置按键IO的方向为输入

  XGpio_SetDataDirection(&BTNInst, 1, 0xF);

//设置LED IO的方向为输出

  XGpio_SetDataDirection(&LED, 1, 0x00);

//设置LED 灯熄灭

  XGpio_DiscreteWrite(&LED,1,0x0f);

// 初始化按键的中断控制器

  status = IntcInitFunction(INTC_DEVICE_ID, &BTNInst);

if(status != XST_SUCCESS) return XST_FAILURE;

while(1){

  }

return (0);

}

//----------------------------------------------------

// INTERRUPT SETUP FUNCTIONS

//----------------------------------------------------

int IntcInitFunction(u16 DeviceId, XGpio *GpioInstancePtr)

{

XScuGic_Config *IntcConfig;

int status;

// Interrupt controller initialization

    IntcConfig = XScuGic_LookupConfig(DeviceId);

    status = XScuGic_CfgInitialize(&INTCInst, IntcConfig, IntcConfig->CpuBaseAddress);

if(status != XST_SUCCESS) return XST_FAILURE;

// Call interrupt setup function

    status = InterruptSystemSetup(&INTCInst);

if(status != XST_SUCCESS) return XST_FAILURE;

// Register GPIO interrupt handler

    status = XScuGic_Connect(&INTCInst,

                             INTC_GPIO_INTERRUPT_ID,

                             (Xil_ExceptionHandler)BTN_Intr_Handler,

                             (void *)GpioInstancePtr);

if(status != XST_SUCCESS) return XST_FAILURE;

// Enable GPIO interrupts

    XGpio_InterruptEnable(GpioInstancePtr, 1);

    XGpio_InterruptGlobalEnable(GpioInstancePtr);

// Enable GPIO interrupts in the controller

    XScuGic_Enable(&INTCInst, INTC_GPIO_INTERRUPT_ID);

return XST_SUCCESS;

}

int InterruptSystemSetup(XScuGic *XScuGicInstancePtr)

{

// Register GIC interrupt handler

    Xil_ExceptionRegisterHandler(XIL_EXCEPTION_ID_INT,

                                 (Xil_ExceptionHandler)XScuGic_InterruptHandler,

                                 XScuGicInstancePtr);

    Xil_ExceptionEnable();

return XST_SUCCESS;

}
程序也算是很简单了,看到他的初始化流程是先初始化一个指针去查找ID对应的配置,然后用一个函数写入就完事了..