使用maven打jar包上传服务器运行程序步骤
步骤1:在pom.xml中添加此段代码
<build>
        <plugins>
            <plugin>
                <groupId>org.apache.maven.plugins</groupId>
                <artifactId>maven-assembly-plugin</artifactId>
                <version>2.4.1</version>
                <configuration>
                    <descriptors>
                        <descriptor>src/main/assembly/assembly.xml</descriptor>
                    </descriptors>
                    <archive>
                        <manifest>
                            <mainClass>com.jd.broadway.server.Application</mainClass>
                        </manifest>
                    </archive>
                </configuration>
                <executions>
                    <execution>
                        <id>make-assembly</id>
                        <phase>package</phase>
                        <goals>
                            <goal>single</goal>
                        </goals>
                    </execution>
                </executions>
            </plugin>
        </plugins>
    </build>
步骤2:创建assembly.xml文件,ps:这里目录是 src/main/assembly/bin ,修改时注意保持一致。
<assembly>
    <id>assembly</id>
    <formats>
        <format>zip</format>
        <format>dir</format>
    </formats>
    <includeBaseDirectory>false</includeBaseDirectory>
    <fileSets>
        <fileSet>
            <directory>src/main/assembly/bin</directory>
            <outputDirectory>bin</outputDirectory>
            <includes>
                <include>*.sh</include>
            </includes>
            <fileMode>0755</fileMode>
        </fileSet>
        <fileSet>
            <directory>config</directory>
            <outputDirectory>config</outputDirectory>
        </fileSet>
    </fileSets>
    <dependencySets>
        <dependencySet>
            <outputDirectory>lib</outputDirectory>
        </dependencySet>
    </dependencySets>
</assembly>
步骤三:start.sh脚本。将start.sh脚本放到bin目录下,ps:注意修改脚本中文件路径,为包名+类名,保持一致。
#!/bin/bash
cd `dirname $0`
BIN_DIR=`pwd`
cd ..
DEPLOY_DIR=`pwd`
CONF_DIR=$DEPLOY_DIR/config

SERVER_NAME=`sed '/name/!d;s/.*=//' config/application.conf | tr -d '"\t\r\n ' | head -n 1`
SERVER_PORT=`sed '/port/!d;s/.*=//' config/application.conf | tr -d '"\t\r\n ' | head -n 1`
if [ -z "$SERVER_NAME" ]; then
    SERVER_NAME=`hostname`
fi

PIDS=`ps  --no-heading -C java -f --width 1000 | grep "$CONF_DIR" |awk '{print $2}'`
if [ -n "$PIDS" ]; then
    echo "ERROR: The $SERVER_NAME already started!"
    echo "PID: $PIDS"
    exit 1
fi

if [ -n "$SERVER_PORT" ]; then
    SERVER_PORT_COUNT=`netstat -tln | grep $SERVER_PORT | wc -l`
    if [ $SERVER_PORT_COUNT -gt 0 ]; then
        echo "ERROR: The $SERVER_NAME port $SERVER_PORT already used!"
        exit 1
    fi
fi

LOGS_DIR="/export/Logs/producer/"
if [ -z "$LOGS_DIR" ]; then
    LOGS_DIR=$DEPLOY_DIR/logs
fi
if [ ! -d $LOGS_DIR ]; then
    mkdir $LOGS_DIR
fi
STDOUT_FILE=$LOGS_DIR/stdout.log

LIB_DIR=$DEPLOY_DIR/lib
LIB_JARS=`ls $LIB_DIR|grep .jar|awk '{print "'$LIB_DIR'/"$0}'|tr "\n" ":"`

JAVA_OPTS=" -Djava.awt.headless=true -Djava.net.preferIPv4Stack=true "
JAVA_DEBUG_OPTS=""
if [ "$1" = "debug" ]; then
    JAVA_DEBUG_OPTS=" -Xdebug -Xnoagent -Djava.compiler=NONE -Xrunjdwp:transport=dt_socket,address=8000,server=y,suspend=n "
fi
JAVA_JMX_OPTS=""
if [ "$1" = "jmx" ]; then
    JAVA_JMX_OPTS=" -Dcom.sun.management.jmxremote.port=1099 -Dcom.sun.management.jmxremote.ssl=false -Dcom.sun.management.jmxremote.authenticate=false "
fi
JAVA_MEM_OPTS=""
BITS=`file $JAVA_HOME/bin/java | grep 64-bit`
if [ -n "$BITS" ]; then
    let memTotal=`cat /proc/meminfo |grep MemTotal|awk '{printf "%d", $2/1024 }'`
    if [ $memTotal -gt 2500 ];then
        JAVA_MEM_OPTS=" -server -Xmx8000m -Xms8000m -Xmn3000m -XX:PermSize=256m -Xss2048k -XX:+DisableExplicitGC -XX:+UseConcMarkSweepGC -XX:+CMSParallelRemarkEnabled -XX:+UseCMSCompactAtFullCollection -XX:LargePageSizeInBytes=256m -XX:+UseFastAccessorMethods -XX:+UseCMSInitiatingOccupancyOnly -XX:CMSInitiatingOccupancyFraction=70 "
    else
        JAVA_MEM_OPTS=" -server -Xmx1024m -Xms1024m -Xmn256m -XX:PermSize=128m -Xss256k -XX:+DisableExplicitGC -XX:+UseConcMarkSweepGC -XX:+CMSParallelRemarkEnabled -XX:+UseCMSCompactAtFullCollection -XX:LargePageSizeInBytes=128m -XX:+UseFastAccessorMethods -XX:+UseCMSInitiatingOccupancyOnly -XX:CMSInitiatingOccupancyFraction=70 "
    fi
else
    JAVA_MEM_OPTS=" -server -Xms1024m -Xmx1024m -XX:PermSize=128m -XX:SurvivorRatio=2 -XX:+UseParallelGC "
fi


echo -e "Starting the $SERVER_NAME ...\c"
nohup $JAVA_HOME/bin/java $JAVA_OPTS $JAVA_MEM_OPTS $JAVA_DEBUG_OPTS $JAVA_JMX_OPTS -classpath $CONF_DIR:$LIB_JARS com.jd.producer.ProducerNum > $STDOUT_FILE 2>&1 &

COUNT=0
while [ $COUNT -lt 1 ]; do
    echo -e ".\c"
    sleep 1
        COUNT=`ps  --no-heading -C java -f --width 1000 | grep "$DEPLOY_DIR" | awk '{print $2}' | wc -l`
    if [ $COUNT -gt 0 ]; then
        break
    fi
done
echo "OK!"
PIDS=`ps  --no-heading -C java -f --width 1000 | grep "$DEPLOY_DIR" | awk '{print $2}'`
echo "PID: $PIDS"
echo "STDOUT: ${STDOUT_FILE}"
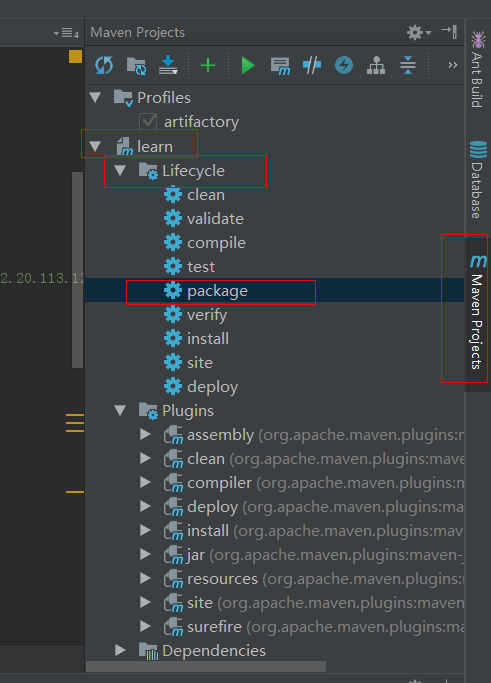
步骤四:打包,双击package,打包完成后在target目录下会生成对应zip包。
步骤五:讲zip包上传至对应开发机相应目录,解压,运行bin目录下start.sh脚本即可,脚本中指定了相应日志目录,注意修改。
一些基本命令:
覆盖上传:rz -bey
解压:unzip xxx.zip
运行脚本:./xxx.sh
删除目录:\rm -rf xxx/
杀进程:kill -9 PID