使用caffe的流程
1. 准备数据(写一个脚本将其转换为LMDB数据库的格式)
2. 定义网络(写一个prototxt)
3. 定义solover(写一个solover prototxt,solver定义了训练用的超参数和要训练的网络)
4. 训练(运行一个脚本,相当于执行shell 命令caffe train --solver=XXX_solver.prototxt)
几个概念
Blob: store data and derivatives
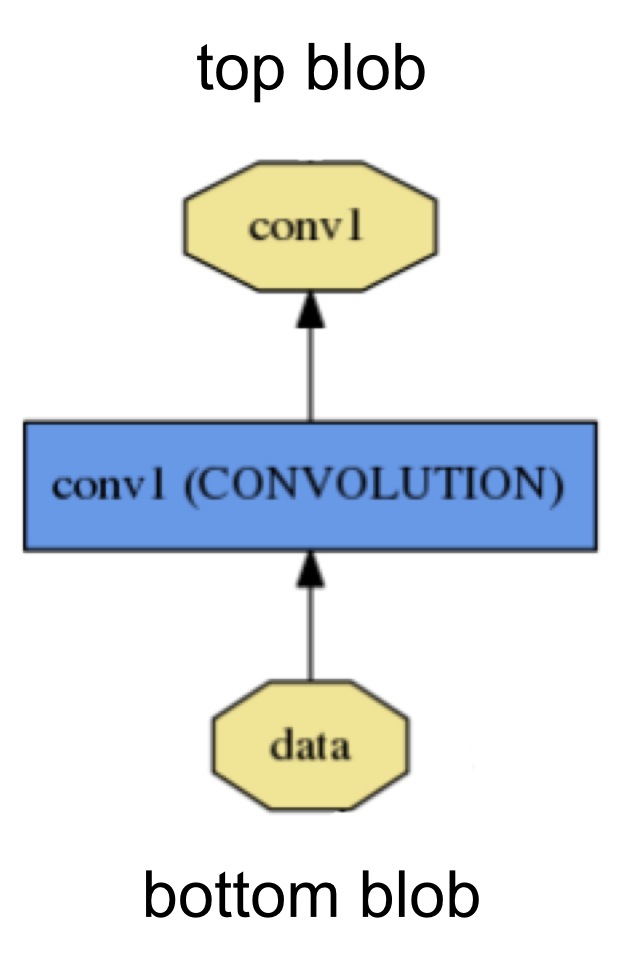
Layer: transforms bottom blob to top blobs
Net: many layers; computes gradients via forward / backward
Solver: uses gradients to update weights. 存放超参数
Blob
blob封装了运行时的数据信息,从数学上来讲,blob是一个连续存储的n维数组。caffe使用blob存储和传输数据。它和layer的关系是,layer的输入是bottom blob,输出是top blob,blob存有数据。
layer
主要有数据层,视觉层,激活层,其他常用层等,各个层有自己的参数需要设置。每个层主要包括设置,forward,backward。可以自定义层(改源码)
Net
Net是由许多layer组成的。是DAG有向无环图。net写在一个prototxt文件里。
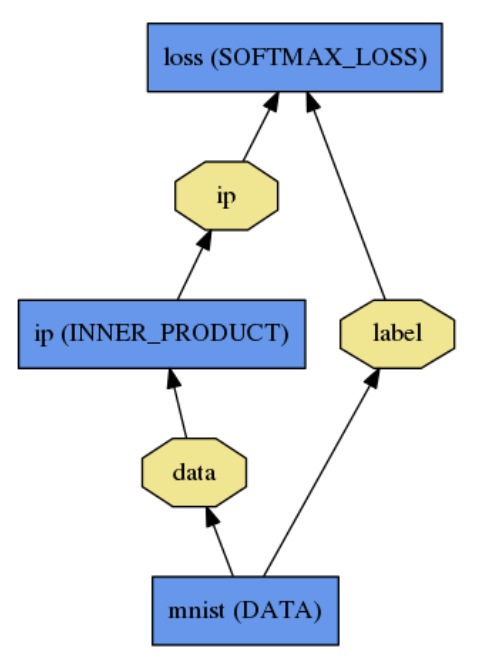
一个简单的逻辑回归分类器
# train_test.prototxt
name: "LogReg"
layer {
  name: "mnist"
  type: "Data"
  top: "data"
  top: "label"
  data_param {
    source: "input_leveldb"
    batch_size: 64
  }
}
layer {
  name: "ip"
  type: "InnerProduct"
  bottom: "data"
  top: "ip"
  inner_product_param {
    num_output: 2
  }
}
layer {
  name: "loss"
  type: "SoftmaxWithLoss"
  bottom: "ip"
  bottom: "label"
  top: "loss"
}
模型初始化由Net::Init()。处理。初始化主要做两件事:通过创建blob和图层来构建整个DAG(对于C ++极客:网络将在其生命周期内保留blob和图层的所有权),并调用图层的SetUp()功能。它还会执行一系列其他簿记操作,例如验证整个网络体系结构的正确性。
solver
solver算是caffe的核心的核心,它协调着整个模型的运作。caffe程序运行必带的一个参数就是solver配置文件。
训练模型命令caffe train --solver=xxx_solver.prototxt
solver的主要作用就是交替调用前向(forward)算法和后向(backward)算法来更新参数,从而最小化loss,实际上就是一种迭代的优化算法。
目前有6中优化算法,实际上对应着tensorflow里的optimizer:
Stochastic Gradient Descent (type: "SGD"),
AdaDelta (type: "AdaDelta"),
Adaptive Gradient (type: "AdaGrad"),
Adam (type: "Adam"),
Nesterov’s Accelerated Gradient (type: "Nesterov") and
RMSprop (type: "RMSProp")
具体请看:
例子:
net: "examples/mnist/lenet_train_test.prototxt"
test_iter: 100
test_interval: 500
base_lr: 0.01
momentum: 0.9
type: SGD
weight_decay: 0.0005
lr_policy: "inv"
gamma: 0.0001
power: 0.75
display: 100
max_iter: 20000
snapshot: 5000
snapshot_prefix: "examples/mnist/lenet"
solver_mode: CPU
prototxt
prototxt文件是用来存放模型结构的地方,模型的结构主要以layer为单位来构建。
name: "LeNet"
layer {
  name: "mnist"                                #网络层名称
  type: "Data"                                 #网络层类型,数据层
  top: "data"                                  #这一层的输出,数据
  top: "label"                                 #这一层的输出,标签
  include {    phase: TRAIN  }                 #TRAIN:=用于训练,TEST:=用于测试
  transform_param {    scale: 0.00390625  }    #对数据进行scale
  data_param {                                 #数据层配置
    source: "examples/mnist/mnist_train_lmdb"  #数据存放路径
    batch_size: 64                             #指定batch大小
    backend: LMDB                              #指定数据库格式,LMDB/LevelDB
  }
}
layer {
  name: "mnist"
  type: "Data"
  top: "data"
  top: "label"
  include {    phase: TEST  }
  transform_param {    scale: 0.00390625  }
  data_param {
    source: "examples/mnist/mnist_test_lmdb"
    batch_size: 100
    backend: LMDB
  }
}
layer{
    name:"conv1"
    type:"Convolution" #卷积层
    bottom:"data"      #上一层的输出作为输入
    top:"conv1"
    param{name:"conv1_w" lr_mult:1 decay_mult:1} #卷积层参数w的名称,学习率和衰减率(相对于base_lr和weight_decay的倍数)
    param{name:"conv1_b" lr_mult:2 decay_mult:0} #卷积层参数b的名称,学习率和衰减率
    convolution_param{
        num_output:20         #卷积层输出的feature map数量
        kernel_size:5         #卷积层的大小
        pad:0                 #卷积层的填充大小
        stride:1              #进行卷积的步长
        weight_filler{type:"xavier" }      #参数w的初始话策略
        weight_filler{type:"constant" value:0.1}     #参数b的初始化策略
    }
}
layer {        #BatchNorm层,对feature map进行批规范化处理
    name:"bn1"
    type:"BatchNorm"
    bottom:"conv1"
    top:"conv1"
    batch_norm_param{ use_global_stats:false} #训练时为false,测试时为true
}
layer {           #池化层,即下采样层
  name: "pool1"
  type: "Pooling"
  bottom: "conv1"
  top: "pool1"
  pooling_param {
    pool: MAX   #最大值池化,还有AVE均值池化
    kernel_size: 2
    stride: 2
  }
}
layer {
  name: "conv2"
  type: "Convolution"
  bottom: "pool1"
  top: "conv2"
  param {    lr_mult: 1  }
  param {    lr_mult: 2  }
  convolution_param {
    num_output: 50
    kernel_size: 5
    stride: 1
    weight_filler {      type: "xavier"    }
    bias_filler {      type: "constant"    }
  }
}
layer {
    name:"bn2"
    type:"BatchNorm"
    bottom:"conv2"
    top:"conv2"
    batch_norm_param{ use_global_stats:false}
}
layer {
  name: "pool2"
  type: "Pooling"
  bottom: "conv2"
  top: "pool2"
  pooling_param {
    pool: MAX
    kernel_size: 2
    stride: 2
  }
}
layer {                         #全连接层
  name: "ip1"
  type: "InnerProduct"
  bottom: "pool2"
  top: "ip1"
  param {    lr_mult: 1  }
  param {    lr_mult: 2  }
  inner_product_param {
    num_output: 500
    weight_filler {      type: "xavier"    }
    bias_filler {      type: "constant"    }
  }
}
layer {                             #激活函数层,提供非线性能力
  name: "relu1"
  type: "ReLU"
  bottom: "ip1"
  top: "ip1"
}
layer {
  name: "ip2"
  type: "InnerProduct"
  bottom: "ip1"
  top: "ip2"
  param {    lr_mult: 1  }
  param {    lr_mult: 2  }
  inner_product_param {
    num_output: 10
    weight_filler {      type: "xavier"    }
    bias_filler {      type: "constant"    }
  }
}
layer {                             #损失函数层
  name: "prob"
  type: "SoftmaxWithLoss"
  bottom: "ip2"
  bottom: "label"
  top: "prob"
}
train.sh
TOOLS=/path/to/your/caffe/build/tools
GLOG_logtostderr=0 GLOG_log_dir=log/ \ #该行用于调用glog进行训练日志保存,使用时请把该行注释删除,否则会出错
$TOOLS/caffe train --solver=/path/to/your/solver.prototxt #--snapshot=/path/to/your/snapshot or --weights=/path/to/your/caffemodel ,snapshot和weights两者只是选一,两个参数都可以用来继续训练,区别在于是否保存solver状态
数据准备
#!/usr/bin/env sh
# Create the imagenet lmdb inputs
# N.B. set the path to the imagenet train + val data dirs
set -e

EXAMPLE=""                            #存储路径
DATA=""                               #数据路径
TOOLS=/path/to/your/caffe/build/tools #caffe所在目录

TRAIN_DATA_ROOT=""                   #训练数据根目录
VAL_DATA_ROOT=""                     #测试数据根目录
# RESIZE=true to resize the images to 256x256. Leave as false if images have
# already been resized using another tool.
RESIZE=false                         #重新调整图片大小
if $RESIZE; then
  RESIZE_HEIGHT=256
  RESIZE_WIDTH=256
else
  RESIZE_HEIGHT=0
  RESIZE_WIDTH=0
fi

#检测路径是否存在
if [ ! -d "$TRAIN_DATA_ROOT" ]; then
  echo "Error: TRAIN_DATA_ROOT is not a path to a directory: $TRAIN_DATA_ROOT"
  echo "Set the TRAIN_DATA_ROOT variable in create_imagenet.sh to the path" \
       "where the ImageNet training data is stored."
  exit 1
fi

if [ ! -d "$VAL_DATA_ROOT" ]; then
  echo "Error: VAL_DATA_ROOT is not a path to a directory: $VAL_DATA_ROOT"
  echo "Set the VAL_DATA_ROOT variable in create_imagenet.sh to the path" \
       "where the ImageNet validation data is stored."
  exit 1
fi

echo "Creating train lmdb..."

GLOG_logtostderr=1 $TOOLS/convert_imageset \
    --resize_height=$RESIZE_HEIGHT \
    --resize_width=$RESIZE_WIDTH \
    --shuffle \
    $TRAIN_DATA_ROOT \
    $DATA/train.txt \                #训练图片列表,运行时请把该行注释删除,否则会出错
    $EXAMPLE/mnist_train_lmdb

echo "Creating val lmdb..."

GLOG_logtostderr=1 $TOOLS/convert_imageset \
    --resize_height=$RESIZE_HEIGHT \
    --resize_width=$RESIZE_WIDTH \
    --shuffle \
    $VAL_DATA_ROOT \
    $DATA/val.txt \
    $EXAMPLE/mnist_test_lmdb

echo "Done."