看github上的wiki,使用gradle接入Tinker。
根据提示导入tinker-sample-android demo。
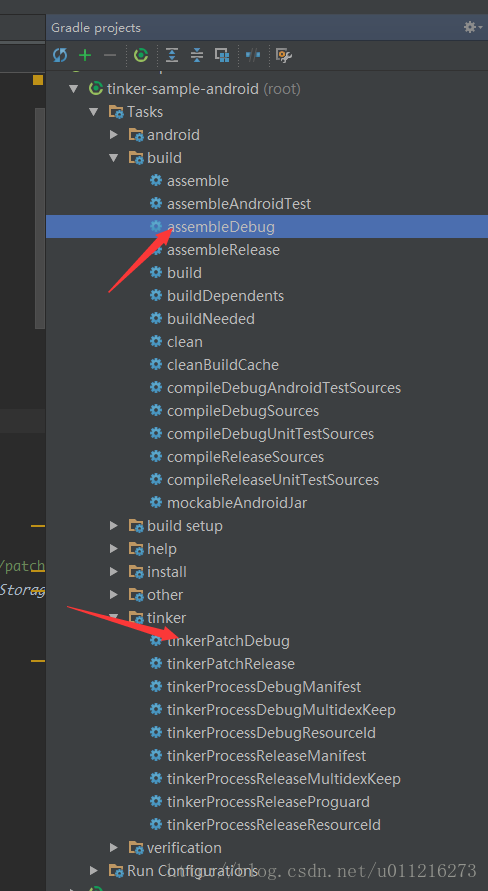
调用assembleDebug编译,我们会将编译过的包保存在build/bakApk中。然后我们将它安装到手机,点击SHOW INFO按钮,可以看到补丁并没有加载.
生成后的apk存放位置在

修改代码,例如将MainActivity中I am on patch onCreate的Log打开。然后我们需要修改build.gradle中的参数,将步骤一编译保存的安装包路径拷贝到tinkerPatch中的oldApk参数中。
oldApk = getOldApkPath() 找到 getOldApkPath()方法
ext {
    //for some reason, you may want to ignore tinkerBuild, such as instant run debug build?
    tinkerEnabled = true

    //for normal build
    //old apk file to build patch apk
    tinkerOldApkPath = "${bakPath}/app-debug-0329-16-29-56.apk"
    //proguard mapping file to build patch apk
    tinkerApplyMappingPath = "${bakPath}/app-debug-1018-17-32-47-mapping.txt"
    //resource R.txt to build patch apk, must input if there is resource changed
    tinkerApplyResourcePath = "${bakPath}/app-debug-1018-17-32-47-R.txt"

    //only use for build all flavor, if not, just ignore this field
    tinkerBuildFlavorDirectory = "${bakPath}/app-1018-17-32-47"
}


def getOldApkPath() {
    return hasProperty("OLD_APK") ? OLD_APK : ext.tinkerOldApkPath
}
可以看到getOldApkPath方法最后引用的是ext.tinkerOldApkPath,找到他,
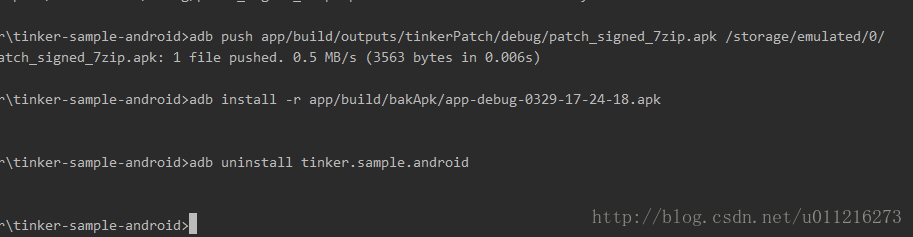
tinkerOldApkPath = "${bakPath}/你生成apk的名字(如app-debug-0329-16-29-56).apk"调用tinkerPatchDebug, 补丁包与相关日志会保存在/build/outputs/tinkerPatch/。然后我们将patch_signed_7zip.apk推送到手机的sdcard中。下面截图是推到手机目录上和安装apk和下载apk的adb命令,还有重要的一点是推送apk到手机sd中的路径是从MainActivity的loadPatchButton触发的,这里图推送apk的地址可以自己更改。ps:手机模拟器的sd卡地址是/storage/emulated/0/。
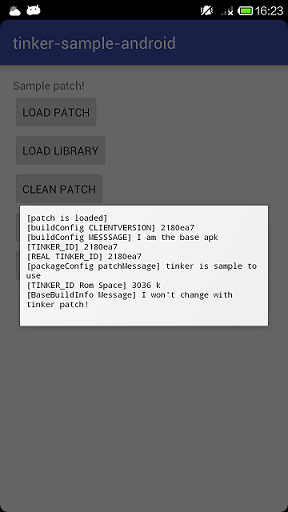
最后一个验证是否load patch并且打印了i am on patch onCreatelog。
点击LOAD PATCH按钮, 如果看到patch success, please restart process的toast,即可锁屏或者点击KILL SELF按钮(重启app)。我们可以看到的确出现了I am on patch onCreate日志,同时点击SHOW INFO按钮,显示补丁包的确已经加载成功了。
ps:(●’◡’●)偷了张Tinker的图。