版权声明:本文为博主原创文章,未经博主允许不得转载。 https://blog.csdn.net/luffysk/article/details/81608973
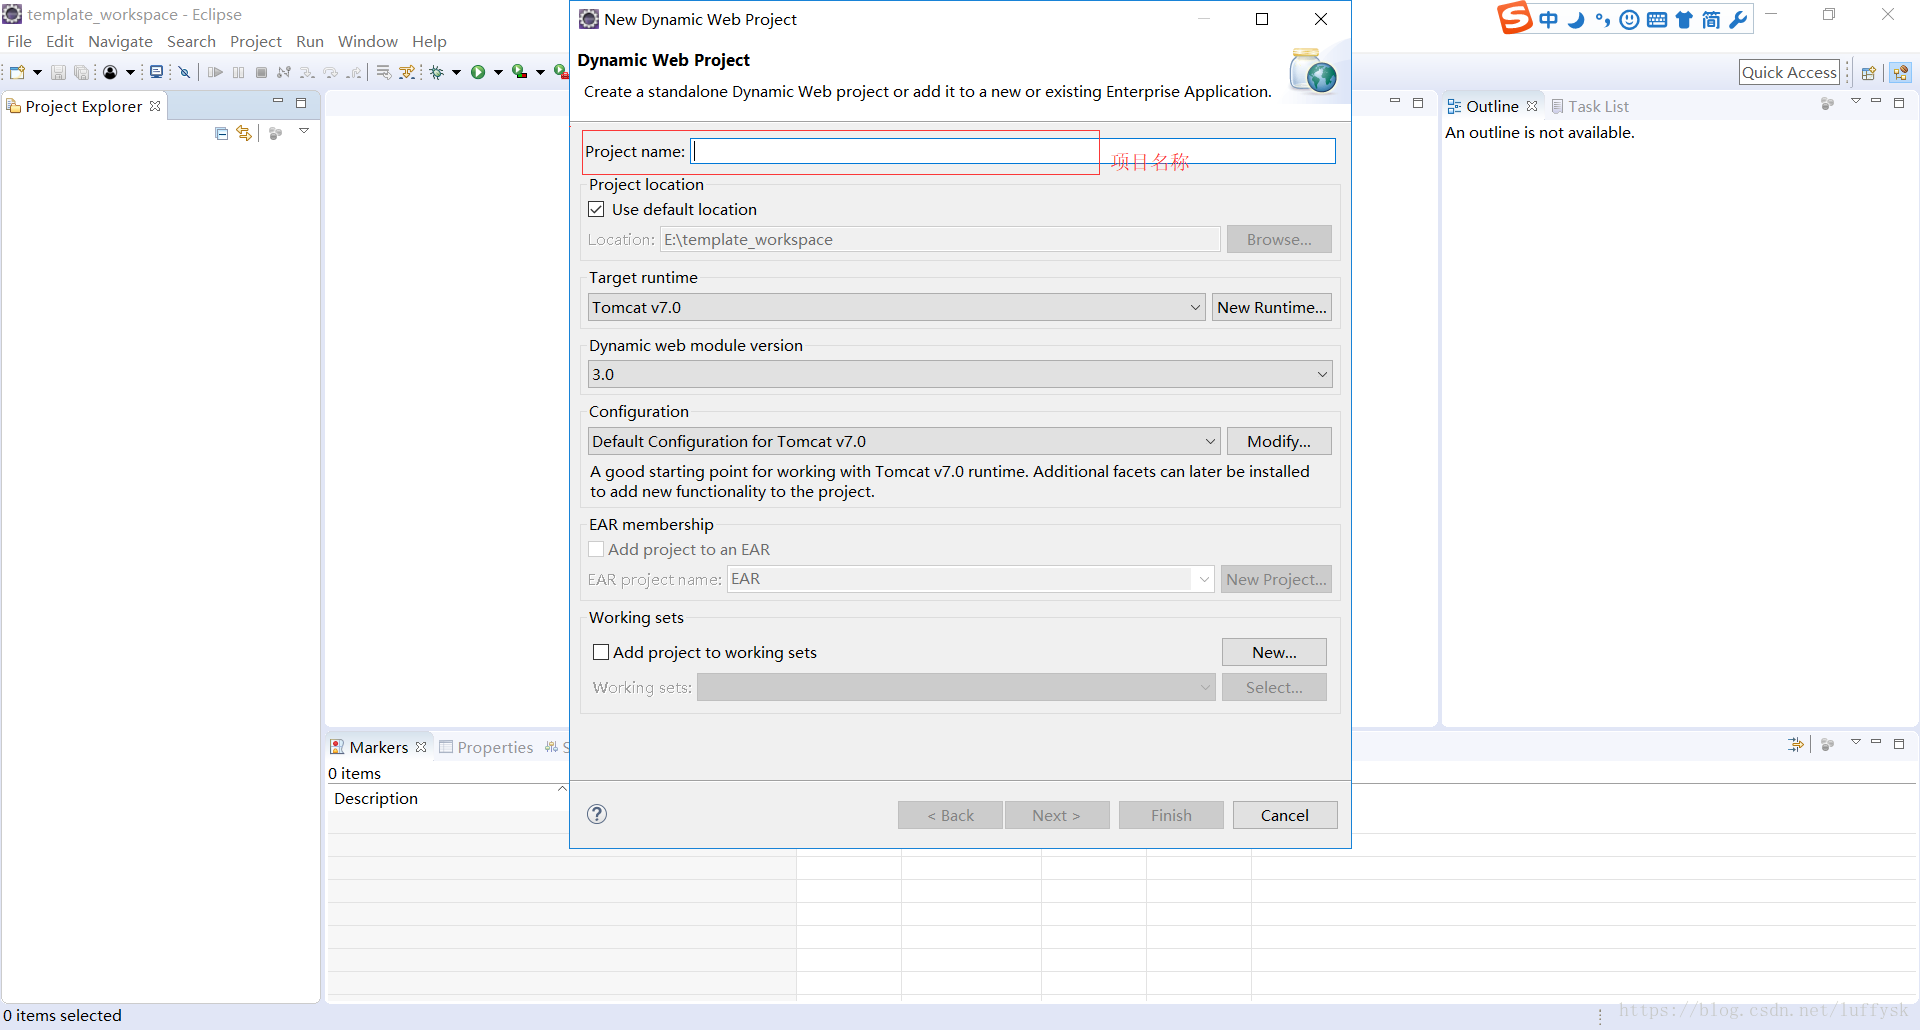
第一步:打开eclipse,单击右键–》new–》Dynamic Web Project,输入项目名称后一直点击next到最后一步,勾选创建web.xml后点击finish,主要的目录为图中选中的三部分。
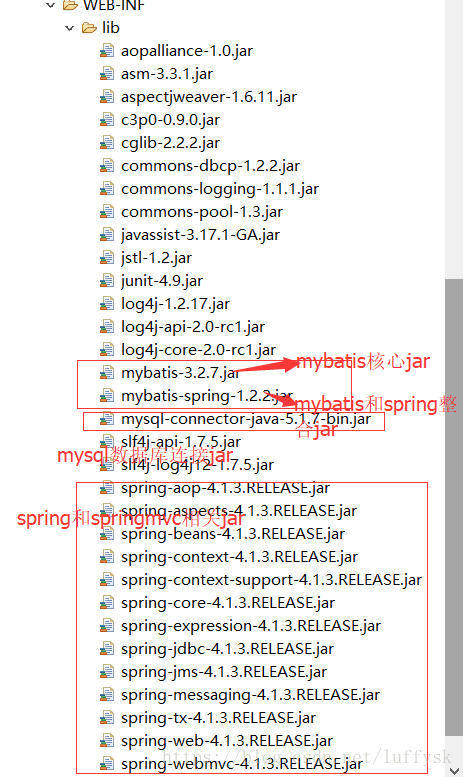
第二步:复制spring、springmvc和mybatis的jar包加入到lib目录中,选中所有jar包右键BuildPath->add Build Path
第三步:在web.xml中添加spring的监听器,springmvc的前端控制器
<?xml version="1.0" encoding="UTF-8"?>
<web-app xmlns:xsi="http://www.w3.org/2001/XMLSchema-instance" xmlns="http://java.sun.com/xml/ns/javaee" xsi:schemaLocation="http://java.sun.com/xml/ns/javaee http://java.sun.com/xml/ns/javaee/web-app_2_5.xsd" id="WebApp_ID" version="2.5">
<display-name>ssm</display-name>
<welcome-file-list>
<welcome-file>index.html</welcome-file>
<welcome-file>index.htm</welcome-file>
<welcome-file>index.jsp</welcome-file>
<welcome-file>default.html</welcome-file>
<welcome-file>default.htm</welcome-file>
<welcome-file>default.jsp</welcome-file>
</welcome-file-list>
<!-- 加载spring容器 -->
<context-param>
<param-name>contextConfigLocation</param-name>
<!-- 将spring的配置文件拆分为多个,便于维护和管理 -->
<param-value>classpath:ApplicationContext-*.xml</param-value>
</context-param>
<listener>
<listener-class>org.springframework.web.context.ContextLoaderListener</listener-class>
</listener>
<!-- springmvc前端控制器 -->
<servlet>
<servlet-name>springMvc</servlet-name>
<servlet-class>org.springframework.web.servlet.DispatcherServlet</servlet-class>
<init-param>
<param-name>contextConfigLocation</param-name>
<param-value>classpath:SpringMvc.xml</param-value>
</init-param>
<!-- 在tomcat启动的时候就加载这个servlet -->
<load-on-startup>1</load-on-startup>
</servlet>
<servlet-mapping>
<servlet-name>springMvc</servlet-name>
<!--
*.action 代表拦截后缀名为.action结尾的
/ 拦截所有但是不包括.jsp
/* 拦截所有包括.jsp
-->
<url-pattern>*.action</url-pattern>
</servlet-mapping>
<!-- 配置Post请求乱码 -->
<filter>
<filter-name>CharacterEncodingFilter</filter-name>
<filter-class>org.springframework.web.filter.CharacterEncodingFilter</filter-class>
<init-param>
<param-name>encoding</param-name>
<param-value>utf-8</param-value>
</init-param>
</filter>
<filter-mapping>
<filter-name>CharacterEncodingFilter</filter-name>
<url-pattern>/*</url-pattern>
</filter-mapping>
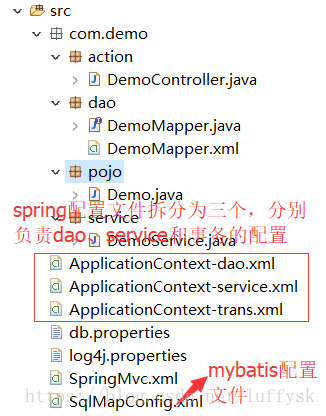
</web-app>第三步:创建包目录结构和相关的配置文件
ApplicationContext-dao.xml
<?xml version="1.0" encoding="UTF-8"?>
<beans xmlns="http://www.springframework.org/schema/beans"
    xmlns:context="http://www.springframework.org/schema/context" xmlns:p="http://www.springframework.org/schema/p"
    xmlns:aop="http://www.springframework.org/schema/aop" xmlns:tx="http://www.springframework.org/schema/tx"
    xmlns:xsi="http://www.w3.org/2001/XMLSchema-instance"
    xsi:schemaLocation="http://www.springframework.org/schema/beans http://www.springframework.org/schema/beans/spring-beans-4.0.xsd
    http://www.springframework.org/schema/context http://www.springframework.org/schema/context/spring-context-4.0.xsd
    http://www.springframework.org/schema/aop http://www.springframework.org/schema/aop/spring-aop-4.0.xsd http://www.springframework.org/schema/tx http://www.springframework.org/schema/tx/spring-tx-4.0.xsd
    http://www.springframework.org/schema/util http://www.springframework.org/schema/util/spring-util-4.0.xsd">

    <!-- 加载配置文件 -->
    <context:property-placeholder location="classpath:db.properties" />
    <!-- 数据库连接池 -->
    <bean id="dataSource" class="com.mchange.v2.c3p0.ComboPooledDataSource"
        destroy-method="close">
        <!-- 在db.properties中取值,${db.properties中的参数名} -->
        <property name="driverClass" value="${jdbc.driver}" />
        <property name="jdbcUrl" value="${jdbc.url}" />
        <property name="user" value="${jdbc.username}" />
        <property name="password" value="${jdbc.password}" />
    </bean>

    <!-- mapper配置 -->
    <!-- 让spring管理sqlsessionfactory 使用mybatis和spring整合包中的 -->
    <bean id="sqlSessionFactory" class="org.mybatis.spring.SqlSessionFactoryBean">
        <!-- 数据库连接池 -->
        <property name="dataSource" ref="dataSource" />
        <!-- 加载mybatis的全局配置文件 -->
        <property name="configLocation" value="classpath:SqlMapConfig.xml" />
    </bean>

    <!-- 配置Mapper扫描器 -->
    <bean class="org.mybatis.spring.mapper.MapperScannerConfigurer">
        <property name="basePackage" value="com.demo.dao"/>
    </bean>

</beans>
ApplicationContext-service.xml
<?xml version="1.0" encoding="UTF-8"?>
<beans xmlns="http://www.springframework.org/schema/beans"
    xmlns:context="http://www.springframework.org/schema/context" xmlns:p="http://www.springframework.org/schema/p"
    xmlns:aop="http://www.springframework.org/schema/aop" xmlns:tx="http://www.springframework.org/schema/tx"
    xmlns:xsi="http://www.w3.org/2001/XMLSchema-instance"
    xsi:schemaLocation="http://www.springframework.org/schema/beans http://www.springframework.org/schema/beans/spring-beans-4.0.xsd
    http://www.springframework.org/schema/context http://www.springframework.org/schema/context/spring-context-4.0.xsd
    http://www.springframework.org/schema/aop http://www.springframework.org/schema/aop/spring-aop-4.0.xsd
http://www.springframework.org/schema/tx
http://www.springframework.org/schema/tx/spring-tx-4.0.xsd
    http://www.springframework.org/schema/util http://www.springframework.org/schema/util/spring-util-4.0.xsd">

    <!-- @Service扫描 -->
    <context:component-scan base-package="com.demo.service"></context:component-scan>
</beans>
ApplicationContext-trans.xml
<?xml version="1.0" encoding="UTF-8"?>
<beans xmlns="http://www.springframework.org/schema/beans"
    xmlns:context="http://www.springframework.org/schema/context" xmlns:p="http://www.springframework.org/schema/p"
    xmlns:aop="http://www.springframework.org/schema/aop" xmlns:tx="http://www.springframework.org/schema/tx"
    xmlns:xsi="http://www.w3.org/2001/XMLSchema-instance"
    xsi:schemaLocation="http://www.springframework.org/schema/beans http://www.springframework.org/schema/beans/spring-beans-4.0.xsd
    http://www.springframework.org/schema/context http://www.springframework.org/schema/context/spring-context-4.0.xsd
    http://www.springframework.org/schema/aop http://www.springframework.org/schema/aop/spring-aop-4.0.xsd
http://www.springframework.org/schema/tx
http://www.springframework.org/schema/tx/spring-tx-4.0.xsd
    http://www.springframework.org/schema/util http://www.springframework.org/schema/util/spring-util-4.0.xsd">

    <!-- 事务管理器 -->
    <bean id="transactionManager"
        class="org.springframework.jdbc.datasource.DataSourceTransactionManager">
        <!-- 数据源 -->
        <property name="dataSource" ref="dataSource" />
    </bean>

    <!-- 通知 -->
    <tx:advice id="txAdvice" transaction-manager="transactionManager">
        <tx:attributes>
            <!-- 传播行为 -->
            <tx:method name="save*" propagation="REQUIRED" />
            <tx:method name="insert*" propagation="REQUIRED" />
            <tx:method name="delete*" propagation="REQUIRED" />
            <tx:method name="update*" propagation="REQUIRED" />
            <tx:method name="find*" propagation="SUPPORTS" read-only="true" />
            <tx:method name="get*" propagation="SUPPORTS" read-only="true" />
        </tx:attributes>
    </tx:advice>

    <!-- 切面 -->
    <aop:config>
        <aop:advisor advice-ref="txAdvice"
            pointcut="execution(* com.demo.service.*.*(..))" />
    </aop:config>

</beans>
SpringMvc.xml
<?xml version="1.0" encoding="UTF-8"?>
<beans xmlns="http://www.springframework.org/schema/beans"
    xmlns:xsi="http://www.w3.org/2001/XMLSchema-instance" xmlns:p="http://www.springframework.org/schema/p"
    xmlns:context="http://www.springframework.org/schema/context"
    xmlns:dubbo="http://code.alibabatech.com/schema/dubbo" xmlns:mvc="http://www.springframework.org/schema/mvc"
    xsi:schemaLocation="http://www.springframework.org/schema/beans http://www.springframework.org/schema/beans/spring-beans-4.0.xsd
        http://www.springframework.org/schema/mvc http://www.springframework.org/schema/mvc/spring-mvc-4.0.xsd
        http://code.alibabatech.com/schema/dubbo http://code.alibabatech.com/schema/dubbo/dubbo.xsd
        http://www.springframework.org/schema/context http://www.springframework.org/schema/context/spring-context-4.0.xsd">

    <!-- @Controller注解扫描 -->
    <context:component-scan base-package="com.demo.action"></context:component-scan>

    <!-- 注解驱动:
            替我们显示的配置了最新版的注解的处理器映射器和处理器适配器 -->
    <mvc:annotation-driven conversion-service="conversionService"></mvc:annotation-driven>

    <!-- 配置视图解析器
    作用:在controller中指定页面路径的时候就不用写页面的完整路径名称了,可以直接写页面去掉扩展名的名称
    -->
    <bean class="org.springframework.web.servlet.view.InternalResourceViewResolver">
        <!-- 真正的页面路径 =  前缀 + 去掉后缀名的页面名称 + 后缀 -->
        <!-- 前缀 -->
        <property name="prefix" value="/WEB-INF/"></property>
        <!-- 后缀 -->
        <property name="suffix" value=".jsp"></property>
    </bean>

    <!-- 配置自定义转换器
    注意: 一定要将自定义的转换器配置到注解驱动上
    -->
    <bean id="conversionService"
        class="org.springframework.format.support.FormattingConversionServiceFactoryBean">
        <!-- <property name="converters">
            <set>
                指定自定义转换器的全路径名称
                <bean class=""/>
            </set>
        </property> -->
    </bean>


</beans>
SqlMapConfig.xml为只含有configuration标签的空文件,负责配置一些全局信息
第四步:编写DemoController、Demo、DemoService、DemoMapper文件
DemoController.java
@Controller
@RequestMapping("/demo")
public class DemoController {
    @Resource
    private DemoService demoService;
    @RequestMapping("/list")
    public String list(Model model) {
        List<Demo> list = demoService.findAllDemo();
        model.addAttribute("list", list);

        return "demo";
    }
}
DemoService.java
@Service
public class DemoService {
    @Resource
    private DemoMapper demoMapper;
    public List<Demo> findAllDemo(){
        return demoMapper.findAllDemo();
    }
}
DemoMapper.xml
<?xml version="1.0" encoding="UTF-8" ?>
<!DOCTYPE mapper PUBLIC "-//mybatis.org//DTD Mapper 3.0//EN" "http://mybatis.org/dtd/mybatis-3-mapper.dtd" >
<mapper namespace="com.demo.dao.DemoMapper">
    <select id="findAllDemo" resultType="com.demo.pojo.Demo">
        select uuid, user_name username,gender from t_demo
    </select>
</mapper>
DemoMapper.java
扫描二维码关注公众号,回复:
2996455 查看本文章

public interface DemoMapper {
    public List<Demo> findAllDemo();
}
Demo.java
public class Demo {
    private String uuid;
    private String username;
    private String gender;
    public String getUuid() {
        return uuid;
    }
    public void setUuid(String uuid) {
        this.uuid = uuid;
    }
    public String getUsername() {
        return username;
    }
    public void setUsername(String username) {
        this.username = username;
    }
    public String getGender() {
        return gender;
    }
    public void setGender(String gender) {
        this.gender = gender;
    }
    @Override
    public String toString() {
        return "Demo [uuid=" + uuid + ", username=" + username + ", gender=" + gender + "]";
    }
}