一、开始使用Spring Cloud实战微服务
1、SpringCloud是什么?
云计算的解决方案?不是
SpringCloud是一个在SpringBoot的基础上构建的一个快速构建分布式系统的工具集(全家桶)。
SpringCloud拥有SpringBoot的特点。
2、关于SpringCloud的版本?
大部分spring软件的版本是以:主版本.次版本.增量版本.里程碑版本的形式命名。
Spring Cloud Angel SR6???
Angel是SpringCloud的一个大版本,Service Release6版本,标识一个bug修复的版本。
3、SpringCloud的特点?
1)、约定优于配置
2)、开箱即用、快速启动
3)、适用于各种环境(PC Server、云环境、Subtopic、容器Docker)
4)、轻量级的组件(如服务发现中整合的Eureka)
5)、组件支持很丰富、功能很齐全(如提供配置中心、注册中心、智能路由…)
6)、选型中立(服务发现中使用Eureka、Zookeeper、Consul等都可以)
二、需要的技术储备
1、java(scala、Groovy…均可)
2、构建工具
1)、Maven
2)、Gradle
将maven项目转换成gradle项目:(在pom文件的上一级目录执行如下命令,使用cmd操作)
gradle init --type pom
3)、SpringBoot:http://cnblogs.com/mmzs/category/1192166.html
三、使用的软件版本
1、原则:使用最新的版本进行讲解
2、JDK 1.8
3、Maven 3.3.9
4、IDE(Spring Tool Suite 3.8.2、IDEA、Eclipse)
5、Spring Boot
6、SpringCloud Camden SR1
建议:大家学习时,尽量使用相同的版本进行选择,避免采坑
SpringCloud学习(二):开始使用Spring Cloud实战微服务
四、创建工程
1、创建调用关系的微服务
创建存在调用关系的微服务,调用关系如下
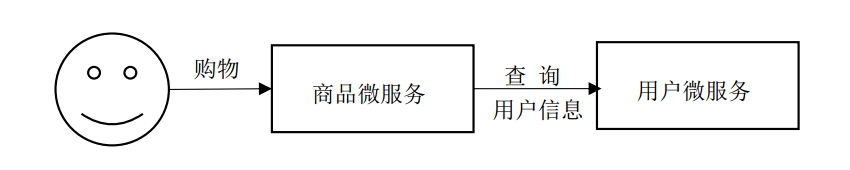
服务消费者:服务的调用方,调用别的微服务的微服务(即:依赖其他服务的服务)
服务提供者:服务的被调用方,提供API的微服务(即:为其他服务提供服务的服务)
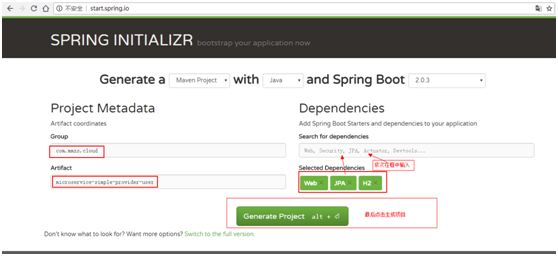
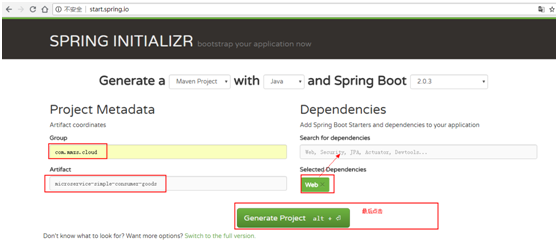
2、编写一个服务提供者
填写信息:
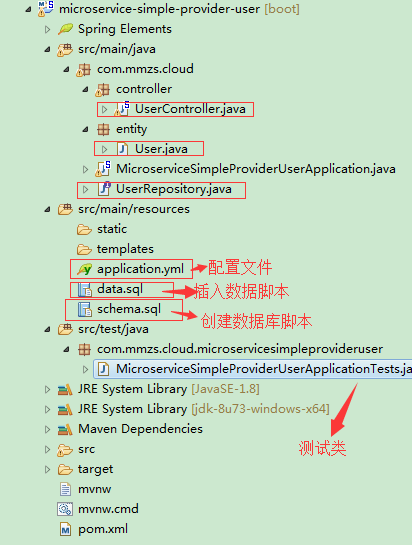
(1)、将生成的maven工程导入eclipse
然后一次创建如下选中的类和配置文件。
(2)、data.sql和schema.sql


insert into user(id,username, name, age, balance) values(1,'liubei', '刘备', 20, 100.00);
insert into user(id,username, name, age, balance) values(2,'guanyu', '关羽', 20, 100.00);
insert into user(id,username, name, age, balance) values(3,'zhangfei', '张飞', 20, 100.00);
insert into user(id,username, name, age, balance) values(4,'machao', '马超', 20, 100.00);
drop table user if exists;
create table user(
    id bigint generated by default as identity,
    username varchar(40),
    name varchar(20),
    age int(3),
    balance decimal(10,2),
    primary key(id)
);
(3)、配置文件application.yml
 1 server:
 2   # 服务器端口号
 3   port: 6900
 4 spring:
 5   jpa:
 6     # 是否生成ddl语句
 7     generate-ddl: false
 8     # 是否打印sql语句
 9     show-sql: true
10     hibernate:
11       # 自动生成ddl,由于指定了具体的ddl,此处设置为none
12       ddl-auto: none
13   datasource:
14     # 使用H2数据库
15     platform: h2
16     # 指定生成数据库的schema文件位置
17     schema: classpath:schema.sql
18     # 指定插入数据库语句的脚本位置
19     data: classpath:data.sql
20
21 # 配置日志打印信息
22 logging:
23   level:
24     root: INFO
25     org.hibernate: INFO
26     org.hibernate.type.descriptor.sql.BasicBinder: TRACE
27     org.hibernate.type.descriptor.sql.BasicExtractor: TRACE
28     com.itmuch: DEBUG
(4)、创建UserController
 1 package com.mmzs.cloud.controller;
 2
 3 import javax.annotation.Resource;
 4 import javax.websocket.server.PathParam;
 5
 6 import org.springframework.beans.factory.annotation.Autowired;
 7 import org.springframework.web.bind.annotation.GetMapping;
 8 import org.springframework.web.bind.annotation.PathVariable;
 9 import org.springframework.web.bind.annotation.RequestMapping;
10 import org.springframework.web.bind.annotation.RestController;
11
12 import com.mmzs.cloud.UserRepository;
13 import com.mmzs.cloud.entity.User;
14
15 /**
16  * @author: mmzsit
17  * @date:   2018年8月17日
18  * @Description:
19  * 博客地址:https://www.cnblogs.com/mmzs/p/9282412.html
20  * @version V1.0
21 */
22 @RestController
23 public class UserController {
24
25     @Resource
26     private UserRepository userRepository;
27
28     //第一种方式
29     @GetMapping("/user/{id}")
30     //第二种方式
31     //@RequestMapping(value="/xxx",method=org.springframework.web.bind.annotation.RequestMethod.GET)
32     //第一种和第二种方式其实是等效的
33     public User findById(@PathVariable Long id){
34         return this.userRepository.getOne(id);
35     }
36 }
(5)、创建UserRepository
 1 package com.mmzs.cloud;
 2
 3
 4 import org.springframework.data.jpa.repository.JpaRepository;
 5 import org.springframework.stereotype.Repository;
 6
 7 import com.mmzs.cloud.entity.User;
 8
 9 /**
10  * @author: mmzsit
11  * @date:   2018年8月17日
12  * @Description:
13  * 博客地址:https://www.cnblogs.com/mmzs/p/9282412.html
14  * @version V1.0
15 */
16 @Repository
17 public interface UserRepository extends JpaRepository<User, Long>{
18
19     /**
20      * @Description:
21      * @param:  @param id
22      * @param:  @return
23      * @return: User
24      * @throws
25     */
26 //    User findOne(Long id);
27
28
29
30 }
(6)、创建实体类User
 1 package com.mmzs.cloud.entity;
 2
 3 import java.math.BigDecimal;
 4
 5 import javax.persistence.Column;
 6 import javax.persistence.Entity;
 7 import javax.persistence.GeneratedValue;
 8 import javax.persistence.GenerationType;
 9 import javax.persistence.Id;
10
11 import com.fasterxml.jackson.annotation.JsonIgnoreProperties;
12
13 /**
14  * @author: mmzsit
15  * @date:   2018年8月17日
16  * @Description:
17  * 博客地址:https://www.cnblogs.com/mmzs/p/9282412.html
18  * @version V1.0
19 */
20 @Entity
21 @JsonIgnoreProperties(value = { "hibernateLazyInitializer", "handler" })
22 public class User {
23
24     @SuppressWarnings("unused")
25     private static final long serialVersionUID = 1L;
26
27     @Id
28     @GeneratedValue(strategy=GenerationType.AUTO)
29     private Long id;
30     @Column
31     private String username;
32     @Column
33     private String name;
34     @Column
35     private Short age;
36     @Column
37     private BigDecimal balance;
38
39     public Long getId() {
40         return id;
41     }
42     public String getUsername() {
43         return username;
44     }
45     public String getName() {
46         return name;
47     }
48     public Short getAge() {
49         return age;
50     }
51     public BigDecimal getBalance() {
52         return balance;
53     }
54     public void setId(Long id) {
55         this.id = id;
56     }
57     public void setUsername(String username) {
58         this.username = username;
59     }
60     public void setName(String name) {
61         this.name = name;
62     }
63     public void setAge(Short age) {
64         this.age = age;
65     }
66     public void setBalance(BigDecimal balance) {
67         this.balance = balance;
68     }
69
70 }
注:此处采用的是jpa,使用的是h2数据库,如果访问时出现实体类转化json格式错误,则需要在实体类前面加上如下这句注释:
@JsonIgnoreProperties(value = { "hibernateLazyInitializer", "handler" })
错误提示:disable SerializationFeature.FAIL_ON_EMPTY_BEANS
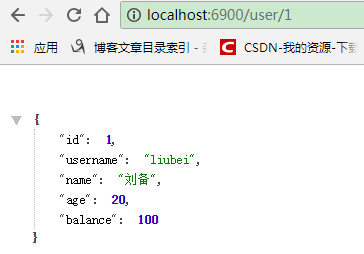
(7)、执行MicroserviceSimpleProviderUserApplication类,然后进行访问测试
3、编写一个服务消费者
填写信息:
(1)、将生成的maven工程导入eclipse
然后一次创建如下选中的类和配置文件。

(2)、配置文件application.yml
server:
  port: 6901
(3)、创建GoodsController
 1 package com.mmzs.cloud.controller;
 2
 3 import org.springframework.beans.factory.annotation.Autowired;
 4 import org.springframework.beans.factory.annotation.Value;
 5 import org.springframework.web.bind.annotation.GetMapping;
 6 import org.springframework.web.bind.annotation.PathVariable;
 7 import org.springframework.web.bind.annotation.RestController;
 8 import org.springframework.web.client.RestTemplate;
 9
10 import com.mmzs.cloud.entity.User;
11
12 /**
13  * @author: mmzsit
14  * @date: 2018年8月17日
15  * @Description: 博客地址:https://www.cnblogs.com/mmzs/p/9282412.html
16  * @version V1.0
17  */
18 @RestController
19 public class GoodsController {
20     @Autowired
21     private RestTemplate restTemplate;
22
23     @GetMapping("/goods/{id}")
24     public User findById(@PathVariable Long id) {
25         //采用了硬编码注册user服务
26         return this.restTemplate.getForObject("http://localhost:6900/user/" + id, User.class);
27     }
28 }
(4)、创建实体类User
 1 package com.mmzs.cloud.entity;
 2
 3 import java.io.Serializable;
 4 import java.math.BigDecimal;
 5
 6 /**
 7  * @author: mmzsit
 8  * @date:   2018年8月17日
 9  * @Description:
10  * 博客地址:https://www.cnblogs.com/mmzs/p/9282412.html
11  * @version V1.0
12 */
13
14 public class User implements Serializable{
15
16     private static final long serialVersionUID = -7125209803403015533L;
17
18     private Long id;
19     private String username;
20     private String name;
21     private Short age;
22     private BigDecimal balance;
23     public Long getId() {
24         return id;
25     }
26     public void setId(Long id) {
27         this.id = id;
28     }
29     public String getUsername() {
30         return username;
31     }
32     public void setUsername(String username) {
33         this.username = username;
34     }
35     public String getName() {
36         return name;
37     }
38     public void setName(String name) {
39         this.name = name;
40     }
41     public Short getAge() {
42         return age;
43     }
44     public void setAge(Short age) {
45         this.age = age;
46     }
47     public BigDecimal getBalance() {
48         return balance;
49     }
50     public void setBalance(BigDecimal balance) {
51         this.balance = balance;
52     }
53
54 }
(5)、在MicroserviceSimpleConsumerGoodsApplication类中注入Bean
其中11-16行表示注入的Bean
 1 package com.mmzs.cloud;
 2
 3 import org.springframework.boot.SpringApplication;
 4 import org.springframework.boot.autoconfigure.SpringBootApplication;
 5 import org.springframework.context.annotation.Bean;
 6 import org.springframework.web.client.RestTemplate;
 7
 8 @SpringBootApplication
 9 public class MicroserviceSimpleConsumerGoodsApplication {
10
11     @Bean
12     public RestTemplate restTemplate() {
13         return new RestTemplate();
14     }
15     //12、13、14、行相当于16行
16     //private RestTemplate restTemplate = new RestTemplate();
17
18     public static void main(String[] args) {
19         SpringApplication.run(MicroserviceSimpleConsumerGoodsApplication.class, args);
20     }
21 }
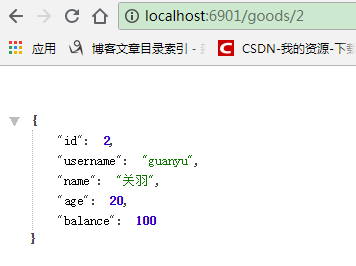
(5)、执行MicroserviceSimpleConsumerGoodsApplication类,然后进行访问测试
4、小小优化一下
主要优化的点是在GoodsController类中的硬编码部分。简单优化如下:
@RestController
public class GoodsController {
    @Autowired
    private RestTemplate restTemplate;

    //优化部分
    @Value("${user.userServicePath}")
    private String userServicePath;

    //优化后此处的硬编码字符串,修改为变量获取
    @GetMapping("/goods/{id}")
    public User findById(@PathVariable Long id) {
        //采用了硬编码注册user服务
        return this.restTemplate.getForObject(this.userServicePath + id, User.class);
    }
}
这样子的话,userServicePath的具体值需要通过配置文件application.yml来配置,故application.yml文件修改为:
server:
  port: 6901
# 优化部分
user:
  userServicePath: http://localhost:6900/user/
注: 其实这样子的优化也不是很好,因为当微服务过多时,层层调用,需要修改的部分也会越来越多,不便于维护和修改。具体措施,详见下回分解。
五、代码下载
如果需要积分的话,其实大家没必要消耗积分进行下载,按照文章内容一步一步来,绝对是可以完美测试成功的,动手过程,让影响更加深刻,不是吗?