目录
1.Android当中的进度条
- 进度条的种类

2.各种进度条之间的关系

例子:
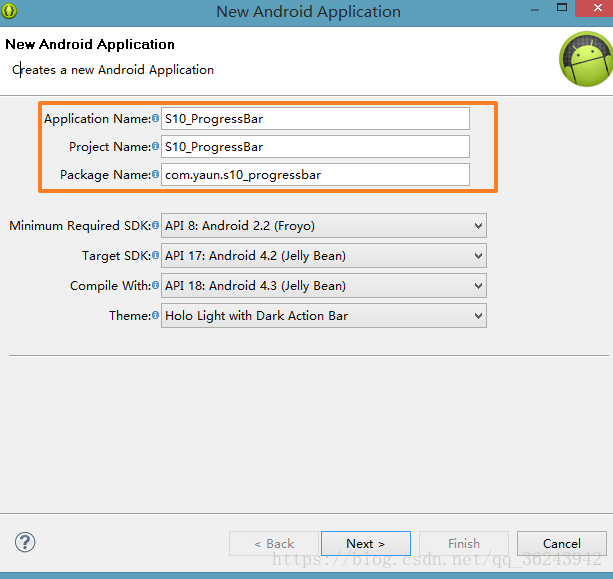
- 新建一个应用程序,命名为:S10_ProgressBar
新建默认的进度条如下所示:

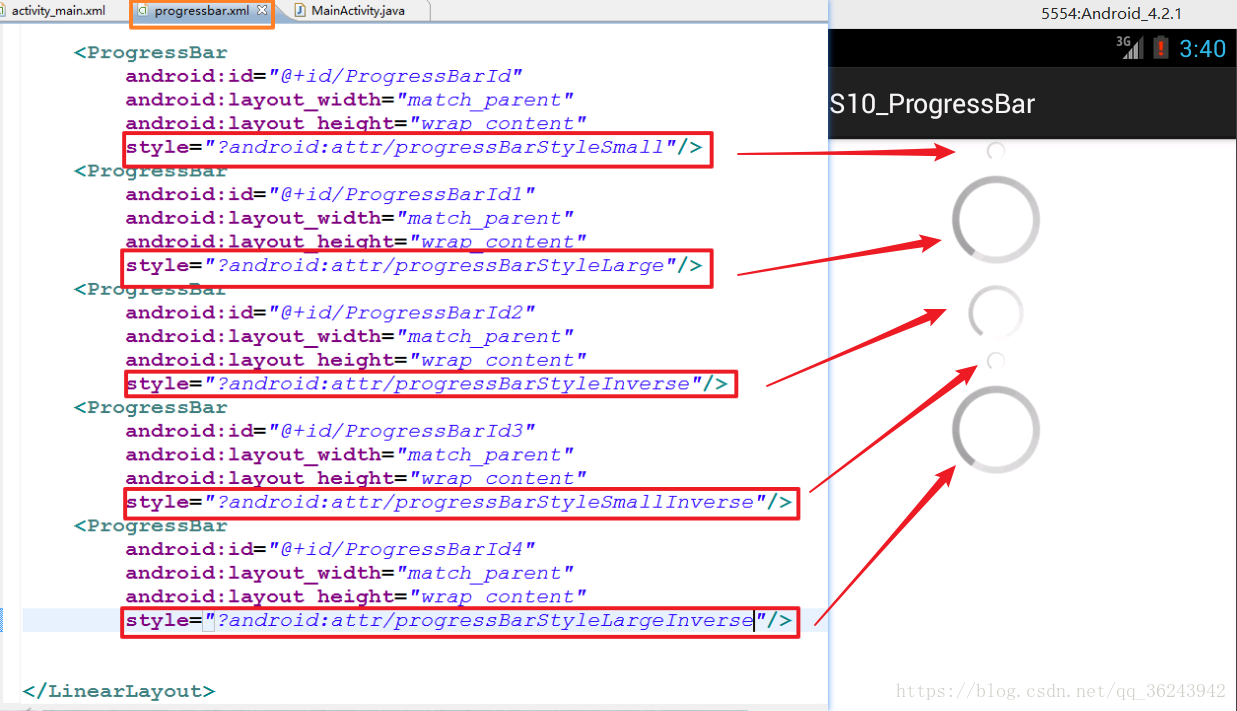
3.ProgressBark进度条的风格
ProgressBar的Style:
1.水平风格:Horizontal
2.小风格:Small
3.大风格:Large
4.反向风格:Inverse
5.小反向风格:Small.Inverse
6.大反向风格:Large.Inverse

- 水平风格进度条,最常见到:

- 为了方便演示.新建一个LinearLayout的布局文件来演示这些属性,以下为各种属性的进度条:
4.ProressBar的使用方法

进度条的主要属性
1.进度最大值:max
2.当前进度:progress
3.次要进度的值:SecondaryProgress
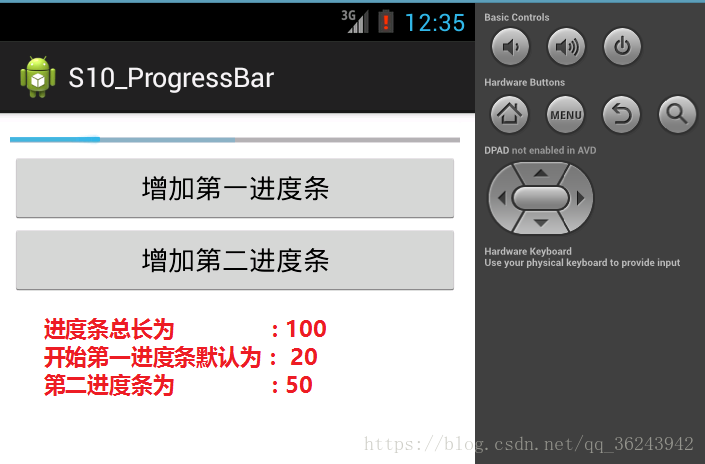
- 在刚刚相对布局的布局文件上修改:增加属性max=200,progress=50;

效果如下:

增加一个第二进度条secondaProgress:

- 在代码当中使用,声明一个ProgressBar的对象,然后获取ProgressBar的空间用对象表示:
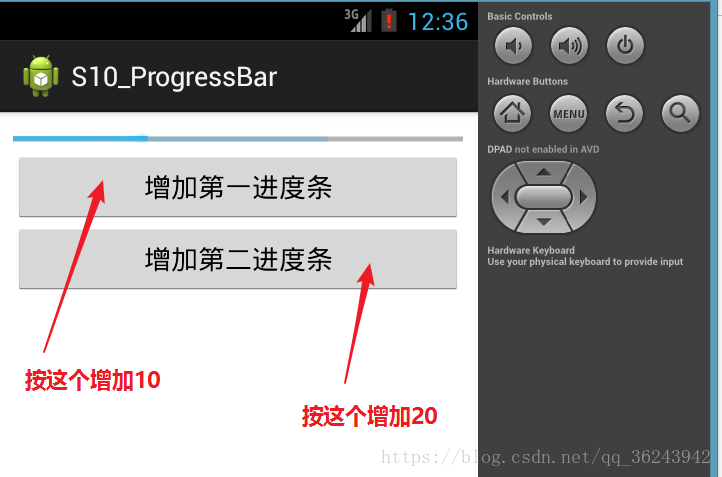
- ,先修改xml文件增加两个按钮手动控制第一进度条和第二进度条的数值:
<RelativeLayout xmlns:android="http://schemas.android.com/apk/res/android"
    xmlns:tools="http://schemas.android.com/tools"
    android:layout_width="match_parent"
    android:layout_height="match_parent"
    android:padding="10dp" >
	<ProgressBar
	    android:id="@+id/ProgressBarId"
	    android:layout_width="match_parent"
    	android:layout_height="wrap_content"
    	android:max="200"
    	android:secondaryProgress="150"
    	android:progress="50"
		style="?android:attr/progressBarStyleHorizontal"/>"
	<Button
	    android:id="@+id/firstButtonId"
	    android:layout_width="match_parent"
	    android:layout_height="wrap_content"
	    android:text="增加第一进度条"
	    android:layout_below="@id/ProgressBarId"/>
	<Button
	    android:id="@+id/secondButtonId"
	    android:layout_width="match_parent"
	    android:layout_height="wrap_content"
	    android:text="增加第二进度条"
	    android:layout_below="@id/firstButtonId"/>


</RelativeLayout>- 在MainActivity中声明应用,使用对象代表控件,然后复写Button的监听器接口,为按钮绑定监听器:

实现接监听器接口:

生成监听器对象,绑定监听器:

代码如下:
package com.yaun.s10_progressbar;

import android.app.Activity;
import android.os.Bundle;
import android.view.Menu;
import android.view.View;
import android.view.View.OnClickListener;
import android.widget.Button;
import android.widget.ProgressBar;
//导入一些包
public class MainActivity extends Activity {
	//声明引用
	private ProgressBar progressBar;
	private Button firstButton,secondButton;
    @Override
    protected void onCreate(Bundle savedInstanceState) {
        super.onCreate(savedInstanceState);
        setContentView(R.layout.activity_main);
        //获取控件的标签用对象的方法表示
        progressBar = (ProgressBar)findViewById(R.id.ProgressBarId);
        firstButton =(Button)findViewById(R.id.firstButtonId);
        secondButton= (Button)findViewById(R.id.secondButtonId);
        //设最大值
        progressBar.setMax(100);
        //设置第一进度条的值
        progressBar.setProgress(20);
        //设第二进度条的值
        progressBar.setSecondaryProgress(50);
        //生成监听器对象,并未两个按钮绑定监听器
        OnButtonListener1 listener1 =new OnButtonListener1();
        OnbuttonListener2 listener2 =new OnbuttonListener2();
        firstButton.setOnClickListener(listener1);
        secondButton.setOnClickListener(listener2);

    }
    //实现按钮监听器的类
    class OnButtonListener1 implements OnClickListener{

		@Override
		public void onClick(View v) {
			// TODO Auto-generated method stub
			progressBar.incrementProgressBy(10);
		}
    }
    //实现按钮监听器的类
    class OnbuttonListener2 implements OnClickListener{

		@Override
		public void onClick(View v) {
			// TODO Auto-generated method stub
			progressBar.incrementSecondaryProgressBy(20);
		}

    }
    @Override
    public boolean onCreateOptionsMenu(Menu menu) {
        // Inflate the menu; this adds items to the action bar if it is present.
        getMenuInflater().inflate(R.menu.main, menu);
        return true;
    }

}
效果如下:
5.SeekBar

seekBar的主要属性
1.进度的最大值:max
2.当前进度:progress
3.次要进度的值:SecondaProgress
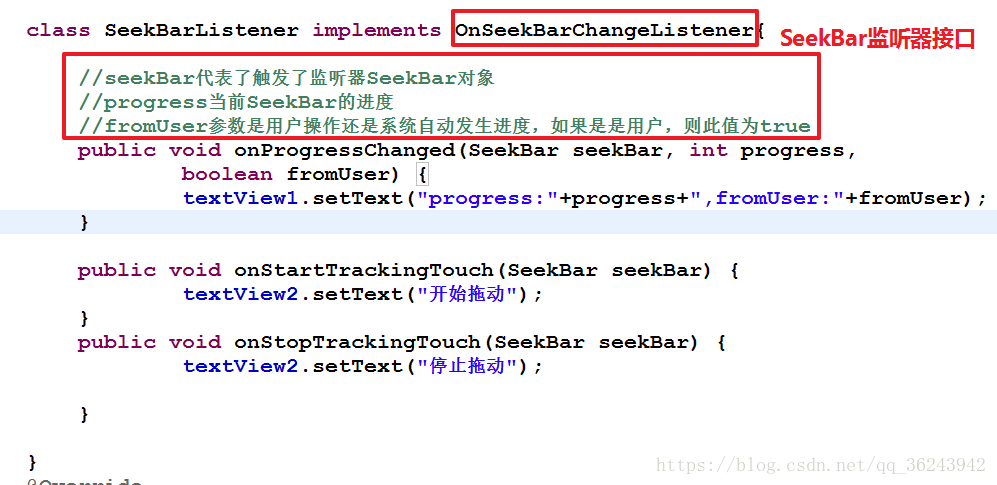
SeekBar的监听器:OnSeekBarChangedListener
监听器的方法:
- 只要进度发生变化,就会触发这个监听器,用户可以拖拽这个监听器
1.onProgressChanged(SeekBar seekBar,int progress,boolean fromUser)
- 用户开始拖拽就会调用这个方法
2.onStartTrackongTouch(SeekBar seekbar)
- 用户停止拖动就会调用这个方法
3.onStopTrackingTounch(SeekBar seekbar)
新建应用程序,命名为:S10_SeekBar

在xml布局文件新增一个SeekBar控件,然后新建两个TextView控件用来显示SeekBar当前的状态:
<RelativeLayout xmlns:android="http://schemas.android.com/apk/res/android"
    xmlns:tools="http://schemas.android.com/tools"
    android:layout_width="match_parent"
    android:layout_height="match_parent"
    android:paddingBottom="@dimen/activity_vertical_margin"
    android:paddingLeft="@dimen/activity_horizontal_margin"
    android:paddingRight="@dimen/activity_horizontal_margin"
    android:paddingTop="@dimen/activity_vertical_margin"
    tools:context=".MainActivity" >
	<SeekBar
	    android:id="@+id/seekBarId"
	    android:layout_width="match_parent"
	    android:layout_height="wrap_content"
	    android:max="100"
	    android:progress="10"
	    android:secondaryProgress="20"/>
	<TextView
	    android:id="@+id/textViewId1"
	    android:layout_width="wrap_content"
	    android:layout_height="wrap_content"
	    android:textSize="20dp"
	    android:text="进度显示->"
	    android:layout_below="@id/seekBarId"
	    android:layout_marginTop="20dp"/>
	<TextView
	    android:id="@+id/textViewId2"
	    android:layout_width="wrap_content"
	    android:layout_height="wrap_content"
	    android:textSize="20dp"
	    android:text="拖动状态"
	    android:layout_below="@id/textViewId1"
	    android:layout_marginTop="20dp"
	    />
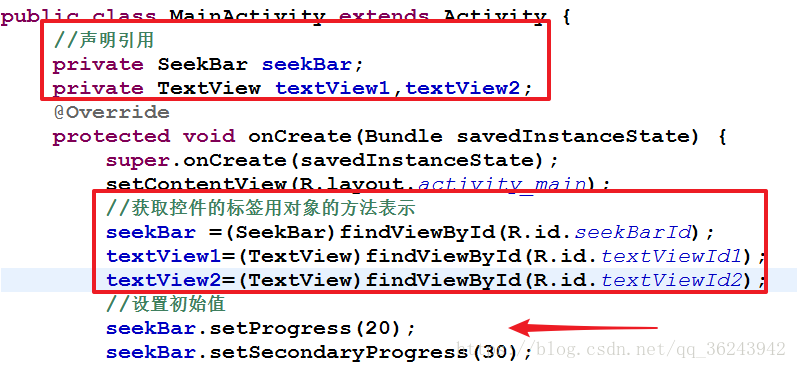
</RelativeLayout>- 然后再MainActivity中声明引用,获取控件用对象的方法表示,然后设置SeekBar的初始值:
- 复写OnSeekBarChangedListener监听器类,复写里面的三个函数:
- 生成监听器对象,为SeekBar绑定监听器,监控他们的状态:

- 代码如下:
package com.yuan.s10_seekbar;

import android.app.Activity;
import android.os.Bundle;
import android.view.Menu;
import android.widget.SeekBar;
import android.widget.SeekBar.OnSeekBarChangeListener;
import android.widget.TextView;

public class MainActivity extends Activity {
	//声明引用
	private SeekBar seekBar;
	private TextView textView1,textView2;
    @Override
    protected void onCreate(Bundle savedInstanceState) {
        super.onCreate(savedInstanceState);
        setContentView(R.layout.activity_main);
        //获取控件的标签用对象的方法表示
        seekBar =(SeekBar)findViewById(R.id.seekBarId);
        textView1=(TextView)findViewById(R.id.textViewId1);
        textView2=(TextView)findViewById(R.id.textViewId2);
        //设置初始值
        seekBar.setProgress(20);
        seekBar.setSecondaryProgress(30);
        //设置监听器
        SeekBarListener listener = new SeekBarListener();
        seekBar.setOnSeekBarChangeListener(listener);
    }

    class SeekBarListener implements OnSeekBarChangeListener{

    	//seekBar代表了触发了监听器SeekBar对象
    	//progress当前SeekBar的进度
    	//fromUser参数是用户操作还是系统自动发生进度,如果是是用户,则此值为true
		public void onProgressChanged(SeekBar seekBar, int progress,
				boolean fromUser) {
				textView1.setText("progress:"+progress+",fromUser:"+fromUser);
		}

		public void onStartTrackingTouch(SeekBar seekBar) {
				textView2.setText("开始拖动");
		}
		public void onStopTrackingTouch(SeekBar seekBar) {
				textView2.setText("停止拖动");

		}

    }
    @Override
    public boolean onCreateOptionsMenu(Menu menu) {
        // Inflate the menu; this adds items to the action bar if it is present.
        getMenuInflater().inflate(R.menu.main, menu);
        return true;
    }

}
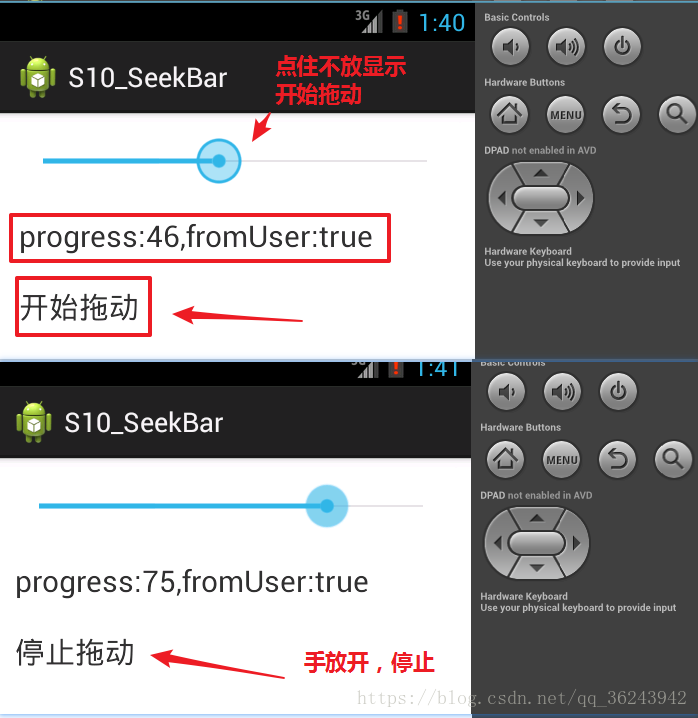
- 效果如下:

6.RatingBar
RatingBar的主要属性:
1. 星星的个数:numStars
2.当前等级:progress
3.stepSize
RatingBar的监听器:OnRatingBarChangedListener
- 星星个数的改变机会触发监听器的方法,然后可以判断是否是用户改变的
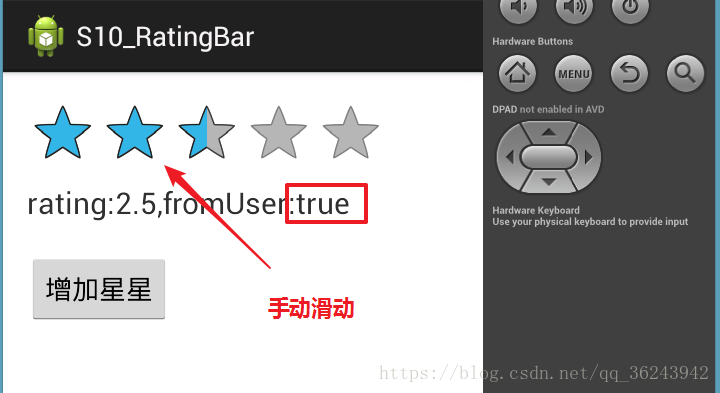
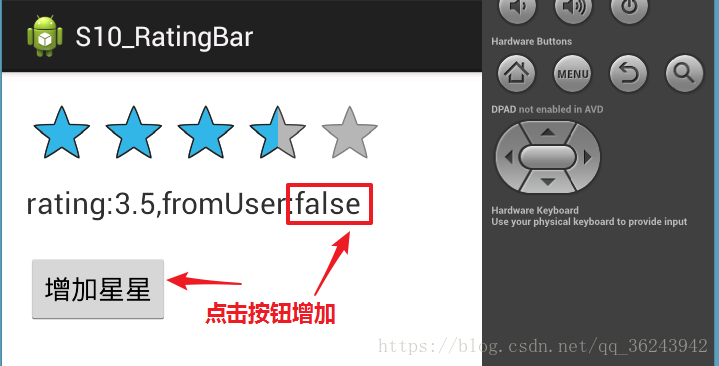
1.onRatingChanged(RatingBar ratingBar,float Rating,boolean fromUser)
- 新建一个应用程序,命名为:S10_RatingBar

- 编写布局文件,然后看一下基本属性:

- 为了程序的简单明了,我们同样在布局文件,增加一个TextView显示状态,然后增加一个button控件,用于控制通过程序增加星星的个数(主要为了演示fromUser的作用),程序如下:
<RelativeLayout xmlns:android="http://schemas.android.com/apk/res/android"
    xmlns:tools="http://schemas.android.com/tools"
    android:layout_width="match_parent"
    android:layout_height="match_parent"
    android:paddingBottom="@dimen/activity_vertical_margin"
    android:paddingLeft="@dimen/activity_horizontal_margin"
    android:paddingRight="@dimen/activity_horizontal_margin"
    android:paddingTop="@dimen/activity_vertical_margin"
    tools:context=".MainActivity" >

    <RatingBar
        android:id="@+id/ratingBarId"
        android:layout_width="wrap_content"
        android:layout_height="wrap_content"
        android:numStars="5"
        android:stepSize="0.5"/>
    <TextView
        android:id="@+id/textViewId"
        android:layout_width="wrap_content"
        android:layout_height="wrap_content"
        android:text="评价状态:"
        android:textSize="20dp"
        android:layout_below="@id/ratingBarId"/>
    <Button
        android:id="@+id/buttonId"
        android:layout_width="wrap_content"
        android:layout_height="wrap_content"
        android:text="增加星星"
        android:layout_below="@id/textViewId"
        android:layout_marginTop="20dp"/>

</RelativeLayout>- 效果图如下:

- 接下来就是声明一下引用,获取控件的标签用对象表示,然后实现RatingBar监听器和Button监听器的接口,并为button,和ratingBar绑定监听器:

- 实现接口:
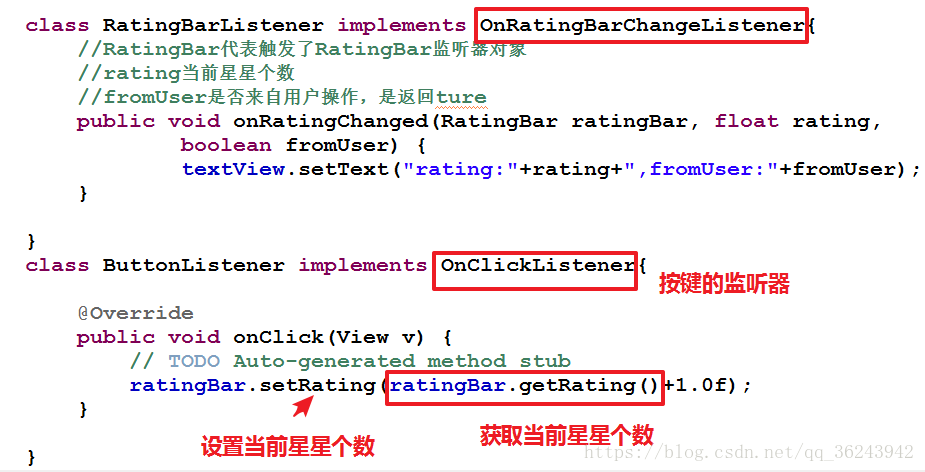
- 生成实现类的对象,然后绑定监听器:

- 整体MainActivity的代码如下:
package com.yuan.s10_ratingbar;

import android.app.Activity;
import android.os.Bundle;
import android.view.Menu;
import android.view.View;
import android.view.View.OnClickListener;
import android.widget.Button;
import android.widget.RatingBar;
import android.widget.RatingBar.OnRatingBarChangeListener;
import android.widget.TextView;

public class MainActivity extends Activity {
	//声明引用
	private RatingBar ratingBar;
	private TextView textView;
	private Button button;

    @Override
    protected void onCreate(Bundle savedInstanceState) {
        super.onCreate(savedInstanceState);
        setContentView(R.layout.activity_main);
        //获取标签用对象表示
        ratingBar =(RatingBar)findViewById(R.id.ratingBarId);
        textView =(TextView)findViewById(R.id.textViewId);
        button =(Button)findViewById(R.id.buttonId);
        //设置初始值
        ratingBar.setProgress(1);
        //生成监听器对象,并为rating绑定监听器
        RatingBarListener listener =new RatingBarListener();
        ratingBar.setOnRatingBarChangeListener(listener);
        //生成按钮的对面,并为button绑定监听器
        ButtonListener buttonlistener = new ButtonListener();
        button.setOnClickListener(buttonlistener);
    }

    class RatingBarListener implements OnRatingBarChangeListener{
	    //RatingBar代表触发了RatingBar监听器对象
    	//rating当前星星个数
    	//fromUser是否来自用户操作,是返回ture
		public void onRatingChanged(RatingBar ratingBar, float rating,
				boolean fromUser) {
				textView.setText("rating:"+rating+",fromUser:"+fromUser);
		}

    }
    class ButtonListener implements OnClickListener{

		@Override
		public void onClick(View v) {
			// TODO Auto-generated method stub
			ratingBar.setRating(ratingBar.getRating()+1.0f);
		}

    }
    @Override
    public boolean onCreateOptionsMenu(Menu menu) {
        // Inflate the menu; this adds items to the action bar if it is present.
        getMenuInflater().inflate(R.menu.main, menu);
        return true;
    }

}
运行应用程序:

附录:
本博文Demo下载:https://github.com/zGuangYuan/Android-
github的用法:点我查看