缘起
最近一直在研究日志收集系统的框架,之前在线游戏的数据发送都是由游戏服务器发送的,我来之前一直是rsync传输,也还算稳定。但现在上了单机游戏,只能由手机客户端直接发送,dau比较高,最近很火的<<贪吃蛇>>在海外上线,一个星期dau已经达到千万级别。初步方案,lvs做4层负载均衡,下挂nginx做7层转发,数据直接入kafaka。一直不太喜欢通过reload修改nginx upstream,刚好看到微博的upsync觉得很有价值,于是拿来研究了一下。
感兴趣的童鞋可以看下这篇文章http://mp.weixin.qq.com/s?__biz=MzAwMDU1MTE1OQ==&mid=404151075&idx=1&sn=5f3b8c007981a2d048766f808f8c8c98&scene=2&srcid=0223XScbJrOv7noogVX6T60Q&from=timeline&isappinstalled=0#wechat_redirect(Upsync:微博开源基于Nginx容器动态流量管理方案 )
consul
upsync的upstream可以从consul(https://www.consul.io/intro/getting-started/install.html)或etcd中获取,本文使用的是consul这个用golang写的服务注册与发现框架,据我所知consul在国内也用的非常广,比如微博,今日头条等。所以需要先安装consul,consul的getting-started文档用vagrant(https://www.vagrantup.com/docs/getting-started/)搭建集群的,vagrant是用ruby开发的用来构建虚拟开发环境的工具,有点类似docker,不过vagrant是依赖与虚拟机的,比如virtualbox
下面是我ubuntu主机安装操作:
1.安装virtualbox和vagrant
sudo apt-get install virtualbox
wget https://releases.hashicorp.com/vagrant/1.8.6/vagrant_1.8.6_x86_64.deb
sudo dpkg -i vagrant_1.8.6_x86_64.deb
2.下载vagrant镜像
由于hashicorp下载太慢,我是在百度云(https://pan.baidu.com/s/1pLzVhnP)上找的一个ubuntu_trusty_64.box镜像。
vagrant box add ubuntu ~/vagrant_start/ubuntu_trusty_64.box把ubuntu_trusty_64.box加载到vagrant中,并命名为ubuntu
3.创建Vagrantfile
在当前目录下创建Vagrantfile,类似于dockerfile
# -*- mode: ruby -*-
# vi: set ft=ruby :
$script = <<SCRIPT

echo Installing dependencies...
sudo apt-get update
sudo apt-get install -y unzip curl

echo Fetching Consul...
cd /tmp/
curl https://releases.hashicorp.com/consul/0.6.4/consul_0.6.4_linux_amd64.zip -o consul.zip

echo Installing Consul...
unzip consul.zip
sudo chmod +x consul
sudo mv consul /usr/bin/consul

sudo mkdir /etc/consul.d
sudo chmod a+w /etc/consul.d

SCRIPT

# Vagrantfile API/syntax version. Don't touch unless you know what you're doing!
VAGRANTFILE_API_VERSION = "2"

Vagrant.configure(VAGRANTFILE_API_VERSION) do |config|
  config.vm.box = "ubuntu"

  config.vm.provision "shell", inline: $script

  config.vm.define "n1" do |n1|
      n1.vm.hostname = "n1"
      n1.vm.network "private_network", ip: "172.20.20.10"
  end

  config.vm.define "n2" do |n2|
      n2.vm.hostname = "n2"
      n2.vm.network "private_network", ip: "172.20.20.11"
  end
end
4.启动虚拟机并登陆到n1
vagrant up
vagrant ssh n1
vagrent up将会读取当前目录的Vagrantfile,创建两个虚拟机n1,n2,并安装consul到/usr/bin/consul目录。
5.启动consul
consul agent -server -bootstrap-expect=1 -data-dir=/tmp/consul -node=agent-one -bind=172.20.20.10 -config-dir=/etc/consul.d -client 0.0.0.0 -uin1将会作为leader节点,并开启ui界面,可通过http://172.20.20.10:8500访问consul管理界面
6.把upstream存到consul
curl -X PUT http://172.20.20.10:8500/v1/kv/upstreams/test/172.20.20.11:8080将会把upsteam 172.20.20.11:8080存到consul的kv store中。
到这里consul就结束了
nginx-upsync-module+nginx_upstream_check_module
upsync(https://github.com/weibocom/nginx-upsync-module)是微博开源的,以及在微博广泛使用了,下面将安装上面这两个nginx扩展
1.下载对应软件包
如果在宿主机,最好在Vagrantfile目录下载,Vagrant会共享当前目录到虚拟机的/vagrant
目录,如果在虚拟机则可以在/vagrant目录下载。
需要注意版本,具体看upsync Readme,由于我使用时upsync master支持nginx1.9+,所以我使用了nginx1.9.2
vagrant ssh n2
wget 'http://nginx.org/download/nginx-1.9.2.tar.gz'
git clone https://github.com/weibocom/nginx-upsync-module
git clone https://github.com/xiaokai-wang/nginx_upstream_check_modulenginx_upstream_check_module需要根据nginx不同版本给nginx打patch,具体看Readme,upstream_check是tengine(http://tengine.taobao.org/documentation_cn.html)中的模块,主要作用用于upstream的健康检查。当遇到不可用的upstream时,nginx虽然会自动使用下一个upstream,但下一次还是会重试该upstream,导致无效请求增多。upstream_check检测到不可用会剔除该upsteam,该特性还是很有用的。
2.编译安装nginx
sudo apt-get install libreadline-dev libncurses5-dev libpcre3-dev libssl-dev perl make build-essential
wget 'http://nginx.org/download/nginx-1.9.2.tar.gz'
git clone https://github.com/weibocom/nginx-upsync-module
git clone https://github.com/xiaokai-wang/nginx_upstream_check_module
patch -p0 < /vagrant/nginx_upstream_check_module/check_1.9.2+.patch

./configure --add-module=/vagrant/nginx_upstream_check_module  --add-module=/vagrant/nginx-upsync-module
make && make install
3.配置nginx
nginx会默认安装到/usr/local/nginx目录下
cd /usr/local/nginx
mkdir /usr/local/nginx/conf/conf.d
mv /usr/local/nginx/conf/nginx.conf /usr/local/nginx/conf/nginx.conf_back

useradd -M nginx
mkdir /var/log/nginx
mkdir /usr/local/nginx/conf/servers
将之前的nginx.conf备份,用下面内容替换
vim /usr/local/nginx/conf/nginx.conf
user  nginx;
worker_processes  5;

error_log  /var/log/nginx/error.log warn;
pid        /var/run/nginx.pid;

events {
    worker_connections  1024;
}

http {
    include       /usr/local/nginx/conf/mime.types;
    default_type  application/octet-stream;

    log_format  main  '$remote_addr - $remote_user [$time_local] "$request" '
                      '$status $body_bytes_sent "$http_referer" '
                      '"$http_user_agent" "$http_x_forwarded_for"';

    access_log  /var/log/nginx/access.log  main;

    sendfile        on;
    #tcp_nopush     on;

    keepalive_timeout  65;

    #gzip  on;

    include /usr/local/nginx/conf/conf.d/*.conf;
}
创建check.conf
vim /usr/local/nginx/conf/conf.d/check.conf
upstream test {
# fake server otherwise ngx_http_upstream will report error when startup
server 127.0.0.1:11111;
# all backend server will pull from consul when startup and will delete fake server
upsync 172.20.20.10:8500/v1/kv/upstreams/test upsync_timeout=6m upsync_interval=500ms upsync_type=consul strong_dependency=off;
upsync_dump_path /usr/local/nginx/conf/servers/servers_test.conf;
check interval=1000 rise=2 fall=2 timeout=3000 type=http default_down=false;
check_http_send "HEAD / HTTP/1.0\r\n\r\n";
check_http_expect_alive http_2xx http_3xx;
}
upstream bar {
server 172.20.20.11:8080 weight=1 fail_timeout=10 max_fails=3;
}
server {
listen 80;
location = / {
proxy_pass http://test;
}
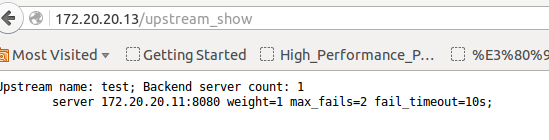
location = /upstream_show {
upstream_show;
}
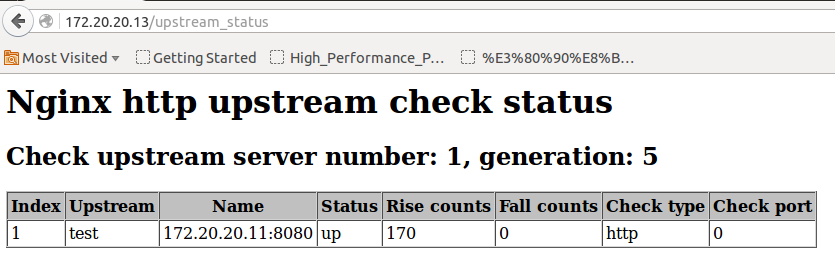
location = /upstream_status {
check_status;
access_log off;
}
}
4.启动nginx
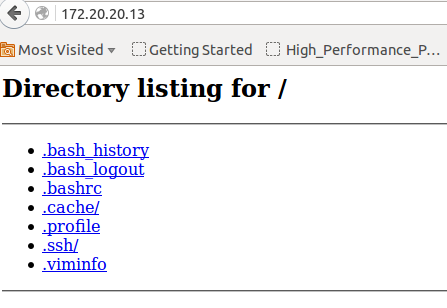
我们在上面介绍consul的最好增加一个172.20.20.11:8080 upstream, 在n2上我们开一个python的http server
/usr/local/nginx/sbin/nginx
python -m SimpleHTTPServer 8080
大功告成,看下成果
请将下面的172.20.20.13地址换成你们的172.20.20.11,我开了很多个虚拟机^^^^
首页就是用python开的simplehttpserver
upstream列表
upstream状态