集群环境
| 主机名称 | IP | 备注 | 操作系统 |
| master | 192.168.0.8 | docker、kubectl、kubelet、kubeadm、flannel | centos7.3 |
| node01 | 192.168.0.9 | docker、kubectl、kubelet、kubeadm | centos7.3 |
| node02 | 192.168.0.10 | docker、kubectl、kubelet、kubeadm | centos7.3 |
软件版本
kubernetes:1.11.2
docker-ce:18.06.1-ce
flennal:master
一、环境初始化
1、分别在各节点设置主机名称
hostnamectl set-hostname master
hostnamectl set-hostname node01
hostnamectl set-hostname node02
2、配置主机映射(各节点都需要)
cat <<EOF > /etc/hosts
127.0.0.1   localhost localhost.localdomain localhost4 localhost4.localdomain4
::1         localhost localhost.localdomain localhost6 localhost6.localdomain6
192.168.0.8 master
192.168.0.9 node01
192.168.0.10 node02
EOF
3、关闭防火墙
systemctl stop firewalld && systemctl disable firewalld4、关闭Selinux
setenforce  0 #临时禁用selinux
sed -i "s/^SELINUX=enforcing/SELINUX=disabled/g" /etc/sysconfig/selinux  #永久关闭 修改/etc/sysconfig/selinux文件设置
sed -i "s/^SELINUX=enforcing/SELINUX=disabled/g" /etc/selinux/config
5、关闭Swap,否则kubelet会出错!
swapoff -a #临时关闭swap
sed -i 's/.*swap.*/#&/' /etc/fstab #永久关闭 注释/etc/fstab文件里swap相关的行
6、配置路由
cat <<EOF >  /etc/sysctl.d/k8s.conf
net.bridge.bridge-nf-call-ip6tables = 1
net.bridge.bridge-nf-call-iptables = 1
EOF
使其立刻生效
sysctl --system
或执行sysctl -p /etc/sysctl.d/k8s.conf生效
7、安装依赖包配置ntp
yum install -y epel-release
yum install -y yum-utils device-mapper-persistent-data lvm2 net-tools conntrack-tools wget vim  ntpdate libseccomp libtool-ltdl
systemctl enable ntpdate.service
echo '*/30 * * * * /usr/sbin/ntpdate time7.aliyun.com >/dev/null 2>&1' > /tmp/crontab2.tmp
crontab /tmp/crontab2.tmp
systemctl start ntpdate.service
8、添加kubernetes的yum源
cat <<EOF > /etc/yum.repos.d/kubernetes.repo
[kubernetes]
name=Kubernetes
baseurl=https://mirrors.aliyun.com/kubernetes/yum/repos/kubernetes-el7-x86_64/
enabled=1
gpgcheck=1
repo_gpgcheck=1
gpgkey=https://mirrors.aliyun.com/kubernetes/yum/doc/yum-key.gpg https://mirrors.aliyun.com/kubernetes/yum/doc/rpm-package-key.gpg
EOF
9、设置内核(可不设置)
echo "* soft nofile 65536" >> /etc/security/limits.conf
echo "* hard nofile 65536" >> /etc/security/limits.conf
echo "* soft nproc 65536" >> /etc/security/limits.conf
echo "* hard nproc 65536" >> /etc/security/limits.conf
echo "* soft memlock unlimited" >> /etc/security/limits.conf
echo "* hard memlock unlimited" >> /etc/security/limits.conf
自己写的一个初始化脚本config.sh ,可以提高初始化效率
二、安装与配置docker
1、安装docker
参照《Centos7安装Docker最新版》
2、配置docker镜像下载代理
vi /usr/lib/systemd/system/docker.service的ExecStart前加入一行
Environment="HTTPS_PROXY=http://ik8s.io:10080"
Environment="NO_PROXY=127.0.0.0/8,172.20.0.0/16"
3、重启docker
systemctl daemon-reload && systemctl restart docker
三、安装与配置kubeadm, kubelet和kubectl
1、安装kubeadm, kubelet和kubectl
yum install -y kubelet kubeadm kubectl2、配置kubeadm
vi /etc/systemd/system/kubelet.service.d/10-kubeadm.conf修改如下
Environment="KUBELET_NETWORK_ARGS=--network-plugin=cni --cni-conf-dir=/etc/cni/ --cni-bin-dir=/opt/cni/bin"systemctl enable kubelet && systemctl start kubelet
4: 命令补全
yum install -y bash-completion
source /usr/share/bash-completion/bash_completion
source <(kubectl completion bash)
echo "source <(kubectl completion bash)" >> ~/.bashrc
四、使用kubeadm初始化master
初始化的时候指定一下kubernetes版本,并设置一下pod-network-cidr(后面的flannel会用到):
$ kubeadm init --kubernetes-version=v1.11.2 --pod-network-cidr=10.244.0.0/16
[root@master]# kubeadm init --kubernetes-version=v1.11.2 --pod-network-cidr=10.244.0.0/16
[init] using Kubernetes version: v1.11.2
[preflight] running pre-flight checks
I0825 11:41:52.394205    5611 kernel_validator.go:81] Validating kernel version
I0825 11:41:52.394466    5611 kernel_validator.go:96] Validating kernel config
[preflight/images] Pulling images required for setting up a Kubernetes cluster
[preflight/images] This might take a minute or two, depending on the speed of your internet connection
[preflight/images] You can also perform this action in beforehand using 'kubeadm config images pull'
[kubelet] Writing kubelet environment file with flags to file "/var/lib/kubelet/kubeadm-flags.env"
[kubelet] Writing kubelet configuration to file "/var/lib/kubelet/config.yaml"
[preflight] Activating the kubelet service
[certificates] Generated ca certificate and key.
[certificates] Generated apiserver certificate and key.
[certificates] apiserver serving cert is signed for DNS names [master kubernetes kubernetes.default kubernetes.default.svc kubernetes.default.svc.cluster.local] and IPs [10.96.0.1 192.168.0.8]
[certificates] Generated apiserver-kubelet-client certificate and key.
[certificates] Generated sa key and public key.
[certificates] Generated front-proxy-ca certificate and key.
[certificates] Generated front-proxy-client certificate and key.
[certificates] Generated etcd/ca certificate and key.
[certificates] Generated etcd/server certificate and key.
[certificates] etcd/server serving cert is signed for DNS names [master localhost] and IPs [127.0.0.1 ::1]
[certificates] Generated etcd/peer certificate and key.
[certificates] etcd/peer serving cert is signed for DNS names [master localhost] and IPs [192.168.0.8 127.0.0.1 ::1]
[certificates] Generated etcd/healthcheck-client certificate and key.
[certificates] Generated apiserver-etcd-client certificate and key.
[certificates] valid certificates and keys now exist in "/etc/kubernetes/pki"
[kubeconfig] Wrote KubeConfig file to disk: "/etc/kubernetes/admin.conf"
[kubeconfig] Wrote KubeConfig file to disk: "/etc/kubernetes/kubelet.conf"
[kubeconfig] Wrote KubeConfig file to disk: "/etc/kubernetes/controller-manager.conf"
[kubeconfig] Wrote KubeConfig file to disk: "/etc/kubernetes/scheduler.conf"
[controlplane] wrote Static Pod manifest for component kube-apiserver to "/etc/kubernetes/manifests/kube-apiserver.yaml"
[controlplane] wrote Static Pod manifest for component kube-controller-manager to "/etc/kubernetes/manifests/kube-controller-manager.yaml"
[controlplane] wrote Static Pod manifest for component kube-scheduler to "/etc/kubernetes/manifests/kube-scheduler.yaml"
[etcd] Wrote Static Pod manifest for a local etcd instance to "/etc/kubernetes/manifests/etcd.yaml"
[init] waiting for the kubelet to boot up the control plane as Static Pods from directory "/etc/kubernetes/manifests"
[init] this might take a minute or longer if the control plane images have to be pulled
[apiclient] All control plane components are healthy after 49.502361 seconds
[uploadconfig] storing the configuration used in ConfigMap "kubeadm-config" in the "kube-system" Namespace
[kubelet] Creating a ConfigMap "kubelet-config-1.11" in namespace kube-system with the configuration for the kubelets in the cluster
[markmaster] Marking the node master as master by adding the label "node-role.kubernetes.io/master=''"
[markmaster] Marking the node master as master by adding the taints [node-role.kubernetes.io/master:NoSchedule]
[patchnode] Uploading the CRI Socket information "/var/run/dockershim.sock" to the Node API object "master" as an annotation
[bootstraptoken] using token: 3resfo.cam2tnjxw0tastur
[bootstraptoken] configured RBAC rules to allow Node Bootstrap tokens to post CSRs in order for nodes to get long term certificate credentials
[bootstraptoken] configured RBAC rules to allow the csrapprover controller automatically approve CSRs from a Node Bootstrap Token
[bootstraptoken] configured RBAC rules to allow certificate rotation for all node client certificates in the cluster
[bootstraptoken] creating the "cluster-info" ConfigMap in the "kube-public" namespace
[addons] Applied essential addon: CoreDNS
[addons] Applied essential addon: kube-proxy

Your Kubernetes master has initialized successfully!

To start using your cluster, you need to run the following as a regular user:

  mkdir -p $HOME/.kube
  sudo cp -i /etc/kubernetes/admin.conf $HOME/.kube/config
  sudo chown $(id -u):$(id -g) $HOME/.kube/config

You should now deploy a pod network to the cluster.
Run "kubectl apply -f [podnetwork].yaml" with one of the options listed at:
  https://kubernetes.io/docs/concepts/cluster-administration/addons/

You can now join any number of machines by running the following on each node
as root:

  kubeadm join 192.168.0.8:6443 --token 3resfo.cam2tnjxw0tastur --discovery-token-ca-cert-hash sha256:4a4f45a3c7344ddfe02af363be293b21237caaf2b1598c31d6e662a18bb76fd9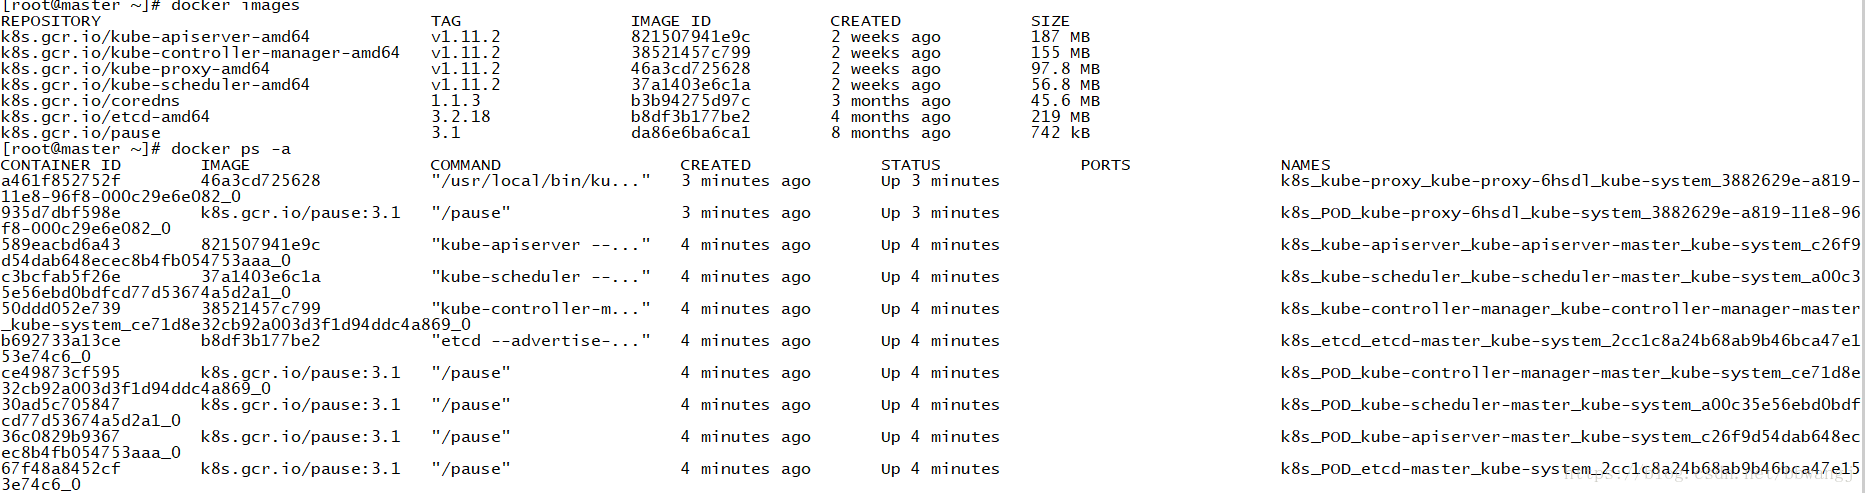
设置config
mkdir -p $HOME/.kube
sudo cp -i /etc/kubernetes/admin.conf $HOME/.kube/config
sudo chown $(id -u):$(id -g) $HOME/.kube/config
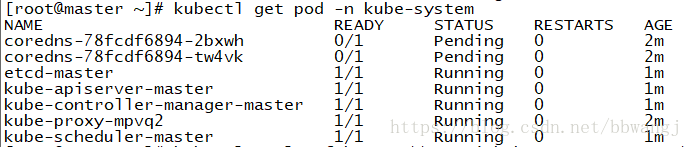
未安装flannel如下状态
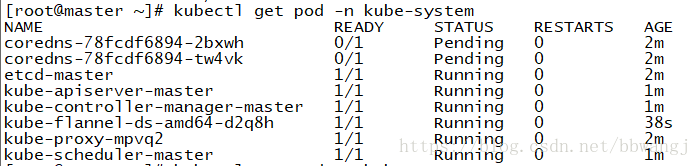
安装flannel,中间的版本号换为master即为最新版。
kubectl apply -f https://raw.githubusercontent.com/coreos/flannel/v0.9.1/Documentation/kube-flannel.yml
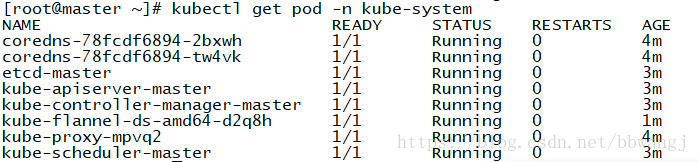
安装完network之后,你可以通过kubectl get pods --all-namespaces来查看kube-dns是否在running来判断network是否安装成功。安装成功既如下
测试master健康

五、将node加入集群
1、配置kubelet
从master将kubelet文件分别复制到node01、node02
scp /etc/sysconfig/kubelet node01:/etc/sysconfig/kubelet
scp /etc/sysconfig/kubelet node02:/etc/sysconfig/kubelet
2、执行 kubeadm join的命令即可:
kubeadm join 192.168.0.8:6443 --token 3resfo.cam2tnjxw0tastur --discovery-token-ca-cert-hash sha256:4a4f45a3c7344ddfe02af363be293b21237caaf2b1598c31d6e662a18bb76fd9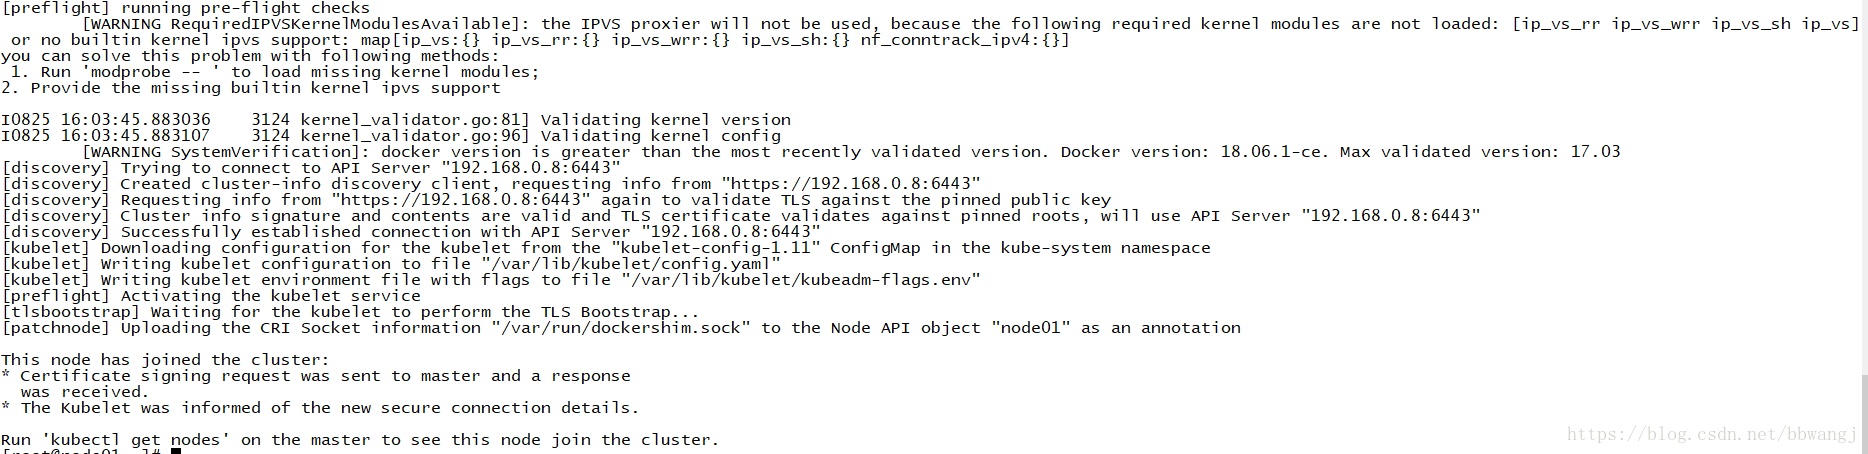
六、测试
kubectl get nodes
集群部署成功

七、初始化集群报错及问题解决:
问题一:
[kubeadm] WARNING: kubeadm is in beta, please do not use it for production clusters.
unable to fetch release information. URL: "https://storage.googleapis.com/kubernetes-release/release/stable-1.7.5.txt" Status: 404 Not Found
#解决:
添加版本信息“--kubernetes-version=v1.7.5”,kubeadm reset,再次执行init
问题二:
W1205 18:49:21.323220 106548 cni.go:189] Unable to update cni config: No networks found in /etc/cni/net.d
Container runtime network not ready: NetworkReady=false reason:NetworkPluginNotReady message:docker: network plugin is not ready: cni config uninitialized
#解决:
修改文件内容: /etc/systemd/system/kubelet.service.d/10-kubeadm.conf
Environment="KUBELET_NETWORK_ARGS=--network-plugin=cni --cni-conf-dir=/etc/cni/ --cni-bin-dir=/opt/cni/bin"
问题三:
k8s.io/kubernetes/pkg/kubelet/config/apiserver.go:46: Failed to list *v1.Pod: Get https://192.168.0.8:6443/api/v1/pods?fieldSelector=spec.nodeName%3Dk8s-master&resourceVersion=0: dial tcp 192.168.0.8:6443: getsockopt: connection refused
k8s.io/kubernetes/pkg/kubelet/kubelet.go:400: Failed to list *v1.Service: Get https://192.168.0.8:6443/api/v1/services?resourceVersion=0: dial tcp 192.168.0.8:6443: getsockopt: connection refused
k8s.io/kubernetes/pkg/kubelet/kubelet.go:408: Failed to list *v1.Node: Get https://192.168.0.8:6443/api/v1/nodes?fieldSelector=metadata.name%3Dk8s-master&resourceVersion=0: dial tcp 192.168.0.8:6443: getsockopt: connection refused
Unable to write event: 'Post https://192.168.0.8:6443/api/v1/namespaces/kube-system/events: dial tcp 192.168.0.8:6443: getsockopt: connection refused' (may retry after sleeping)
Failed to get status for pod "etcd-k8s-master_kube-system(5802ae0664772d031dee332b3c63498e)": Get https://192.168.0.8:6443/api/v1/namespaces/kube-system/pods/etcd-k8s-master: dial tcp 192.168.0.8:6443: getsockopt: connection refused
#解决:
打开防火墙:
systemctl start firewalld
添加火墙规则:
firewall-cmd --zone=public --add-port=80/tcp --permanent
firewall-cmd --zone=public --add-port=6443/tcp --permanent
firewall-cmd --zone=public --add-port=2379-2380/tcp --permanent
firewall-cmd --zone=public --add-port=10250-10255/tcp --permanent
firewall-cmd --zone=public --add-port=30000-32767/tcp --permanent
firewall-cmd --reload
firewall-cmd --zone=public --list-ports
问题四:
[root@master]# kubectl get node
Unable to connect to the server: x509: certificate signed by unknown authority (possibly because of "crypto/rsa: verification error" while trying to verify candidate authority certificate "kubernetes")
#解决:
[root@master]# mv $HOME/.kube $HOME/.kube.bak
[root@mster]# mkdir -p $HOME/.kube
[root@master]# cp -i /etc/kubernetes/admin.conf $HOME/.kube/config
[root@master]# chown $(id -u):$(id -g) $HOME/.kube/config
八、安装kubernetes-dashboard
1、下载kubernetes-dashboard.yaml
wget https://raw.githubusercontent.com/kubernetes/dashboard/master/src/deploy/recommended/kubernetes-dashboard.yaml2、编辑kubernetes-dashboard.yaml
添加type: Nodeport 和nodePort: 30001,将146行的serviceAccountName: kubernetes-dashboard改为serviceAccountName: kubernetes-dashboard-admin
kubernetes-dashboard.yaml内容如下:
# Copyright 2017 The Kubernetes Authors.
#
# Licensed under the Apache License, Version 2.0 (the "License");
# you may not use this file except in compliance with the License.
# You may obtain a copy of the License at
#
#     http://www.apache.org/licenses/LICENSE-2.0
#
# Unless required by applicable law or agreed to in writing, software
# distributed under the License is distributed on an "AS IS" BASIS,
# WITHOUT WARRANTIES OR CONDITIONS OF ANY KIND, either express or implied.
# See the License for the specific language governing permissions and
# limitations under the License.

# Configuration to deploy release version of the Dashboard UI compatible with
# Kubernetes 1.8.
#
# Example usage: kubectl create -f <this_file>

# ------------------- Dashboard Secret ------------------- #

apiVersion: v1
kind: Secret
metadata:
  labels:
    k8s-app: kubernetes-dashboard
  name: kubernetes-dashboard-certs
  namespace: kube-system
type: Opaque

---
# ------------------- Dashboard Service Account ------------------- #

apiVersion: v1
kind: ServiceAccount
metadata:
  labels:
    k8s-app: kubernetes-dashboard
  name: kubernetes-dashboard
  namespace: kube-system

---
# ------------------- Dashboard Role & Role Binding ------------------- #

kind: Role
apiVersion: rbac.authorization.k8s.io/v1
metadata:
  name: kubernetes-dashboard-minimal
  namespace: kube-system
rules:
  # Allow Dashboard to create 'kubernetes-dashboard-key-holder' secret.
- apiGroups: [""]
  resources: ["secrets"]
  verbs: ["create"]
  # Allow Dashboard to create 'kubernetes-dashboard-settings' config map.
- apiGroups: [""]
  resources: ["configmaps"]
  verbs: ["create"]
  # Allow Dashboard to get, update and delete Dashboard exclusive secrets.
- apiGroups: [""]
  resources: ["secrets"]
  resourceNames: ["kubernetes-dashboard-key-holder", "kubernetes-dashboard-certs"]
  verbs: ["get", "update", "delete"]
  # Allow Dashboard to get and update 'kubernetes-dashboard-settings' config map.
- apiGroups: [""]
  resources: ["configmaps"]
  resourceNames: ["kubernetes-dashboard-settings"]
  verbs: ["get", "update"]
  # Allow Dashboard to get metrics from heapster.
- apiGroups: [""]
  resources: ["services"]
  resourceNames: ["heapster"]
  verbs: ["proxy"]
- apiGroups: [""]
  resources: ["services/proxy"]
  resourceNames: ["heapster", "http:heapster:", "https:heapster:"]
  verbs: ["get"]

---
apiVersion: rbac.authorization.k8s.io/v1
kind: RoleBinding
metadata:
  name: kubernetes-dashboard-minimal
  namespace: kube-system
roleRef:
  apiGroup: rbac.authorization.k8s.io
  kind: Role
  name: kubernetes-dashboard-minimal
subjects:
- kind: ServiceAccount
  name: kubernetes-dashboard
  namespace: kube-system

---
# ------------------- Dashboard Deployment ------------------- #

kind: Deployment
apiVersion: apps/v1beta2
metadata:
  labels:
    k8s-app: kubernetes-dashboard
  name: kubernetes-dashboard
  namespace: kube-system
spec:
  replicas: 1
  revisionHistoryLimit: 10
  selector:
    matchLabels:
      k8s-app: kubernetes-dashboard
  template:
    metadata:
      labels:
        k8s-app: kubernetes-dashboard
    spec:
      containers:
      - name: kubernetes-dashboard
        image: k8s.gcr.io/kubernetes-dashboard-amd64:v1.8.3
        ports:
        - containerPort: 8443
          protocol: TCP
        args:
          - --auto-generate-certificates
          # Uncomment the following line to manually specify Kubernetes API server Host
          # If not specified, Dashboard will attempt to auto discover the API server and connect
          # to it. Uncomment only if the default does not work.
          # - --apiserver-host=http://my-address:port
        volumeMounts:
        - name: kubernetes-dashboard-certs
          mountPath: /certs
          # Create on-disk volume to store exec logs
        - mountPath: /tmp
          name: tmp-volume
        livenessProbe:
          httpGet:
            scheme: HTTPS
            path: /
            port: 8443
          initialDelaySeconds: 30
          timeoutSeconds: 30
      volumes:
      - name: kubernetes-dashboard-certs
        secret:
          secretName: kubernetes-dashboard-certs
      - name: tmp-volume
        emptyDir: {}
      serviceAccountName: kubernetes-dashboard-admin
      #不改的话有坑
      # Comment the following tolerations if Dashboard must not be deployed on master
      tolerations:
      - key: node-role.kubernetes.io/master
        effect: NoSchedule

---
# ------------------- Dashboard Service ------------------- #

kind: Service
apiVersion: v1
metadata:
  labels:
    k8s-app: kubernetes-dashboard
  name: kubernetes-dashboard
  namespace: kube-system
spec:
  type: NodePort
  ports:
    - port: 443
      targetPort: 8443
      nodePort: 30001
  selector:
    k8s-app: kubernetes-dashboard
3、安装dashboard
kubectl apply -f kubernetes-dashboard.yaml
如果不授予权限就会报错。
4、授予dashboard账户集群管理权限,新建vi kubernetes-dashboard-admin.rbac.yaml
apiVersion: v1
kind: ServiceAccount
metadata:
  labels:
    k8s-app: kubernetes-dashboard
  name: kubernetes-dashboard-admin
  namespace: kube-system
---
apiVersion: rbac.authorization.k8s.io/v1beta1
kind: ClusterRoleBinding
metadata:
  name: kubernetes-dashboard-admin
  labels:
    k8s-app: kubernetes-dashboard
roleRef:
  apiGroup: rbac.authorization.k8s.io
  kind: ClusterRole
  name: cluster-admin
subjects:
- kind: ServiceAccount
  name: kubernetes-dashboard-admin
  namespace: kube-system
授予权限
kubectl apply -f kubernetes-dashboard-admin.rbac.yaml6、访问dashboard
https://192.168.0.10:30001

6、获取token令牌的方式访问
获取token
[root@master ~]# kubectl -n kube-system get secret | grep kubernetes-dashboard-admin|awk '{print "secret/"$1}'|xargs kubectl describe -n kube-system|grep token:|awk -F : '{print $2}'|xargs echo
eyJhbGciOiJSUzI1NiIsImtpZCI6IiJ9.eyJpc3MiOiJrdWJlcm5ldGVzL3NlcnZpY2VhY2NvdW50Iiwia3ViZXJuZXRlcy5pby9zZXJ2aWNlYWNjb3VudC9uYW1lc3BhY2UiOiJrdWJlLXN5c3RlbSIsImt1YmVybmV0ZXMuaW8vc2VydmljZWFjY291bnQvc2VjcmV0Lm5hbWUiOiJrdWJlcm5ldGVzLWRhc2hib2FyZC1hZG1pbi10b2tlbi1qYnRrZyIsImt1YmVybmV0ZXMuaW8vc2VydmljZWFjY291bnQvc2VydmljZS1hY2NvdW50Lm5hbWUiOiJrdWJlcm5ldGVzLWRhc2hib2FyZC1hZG1pbiIsImt1YmVybmV0ZXMuaW8vc2VydmljZWFjY291bnQvc2VydmljZS1hY2NvdW50LnVpZCI6ImYzZTY2NjBhLWE4NTgtMTFlOC1iNTI2LTAwMGMyOWU2ZTA4MiIsInN1YiI6InN5c3RlbTpzZXJ2aWNlYWNjb3VudDprdWJlLXN5c3RlbTprdWJlcm5ldGVzLWRhc2hib2FyZC1hZG1pbiJ9.CcgvvsCEkwKi0nhq-cnm-rDmLiBSclnK3H3cTugUpawvS2ruBl05jVpwPyh3pNc4Z_V5GPelTa7tsVJHDQ2uG1P7HYqKkcvtFnua9y5DAFMqtOf-sxiHSDjIkphXDKCxRVaGXQzv9bTC-MAT0NnJzK08w8lZlITWDuT_GQQHcczCOVknFnwVFDEzQKR0DLc9Bx2Gw-5TINidjhVHIWmUMhfEZE5F1D_kvBHRS6bgE43h0OsoPqs3BeCzxRTCbdbeDb9wIVcBxoi9QF9pE5k5dyuNOylRP2SLiHrK8nuCZSESZkRSDkC_3M2ax_2yfnBGi1cwH1A4JAgcMr7iIIBKAg
将令牌复制登录即可

7、config方式登录