主要资料来源:
https://gitlab.eurecom.fr/oai/openairinterface5g/wikis/uestartup
https://gitlab.eurecom.fr/oai/openairinterface5g/wikis/OpenAirKernelMainSetup
https://gitlab.eurecom.fr/oai/openairinterface5g/wikis/HowToConnectOAIENBWithOAIUEWithoutS1Interface
安装前工作
系统准备
下载镜像
Ubuntu16.04.2(Ubuntu 16.04.2 LTS/Linux Kernel version 4.8)或者Ubuntu14.04.3 (Ubuntu 14.04.3 LTS/Linux Kernel version 3.19) 的镜像
除了Ubuntu, OAI还支持以下系统,下面仅以Ubuntu+USRP B210使用为例。
安装Ubuntu系统
Ubuntu安装比较简单,下一步即可。
有以下注意有,安装时分区、NVIDIA驱动安装(如果有NVIDIA显卡)。
sudo add-apt-repository ppa:graphics-drivers/ppa
sudo apt-get update
sudo apt-get install nvidia-384(根据显卡型号变化,具体看官网)
编译前准备
安装内核
使用uname -a查看当前内核版本,如下ubuntu14.04.3的内核版本为 version=3.19.0- 25,Ubuntu16.04的内核版本为4.8.0- 36![]()
分别使用如下命令安装低延迟内核
Ubuntu14.04: sudo apt-get install linux-image-3.19.0-25-lowlatency linux-headers-3.19.0-25-lowlatency
Ubuntu16.04: sudo apt-get install linux-image-4.8.0-36-lowlatency linux-headers-4.8.0-36-lowlatency
电脑电源管理
- 检查CPU频率
使用此命令watch grep \"cpu MHz\" /proc/cpuinfo
如下是官方建议CPU
Intel Core i5-6600K CPU @ 3.50GHz × 4
Intel Core i5-6600 CPU @ 3.30GHz × 4
Intel Core i7-8700 CPU @ 3.20GHz × 6
我使用的机器如下:Intel(R) Xeon(R) CPU E5-2643 v4 @ 3.40GHz x 6

- 禁用p-state和c-state
在/etc/default/grub中添加GRUB_CMDLINE_LINUX_DEFAULT="quiet intel_pstate=disable",可选的也可以添加GRUB_CMDLINE_LINUX_DEFAULT="processor.max_cstate=1 intel_idle.max_cstate=0 idle=poll",在修改完成/etc/default/grub文件后需要update-grub更新信息。
- intel_powerclamp加入黑名单
/etc/modprobe.d/blacklist.conf的末尾添加“blacklist intel_powerclamp”, 将intel_powerclamp“模块列入黑名单,如果该文件不存在,请创建一个,然后将该行添加到其中。
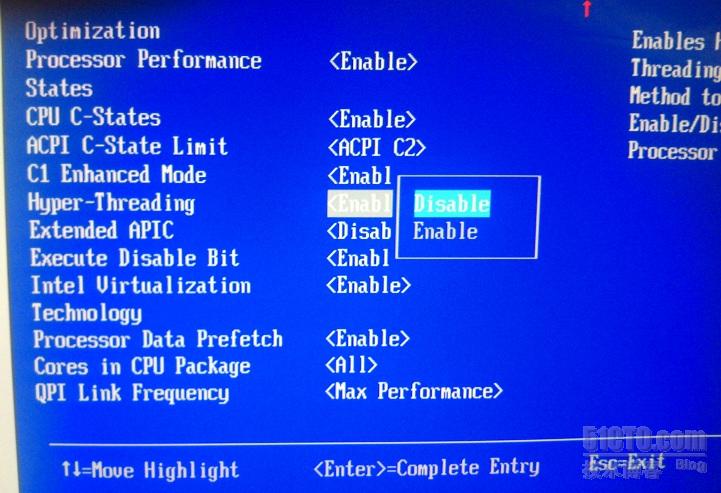
- BIOS中电源和CPU管理设置
还需要禁用超线程,CPU频率控制,C状态,P状态
- 安装i7z查看CPU设置情况
sudo apt-get install i7z
sudo i7z

如果不生效,在后面所有设置完成后重启电脑,再次查看是否生效。
CPU Frequency scaling
- 设置CPU为高性能模式
安装cpufrequtils:
sudo apt-get install cpufrequtils
然后编辑以下文件(如果它不存在,则创建它):sudo vi /etc/default/cpufrequtils
添加:GOVERNOR="performance"保存并退出。
禁用ondemand守护程序
sudo update-rc.d ondemand disable
sudo /etc/init.d/cpufrequtils restart
您可以使用以下方法检查设置:cpufreq-info
它将显示处理器所具有的每个核心的信息。只需检查所有这些是否处于性能模式,并且处理器的最大速度。
编译和安装
下载代码
代码
UE/eNB: git clone https://gitlab.eurecom.fr/oai/openairinterface5g.git
MME/HSS/SPGW: git clone https://gitlab.eurecom.fr/oai/openair-cn.git
安装依赖库
安装依赖库跟OAI运行哪种模式无关,无论你最终要运行哪种模式,安装依赖库的命令都一样。
cd ./openairinterface5g
source oaienv
cd cmake_targets
sudo ./build_oai -I
安装其他OAI之外的依赖库
sudo apt install libboost-dev
安装USRP驱动–uhd
一定要更新,不然USRP运行会出现问题。
sudo add-apt-repository ppa:ettusresearch/uhd
sudo apt-get update
sudo apt-get install libuhd-dev libuhd003 uhd-host
在安装完成之后,USRP插上电源和USB线,运行uhd_find_devices查看是否有信息。

如无上述信息,可根据提示运行python /usr/share/man/man1/uhd_images_downloader.py下载USRP板子镜像。
可能出现的问题
- AttributeError: 'module' object has no attribute 'SSL_ST_INIT'
解决方法:
卸载pyopenssl重新安装,或者直接升级。
pip install --upgrade pyOpenSSL
编译
编译过程中出现的问题,都可以根据提示生成的log具体问题具体查看解决方法。
eNB侧:
--UE可加可不加
cd openairinterface5g/cmake_targets
sudo ./build_oai -c -C --eNB --UE -r Rel8 -w USRP --noS1 -x

UE侧:
--eNB可加可不加
cd openairinterface5g/cmake_targets
sudo ./build_oai -c -C --eNB --UE -r Rel8 -w USRP --noS1 -x

设置虚拟网卡
目的:加载nasmesh.ko以建立无线承载并提供eNB与连接的UE之间的IP连接。
默认eNB应该oai0具有IP地址10.0.1.1网络掩码255.255.255.0 的接口。(ifconfig验证)
默认UE应该oai0具有IP地址10.0.1.9网络掩码255.255.255.0 的接口。
不可重复加载nasmesh.ko,否则会直接死掉。
eNB侧:
cd openairinterface5g
./cmake_targets/tools/init_nas_nos1 eNB
UE侧:
cd openairinterface5g
./cmake_targets/tools/init_nas_nos1 UE
起完虚拟网卡后,应该能在各自电脑上看到一个虚拟网卡,eNB侧的IP地址应该是10.0.1.1,UE侧的IP地址应该是10.0.1.9.
硬件连接
在运行之前需要连接好硬件设备

注意:一定要Tx连对方的Rx,Rx连接对端的Tx。
UE和eNB之间的衰减应该在40到60dB之间调整。可以从50开始,并根据应该调整范围内的功能。
因为不同硬件晶振精确度不一样,最好两个设备同用一个REF in。

运行
eNB侧运行
cd openairinterface5g
sudo ./targets/bin/lte-softmodem-nos1.Rel8 -O ./targets/PROJECTS/GENERIC-LTE-EPC/CONF/enb.band7.tm1.usrpb210.conf -d
2
>&
1
|
UE侧运行
cd openairinterface5g
sudo ./targets/bin/lte-softmodem-nos1.Rel8 -U -g
5
-C
2660000000
--ue-txgain
90
--ue-rxgain
115
--ue-scan-carrier -r25 -d
2
>&
1
|
如果用户成功连接到eNB,则应观察UE发送的RRCConnectionReconfigurationComplete消息,UE状态为RRC_RECONFIGURED。

eNB端

UE端

业务
ping测试
我们可以在虚拟网卡上跑各种局域网内的业务。比如你可以在eNB侧ping UE,命令如下:
ping
10.0
.
1.9
|
Iperf测试

从UE到eNB的UDP测试
在eNB中打开终端并键入iperf -s -i 1 -u。
接下来,在UE中打开终端并键入iperf -c 10.0.1.1 -i 1 -u -t 10 -b 1M。1M表示从UE到eNB生成的1Mbps UDP吞吐量。
EPC搭建
EPC的比较简单,可参考https://blog.csdn.net/jamie_byr/article/details/79664157
《完》