代孕深圳代孕【代孕代孕网】【微信:13802269370】代孕是一种新的观念,新的趋势。在现今社会里人类文明高度发达,依然有不少不孕不育的夫妇。随着人工生殖科技的迅速发展,七十年代以来,欧美各国陆续开始有人委托代理孕母怀孕生子,代孕是一种解决不孕不育的临床选择。
Tomcat 的结构很复杂,但是 Tomcat 也非常的模块化,找到了 Tomcat 最核心的模块,您就抓住了 Tomcat 的“七寸”。
1. Tomcat整体结构
1.1. Tomcat总体结构图
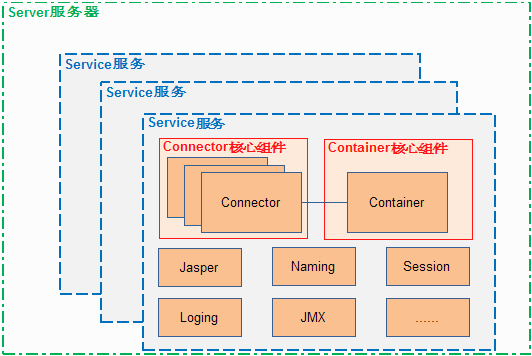
从上图中可以看出 Tomcat 的心脏是两个组件:Connector 和 Container,关于这两个组件将在后面详细介绍。Connector 组件是可以被替换,这样可以提供给服务器设计者更多的选择,因为这个组件是如此重要,不仅跟服务器的设计的本身,而且和不同的应用场景也十分相关,所以一个 Container 可以选择对应多个 Connector。多个 Connector 和一个 Container 就形成了一个 Service,Service 的概念大家都很熟悉了,有了 Service 就可以对外提供服务了,但是 Service 还要一个生存的环境,必须要有人能够给她生命、掌握其生死大权,那就非 Server 莫属了。所以整个 Tomcat 的生命周期由 Server 控制。
1.1. 以 Service 作为“婚姻”
我们将 Tomcat 中 Connector、Container 作为一个整体比作一对情侣的话,Connector 主要负责对外交流,可以比作为 Boy,Container 主要处理 Connector 接受的请求,主要是处理内部事务,可以比作为 Girl。那么这个 Service 就是连接这对男女的结婚证了。是 Service 将它们连接在一起,共同组成一个家庭。当然要组成一个家庭还要很多其它的元素。
说白了,Service 只是在 Connector 和 Container 外面多包一层,把它们组装在一起,向外面提供服务,一个 Service 可以设置多个 Connector,但是只能有一个Container 容器。这个 Service 接口的方法列表如下:
1) Service 接口
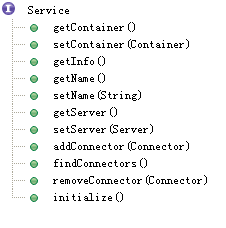
从 Service 接口中定义的方法中可以看出,它主要是为了关联 Connector 和 Container,同时会初始化它下面的其它组件,注意接口中它并没有规定一定要控制它下面的组件的生命周期。所有组件的生命周期在一个 Lifecycle 的接口中控制,这里用到了一个重要的设计模式,关于这个接口将在后面介绍。
Tomcat 中 Service 接口的标准实现类是 StandardService 它不仅实现了 Service 借口同时还实现了 Lifecycle 接口,这样它就可以控制它下面的组件的生命周期了。StandardService 类结构图如下:
1) StandardService 的类结构图
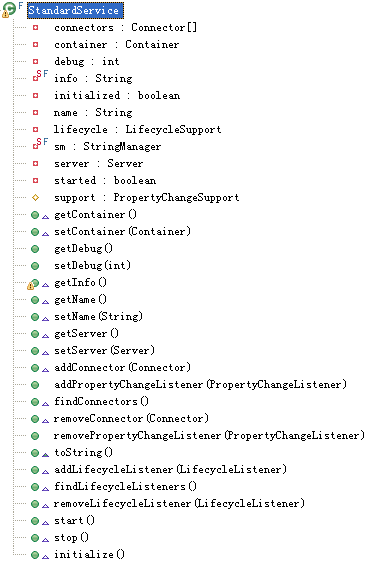
从上图中可以看出除了 Service 接口的方法的实现以及控制组件生命周期的 Lifecycle 接口的实现,还有几个方法是用于在事件监听的方法的实现,不仅是这个Service 组件,Tomcat 中其它组件也同样有这几个方法,这也是一个典型的设计模式,将在后面介绍。
下面看一下 StandardService 中主要的几个方法实现的代码,下面是 setContainer 和 addConnector 方法的源码:
1) StandardService. SetContainer
public void setContainer(Container container) {
Container oldContainer = this.container;
if ((oldContainer != null) && (oldContainer instanceof Engine))
((Engine) oldContainer).setService(null);
this.container = container;
if ((this.container != null) && (this.container instanceof Engine))
((Engine) this.container).setService(this);
if (started && (this.container != null) && (this.container instanceof Lifecycle)) {
try {
((Lifecycle) this.container).start();
} catch (LifecycleException e) {
;
}
}
synchronized (connectors) {
for (int i = 0; i < connectors.length; i++)
connectors[i].setContainer(this.container);
}
if (started && (oldContainer != null) && (oldContainer instanceof Lifecycle)) {
try {
((Lifecycle) oldContainer).stop();
} catch (LifecycleException e) {
;
}
}
support.firePropertyChange("container", oldContainer, this.container);
}
这段代码很简单,其实就是先判断当前的这个 Service 有没有已经关联了 Container,如果已经关联了,那么去掉这个关联关系—— oldContainer.setService(null)。如果这个 oldContainer 已经被启动了,结束它的生命周期。然后再替换新的关联、再初始化并开始这个新的 Container 的生命周期。最后将这个过程通知感兴趣的事件监听程序。这里值得注意的地方就是,修改 Container 时要将新的 Container 关联到每个 Connector,还好 Container 和 Connector 没有双向关联,不然这个关联关系将会很难维护。
2) StandardService. addConnector
public void addConnector(Connector connector) {
synchronized (connectors) {
connector.setContainer(this.container);
connector.setService(this);
Connector results[] = new Connector[connectors.length + 1];
System.arraycopy(connectors, 0, results, 0, connectors.length);
results[connectors.length] = connector;
connectors = results;
if (initialized) {
try {
connector.initialize();
} catch (LifecycleException e) {
e.printStackTrace(System.err);
}
}
if (started && (connector instanceof Lifecycle)) {
try {
((Lifecycle) connector).start();
} catch (LifecycleException e) {
;
}
}
support.firePropertyChange("connector", null, connector);
}
}
上面是 addConnector 方法,这个方法也很简单,首先是设置关联关系,然后是初始化工作,开始新的生命周期。这里值得一提的是,注意 Connector 用的是数组而不是 List 集合,这个从性能角度考虑可以理解,有趣的是这里用了数组但是并没有向我们平常那样,一开始就分配一个固定大小的数组,它这里的实现机制是:重新创建一个当前大小的数组对象,然后将原来的数组对象 copy 到新的数组中,这种方式实现了类似的动态数组的功能,这种实现方式,值得我们以后拿来借鉴。
最新的 Tomcat6 中 StandardService 也基本没有变化,但是从 Tomcat5 开始 Service、Server 和容器类都继承了 MBeanRegistration 接口,Mbeans 的管理更加合理。
1.1. 以 Server 为“居”
前面说一对情侣因为 Service 而成为一对夫妻,有了能够组成一个家庭的基本条件,但是它们还要有个实体的家,这是它们在社会上生存之本,有了家它们就可以安心的为人民服务了,一起为社会创造财富。
Server 要完成的任务很简单,就是要能够提供一个接口让其它程序能够访问到这个 Service 集合、同时要维护它所包含的所有 Service 的生命周期,包括如何初始化、如何结束服务、如何找到别人要访问的 Service。还有其它的一些次要的任务,如您住在这个地方要向当地政府去登记啊、可能还有要配合当地公安机关日常的安全检查什么的。
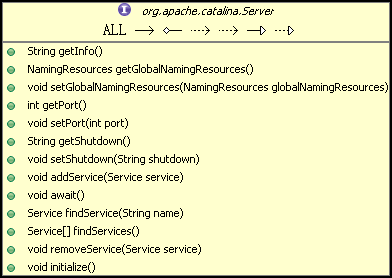
Server 的类结构图如下:
1) Server 的类结构图
它的标准实现类 StandardServer 实现了上面这些方法,同时也实现了 Lifecycle、MbeanRegistration 两个接口的所有方法,下面主要看一下 StandardServer 重要的一个方法 addService 的实现:
1) StandardServer.addService
public void addService(Service service) {
service.setServer(this);
synchronized (services) {
Service results[] = new Service[services.length + 1];
System.arraycopy(services, 0, results, 0, services.length);
results[services.length] = service;
services = results;
if (initialized) {
try {
service.initialize();
} catch (LifecycleException e) {
e.printStackTrace(System.err);
}
}
if (started && (service instanceof Lifecycle)) {
try {
((Lifecycle) service).start();
} catch (LifecycleException e) {
;
}
}
support.firePropertyChange("service", null, service);
}
}
从上面第一句就知道了 Service 和 Server 是相互关联的,Server 也是和 Service 管理 Connector 一样管理它,也是将 Service 放在一个数组中,后面部分的代码也是管理这个新加进来的 Service 的生命周期。Tomcat6 中也是没有什么变化的。
1.1. 组件的生命线“Lifecycle”
前面一直在说 Service 和 Server 管理它下面组件的生命周期,那它们是如何管理的呢?
Tomcat 中组件的生命周期是通过 Lifecycle 接口来控制的,组件只要继承这个接口并实现其中的方法就可以统一被拥有它的组件控制了,这样一层一层的直到一个最高级的组件就可以控制 Tomcat 中所有组件的生命周期,这个最高的组件就是 Server,而控制 Server 的是 Startup,也就是您启动和关闭 Tomcat。
下面是 Lifecycle 接口的类结构图:
1) Lifecycle 类结构图

除了控制生命周期的 Start 和 Stop 方法外还有一个监听机制,在生命周期开始和结束的时候做一些额外的操作。这个机制在其它的框架中也被使用,如在 Spring 中。关于这个设计模式会在后面介绍。
Lifecycle 接口的方法的实现都在其它组件中,就像前面中说的,组件的生命周期由包含它的父组件控制,所以它的 Start 方法自然就是调用它下面的组件的 Start 方法,Stop 方法也是一样。如在 Server 中 Start 方法就会调用 Service 组件的 Start 方法,Server 的 Start 方法代码如下:
1) StandardServer.Start
public void start() throws LifecycleException {
if (started) {
log.debug(sm.getString("standardServer.start.started"));
return;
}
lifecycle.fireLifecycleEvent(BEFORE_START_EVENT, null);
lifecycle.fireLifecycleEvent(START_EVENT, null);
started = true;
synchronized (services) {
for (int i = 0; i < services.length; i++) {
if (services[i] instanceof Lifecycle)
((Lifecycle) services[i]).start();
}
}
lifecycle.fireLifecycleEvent(AFTER_START_EVENT, null);
}
监听的代码会包围 Service 组件的启动过程,就是简单的循环启动所有 Service 组件的 Start 方法,但是所有 Service 必须要实现 Lifecycle 接口,这样做会更加灵活。
Server 的 Stop 方法代码如下:
2) StandardServer.Stop
public void stop() throws LifecycleException {
if (!started)
return;
lifecycle.fireLifecycleEvent(BEFORE_STOP_EVENT, null);
lifecycle.fireLifecycleEvent(STOP_EVENT, null);
started = false;
for (int i = 0; i < services.length; i++) {
if (services[i] instanceof Lifecycle)
((Lifecycle) services[i]).stop();
}
lifecycle.fireLifecycleEvent(AFTER_STOP_EVENT, null);
}
它所要做的事情也和 Start 方法差不多。
本教程由尚硅谷教育大数据研究院出品,如需转载请注明来源,欢迎大家关注尚硅谷公众号(atguigu)了解更多。