原文地址:http://blog.csdn.net/zhengqijun_/article/details/69952410
相信在Linux环境下做过项目的人,都会知道Makefile的重要性。它能够帮助我们完成很多的编译工作,节约我们自己去编译的时间。Makefile的重要性这里就不在强调了!Windows下的IDE都自动生成了Makefile,因此不需要自己再去写Makefile,所以习惯了在Windows下编程的人突然在Linux下编程是不适应的。
既然Windows下能够自动生成Makefile,那么Linux下有没有这样的工具呢?
答案是有的,应该在做一个大的项目的时候,不可能都靠人来写Makefile,这样太麻烦了!很多GNULinux的的软件都是用它生成Makefile的,包括我们非常熟悉的Linux内核源代码。Linux下自动生成Makefile的工具有autotools、qmake等。(玩过QT的人应该对qmake十分熟悉)
一、autotools的安装步骤
下面主要是针对autotools工具来讲,先从安装步骤开始吧。
我的环境是Ubuntu 14.04版本,Ubuntu安装工具十分方便,用apt命令即可。
sudo apt-get install autoconf- zqj@ubuntu:~ which aclocal </span></span></li><li class=""><span>/usr/bin/aclocal </span></li><li class="alt"><span>zqj@ubuntu:~ which autoscan
- /usr/bin/autoscan
- zqj@ubuntu:~ which autoconf </span></li><li class=""><span>/usr/bin/autoconf </span></li><li class="alt"><span>zqj@ubuntu:~ which autoheader
- /usr/bin/autoheader
- zqj@ubuntu:~ which automake </span></li><li class=""><span>/usr/bin/automake </span></li></ol><div class="save_code tracking-ad" data-mod="popu_249" style="display: none;"><a href="javascript:;" target="_blank"><img src="http://static.blog.csdn.net/images/save_snippets.png"></a></div></div><pre code_snippet_id="2324182" snippet_file_name="blog_20170410_2_3605719" name="code" class="cpp" style="display: none;">zqj@ubuntu:~ which aclocal /usr/bin/aclocal zqj@ubuntu:~
whichautoscan/usr/bin/autoscanzqj@ubuntu: which autoconf /usr/bin/autoconf zqj@ubuntu:~whichautoheader/usr/bin/autoheaderzqj@ubuntu: which automake /usr/bin/automake这样就安装完成了,接下来讲讲怎么使用autotools吧!
二、autotools的使用
接下来我们写个测试代码吧!
我写的测试代码结构如下:tree命令查看
.
head.h
└── Test
├── include
│ └── head.h
└── Main
└── main.cpp
- /*******************************************
- Copyright (C) 2017-2018 All rights reserved.
- File name : head.h
- Version : v1.0
- Author : Zhengqijun
- Date : 2017年04月10日 星期一 17时31分05秒
- Description : 头文件
- Funcion List :
- *******************************************/
- #ifndef HEAD_H
- #define HEAD_H
- #include <iostream>
- using namespace std;
- #endif //HEAD_H

/*******************************************

Copyright (C) 2017-2018 All rights reserved.

File name    : head.h

Version      : v1.0

Author       : Zhengqijun

Date         : 2017年04月10日 星期一 17时31分05秒

Description  : 头文件

Funcion List :

*******************************************/
- /*****************************************************
- Copyright (C) 2017-2018 All rights reserved.
- File name : main.cpp
- Version : v1.0
- Author : Zhengqijun
- Date : 2017年04月10日 星期一 17时32分20秒
- Description : 主函数
- Funcion List : main()
- *****************************************************/
- #include ”../include/head.h”
- int main()
- {
- cout << ”hello world!” << endl;
- return 0;
- }
/*****************************************************
Copyright (C) 2017-2018 All rights reserved.
File name    : main.cpp
Version      : v1.0
Author       : Zhengqijun
Date         : 2017年04月10日 星期一 17时32分20秒
Description  : 主函数
Funcion List : main()
*****************************************************/
autotools的使用步骤如下:
1、使用autoscan命令生成autoscan.log configure.scan两个文件。- zqj@ubuntu:~/2017/0410/Test autoscan </span></span></li><li class=""><span>zqj@ubuntu:~/2017/0410/Test ls
- autoscan.log configure.scan include Main
zqj@ubuntu:~/2017/0410/Test$ autoscan
zqj@ubuntu:~/2017/0410/Test$ ls
autoscan.log  configure.scan  include  Main
2、使用cp命令生成configure.ac文件。
- zqj@ubuntu:~/2017/0410/Test cp configure.scan configure.ac </span></span></li><li class=""><span>zqj@ubuntu:~/2017/0410/Test ls
- autoscan.log configure.ac configure.scan include Main
zqj@ubuntu:~/2017/0410/Test$ cp configure.scan configure.ac
zqj@ubuntu:~/2017/0410/Test$ ls
autoscan.log  configure.ac  configure.scan  include  Main
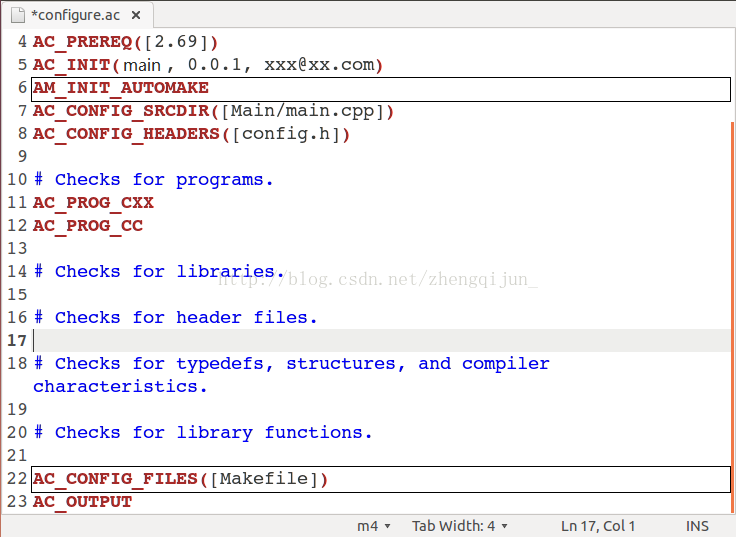
找到这句 AC_INIT([FULL-PACKAGE-NAME], [VERSION], [BUG-REPORT-ADDRESS])
其中,FULL-PACKAGE-NAME为程序名称,VERSION为当前版本,BUG-REPORT-ADDRESS为bug汇报地址。
这里我改为:(根据自己的实际情况)

AC_INIT(Main, 0.0.1, [email protected])
4、执行aclocal命令生成aclocal.m4和autom4te.cache文件。
- zqj@ubuntu:~/2017/0410/Test aclocal </span></span></li><li class=""><span>zqj@ubuntu:~/2017/0410/Test ls
- aclocal.m4 autoscan.log configure.scan Main
- autom4te.cache configure.ac include
zqj@ubuntu:~/2017/0410/Test$ aclocal
zqj@ubuntu:~/2017/0410/Test$ ls
aclocal.m4      autoscan.log  configure.scan  Main
autom4te.cache  configure.ac  include
5、制作Makefile.am文件,因为automake这个命令需要用到这个配置文件。
- # Makefile.am
- AUTOMAKE_OPTIONS = foreign
- bin_PROGRAMS = main
- main_SOURCES = include/head.h Main/main.cpp
- main_CPPFLAGS = -I include/
# Makefile.am
AUTOMAKE_OPTIONS = foreign
bin_PROGRAMS     = main
main_SOURCES     = include/head.h Main/main.cpp
main_CPPFLAGS    = -I include/
6、执行autoheader命令生成config.h.in文件。
7、使用touch命令生成automake必须文件。
touch NEWS README AUTHORS ChangeLog
| automake必须文件: install-sh、missing、INSTALL、NEWS、README、AUTHORS、ChangeLog、COPYING、depcomp 执行automake -a的时候会自动生成 install-sh、missing、INSTALL、COPYING、depcomp 其它文件就需要自己手动添加了。可以使用touch命令 |
8、执行automake -a命令生成其它文件。
- zqj@ubuntu:~/2017/0410/Test automake -a </span></span></li><li class=""><span>zqj@ubuntu:~/2017/0410/Test ls
- aclocal.m4 ChangeLog configure.scan INSTALL Makefile.in
- AUTHORS compile COPYING install-sh missing
- autom4te.cache config.h.in depcomp Main NEWS
- autoscan.log configure.ac include Makefile.am README
zqj@ubuntu:~/2017/0410/Test$ automake -a
zqj@ubuntu:~/2017/0410/Test$ ls
aclocal.m4      ChangeLog     configure.scan  INSTALL      Makefile.in
AUTHORS         compile       COPYING         install-sh   missing
autom4te.cache  config.h.in   depcomp         Main         NEWS
autoscan.log    configure.ac  include         Makefile.am  README
9、执行autoconf命令生成configure文件。
- zqj@ubuntu:~/2017/0410/Test autoconf </span></span></li><li class=""><span>zqj@ubuntu:~/2017/0410/Test ls
- aclocal.m4 compile COPYING Main README
- AUTHORS config.h.in depcomp Makefile.am
- autom4te.cache configure include Makefile.in
- autoscan.log configure.ac INSTALL missing
- ChangeLog configure.scan install-sh NEWS
zqj@ubuntu:~/2017/0410/Test$ autoconf
zqj@ubuntu:~/2017/0410/Test$ ls
aclocal.m4      compile         COPYING     Main         README
AUTHORS         config.h.in     depcomp     Makefile.am
autom4te.cache  configure       include     Makefile.in
autoscan.log    configure.ac    INSTALL     missing
ChangeLog       configure.scan  install-sh  NEWS
10、执行./configure命令进行测试。
- zqj@ubuntu:~/2017/0410/Test ./configure </span></span></li><li class=""><span>checking <span class="keyword">for</span><span> a BSD-compatible install... /usr/bin/install -c </span></span></li><li class="alt"><span>checking whether build environment is sane... yes </span></li><li class=""><span>checking <span class="keyword">for</span><span> a </span><span class="keyword">thread</span><span>-safe mkdir -p... /bin/mkdir -p </span></span></li><li class="alt"><span>checking <span class="keyword">for</span><span> gawk... no </span></span></li><li class=""><span>checking <span class="keyword">for</span><span> mawk... mawk </span></span></li><li class="alt"><span>checking whether make sets (MAKE)… yes
- checking whether make supports nested variables… yes
- checking for g++… g++
- checking whether the C++ compiler works… yes
- checking for C++ compiler default output file name… a.out
- checking for suffix of executables…
- checking whether we are cross compiling… no
- checking for suffix of object files… o
- checking whether we are using the GNU C++ compiler… yes
- checking whether g++ accepts -g… yes
- checking for style of include used by make… GNU
- checking dependency style of g++… gcc3
- checking for gcc… gcc
- checking whether we are using the GNU C compiler… yes
- checking whether gcc accepts -g… yes
- checking for gcc option to accept ISO C89… none needed
- checking whether gcc understands -c and -o together… yes
- checking dependency style of gcc… gcc3
- checking that generated files are newer than configure… done
- configure: creating ./config.status
- config.status: creating Makefile
- config.status: creating config.h
- config.status: executing depfiles commands
zqj@ubuntu:~/2017/0410/Test$ ./configure
checking for a BSD-compatible install... /usr/bin/install -c
checking whether build environment is sane... yes
checking for a thread-safe mkdir -p... /bin/mkdir -p
checking for gawk... no
checking for mawk... mawk
checking whether make sets $(MAKE)... yes
checking whether make supports nested variables... yes
checking for g++... g++
checking whether the C++ compiler works... yes
checking for C++ compiler default output file name... a.out
checking for suffix of executables...
checking whether we are cross compiling... no
checking for suffix of object files... o
checking whether we are using the GNU C++ compiler... yes
checking whether g++ accepts -g... yes
checking for style of include used by make... GNU
checking dependency style of g++... gcc3
checking for gcc... gcc
checking whether we are using the GNU C compiler... yes
checking whether gcc accepts -g... yes
checking for gcc option to accept ISO C89... none needed
checking whether gcc understands -c and -o together... yes
checking dependency style of gcc... gcc3
checking that generated files are newer than configure... done
configure: creating ./config.status
config.status: creating Makefile
config.status: creating config.h
config.status: executing depfiles commands
11、执行make命令生成可执行文件。
- zqj@Zqj-ubuntu:~/2017/0410/Test make </span></span></li><li class=""><span>make all-am </span></li><li class="alt"><span>make[1]: Entering directory `/home/zqj/2017/0410/Test' </span></li><li class=""><span>g++ -DHAVE_CONFIG_H -I. -I include/ -g -O2 -MT main-main.o -MD -MP -MF .deps/main-main.Tpo -c -o main-main.o `test -f <span class="string">'Main/main.cpp'</span><span> || echo </span><span class="string">'./'</span><span>`Main/main.cpp </span></span></li><li class="alt"><span>mv -f .deps/main-main.Tpo .deps/main-main.Po </span></li><li class=""><span>g++ -g -O2 -o main main-main.o </span></li><li class="alt"><span>make[1]: Leaving directory `/home/zqj/2017/0410/Test' </span></li></ol><div class="save_code tracking-ad" data-mod="popu_249" style="display: none;"><a href="javascript:;" target="_blank"><img src="http://static.blog.csdn.net/images/save_snippets.png"></a></div></div><pre code_snippet_id="2324182" snippet_file_name="blog_20170410_15_2549088" name="code" class="cpp" style="display: none;">zqj@Zqj-ubuntu:~/2017/0410/Test make make all-am make[1]: Entering directory `/home/zqj/2017/0410/Test’ g++ -DHAVE_CONFIG_H -I. -I include/ -g -O2 -MT main-main.o -MD -MP -MF .deps/main-main.Tpo -c -o main-main.o `test -f ‘Main/main.cpp’ || echo ‘./’`Main/main.cpp mv -f .deps/main-main.Tpo .deps/main-main.Po g++ -g -O2 -o main main-main.o make[1]: Leaving directory `/home/zqj/2017/0410/Test’ 注意:如果make出错,没有生成可执行文件。那么下次make编译前,先使用make clean清除中间文件,再进行重新编译!(make出错可能是配置文件写的有问题Makefile.am)
虽然第一次使用可能感觉autotools还没有自己写Makefile好用,但是当你熟练掌握它的使用方法的时候,再去做大项目的时候,你会发现autotools的好用之处!