转载请声明出处: https://blog.csdn.net/AndrExpert/article/details/80248957
在浅析Android View内部工作原理及其实战 文章中,我们简单介绍了Android View工作原理中的UI界面架构和View绘制流程,目的在于先给大家有个大概的了解,方便后面的学习。接下来,我们将从源码的角度来分析(1)中提到的内容,为了避免文章过长,关于View工作原理的源码剖析分为两篇文章,也就是两个部分:UI界面架构和View绘制流程,本文先讲解第一部分-UI界面架构原理。
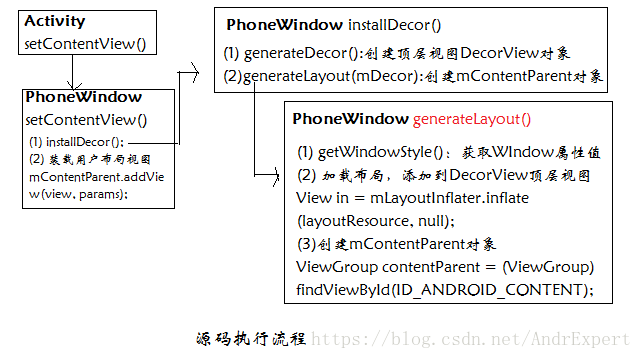
从Activity的setContentView入手,该方法会通过getWindow获取Activity对应的Window对象,并调用Window对象的setContentView方法,但是由于Window实质是一个抽象类,通过查看其源码文档有一段介绍,说明真正实现setContentView具体逻辑是Window的唯一的实现类PhoneWindow,于..\frameworks\base\core\java\com\android\internal\policy目录下。Activity中部分源码:
public void setContentView(@LayoutRes int layoutResID) {
      getWindow().setContentView(layoutResID);
      initWindowDecorActionBar();
}
public Window getWindow() {
      return mWindow;
} 接着,我们分析PhoneWindow的setContentView()方法,该方法会首先判断mContentParent对象(Activity界面的内容区域)是否为空,如果为空就调用installDecor()方法创建一个DecorView对象,否则移除mContentParent中所有子view。通过查看DecorView源码可知,DecorView是PhoneWindow的一个内部类,继承于FrameLayout,它充当Window(窗体)顶层视图的角色;然后,检查Window是否设置了FEATURE_CONTENT_TRANSITIONS属性,如果没有就将我们要设置的view(Activity的布局,比如R.layout.activity_main)添加到mContentParent中,即ID为com.android.internal.R.id.content的FrameLayout中;最后,调用Callback接口的onContentChanged()方法通知Activity窗体内容已发生改变。PhoneWindow中部分源码:
@Override
public void setContentView(View view, ViewGroup.LayoutParams params) {
    // mContentParent是一个FrameLayout,用于放置窗体的contents(内容)部分
    // 如果为空,则创建DecorView和mContentParent
    if (mContentParent == null) {
        installDecor();
    } else if (!hasFeature(FEATURE_CONTENT_TRANSITIONS)) {
        mContentParent.removeAllViews();
    }

    if (hasFeature(FEATURE_CONTENT_TRANSITIONS)) {
        view.setLayoutParams(params);
        final Scene newScene = new Scene(mContentParent, view);
        transitionTo(newScene);
    } else {
        // 将view添加到DecorView或其子类(容器)中
        mContentParent.addView(view, params);
    }
    mContentParent.requestApplyInsets();
    final Callback cb = getCallback();
    if (cb != null && !isDestroyed()) {
        // 通知Activity窗体内容已发生变化
        cb.onContentChanged();
    }
} 接下来,我们再来看PhoneWindow的installDecor()方法,以便加深对DecorView和mContentParent创建过程的理解。首先,该方法会判断窗体的DeocorView对象mDecor是否为空,如果为空说明此时DecorView还未被创建,这里调用generateDecor()方法创建对象mDecor,即new DecorView(getContext(),-1);然后,判断mContentParent是否被创建,如果没有就调用generateLayout(mDecor)完成Window属性获取/设定、DecorView的初始化和mContentParent创建工作。;最后,一切准备就绪就可以根据情况对TitleView进行初始化。PhoneWindow中部分源码:
private void installDecor() {
    if (mDecor == null) {
        // 实例化一个DecorView对象
        // 即 new DecorView(getContext(),-1)
        mDecor = generateDecor();
        ...
    }
    // 如果mContentParent为空,则创建
    if (mContentParent == null) {
        mContentParent = generateLayout(mDecor);

        // Set up decor part of UI to ignore fitsSystemWindows if appropriate.
        mDecor.makeOptionalFitsSystemWindows();
        final DecorContentParent decorContentParent = (DecorContentParent) mDecor.findViewById(
                R.id.decor_content_parent);
        // 判断decorContentParent 是否为空
        if (decorContentParent != null) {
             ...代码省略
        } else {
            // 设置标题栏的Title
            mTitleView = (TextView)findViewById(R.id.title);
            if (mTitleView != null) {
                mTitleView.setLayoutDirection(mDecor.getLayoutDirection());
                if ((getLocalFeatures() & (1 << FEATURE_NO_TITLE)) != 0) {
                    View titleContainer = findViewById(
                            R.id.title_container);
                    if (titleContainer != null) {
                        titleContainer.setVisibility(View.GONE);
                    } else {
                        mTitleView.setVisibility(View.GONE);
                    }
                    if (mContentParent instanceof FrameLayout) {
                        ((FrameLayout)mContentParent).setForeground(null);
                    }
                } else {
                    mTitleView.setText(mTitle);
                }
            }
        }

        if (mDecor.getBackground() == null && mBackgroundFallbackResource != 0) {
            mDecor.setBackgroundFallback(mBackgroundFallbackResource);
        }
        ... 代码省略
    }
} 再接下来,我们深入分析下PhoneWindow的generateLayout()方法,当分析该方法完后,你就会有一种幡然大悟的感觉!
(1) 首先,该方法中通过Context的obtainStuleAttributes方法获取Window theme的各种样式属性(com.android.internal.R.styleable.Window),并进行相应的设置(requestFeature或setFlags)。在PhoneWindow的requestFeature方法中, 它会判断mContentParent是否被创建,否则就会抛出“requestFeature() must be called before adding content”异常,这也解释了为什么我们在Acitivity的onCreate()方法中设置Window(窗体)属性必须在setContentView之前的原因。
protected ViewGroup generateLayout(DecorView decor) {
    // 获取当前theme属性,位于com.android.internal.R.styleable.Window中
    // 使用Context的obtainStuleAttributes实现
    TypedArray a = getWindowStyle();
    // Window_windowIsFloating悬浮属性
    mIsFloating = a.getBoolean(R.styleable.Window_windowIsFloating, false);
    int flagsToUpdate = (FLAG_LAYOUT_IN_SCREEN|FLAG_LAYOUT_INSET_DECOR)
            & (~getForcedWindowFlags());
    if (mIsFloating) {
        setLayout(WRAP_CONTENT, WRAP_CONTENT);
        setFlags(0, flagsToUpdate);
    } else {
        setFlags(FLAG_LAYOUT_IN_SCREEN|FLAG_LAYOUT_INSET_DECOR, flagsToUpdate);
    }
    // Window_windowNoTitle标题栏属性
    if (a.getBoolean(R.styleable.Window_windowNoTitle, false)) {
        requestFeature(FEATURE_NO_TITLE);
    } else if (a.getBoolean(R.styleable.Window_windowActionBar, false)) {
        // Don't allow an action bar if there is no title.
        requestFeature(FEATURE_ACTION_BAR);
    }

    // Inflate the window decor.
    ... // 代码省略,见下小节
}

@Override
 public boolean requestFeature(int featureId) {
    // 判断内容区域是否被创建,即setContentView是否被调用
     if (mContentParent != null) {
         throw new AndroidRuntimeException("requestFeature() must be called before adding content");
     }
    ...
     return super.requestFeature(featureId);
 }
(2) 然后,generateLayout()方法中会根据上述设定的属性选择不同风格的布局文件填充加载(addView)到DecorView中,这些布局文件大部分包括两部分,即不同风格的标题栏和ID为com.android.internal.R.id.content内容区域(FrameLayout)。通过LayoutInflater的inflate()方法将布局资源文件转化为View对象,将其添加addView到DecorView中,即Window顶层视图容器中。最后,通过findViewBy(int id)方法找到ID为com.android.internal.R.id.content的内容视图将其返回赋值给mContentParent,从而说明mContentParent对象指的就是Window窗体的内容区域,也是装载我们在日常开发中使用setContentView设置Activtiy布局文件的视图容器。
protected ViewGroup generateLayout(DecorView decor) {
    ... // 代码省略,见上小节

    // Inflate the window decor.
    int layoutResource;
    int features = getLocalFeatures();
    if ((features & (1 << FEATURE_SWIPE_TO_DISMISS)) != 0) {
        layoutResource = R.layout.screen_swipe_dismiss;
    }
    ... // 代码省略
    else if ((features & (1 << FEATURE_NO_TITLE)) == 0) {
        // If no other features and not embedded, only need a title.
        // If the window is floating, we need a dialog layout
        if (mIsFloating) {
            TypedValue res = new TypedValue();
            getContext().getTheme().resolveAttribute(
                    R.attr.dialogTitleDecorLayout, res, true);
            layoutResource = res.resourceId;
        } else if ((features & (1 << FEATURE_ACTION_BAR)) != 0) {
            layoutResource = a.getResourceId(
                    R.styleable.Window_windowActionBarFullscreenDecorLayout,
                    R.layout.screen_action_bar);
        } else {
            layoutResource = R.layout.screen_title;
        }
    } else {
        // Embedded, so no decoration is needed.
        layoutResource = R.layout.screen_simple;
    }
    mDecor.startChanging();
    // 根据不同属性,获取对应的layoutResource资源文件
    // 比如,Window属性中没有no_title属性,则加载包含Actionbar和Content
    // 的布局文件,如果设定no_title属性,则加载只包含Content区域的布局文件
    View in = mLayoutInflater.inflate(layoutResource, null);
    // 将布局in 添加到DecorView中
    decor.addView(in, new ViewGroup.LayoutParams(MATCH_PARENT, MATCH_PARENT));
    mContentRoot = (ViewGroup) in;
    // 获取布局文件中Content部分ID
    // 即com.android.internal.R.id.content
    ViewGroup contentParent = (ViewGroup)findViewById(ID_ANDROID_CONTENT);
    if (contentParent == null) {
        throw new RuntimeException("Window couldn't find content container view");
    }
    ... // 代码省略
    mDecor.finishChanging();
    // 返回窗体Content
    return contentParent;
}
注:上面提及的布局文件均位于…\frameworks\base\core\res\res\layout目录下 ,为了有个更直观的理解,这里给出screen_simple.xml文件源码:
<?xml version="1.0" encoding="utf-8"?>
<LinearLayout xmlns:android="http://schemas.android.com/apk/res/android"
    android:orientation="vertical"
    android:fitsSystemWindows="true">
    <!-- Popout bar for action modes -->
    <ViewStub android:id="@+id/action_mode_bar_stub"
              android:inflatedId="@+id/action_mode_bar"
              android:layout="@layout/action_mode_bar"
              android:layout_width="match_parent"
              android:layout_height="wrap_content"
              android:theme="?attr/actionBarTheme" />
    <FrameLayout
        android:layout_width="match_parent"
        android:layout_height="?android:attr/windowTitleSize"
        style="?android:attr/windowTitleBackgroundStyle">
        <TextView android:id="@android:id/title"
            style="?android:attr/windowTitleStyle"
            android:background="@null"
            android:fadingEdge="horizontal"
            android:gravity="center_vertical"
            android:layout_width="match_parent"
            android:layout_height="match_parent" />
    </FrameLayout>
    <FrameLayout android:id="@android:id/content"
        android:layout_width="match_parent"
        android:layout_height="0dip"
        android:layout_weight="1"
        android:foregroundGravity="fill_horizontal|top"
        android:foreground="?android:attr/windowContentOverlay" />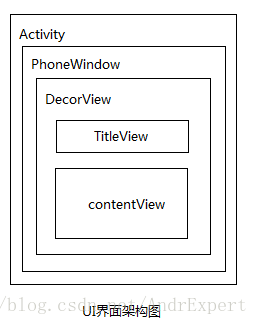
</LinearLayout>至此,从源码角度分析Activity的视图结构基本完毕,这里作下总结:Activity是Android可视化界面,每个Activity都对应一个Window(窗体),但是Window是一个抽象概念,它的具体表现形式是View。Window是一个抽象类,它的具体实现类为PhoneWindow,该类将DecorView作为窗体的顶层视图并封装了相关操作窗体的方法。DecorView是PhoneWindow内部类,它继承于FrameLayout,是整个窗体最顶层视图,其包括TitleView和ContentView两部分,其中,TitleView是窗体的标题栏区域,根据Window主题的不同预设模板表现不同;ContentView是窗体的内容区域,在源码中表现为mContentParent对象,开发者可通过Activity的SetContentView方法为窗体填充各种类型的布局内容,而装载的容器就是mContentParent。
Activity视图结构图:
源码调用流程