对于机器学习和人工智能研究人员而言,好多人都只是构建好模型后就没有进一步处理了,停留在一个比较粗糙的模型上面,没有将其变成一个产品,其实好多创业型人工智能公司都是设计好模型后,将其转化成产品,之后再推向市场。每一个深度学习研究者心中或多或少都想成为一名创业者,但不知道超哪个方向发展。那么,本文将从最简单的网页应用开始,一步一步带领你使用TensorFlow创建一个卷积神经网络(CNN)模型后,使用Flash RESTful API将模型变成一个网页应用产品。
本文使用TensorFlow NN模块构建CNN模型,并在CIFAR-10数据集上进行训练和测试。为了使模型可以远程访问,使用Python创建Flask web应用来接收上传的图像,并使用HTTP返回其分类标签。
1.安装Python、TensorFlow、PyCharm和Flask API
孔子云:工欲善其事,比先利其器。程序员亦如此,在进行开发前,需要准备好开发环境并基本掌握开发工具。Python是第一个需要安装的工具,因为整个环境都依赖于它。如果你已经配置好了开发环境,那么可以跳过第一步。
1.1 安装Anaconda/Python
虽然可以安装传统的方法安装Python,但是建议使用类似于Anaconda这样完整的包,因为里面已经安装了一些好的库可供你直接调用。本文中使用的是Anaconda3版本,对于Windows系统,可以从该网站下载并安装。
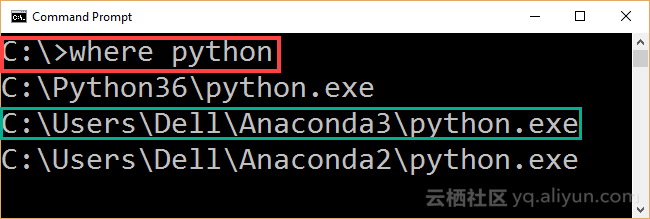
为了确保Anaconda3是否安装成功,在CMD命令行中输入(where Python),如果结果类似于下图,则表明安装成功。
1.2 安装TensorFlow
在上一步Anaconda3安装完毕后,接下来是安装TensorFlow(TF)。本文使用的是Windows系统下CPU版本的TF,安装指导可以见此链接。
TF的安装步骤如下:
1)使用下面代码创建conda环境:
C:> conda create -n tensorflow pip python=3.5这为TF安装创建了一个空的文件以保持虚拟环境(virtual environment, venv),vevn的位置在Anaconda3安装的目录文件下:(Anaconda3envstensorflow)。
2)使用下行命令激活venv
C:> activate tensorflow上行命令告诉我们venv和所需安装的所有库,输入这行命令后,命令行将变(tensorflow)C:>,接下来是安装TensorFlow包。
3)在激活venv后,Window下CPU版本的TensorFlow可以直接使用pip安装:
代码
为了测试TF是否安装成功,可以导入TensorFlow,若结果与下图一样,则表明安装成功。但是在导入TF之前,请确保venv被激活。
1.3安装PyCharm Python IDE
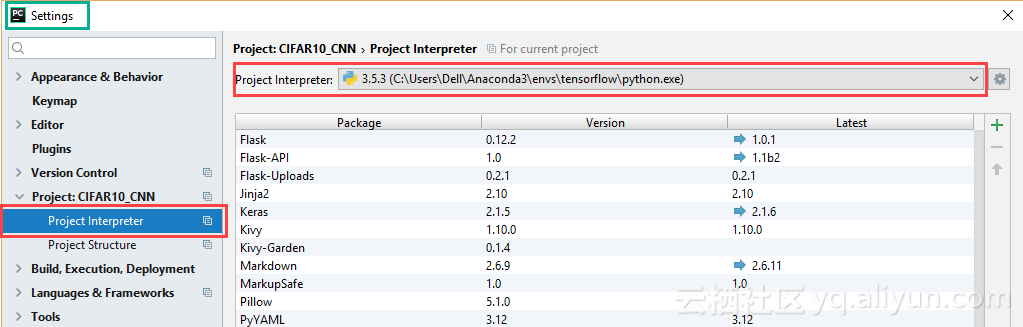
相较于在CMD命令行中输入代码,本文更倾向于使用Python IDE。本文选择PyCharm,Windows版本的下载链接在此。此外,下载安装完毕后,需要设置Python编译器,操作如下图所示,选择之前安装的Python.exe作为IDE的编译器。
1.4 安装Flask
最后的一个工具是安装Flask RESTful API,安装命令如下:
C:> pip install Flask-API在全部安装完毕后,接下来要开始新建工程了。
2.下载并预处理CIFAR-10数据集
CIFAR-10数据集可以在此下载,该数据集包含60,000张图像,并将其划分为训练集和测试集。其中训练集有5个文件夹,分别命名为data_batch_1、data_batch_2...,data_batch_5,每个文件夹中包含10,000张,每张都是32x32x3的RGB图像。测试集只有一个文件夹,命名为batches.meta,包含10,000张图像。训练集和测试集中包含的图像类别为飞机(airplane)、手机(automobile)、鸟(bird)、猫(cat)、鹿(deer)、狗(dog)、青蛙(frog)、马(horse)、船(ship)以及truck(卡车)。
由于数据集中的每个文件都是二进制文件,因此应该对其进行解码以检索实际的图像数据。基于此,创建unpickle_patch函数来执行如下操作:
def unpickle_patch(file):

    """
    Decoding the binary file.
    :param file:File to decode it data.
    :return:Dictionary of the file holding details including input data and output labels.
    """
    patch_bin_file = open(file, 'rb')#Reading the binary file.
    patch_dict = pickle.load(patch_bin_file, encoding='bytes')#Loading the details of the binary file into a dictionary.
    return patch_dict#Returning the dictionary.
该方法接收二进制文件并返回一个包含有关此文件详细信息的字典。该字典除了标签之外还包含文件中所有的10,000个样本的数据。
为了解码整个训练集,创建get_dataset_images函数。该函数接收数据集路径并仅对训练数据起作用。因此,它会过滤一些文件并只返回以data_batch_开头的文件。测试数据在模型训练好后再进行处理。
对于每一个训练文件夹,使用unpickle_patch函数解码,该函数输出一个字典。之后使用get_dataset_images函数获取图像数据以及其对应的类别标签。图像数据是从“data”键中检索,类别标签从“labels”键中检索。
由于数据图形是以一维向量的形式保存,此外TensorFlow接收的是三维形式,因此应对其进行变换处理。基于此,get_dataset_images函数接收的参数为图像的文件路径、行/列数以及图像的通道数。
def get_dataset_images(dataset_path, im_dim=32, num_channels=3):

    """
    This function accepts the dataset path, reads the data, and returns it after being reshaped to match the requierments of the CNN.
    :param dataset_path:Path of the CIFAR10 dataset binary files.
    :param im_dim:Number of rows and columns in each image. The image is expected to be rectangular.
    :param num_channels:Number of color channels in the image.
    :return:Returns the input data after being reshaped and output labels.
    """
    num_files = 5#Number of training binary files in the CIFAR10 dataset.
    images_per_file = 10000#Number of samples withing each binary file.
    files_names = os.listdir(patches_dir)#Listing the binary files in the dataset path.
    """
    Creating an empty array to hold the entire training data after being reshaped.
    The dataset has 5 binary files holding the data. Each binary file has 10,000 samples. Total number of samples in the dataset is 5*10,000=50,000.
    Each sample has a total of 3,072 pixels. These pixels are reshaped to form a RGB image of shape 32x32x3.
    Finally, the entire dataset has 50,000 samples and each sample of shape 32x32x3 (50,000x32x32x3).
    """
    dataset_array = numpy.zeros(shape=(num_files * images_per_file, im_dim, im_dim, num_channels))
    #Creating an empty array to hold the labels of each input sample. Its size is 50,000 to hold the label of each sample in the dataset.
    dataset_labels = numpy.zeros(shape=(num_files * images_per_file), dtype=numpy.uint8)
    index = 0#Index variable to count number of training binary files being processed.
    for file_name in files_names:
        """
        Because the CIFAR10 directory does not only contain the desired training files and has some  other files, it is required to filter the required files.
        Training files start by 'data_batch_' which is used to test whether the file is for training or not.
        """
        if file_name[0:len(file_name) - 1] == "data_batch_":
            print("Working on : ", file_name)
            """
            Appending the path of the binary files to the name of the current file.
            Then the complete path of the binary file is used to decoded the file and return the actual pixels values.
            """
            data_dict = unpickle_patch(dataset_path+file_name)
            """
            Returning the data using its key 'data' in the dictionary.
            Character b is used before the key to tell it is binary string.
            """
            images_data = data_dict[b"data"]
            #Reshaping all samples in the current binary file to be of 32x32x3 shape.
            images_data_reshaped = numpy.reshape(images_data, newshape=(len(images_data), im_dim, im_dim, num_channels))
            #Appending the data of the current file after being reshaped.
            dataset_array[index * images_per_file:(index + 1) * images_per_file, :, :, :] = images_data_reshaped
            #Appening the labels of the current file.
            dataset_labels[index * images_per_file:(index + 1) * images_per_file] = data_dict[b"labels"]
            index = index + 1#Incrementing the counter of the processed training files by 1 to accept new file.
    return dataset_array, dataset_labels#Returning the training input data and output labels.
处理好训练集后,下一步构建CNN模型并进行训练。
3.使用TensorFlow构建CNN模型
使用creat_CNN函数创建CNN模型,该函数创建卷积层(conv)、ReLU激活函数、最大池化(max pooling)、dropout以及全连接层(full connection,FC),最后一层全连接层输出结果。每一层的输出都是下一层的输入,这就要求相邻两层之间的特征图尺寸大小要一致。此外,对于每个conv、ReLU以及最大池化层等,都有一些超参数需要设置,比如卷积或池化时候设置的步长等。
def create_CNN(input_data, num_classes, keep_prop):

    """
    Builds the CNN architecture by stacking conv, relu, pool, dropout, and fully connected layers.
    :param input_data:patch data to be processed.
    :param num_classes:Number of classes in the dataset. It helps determining the number of outputs in the last fully connected layer.
    :param keep_prop:probability of dropping neurons in the dropout layer.
    :return: last fully connected layer.
    """
    #Preparing the first convolution layer.
    filters1, conv_layer1 = create_conv_layer(input_data=input_data, filter_size=5, num_filters=4)
    """
    Applying ReLU activation function over the conv layer output.
    It returns a new array of the same shape as the input array.
    """
    relu_layer1 = tensorflow.nn.relu(conv_layer1)
    print("Size of relu1 result : ", relu_layer1.shape)
    """
    Max pooling is applied to the ReLU layer result to achieve translation invariance.
    It returns a new array of a different shape from the the input array relative to the strides and kernel size used.
    """
    max_pooling_layer1 = tensorflow.nn.max_pool(value=relu_layer1,
                                                ksize=[1, 2, 2, 1],
                                                strides=[1, 1, 1, 1],
                                                padding="VALID")
    print("Size of maxpool1 result : ", max_pooling_layer1.shape)

    #Similar to the previous conv-relu-pool layers, new layers are just stacked to complete the CNN architecture.
    #Conv layer with 3 filters and each filter is of sisze of 5x5.
    filters2, conv_layer2 = create_conv_layer(input_data=max_pooling_layer1, filter_size=7, num_filters=3)
    relu_layer2 = tensorflow.nn.relu(conv_layer2)
    print("Size of relu2 result : ", relu_layer2.shape)
    max_pooling_layer2 = tensorflow.nn.max_pool(value=relu_layer2,
                                                ksize=[1, 2, 2, 1],
                                                strides=[1, 1, 1, 1],
                                                padding="VALID")
    print("Size of maxpool2 result : ", max_pooling_layer2.shape)

    #Conv layer with 2 filters and a filter sisze of 5x5.
    filters3, conv_layer3 = create_conv_layer(input_data=max_pooling_layer2, filter_size=5, num_filters=2)
    relu_layer3 = tensorflow.nn.relu(conv_layer3)
    print("Size of relu3 result : ", relu_layer3.shape)
    max_pooling_layer3 = tensorflow.nn.max_pool(value=relu_layer3,
                                                ksize=[1, 2, 2, 1],
                                                strides=[1, 1, 1, 1],
                                                padding="VALID")
    print("Size of maxpool3 result : ", max_pooling_layer3.shape)

    #Adding dropout layer before the fully connected layers to avoid overfitting.
    flattened_layer = dropout_flatten_layer(previous_layer=max_pooling_layer3, keep_prop=keep_prop)

    #First fully connected (FC) layer. It accepts the result of the dropout layer after being flattened (1D).
    fc_resultl = fc_layer(flattened_layer=flattened_layer, num_inputs=flattened_layer.get_shape()[1:].num_elements(),
                          num_outputs=200)
    #Second fully connected layer accepting the output of the previous fully connected layer. Number of outputs is equal to the number of dataset classes.
    fc_result2 = fc_layer(flattened_layer=fc_resultl, num_inputs=fc_resultl.get_shape()[1:].num_elements(),
                          num_outputs=num_classes)
    print("Fully connected layer results : ", fc_result2)
    return fc_result2#Returning the result of the last FC layer.
由于卷积层将输入数据与设置的卷积核进行卷积运算,因此create_CNN函数将输入数据作为输入参数,这些数据是由get_dataset_images函数返回的数据。create_conv_layer函数接收输入数据、过滤器大小和过滤器数量,并返回输入数据与过滤器集合进行卷积的结果。这组滤波器的大小根据输入图像的深度而设置。 create_conv_layer的定义如下:
def create_conv_layer(input_data, filter_size, num_filters):

    """
    Builds the CNN convolution (conv) layer.
    :param input_data:patch data to be processed.
    :param filter_size:#Number of rows and columns of each filter. It is expected to have a rectangular filter.
    :param num_filters:Number of filters.
    :return:The last fully connected layer of the network.
    """
    """
    Preparing the filters of the conv layer by specifiying its shape.
    Number of channels in both input image and each filter must match.
    Because number of channels is specified in the shape of the input image as the last value, index of -1 works fine.
    """
    filters = tensorflow.Variable(tensorflow.truncated_normal(shape=(filter_size, filter_size, tensorflow.cast(input_data.shape[-1], dtype=tensorflow.int32), num_filters),
                                                              stddev=0.05))
    print("Size of conv filters bank : ", filters.shape)

    """
    Building the convolution layer by specifying the input data, filters, strides along each of the 4 dimensions, and the padding.
    Padding value of 'VALID' means the some borders of the input image will be lost in the result based on the filter size.
    """
    conv_layer = tensorflow.nn.conv2d(input=input_data,
                                      filter=filters,
                                      strides=[1, 1, 1, 1],
                                      padding="VALID")
    print("Size of conv result : ", conv_layer.shape)
    return filters, conv_layer#Returing the filters and the convolution layer result.
对于dropout层,接收一个保持神经元的概率参数,它表明会有多少神经元在dropout层被丢弃。 dropout层是使用dropout_flatten_layer函数实现,如下所示:
ef dropout_flatten_layer(previous_layer, keep_prop):

    """
    Applying the dropout layer.
    :param previous_layer: Result of the previous layer to the dropout layer.
    :param keep_prop: Probability of keeping neurons.
    :return: flattened array.
    """
    dropout = tensorflow.nn.dropout(x=previous_layer, keep_prob=keep_prop)
    num_features = dropout.get_shape()[1:].num_elements()
    layer = tensorflow.reshape(previous_layer, shape=(-1, num_features))#Flattening the results.
    return layer
由于最后一个FC层的输出神经元数应等于数据集类别数量,因此数据集类的数量将用作create_CNN函数的另一个输入参数。全连接层是使用fc_layer函数创建,该函数接收dropout层输出结果,输出结果中的特征数量以及来自此FC层的输出神经元的数量。根据输入和输出的数量,创建一个权重张量,然后乘以flattened_layer得到FC层的返回结果。
def fc_layer(flattened_layer, num_inputs, num_outputs):
"""
uilds a fully connected (FC) layer.
:param flattened_layer: Previous layer after being flattened.
:param num_inputs: Number of inputs in the previous layer.
:param num_outputs: Number of outputs to be returned in such FC layer.
:return:
"""
#Preparing the set of weights for the FC layer. It depends on the number of inputs and number of outputs.
fc_weights = tensorflow.Variable(tensorflow.truncated_normal(shape=(num_inputs, num_outputs),
stddev=0.05))
#Matrix multiplication between the flattened array and the set of weights.
fc_resultl = tensorflow.matmul(flattened_layer, fc_weights)
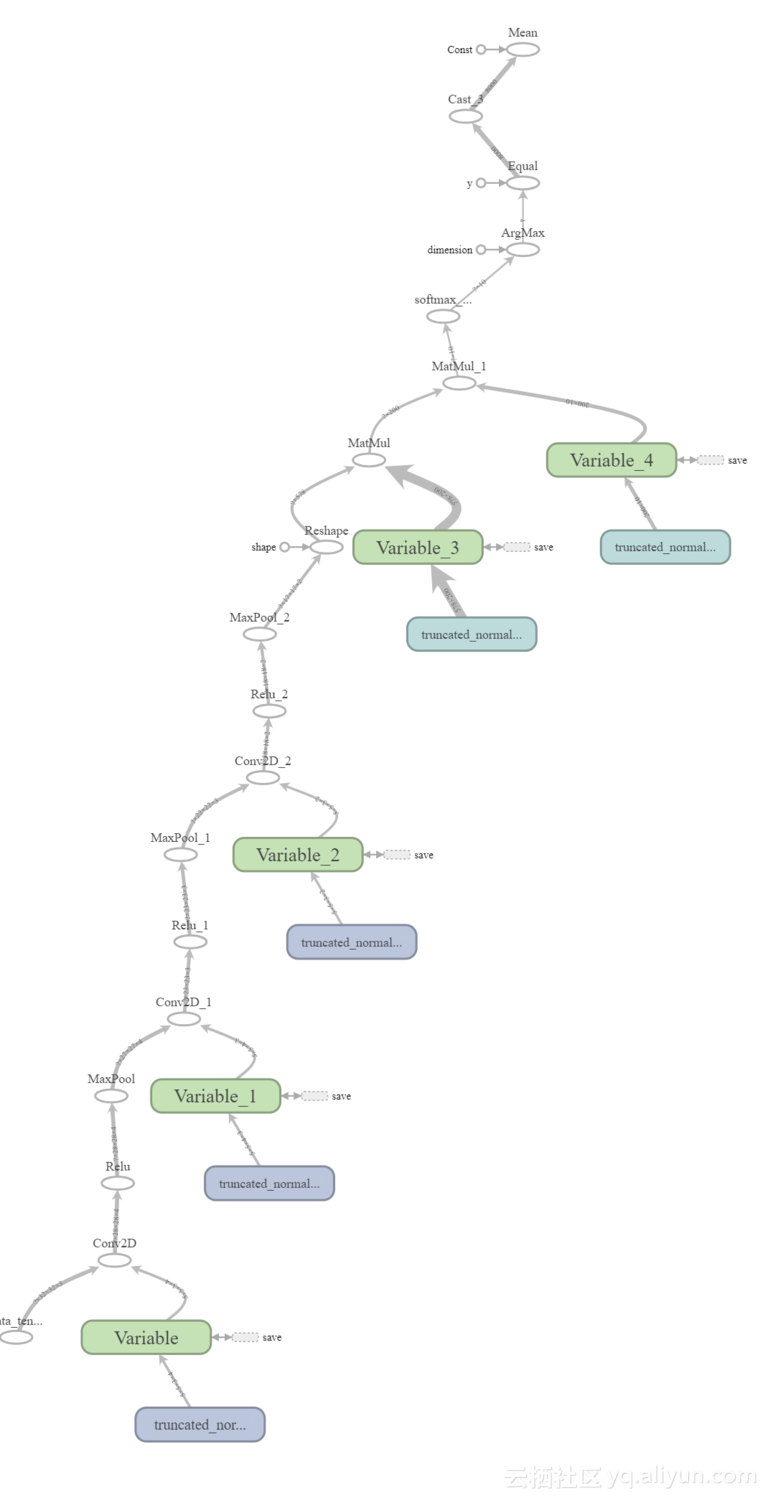
return fc_resultl#Output of the FC layer (result of matrix multiplication).使用TensorBoard可以可视化网络模型结构,如下图所示:
4.训练CNN模型
在构建好CNN模型之后,下一步就是使用之前处理的训练数据进行模型训练,代码如下所示。代码首先准备训练数据的路径,然后调用之前的讨论过的函数,训练的CNN使用梯度下降算法,优化方式是尽可能最小化代价函数。
#Nnumber of classes in the dataset. Used to specify number of outputs in the last fully connected layer.
num_datatset_classes = 10
#Number of rows & columns in each input image. The image is expected to be rectangular Used to reshape the images and specify the input tensor shape.
im_dim = 32
#Number of channels in rach input image. Used to reshape the images and specify the input tensor shape.
num_channels = 3

#Directory at which the training binary files of the CIFAR10 dataset are saved.
patches_dir = "C:\\Users\\Dell\\Downloads\\Compressed\\cifar-10-python\\cifar-10-batches-py\\"
#Reading the CIFAR10 training binary files and returning the input data and output labels. Output labels are used to test the CNN prediction accuracy.
dataset_array, dataset_labels = get_dataset_images(dataset_path=patches_dir, im_dim=im_dim, num_channels=num_channels)
print("Size of data : ", dataset_array.shape)

"""
Input tensor to hold the data read above. It is the entry point of the computational graph.
The given name of 'data_tensor' is useful for retreiving it when restoring the trained model graph for testing.
"""
data_tensor = tensorflow.placeholder(tensorflow.float32, shape=[None, im_dim, im_dim, num_channels], name='data_tensor')

"""
Tensor to hold the outputs label.
The name "label_tensor" is used for accessing the tensor when tesing the saved trained model after being restored.
"""
label_tensor = tensorflow.placeholder(tensorflow.float32, shape=[None], name='label_tensor')

#The probability of dropping neurons in the dropout layer. It is given a name for accessing it later.
keep_prop = tensorflow.Variable(initial_value=0.5, name="keep_prop")

#Building the CNN architecure and returning the last layer which is the fully connected layer.
fc_result2 = create_CNN(input_data=data_tensor, num_classes=num_datatset_classes, keep_prop=keep_prop)

"""
Predicitions probabilities of the CNN for each training sample.
Each sample has a probability for each of the 10 classes in the dataset.
Such tensor is given a name for accessing it later.
"""
softmax_propabilities = tensorflow.nn.softmax(fc_result2, name="softmax_probs")

"""
Predicitions labels of the CNN for each training sample.
The input sample is classified as the class of the highest probability.
axis=1 indicates that maximum of values in the second axis is to be returned. This returns that maximum class probability fo each sample.
"""
softmax_predictions = tensorflow.argmax(softmax_propabilities, axis=1)

#Cross entropy of the CNN based on its calculated probabilities.
cross_entropy = tensorflow.nn.softmax_cross_entropy_with_logits(logits=tensorflow.reduce_max(input_tensor=softmax_propabilities, reduction_indices=[1]),
                                                                labels=label_tensor)
#Summarizing the cross entropy into a single value (cost) to be minimized by the learning algorithm.
cost = tensorflow.reduce_mean(cross_entropy)
#Minimizng the network cost using the Gradient Descent optimizer with a learning rate is 0.01.
error = tensorflow.train.GradientDescentOptimizer(learning_rate=.01).minimize(cost)

#Creating a new TensorFlow Session to process the computational graph.
sess = tensorflow.Session()
#Wiriting summary of the graph to visualize it using TensorBoard.
tensorflow.summary.FileWriter(logdir="./log/", graph=sess.graph)
#Initializing the variables of the graph.
sess.run(tensorflow.global_variables_initializer())

"""
Because it may be impossible to feed the complete data to the CNN on normal machines, it is recommended to split the data into a number of patches.
A percent of traning samples is used to create each path. Samples for each path can be randomly selected.
"""
num_patches = 5#Number of patches
for patch_num in numpy.arange(num_patches):
    print("Patch : ", str(patch_num))
    percent = 80 #percent of samples to be included in each path.
    #Getting the input-output data of the current path.
    shuffled_data, shuffled_labels = get_patch(data=dataset_array, labels=dataset_labels, percent=percent)
    #Data required for cnn operation. 1)Input Images, 2)Output Labels, and 3)Dropout probability
    cnn_feed_dict = {data_tensor: shuffled_data,
                     label_tensor: shuffled_labels,
                     keep_prop: 0.5}
    """
    Training the CNN based on the current patch.
    CNN error is used as input in the run to minimize it.
    SoftMax predictions are returned to compute the classification accuracy.
    """
    softmax_predictions_, _ = sess.run([softmax_predictions, error], feed_dict=cnn_feed_dict)
    #Calculating number of correctly classified samples.
    correct = numpy.array(numpy.where(softmax_predictions_ == shuffled_labels))
    correct = correct.size
    print("Correct predictions/", str(percent * 50000/100), ' : ', correct)
与其将整个数据集一下子送入网络中去,不如将数据分为一批数据块(patch),将数据块分批次送入网络之中形成一个循环。每个数据块都包含训练数据的子集,这些数据块使用get_patch函数返回,该函数接收的参数为输入数据、标签以及返回的百分数,函数根据百分数划分子集。
def get_patch(data, labels, percent=70):

    """
    Returning patch to train the CNN.
    :param data: Complete input data after being encoded and reshaped.
    :param labels: Labels of the entire dataset.
    :param percent: Percent of samples to get returned in each patch.
    :return: Subset of the data (patch) to train the CNN model.
    """
    #Using the percent of samples per patch to return the actual number of samples to get returned.
    num_elements = numpy.uint32(percent*data.shape[0]/100)
    shuffled_labels = labels#Temporary variable to hold the data after being shuffled.
    numpy.random.shuffle(shuffled_labels)#Randomly reordering the labels.
    """
    The previously specified percent of the data is returned starting from the beginning until meeting the required number of samples.
    The labels indices are also used to return their corresponding input images samples.
    """
    return data[shuffled_labels[:num_elements], :, :, :], shuffled_labels[:num_elements]
5.保存训练好的CNN模型
在训练好CNN模型之后,需要保存训练好的参数以便测试时使用,保存路径由你指定,代码如下:
#Saving the model after being trained.
saver = tensorflow.train.Saver()
save_model_path = "C:\\model\\"
save_path = saver.save(sess=sess, save_path=save_model_path+"model.ckpt")
print("Model saved in : ", save_path)
6.准备测试数据并加载训练好的CNN模型
在测试之前,需要准备测试数据并恢复以前的训练模型。测试数据准备与训练数据准备的情况类似,不同的是只有一个二进制文件需要解码,根据修改后的get_dataset_images函数对测试文件进行解码,该函数完全按照训练数据所做的那样调用unpickle_patch函数:
def get_dataset_images(test_path_path, im_dim=32, num_channels=3):

    """
    Similar to the one used in training except that there is just a single testing binary file for testing the CIFAR10 trained models.
    """
    print("Working on testing patch")
    data_dict = unpickle_patch(test_path_path)
    images_data = data_dict[b"data"]
    dataset_array = numpy.reshape(images_data, newshape=(len(images_data), im_dim, im_dim, num_channels))
    return dataset_array, data_dict[b"labels"]
7.测试CNN模型
准备好测试数据并恢复训练好的模型后,可以按照以下代码开始测试模型。值得一提的是,目标是仅返回输入样本的网络预测结果,这也是TF会话运行只返回预测的原因。此外,与训练CNN时会话将尽可能降低代价不同的是,在测试中并不想将成本降到最低,而是关注于预测精度。另一个有趣的地方是,dropout层的概率设置为1,即不丢弃任何节点。
#Dataset path containing the testing binary file to be decoded.
patches_dir = "C:\\Users\\Dell\\Downloads\\Compressed\\cifar-10-python\\cifar-10-batches-py\\"
dataset_array, dataset_labels = get_dataset_images(test_path_path=patches_dir + "test_batch", im_dim=32, num_channels=3)
print("Size of data : ", dataset_array.shape)

sess = tensorflow.Session()

#Restoring the previously saved trained model.
saved_model_path = 'C:\\Users\\Dell\\Desktop\\model\\'
saver = tensorflow.train.import_meta_graph(saved_model_path+'model.ckpt.meta')
saver.restore(sess=sess, save_path=saved_model_path+'model.ckpt')

#Initalizing the varaibales.
sess.run(tensorflow.global_variables_initializer())

graph = tensorflow.get_default_graph()

"""
Restoring previous created tensors in the training phase based on their given tensor names in the training phase.
Some of such tensors will be assigned the testing input data and their outcomes (data_tensor, label_tensor, and keep_prop).
Others are helpful in assessing the model prediction accuracy (softmax_propabilities and softmax_predictions).
"""
softmax_propabilities = graph.get_tensor_by_name(name="softmax_probs:0")
softmax_predictions = tensorflow.argmax(softmax_propabilities, axis=1)
data_tensor = graph.get_tensor_by_name(name="data_tensor:0")
label_tensor = graph.get_tensor_by_name(name="label_tensor:0")
keep_prop = graph.get_tensor_by_name(name="keep_prop:0")

#keep_prop is equal to 1 because there is no more interest to remove neurons in the testing phase.
feed_dict_testing = {data_tensor: dataset_array,
                     label_tensor: dataset_labels,
                     keep_prop: 1.0}
#Running the session to predict the outcomes of the testing samples.
softmax_propabilities_, softmax_predictions_ = sess.run([softmax_propabilities, softmax_predictions],
                                                      feed_dict=feed_dict_testing)
#Assessing the model accuracy by counting number of correctly classified samples.
correct = numpy.array(numpy.where(softmax_predictions_ == dataset_labels))
correct = correct.size
print("Correct predictions/10,000 : ", correct)
8.构建Flask web应用
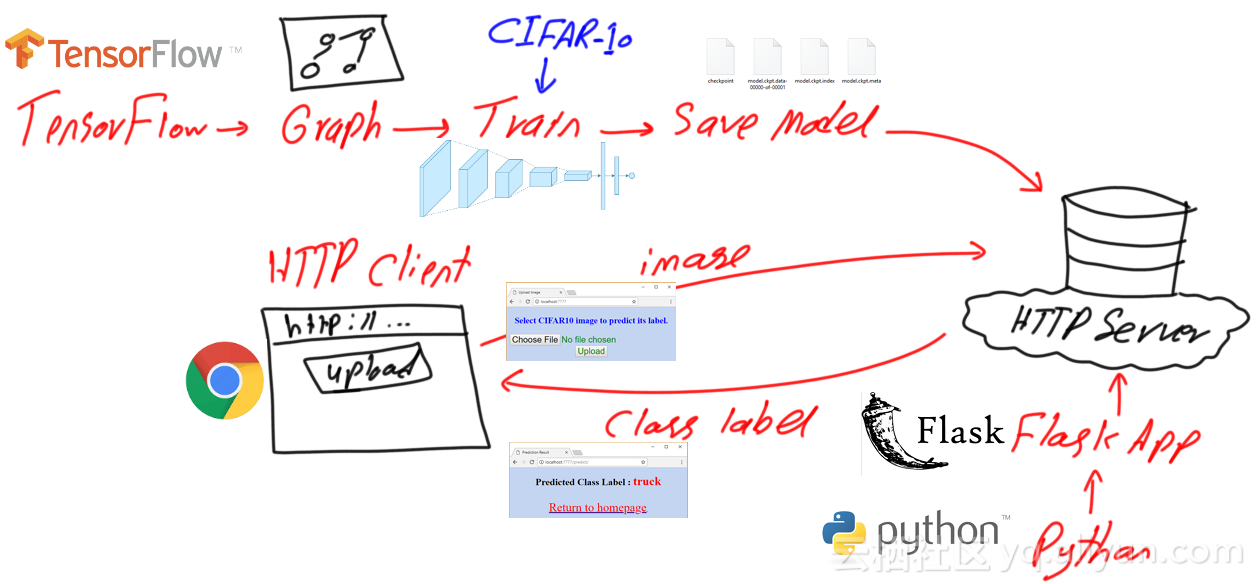
在训练好CNN模型后,将它加入到HTTP服务器中,并允许用户在线使用。使用者将使用HTTP客户端上传一张图像,该图像之后会被HTTP服务器(Flask web应用)接收,该应用将基于训练好的CNN模型预测该图像的类别,并最终将类别返还给HTTP客户端。整个过程如下图所示:
import flask
#Creating a new Flask Web application. It accepts the package name.
app = flask.Flask("CIFAR10_Flask_Web_App")

"""
To activate the Web server to receive requests, the application must run.
A good practice is to check whether the file is whether the file called from an external Python file or not.
If not, then it will run.
"""
if __name__ == "__main__":
    """
    In this example, the app will run based on the following properties:
    host: localhost
    port: 7777
    debug: flag set to True to return debugging information.
    """
    app.run(host="localhost", port=7777, debug=True)
目前,服务器没有提供任何功能。服务器应该做的第一件事是允许用户上传图像,当用户访问该应用程序的根URL时,该应用程序不会执行任何操作。应用程序可以将用户重定向到用户可以上传图像的HTML页面。为此,该应用程序有一个redirect_upload的函数,可将用户重定向到用于上传图像的页面,让用户在访问应用程序根目录后执行此函数能的是使用以下行创建的路由:
app.add_url_rule(rule="/", endpoint="homepage", view_func=redirect_upload)上行代码表示:如果用户访问应用程序的根目录(标记为“/”),则将调用查看函数(redirect_upload)。除了渲染upload_image.html的HTML页面之外,这个函数什么也不做,此页面位于服务器的特殊模板目录下。模板目录内的页面通过调用render_template函数来呈现。
def redirect_upload():

    """
    A viewer function that redirects the Web application from the root to a HTML page for uploading an image to get classified.
    The HTML page is located under the /templates directory of the application.
    :return: HTML page used for uploading an image. It is 'upload_image.html' in this exmaple.
    """
    return flask.render_template(template_name_or_list="upload_image.html")
"""
Creating a route between the homepage URL (http://localhost:7777) to a viewer function that is called after getting to such URL.
Endpoint 'homepage' is used to make the route reusable without hard-coding it later.
"""
app.add_url_rule(rule="/", endpoint="homepage", view_func=redirect_upload)
HTML页面的屏幕显示如下图所示:
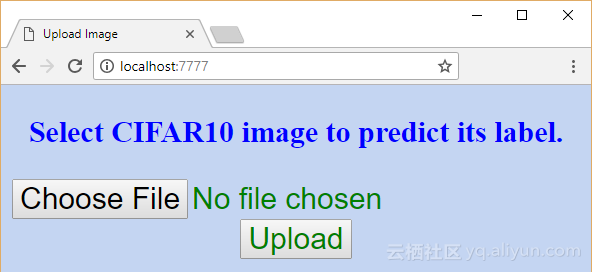
以下代码是上图页面的HTML代码,实现的功能也很简单,允许用户上传一张图像,当提交此类表单时,POST HTTP消息将被返回给URL:
http://localhost:7777/upload/
<!DOCTYPE html>
<html lang="en">
<head>
    <link rel="stylesheet" type="text/css" href="{{url_for(endpoint='static', filename='project_styles.css')}}">
    <meta charset="UTF-8">
    <title>Upload Image</title>
</head>
<body>
<form enctype="multipart/form-data" method="post" action="http://localhost:7777/upload/">
    <center>
    <h3>Select CIFAR10 image to predict its label.</h3>
    <input type="file" name="image_file" accept="image/*"><br>
    <input type="submit" value="Upload">
    </center>
</form>
</body>
</html>
在从HTML表单返回到服务器之后,将调用与action表单属性中指定URL关联的查看函数upload_image,该函数获取用户选择的图像并将其保存到服务器。
def upload_image():

    """
    Viewer function that is called in response to getting to the 'http://localhost:7777/upload' URL.
    It uploads the selected image to the server.
    :return: redirects the application to a new page for predicting the class of the image.
    """
    #Global variable to hold the name of the image file for reuse later in prediction by the 'CNN_predict' viewer functions.
    global secure_filename
    if flask.request.method == "POST":#Checking of the HTTP method initiating the request is POST.
        img_file = flask.request.files["image_file"]#Getting the file name to get uploaded.
        secure_filename = werkzeug.secure_filename(img_file.filename)#Getting a secure file name. It is a good practice to use it.
        img_path = os.path.join(app.root_path, secure_filename)#Preparing the full path under which the image will get saved.
        img_file.save(img_path)#Saving the image in the specified path.
        print("Image uploaded successfully.")
        """
        After uploading the image file successfully, next is to predict the class label of it.
        The application will fetch the URL that is tied to the HTML page responsible for prediction and redirects the browser to it.
        The URL is fetched using the endpoint 'predict'.
        """
        return flask.redirect(flask.url_for(endpoint="predict"))
    return "Image upload failed."
"""
Creating a route between the URL (http://localhost:7777/upload) to a viewer function that is called after navigating to such URL.
Endpoint 'upload' is used to make the route reusable without hard-coding it later.
The set of HTTP method the viewer function is to respond to is added using the 'methods' argument.
In this case, the function will just respond to requests of method of type POST.
"""
app.add_url_rule(rule="/upload/", endpoint="upload", view_func=upload_image, methods=["POST"])
将图像成功上传到服务器后,已准备好读取图像并使用之前训练过的CNN模型预测其类别标签。基于此,upload_image函数将应用程序重定向到负责预测图像类标签的查看器函数。这个查看器功能是通过它的端点(endpoint)来达到的,如下行所指定的:
return flask.redirect(flask.url_for(endpoint="predict"))负责预测图像类别标签的函数CNN_predict定义如下:
def CNN_predict():

    """
    Reads the uploaded image file and predicts its label using the saved pre-trained CNN model.
    :return: Either an error if the image is not for CIFAR10 dataset or redirects the browser to a new page to show the prediction result if no error occurred.
    """
    """
    Setting the previously created 'secure_filename' to global.
    This is because to be able invoke a global variable created in another function, it must be defined global in the caller function.
    """
    global secure_filename
    #Reading the image file from the path it was saved in previously.
    img = scipy.misc.imread(os.path.join(app.root_path, secure_filename))

    """
    Checking whether the image dimensions match the CIFAR10 specifications.
    CIFAR10 images are RGB (i.e. they have 3 dimensions). It number of dimenions was not equal to 3, then a message will be returned.
    """
    if(img.ndim) == 3:
        """
        Checking if the number of rows and columns of the read image matched CIFAR10 (32 rows and 32 columns).
        """
        if img.shape[0] == img.shape[1] and img.shape[0] == 32:
            """
            Checking whether the last dimension of the image has just 3 channels (Red, Green, and Blue).
            """
            if img.shape[-1] == 3:
                """
                Passing all conditions above, the image is proved to be of CIFAR10.
                This is why it is passed to the predictor.
                """
                predicted_class = CIFAR10_CNN_Predict_Image.main(img)
                """
                After predicting the class label of the input image, the prediction label is rendered on an HTML page.
                The HTML page is fetched from the /templates directory. The HTML page accepts an input which is the predicted class.
                """
                return flask.render_template(template_name_or_list="prediction_result.html", predicted_class=predicted_class)
            else:
                # If the image dimensions do not match the CIFAR10 specifications, then an HTML page is rendered to show the problem.
                return flask.render_template(template_name_or_list="error.html", img_shape=img.shape)
        else:
            # If the image dimensions do not match the CIFAR10 specifications, then an HTML page is rendered to show the problem.
            return flask.render_template(template_name_or_list="error.html", img_shape=img.shape)
    return "An error occurred."#Returned if there is a different error other than wrong image dimensions.
"""
Creating a route between the URL (http://localhost:7777/predict) to a viewer function that is called after navigating to such URL.
Endpoint 'predict' is used to make the route reusable without hard-coding it later.
"""
app.add_url_rule(rule="/predict/", endpoint="predict", view_func=CNN_predict)
负责预测图像类别标签的主函数定义如下,它加载训练好的模型并运行会话,返回图像的预测类别,预测的类别将返回到Flask Web应用程序。