转载请注明出处:http://blog.csdn.net/crazy1235/article/details/70175185
构造LayoutInflater
- 获取系统服务
LayoutInflater inflater = (LayoutInflater) getSystemService(Context.LAYOUT_INFLATER_SERVICE);- from(Context)
LayoutInflater inflater = LayoutInflater.from(this);- Activity.getLayoutInflater()
LayoutInflater inflater = getLayoutInflater();其实后两种方式方法内部都是通过方式一的形式获取系统服务
LayoutInflater.from(Context) 的方法体:
/**
     * Obtains the LayoutInflater from the given context.
     */
    public static LayoutInflater from(Context context) {
        LayoutInflater LayoutInflater =
                (LayoutInflater) context.getSystemService(Context.LAYOUT_INFLATER_SERVICE);
        if (LayoutInflater == null) {
            throw new AssertionError("LayoutInflater not found.");
        }
        return LayoutInflater;
    }
getLayoutInflater() 的方式稍复杂一点
@NonNull
    public LayoutInflater getLayoutInflater() {
        return getWindow().getLayoutInflater();
    }
在Activity.java中,通过调用getWindow().getLayoutInflater()来后去LayoutInflater实例!
getWindow()得到的是一个Window对象。
private Window mWindow;final void attach(Context context, ActivityThread aThread,
Instrumentation instr, IBinder token, int ident,
Application application, Intent intent, ActivityInfo info,
CharSequence title, Activity parent, String id,
NonConfigurationInstances lastNonConfigurationInstances,
Configuration config, String referrer, IVoiceInteractor voiceInteractor,
Window window) {
attachBaseContext(context);
mFragments.attachHost(null /*parent*/);
// 重点在这里
mWindow = new PhoneWindow(this, window);
//
mWindow.setWindowControllerCallback(this);
mWindow.setCallback(this);
mWindow.setOnWindowDismissedCallback(this);
mWindow.getLayoutInflater().setPrivateFactory(this);
// ... 省略若干代码 ...
mWindow.setWindowManager(
(WindowManager)context.getSystemService(Context.WINDOW_SERVICE),
mToken, mComponent.flattenToString(),
(info.flags & ActivityInfo.FLAG_HARDWARE_ACCELERATED) != 0);
if (mParent != null) {
mWindow.setContainer(mParent.getWindow());
}
mWindowManager = mWindow.getWindowManager();
mCurrentConfig = config;
}在Activity类中的 attach() 函数体内
new 了一个 PhoneWindow() 窗体对象。
PhoneWindow.java中有getLayoutInflater() 函数。该函数直接返回了一个LayoutInflater对象。
@Override
    public LayoutInflater getLayoutInflater() {
        return mLayoutInflater;
    }
而这个对象时在new PhoneWindow()的时候 创建的。
public PhoneWindow(Context context) {
        super(context);
        mLayoutInflater = LayoutInflater.from(context);
    }
由此可见, getLayoutInflater() 内部是通过LayoutInflater.from(context),最终还是通过getSystemService(Context.LAYOUT_INFLATER_SERVICE) 来获取LayoutInflater 对象!
LayoutInfalter的使用
public View inflate(@LayoutRes int resource, @Nullable ViewGroup root) {
        return inflate(resource, root, root != null);
    }
public View inflate(XmlPullParser parser, @Nullable ViewGroup root) {
return inflate(parser, root, root != null);
}public View inflate(@LayoutRes int resource, @Nullable ViewGroup root, boolean attachToRoot) {
final Resources res = getContext().getResources();
if (DEBUG) {
Log.d(TAG, "INFLATING from resource: \"" + res.getResourceName(resource) + "\" ("
+ Integer.toHexString(resource) + ")");
}
final XmlResourceParser parser = res.getLayout(resource);
try {
return inflate(parser, root, attachToRoot);
} finally {
parser.close();
}
}
public View inflate(XmlPullParser parser, @Nullable ViewGroup root, boolean attachToRoot) {

        synchronized (mConstructorArgs) {
            // ... 省略代码 ...

            View result = root;  // !!!!

            try {

                int type;

                // ... 省略代码 ...

                final String name = parser.getName();

                // 1.
                if (TAG_MERGE.equals(name)) {
                    if (root == null || !attachToRoot) {
                        throw new InflateException("<merge /> can be used only with a valid "
                                + "ViewGroup root and attachToRoot=true");
                    }

                // 2.
                rInflate(parser, root, inflaterContext, attrs, false);

                } else {

                // 3.
                    // Temp is the root view that was found in the xml
                    final View temp = createViewFromTag(root, name, inflaterContext, attrs);

                    ViewGroup.LayoutParams params = null;

                    if (root != null) { // 4.
                        if (DEBUG) {
                            System.out.println("Creating params from root: " +
                                    root);
                        }
                        // Create layout params that match root, if supplied

                        // 5.
                        params = root.generateLayoutParams(attrs);

                        if (!attachToRoot) { // 6.
                            // Set the layout params for temp if we are not
                            // attaching. (If we are, we use addView, below)
                            temp.setLayoutParams(params);
                        }
                    }


                    // 7.
                    rInflateChildren(parser, temp, attrs, true);

                    // 8.
                    // We are supposed to attach all the views we found (int temp)
                    // to root. Do that now.
                    if (root != null && attachToRoot) {
                        root.addView(temp, params);
                    }

                    // 9.
                    // Decide whether to return the root that was passed in or the
                    // top view found in xml.
                    if (root == null || !attachToRoot) {
                        result = temp;
                    }
                }

            } catch (XmlPullParserException e) {
                // ... 省略代码 ...
            } finally {
                // ... 省略代码 ...
            }

            return result;
        }
    }
我们通常那都是使用第一种和第三种重载函数!
但是所有的inflate重载函数最终都是调用了第四个重载方法!
先来收一下inflate()函数的使用
我们通常用在布局文件中动态添加view,还有就是在ListView或者RecyclerView加载item布局。
其实重要的就是inflate的那三个参数的值
@LayoutRes int resource, @Nullable ViewGroup root, boolean attachToRoot举个例子:
在Activity中动态添加一个布局
test_layout.xml – 被添加的布局
<TextView xmlns:android="http://schemas.android.com/apk/res/android"
    xmlns:app="http://schemas.android.com/apk/res-auto"
    android:id="@+id/text_view"
    android:layout_width="100dp"
    android:layout_height="100dp"
    android:background="#E0EEE0"
    android:gravity="center"
    android:padding="10dp"
    android:text="123456"
    android:textSize="20sp"
    android:textStyle="bold" />
activity_test_layout_inflater.xml — Activity布局文件
<?xml version="1.0" encoding="utf-8"?>
<LinearLayout xmlns:android="http://schemas.android.com/apk/res/android"
    xmlns:app="http://schemas.android.com/apk/res-auto"
    xmlns:tools="http://schemas.android.com/tools"
    android:id="@+id/root_layout"
    android:layout_width="match_parent"
    android:layout_height="match_parent"
    android:orientation="vertical" >

     <LinearLayout
        android:id="@+id/content_layout"
        android:layout_width="100dp"
        android:layout_height="80dp"
        android:background="@android:color/holo_blue_light"
        android:orientation="vertical" />

</LinearLayout>
情况一:root == null
@Override
    protected void onCreate(Bundle savedInstanceState) {
        super.onCreate(savedInstanceState);
        setContentView(R.layout.activity_test_layout_inflater);

        rootLayout = (LinearLayout) findViewById(R.id.root_layout);

        LayoutInflater inflater = getLayoutInflater();
        View tempLayout = inflater.inflate(R.layout.test_layout, null); // 两个参数

        rootLayout.addView(tempLayout);
    }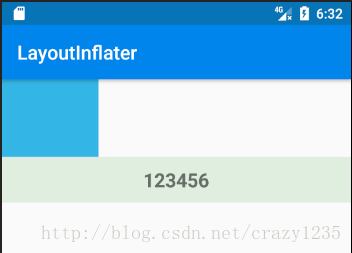
可以看出,TextView的宽高并不是我们设置的100dp。
情况二:root != nul , attachToRoot = false
LayoutInflater inflater = getLayoutInflater();
// !!!
View tempLayout = inflater.inflate(R.layout.test_layout, rootLayout, false);
rootLayout.addView(tempLayout);
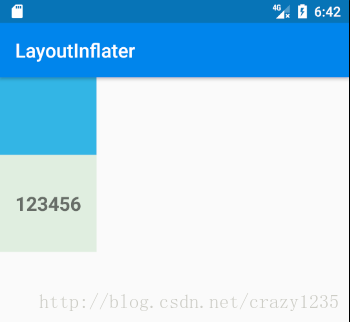
此时,我们设置的100dp的宽高生效了!
情况三:root != nul , attachToRoot = true
LayoutInflater inflater = getLayoutInflater();
// !!!
View tempLayout = inflater.inflate(R.layout.test_layout, rootLayout, true);
rootLayout.addView(tempLayout);
报错了~!!!!!~
Caused by: java.lang.IllegalStateException: The specified child already has a parent. You must call removeView() on the child's parent first.

at android.view.ViewGroup.addViewInner(ViewGroup.java:4417)
at android.view.ViewGroup.addView(ViewGroup.java:4258)
at android.view.ViewGroup.addView(ViewGroup.java:4198)
at android.view.ViewGroup.addView(ViewGroup.java:4171)
at com.jacksen.demo.view.layoutinflater.xxxx.onCreate(TestLayoutInflaterActivity.java:37)
从错误信息看出,我们要添加的View有parent,但是从test_layout.xml 看到 TextView 就是根布局了,哪来的parent!!!???
此时尝试把 rootLayout.addView(tempLayout); 这行代码删除,再次运行
发现运行结果与情况二的一样。
分析情况
主要从inflater的第四个重载函数中找答案!
上面我贴出了 inflate(XmlPullParser parser, @Nullable ViewGroup root, boolean attachToRoot) 的主要代码,并在关键代码上做了注释标记。
1- 判断name 是否是 merge,如果是,接着判断root 和 attachToRoot,当(root == null || !attachToRoot) 时,会抛出异常!
merge标签 是用来 合并和减少布局层级的,root为空,或者不attach到root上 肯定不符合android的设计。
2- rInflate(parser, root, attrs); 这是一个递归函数!
3- createViewFromTag() 用来创建View对象
4- 判断 root是否为 null 。 在上面情况一时,root=null;情况二和情况三 root != null 是走这个方法体的。
5- params = root.generateLayoutParams(attrs); 这个函数比较重要!
它是根据root布局来生成子布局的 LayoutParams 。
从第四步和第五步可看出,只有root!=null 时,ViewGroup.LayoutParams params 才有值!
6- 当attachToRoot = false 时,也就是不绑定到root布局,将上一步生成LayoutParams 设置给temp,也就是设置给被添加的布局!
7- rInflateChildren(parser, temp, attrs, true); 该方法与上面的rInflate(parser, root, attrs) 很相似! 其实内部就是调用的rInflate() 方法。
final void rInflateChildren(XmlPullParser parser, View parent, AttributeSet attrs,
            boolean finishInflate) throws XmlPullParserException, IOException {
        rInflate(parser, parent, parent.getContext(), attrs, finishInflate);
    }
void rInflate(XmlPullParser parser, View parent, Context context,
AttributeSet attrs, boolean finishInflate) throws XmlPullParserException, IOException {
final int depth = parser.getDepth();
int type;
while (((type = parser.next()) != XmlPullParser.END_TAG ||
parser.getDepth() > depth) && type != XmlPullParser.END_DOCUMENT) {
if (type != XmlPullParser.START_TAG) {
continue;
}
final String name = parser.getName();
if (TAG_REQUEST_FOCUS.equals(name)) {
parseRequestFocus(parser, parent);
} else if (TAG_TAG.equals(name)) {
parseViewTag(parser, parent, attrs);
} else if (TAG_INCLUDE.equals(name)) {
if (parser.getDepth() == 0) {
throw new InflateException("<include /> cannot be the root element");
}
parseInclude(parser, context, parent, attrs);
} else if (TAG_MERGE.equals(name)) {
throw new InflateException("<merge /> must be the root element");
} else {
// 生成View
final View view = createViewFromTag(parent, name, context, attrs);
final ViewGroup viewGroup = (ViewGroup) parent;
final ViewGroup.LayoutParams params = viewGroup.generateLayoutParams(attrs);
// 递归调用
rInflateChildren(parser, view, attrs, true);
// 添加到父布局中
viewGroup.addView(view, params);
}
}
if (finishInflate) {
parent.onFinishInflate();
}
}调用rInflateChildren 时 第二个参数是temp,也就是temp_layout.xml的跟布局节点。
通过上面的源码可以看出,最终temp的各级子节点都被添加到了temp中。形成了一个DOM树!
8- 当 root != null && attachToRoot == true 时,直接将temp添加到root 中,并设置了上面生成的LayoutParams
9- 当 root == null 或者 attachToRoot == false 时,result = temp,最后返回的是temp_layout.xml这个布局结构!
总结
情况一中,root = null ,从inflate的第二个重载函数中看出,attachToRoot = false。
(root都为空了,当然也就不能attach到root了)。
此时没有执行函数4.5.6. ,直接执行了 7 9 。此时返回的result并没有设置LayoutParams 。
LayoutInflater inflater = getLayoutInflater();
View tempLayout = inflater.inflate(R.layout.test_layout, null);
Log.d("Test", "tempLayout.getLayoutParams() == null:" + (tempLayout.getLayoutParams() == null));
rootLayout.addView(tempLayout);
D/Test: tempLayout.getLayoutParams() == null:trueOK!
那么最后addView的时候为什么是 【宽度match_parent, 高度wrap_content (从界面上看感觉是)】呢?
来看下addView()的源码:
public void addView(View child) {
        addView(child, -1);
    }
public void addView(View child, int index) {
if (child == null) {
throw new IllegalArgumentException("Cannot add a null child view to a ViewGroup");
}
LayoutParams params = child.getLayoutParams();
if (params == null) {
params = generateDefaultLayoutParams();
if (params == null) {
throw new IllegalArgumentException("generateDefaultLayoutParams() cannot return null");
}
}
addView(child, index, params);
}上面看出,child.getLayoutParams() 为空时,调用 generateDefaultLayoutParams() 生成了一个默认的布局参数!
但是,但是,但是!
protected LayoutParams generateDefaultLayoutParams() {
        return new LayoutParams(LayoutParams.WRAP_CONTENT, LayoutParams.WRAP_CONTENT);
    }
这宽高都是WRAP_CONTENT 哇!!

哎,都亏了我这聪明的脑袋! O(∩_∩)O哈哈~

addView
rootLayout.addView(tempLayout);注意rootLayout 是一个LinearLayout对象, 而
LinearLayout extends ViewGroup
在LinearLayout中,重写了generateDefaultLayoutParams() 函数
@Override
    protected LayoutParams generateDefaultLayoutParams() {
        if (mOrientation == HORIZONTAL) {
            return new LayoutParams(LayoutParams.WRAP_CONTENT, LayoutParams.WRAP_CONTENT);
        } else if (mOrientation == VERTICAL) {
            return new LayoutParams(LayoutParams.MATCH_PARENT, LayoutParams.WRAP_CONTENT);
        }
        return null;
    }
而rootLayout的orientation又是 vertical,所以就生成了 new LayoutParams(LayoutParams.MATCH_PARENT, LayoutParams.WRAP_CONTENT)
故而,上面情况一的效果图是TextView宽度占满屏幕(准确的来说是rootLayout)的宽度,高度是wrap_content!
RelativeLayout也重写了该方法:
@Override
    protected ViewGroup.LayoutParams generateDefaultLayoutParams() {
        return new LayoutParams(LayoutParams.WRAP_CONTENT, LayoutParams.WRAP_CONTENT);
    }
FrameLayout:
@Override
    protected LayoutParams generateDefaultLayoutParams() {
        return new LayoutParams(LayoutParams.MATCH_PARENT, LayoutParams.MATCH_PARENT);
    }
情况二: root!= null, attachToRoot = false
if (root != null) {
        if (DEBUG) {
            System.out.println("Creating params from root: " +
                                    root);
        }
        // Create layout params that match root, if supplied
        params = root.generateLayoutParams(attrs);
        if (!attachToRoot) {
        // Set the layout params for temp if we are not
        // attaching. (If we are, we use addView, below)
        temp.setLayoutParams(params);
        }
}

//   省略代码

if (root == null || !attachToRoot) {
     result = temp;
 }
此时为temp设置了LayoutParams, 并且返回的是temp!
此时调用addView,就将设置的100dp宽高布局参数设置上去了!
情况三: root!= null, attachToRoot = true
if (root != null && attachToRoot) {
      root.addView(temp, params);
}这种情况下,直接将temp添加到root布局中,并设置params! 也就是此时已经将view添加到了root 之中!
但是最终return的时候,返回的是root !并不是temp !!!
故而如果在此时在调用 rootLayout.addView(tempLayout), 就必然会报错!就是上面情况三说的错误!
LayoutInflater inflater = getLayoutInflater();
View tempLayout = inflater.inflate(R.layout.test_layout, rootLayout, true);
Log.d("Test", "tempLayout.getLayoutParams() == null:" + (tempLayout.getLayoutParams() == null));
Log.d("TestLayoutInflaterActiv", tempLayout.toString());
Log.d("TestLayoutInflaterActiv", rootLayout.toString());
D/TestLayoutInflaterActiv: android.widget.LinearLayout{c35fec0 V.E...... ......I. 0,0-0,0 #7f11009a app:id/root_layout}
D/TestLayoutInflaterActiv: android.widget.LinearLayout{c35fec0 V.E...... ......I. 0,0-0,0 #7f11009a app:id/root_layout}
很明显,这种情况下inflate返回的view就是穿进去的root!
在ListView以及RecyclerView中,对应的这三种情况,大家可以自行去试试!这里不在介绍!
完结!