官方文档:
http://www.ansible.com.cn/docs/intro_installation.html#githubansible
server1:172.25.28.1 控制节点 rhel7.3 zabbix-server
server2:172.25.28.2 托管节点 rhel6.3
server3:172.25.28.3 托管节点 rhel6.3
部署
对管理节点的要求
目前,只要机器上安装了 Python 2.6 或 Python 2.7 (windows系统不可以做控制主机),都可以运行Ansible.
主机的系统可以是 Red Hat, Debian, CentOS, OS X, BSD的各种版本,等等.:
对托管节点的要求:
通常我们使用 ssh 与托管节点通信,默认使用 sftp.如果 sftp 不可用,可在 ansible.cfg 配置文件中配置成 scp 的方式. 在托管节点上也需要安装 Python 2.4 或以上的版本.
server1,server2,server3的其他服务关闭,server1配置为zabbix-server

免密登录
[root@server1 ~]# ssh-keygen

Generating public/private rsa key pair.

Enter file in which to save the key (/root/.ssh/id_rsa):

/root/.ssh/id_rsa already exists.

Overwrite (y/n)? y

Enter passphrase (empty for no passphrase):

Enter same passphrase again:

Your identification has been saved in /root/.ssh/id_rsa.

Your public key has been saved in /root/.ssh/id_rsa.pub.

The key fingerprint is:

1b:b5:99:0a:8a:b2:c4:49:22:0c:4a:62:2d:b8:65:72 root@server1

The key's randomart image is:

+--[ RSA 2048]----+

|                 |

|. .              |

|=+E.      .      |

|B*.      . +     |

|=o    . S +      |

|= .. . . +       |

|.+. .   o        |

|.o               |

|.                |

+-----------------+

[root@server1 ~]#

[root@server1 ~]# ssh-copy-id server1

/usr/bin/ssh-copy-id: INFO: attempting to log in with the new key(s), to filter out any that are already installed

/usr/bin/ssh-copy-id: INFO: 1 key(s) remain to be installed -- if you are prompted now it is to install the new keys

root@server1's password:


Number of key(s) added: 1


Now try logging into the machine, with:   "ssh 'server1'"

and check to make sure that only the key(s) you wanted were added.


[root@server1 ~]# ssh-copy-id 172.25.28.1

/usr/bin/ssh-copy-id: INFO: attempting to log in with the new key(s), to filter out any that are already installed


/usr/bin/ssh-copy-id: WARNING: All keys were skipped because they already exist on the remote system.


[root@server1 ~]# scp -r .ssh/ server2:

root@server2's password:

id_rsa                                   100% 1679     1.6KB/s   00:00

id_rsa.pub                               100%  394     0.4KB/s   00:00

known_hosts                              100% 1745     1.7KB/s   00:00

authorized_keys                          100%  394     0.4KB/s   00:00

[root@server1 ~]# scp -r .ssh/ server3:

root@server3's password:

id_rsa                                   100% 1679     1.6KB/s   00:00

id_rsa.pub                               100%  394     0.4KB/s   00:00

known_hosts                              100% 1745     1.7KB/s   00:00

authorized_keys                          100%  394     0.4KB/s   00:00
经过测试:server1,server2,server3可以互相连接
在管理节点上
1,安装pip及相应的模块,这里需要配置虚拟机可以上网
[root@server1 ~]# easy_install pip
[root@server1 ~]# pip install paramiko PyYAML Jinja2 httplib2 six
2,采用yum源安装:
[root@server1 ~]# yum install -y wget
[root@server1 ~]# wget http://dl.fedoraproject.org/pub/epel/epel-release-latest-7.noarch.rpm
[root@server1 ~]# rpm -ivh epel-release-latest-7.noarch.rpm
[root@server1 ~]# yum install ansible
安装完成
3,写管理节点配置文件
[root@server1 ansible]# vim hosts

[root@server1 ansible]# pwd
/etc/ansible
测试
1,ansible Client -m ping # 操作 Client 组 ( all 为操作 hosts 文件中所有主机 ),-m 指定执行 ping 模块

2,执行本地脚本
[root@server1 ~]# vim create.sh
[root@server1 ~]# cat create.sh
#!/bin/bash
echo nihao > test1

-m指定模板 -a指定模板参数
托管节点查看:
[root@server2 ~]# cat test1
nihao
[root@server3 ~]# cat test1
nihao
3,查看 Client 分组主机内存使用情况

4,执行远程脚本
[root@server2 ~]# cat del.sh
#!/bin/bash
rm -f test1 && echo ok!
[root@server3 ~]# cat del.sh
#!/bin/bash
rm -f test1 && echo ok!
!!!!必须要给脚本可执行权限

[root@server2 ~]# ll test1
ls: cannot access test1: No such file or directory
[root@server3 ~]# ll test1
ls: cannot access test1: No such file or directory
https://www.cnblogs.com/wangxiaoqiangs/p/5685239.html
利用Ansible-playbook自动部署zabbix-agent
使用 Ansible-playbook 可以完成一组复杂的动作,例如部署环境、搭建服务、修改配置等。
Playbooks 是 Ansible的配置,部署,编排语言.他们可以被描述为一个需要希望远程主机执行命令的方案,或者一组IT程序运行的命令集合.
注意:这里我添加一个server5:172.25.28.5,配置为和其他几个server SSH免密
1,定义需要部署的主机

2,利用Playbooks写Ansibles的部署语言
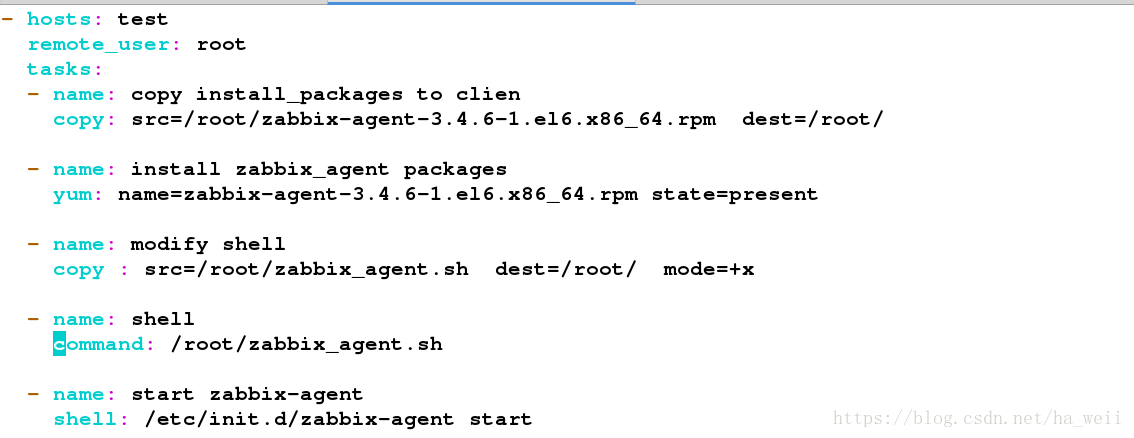
- hosts: test

  remote_user: root

  tasks:

  - name: copy install_packages to clien

    copy: src=/root/zabbix-agent-3.4.6-1.el6.x86_64.rpm  dest=/root/


  - name: install zabbix_agent packages

    yum: name=zabbix-agent-3.4.6-1.el6.x86_64.rpm state=present


  - name: modify shell

    copy : src=/root/zabbix_agent.sh  dest=/root/  mode=+x


  - name: shell

    command: /root/zabbix_agent.sh


  - name: start zabbix-agent

shell: /etc/init.d/zabbix-agent start
3,脚本文件

[root@server1 ~]# vim zabbix_agent.sh
#!/bin/bash

#ip=$(ifconfig eth0 | awk -F " " '/inet\>/{print $2}' | awk -F ":" '{print $2}')

host_name=`hostname`

sed -i  97d  /etc/zabbix/zabbix_agentd.conf

sed -i "97i Server=$ip" /etc/zabbix/zabbix_agentd.conf

sed -i  138d  /etc/zabbix/zabbix_agentd.conf

sed -i "138i ServerActive=172.25.28.1" /etc/zabbix/zabbix_agentd.conf

sed -i  149d  /etc/zabbix/zabbix_agentd.conf

sed -i "149i Hostname=$host_name" /etc/zabbix/zabbix_agentd.conf

rm -rf /root/zabbix-agent-3.4.6-1.el6.x86_64.rpm

rm -rf /root/zabbix_agent.sh
4,运行
[root@server1 ~]# ansible-playbook zabbix_agent.yaml

5,查看运行结果:
[root@server4 ~]# ls
[root@server4 ~]# netstat -antulpe | grep 10050
tcp 0 0 0.0.0.0:10050 0.0.0.0:* LISTEN 498 28137 5813/zabbix_agentd
tcp 0 0 :::10050 :::* LISTEN 498 28138 5813/zabbix_agentd
[root@server4 ~]# /etc/init.d/zabbix-agent status
zabbix_agentd (pid 5813) is running...
[root@server5 ~]# ls
[root@server5 ~]# netstat -antulpe | grep 10050
tcp 0 0 0.0.0.0:10050 0.0.0.0:* LISTEN 498 11129 1763/zabbix_agentd
tcp 0 0 :::10050 :::* LISTEN 498 11130 1763/zabbix_agentd
[root@server5 ~]# /etc/init.d/zabbix-agent status
zabbix_agentd (pid 1763) is running...
6,如果之前我们在浏览器配置了自动发现规则

可以看到如下结果

发现成功