登录框的设计的样式以及结构思路
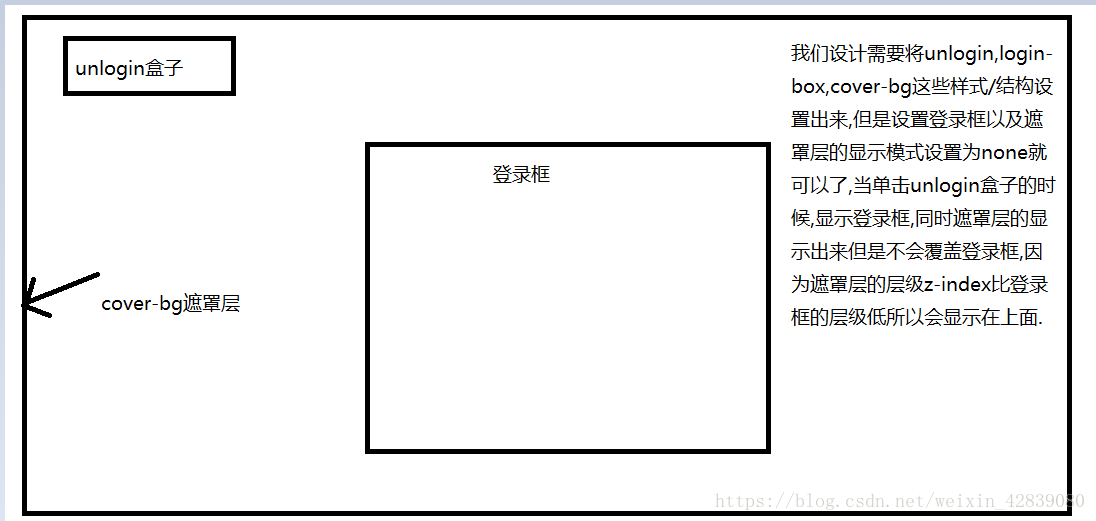
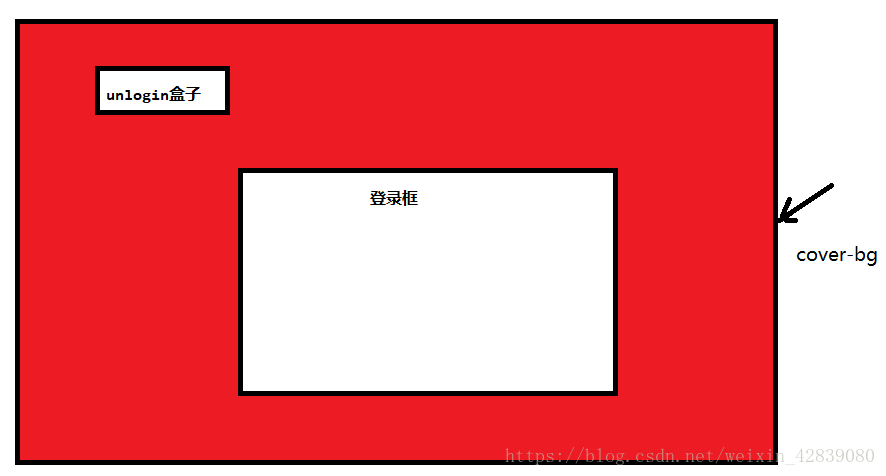
在样式中需要设置登录的unlogin盒子,以及登录框login-web盒子,最后写一个全局的cover-bg来做遮罩层.但是设置样式的时候将cover-bg设置为定位这样就可以让其脱标,不会影响页面的内容,同时也要将登录框的盒子设置为定位属性,但是它的层级一定比cover-bg的层级高,这样就可以让遮罩层显示在下面,登录框在上面的样式.
HTML+CSS:
<!DOCTYPE html>
<html>
<head lang="en">
    <meta charset="UTF-8">
    <title></title>
    <style>
        body {
            background-color: #ccc;
        }
        /*登录页*/
        .login-box {
            float: left;
            color: #fff;
            font-size: 14px;
        }

        #cover-bg {
            position: absolute;
            display: block;
            left: -100px;
            top: 0px;
            opacity: 0.5;
            z-index: 998;
            /*与背景色比较*/
            background-color: red;
            width: 1920px;
            height: 1276px;
            z-index: 9;
            display: none;
        }

        .login-btn {
            position: relative;
            top: 30px;
            display: inline-block;
            width: 78px;
            height: 35px;
            line-height: 35px;
            padding-left: 30px;
            color: #fff;
            font-size: 14px;
            border-radius: 20px;
            border: 2px solid #fe9422;
            margin-left: 10px;
        }

        .login-people-icon {
            position: absolute;
            top: 11px;
            right: 24px;
            width: 9px;
            height: 13px;
            background: url(./images/header-spr.png);
            background-position: -248px 0;
        }

        #login-web {
            background-color: #fff;
            width: 618px;
            height: 364px;
            position: fixed;
            left: 50%;
            top: 50%;
            transform: translate(-50%,-50%);
            z-index: 20;
            text-align: center;
            /*display: none;*/
        }

        #login-web .login-header {
            height: 50px;
            width: 50px;
            position: absolute;
            top: 0;
            right: 0;
            font-family: "微软雅黑";
            z-index: 21;
        }

        #login-web .login-header .close {
            width: 47px;
            height: 20px;
            float: right;
            background: url('./images/icon_3_tiny.png') -221px -126px no-repeat;
        }

        #login-web .login-header .close:hover {
            background: url('./images/icon_3_tiny.png') -221px -151px no-repeat;
        }

        #login-web .login-qr .qr-box{
            position: relative;
        }

        #login-web .scan{
            opacity: 0;
            width: 160px;
            height: 198px;
            position: absolute;
            background: url("./images/small_24_tiny.png");
            top: 118px;
            left: 321px;
        }

        #login-web .login-title{
            font-family: helvetica,arial,微软雅黑,华文黑体;
            color: #333;
            font-size: 20px;
            width: 618px;
            height: 26px;
            margin-top: 36px;
            margin-bottom: 16px;
        }

        #login-web .login-tips {
            width: 618px;
            height: 42px;
            line-height: 21px;
            margin-bottom: 36px;
            color: #666;
            font-size: 16px;
        }

        .login-link a,.login-link span {
            display: inline !important;
        }

        #login-web .login-tips a {
            color: #3481cf;
        }

        #login-web .login-link {
            position: absolute;
            right: 10px;
            bottom: 10px;
        }

        #login-web .dotted {
            color: #bfbfbf;
            margin: 0 5px;
        }
    </style>
</head>
<body>
    <!--登录页 开始-->
    <div id="cover-bg"></div>
    <div class="login-box">
        <div class="unlogin" id="unlogin" style="display: block;">
            <a href="javascript:;" class="login-btn">登录<span class="login-people-icon"></span></a>
        </div>
        <div id="login-web">
            <div class="login-title">快速安全登录</div>
            <div class="login-tips">请使用<a href="#">QQ手机版</a>扫描二维码,<br>安全登录,防止盗号</div>
            <div class="login-qr">
                <div class="qr-box">
                    <img src="./images/loginqr" alt=""/>
                </div>
                <div class="scan">
                </div>
            </div>
            <div class="login-link">
                <a href="#">账号密码登陆</a><span class="dotted">|</span><a href="#">注册新账号</a><span class="dotted">|</span><a href="#">意见反馈</a>
            </div>
            <div class="login-header">
                <a href="javascript:;" class="close"></a>
            </div>
        </div>
    </div>
    <!--登录页结束-->
</body>
JS效果的实现:
需求:
1.当鼠标移入的时候显示cover-bg/login-web设置为显示
2.在利用jQuery里面的自定义动画来实现登录框里面两张图片之间的移动.
在我点击到二维码的图片上时,图片的left的属性左移,同时将手机扫码的图片显示出来,原来这张图片的opacity属性刚开始设置是0,但是当我移入的时候,属性变为1.整个过程都是有动画实现.
JS代码实现:
<script src='jquery-1.12.4.js'></script>
<script>
    $(function(){
        //点击登录打开页面
        $('#unlogin').on('click',function(){
            $('#login-web').show();
            $('#login-web').show();
        })

        //登录页关闭
        $('.login-header .close').on('click', function () {
            $('#cover-bg').hide();
            $('#login-web').hide();
        })

        //登录页动画
        $('#login-web .qr-box>img').on('mouseenter', function () {
            $('#login-web .qr-box').stop(true,false).animate({
                left:'-70px'
            },150,'swing', function () {
                $('#login-web .scan').stop(true,false).animate({
                    opacity:'1'
                },150,'swing')
            })
        })

        $('#login-web .qr-box>img').on('mouseleave', function () {
            $('#login-web .scan').stop(true,false).animate({
                opacity:'0'
            },150,'swing', function () {
                $('#login-web .qr-box').stop(true,false).animate({
                    left:'0'
                },150,'swing')
            })
        })
    })
</script>
</html>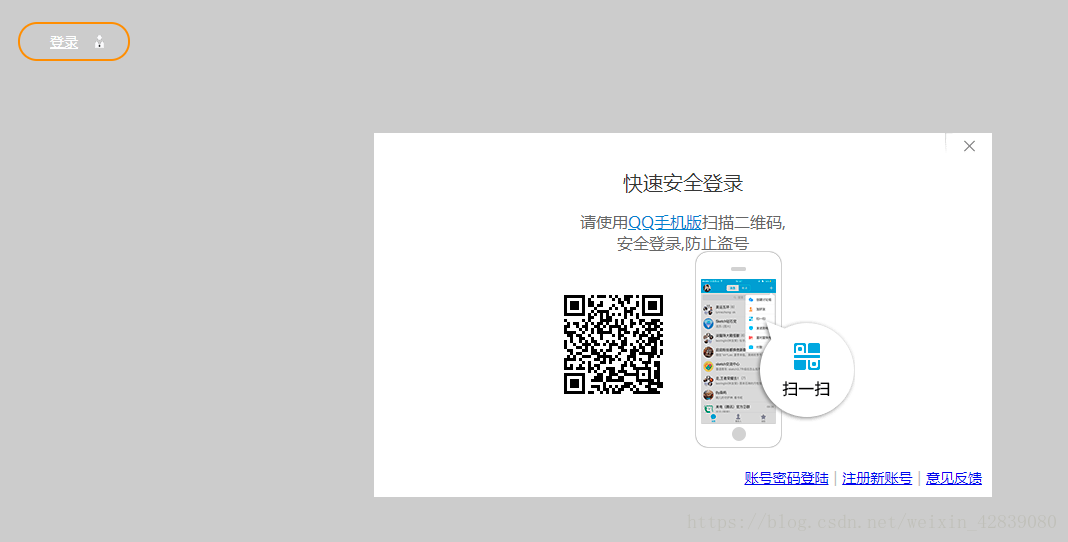
最后就可以实现了.