使用flask-mail扩展发送电子邮件
在我们开发完web系统后,一些特定的事件发生时,系统要自动发送相关邮件至管理员,运维人员和其他相关人员。python标准库中的smtplib包也可以用在Flask程序中发送邮,但包装了smtplib的flask-mail扩展能更好地和Flask集成。本篇文章简单介绍一下如何使用flask-mail扩展发送邮件。
网易邮箱服务器信息:(测试时使用的是网易邮箱地址作为发件者,配置时使用下方信息)
| 服务器名称 | 服务器地址 | SSL协议端口号 | 非SSL协议端口号 |
|---|---|---|---|
| IMAP | imap.163.com | 993 | 143 |
| SMTP | smtp.163.com | 465/994 | 25 |
| POP3 | Pop.163.com | 995 | 110 |
安装flask-mail扩展
查看安装情况: pip show flask-mail, 信息如下,说明安装成功
Name: Flask-Mail
Version: 0.9.1
Summary: Flask extension for sending email
Home-page: https://github.com/rduplain/flask-mail
Author: Dan Jacob
Author-email: [email protected]
License: BSD
Location: /anaconda3/envs/flaskdev/lib/python3.6/site-packages
Requires: Flask, blinker
Required-by:
环境变量添加邮箱账号和密码
发送邮件用的邮箱账号、密码没有直接写在脚本中,将账号密码添加到本地的环境变量,然后通过os模块去调取。这么做也是为了安全起见。
设置方法:
-
mac os/linux
export MAIL_USERNAME='你的邮箱账号'
export MAIL_PASSWORD='客户端授权密码'
如果想永久有效,把上面两句话加到配置文件中,mac(~/.bash_profile),linux(~/.bashrc)
-
windows
set MAIL_USERNAME='你的邮箱账号'
set MAIL_PASSWORD='客户端授权密码'
如果想永久有效,右击 我的电脑 -> 属性 -> 高级系统设置 -> 环境变量,添加MAIL_USERNAME,MAIL_PASSWORD;有疑问的话可以百度一下,很简单。
注意事项:MAIL_PASSWORD,是客户端授权密码,和你常规登录邮箱使用的密码是两回事儿,如果不知道自己的客户端授权密码,可以百度搜索一下,具体的步骤就不在这里写了。
在Python shell中发送电子邮件
初步测试:
import os from flask import Flask from flask_script import Manager from flask_mail import Mail, Message app = Flask(__name__) app.config['MAIL_SERVER'] = 'smtp.163.com' app.config['MAIL_PORT'] = 25 app.config['MAIL_USE_TLS'] = True app.config['MAIL_USERNAME'] = os.environ.get('MAIL_USERNAME') app.config['MAIL_PASSWORD'] = os.environ.get('MAIL_PASSWORD') manager = Manager(app) mail = Mail(app) if __name__ == '__main__': manager.run()
终端操作:
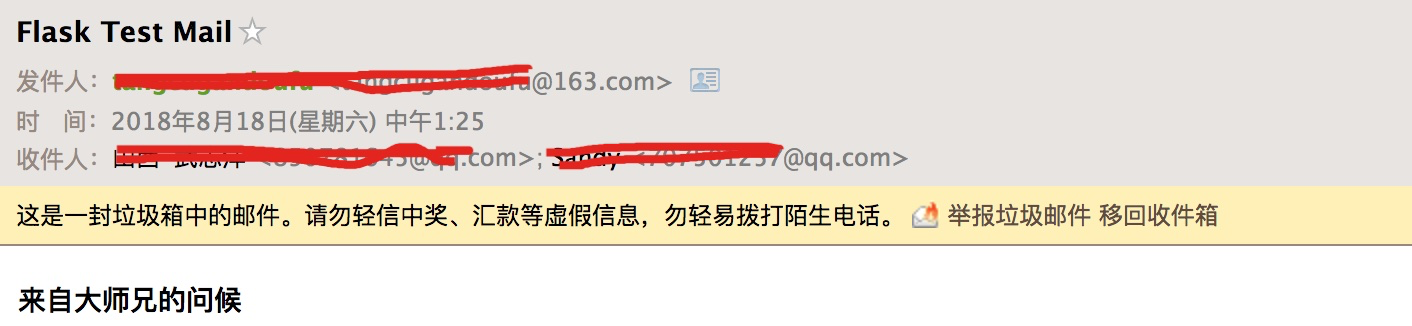
(flaskdev) user@snow:~/codes/python$python debug.py shell
>>> from flask_mail import Message
>>> from debug import mail
>>> msg = Message('Flask Test Mail', sender='发件人', recipients=['收件人1','收件人2'])
>>> msg.body = '邮件内容'
>>> msg.html = '<b>来自大师兄的问候</b>'
>>> with app.app_context():
...     mail.send(msg)
...
# Message参数说明:
# 第一个参数:邮件主题
# 第二个参数:发件人邮箱账号
# 第三个参数:收件人邮箱账号(可以写一个或多个)
# msg.body和msg.html是邮件正文
测试可以发送成功:
![]() 在程序中集成发送电子邮件的功能
在程序中集成发送电子邮件的功能
脚本修改:
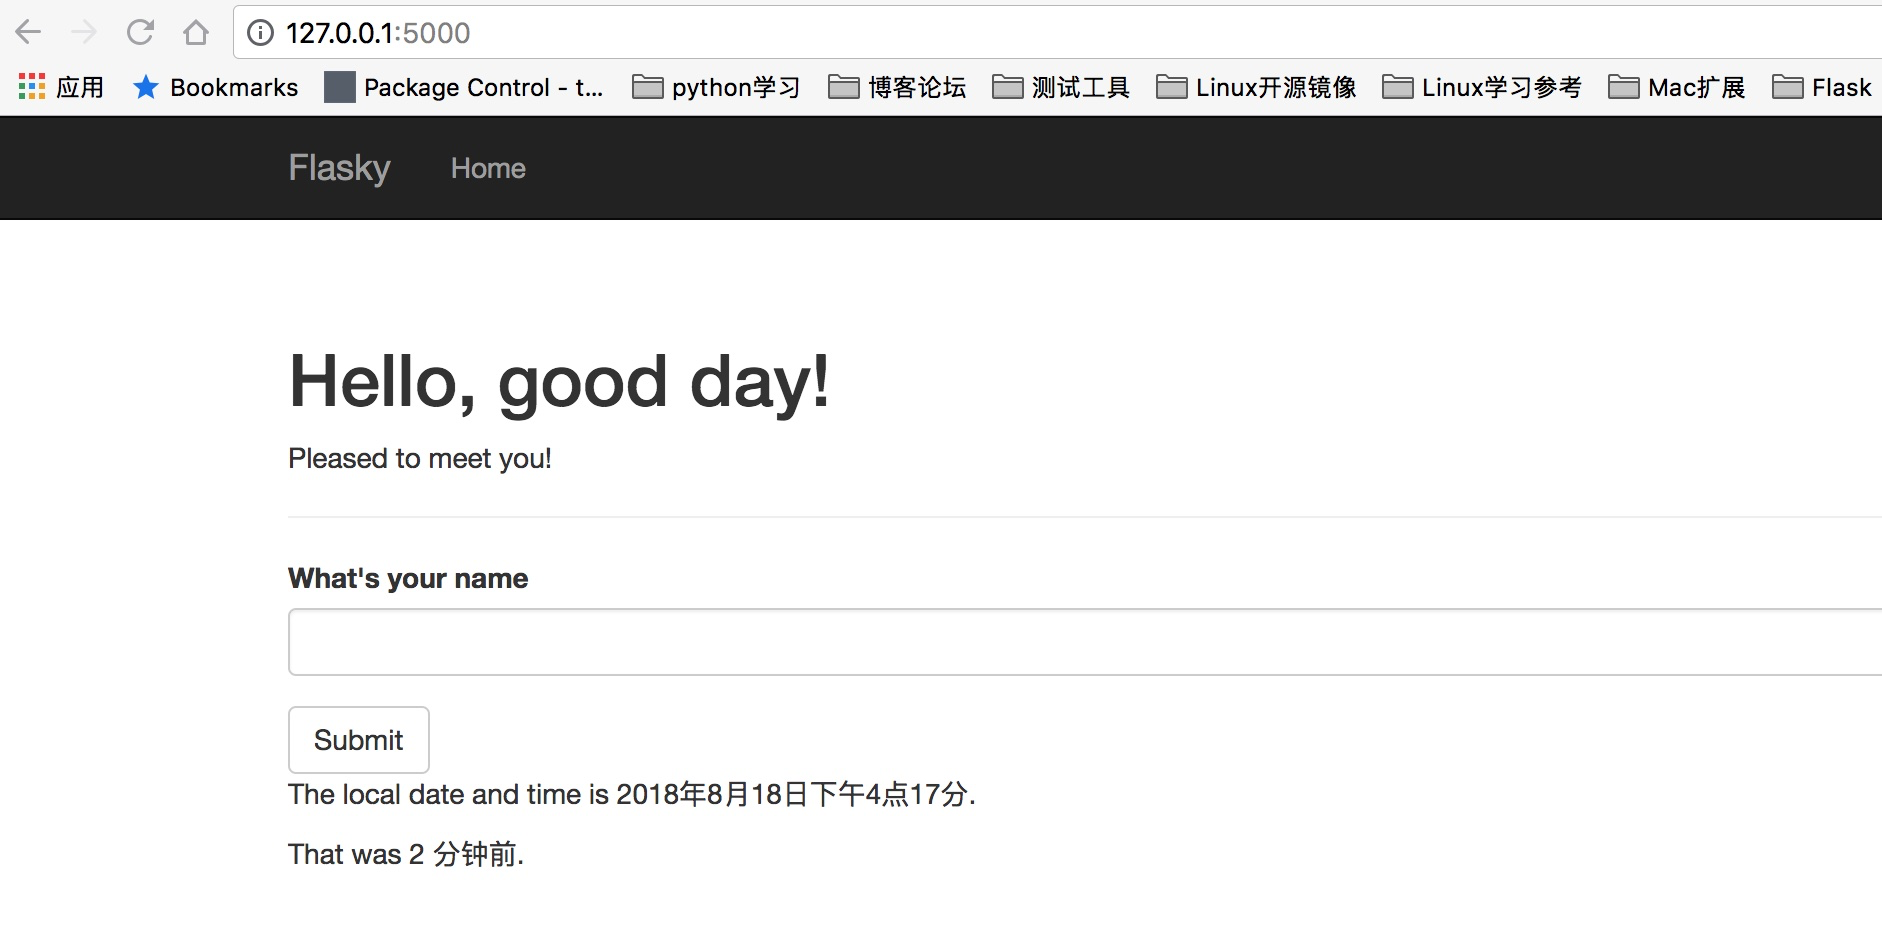
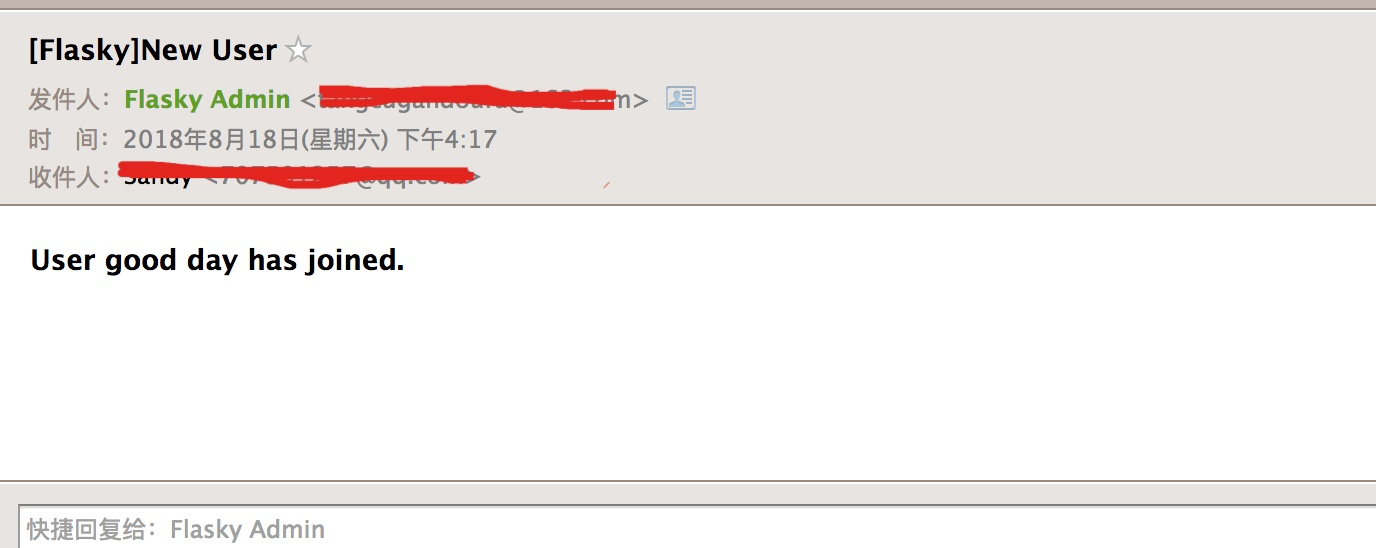
app.config['FLASKY_MAIL_SUBJECT_PREFIX'] = '[Flasky]'
app.config['FLASKY_MAIL_SENDER'] = 'Flasky Admin <[email protected]>'
app.config['FLASKY_ADMIN'] = os.environ.get('FLASKY_ADMIN')

# 增加发送邮件函数
def send_mail(to, subject, template, **kwargs):
    msg = Message(app.config['FLASKY_MAIL_SUBJECT_PREFIX'] + subject,
                    sender=app.config['FLASKY_MAIL_SENDER'], recipients=[to])
    msg.body = render_template(template + '.txt', **kwargs)
    msg.html = render_template(template + '.html', **kwargs)
    mail.send(msg)

# 修改视图函数,条件满足(本例是有新用户登录系统时),自动触发发送邮件
@app.route('/', methods=['GET', 'POST'])
def index():
    form = NameForm()
    if form.validate_on_submit():
        user = User.query.filter_by(username=form.name.data).first()
        if user is None:
            user = User(username=form.name.data)
            db.session.add(user)
            session['known'] = False
            if app.config['FLASKY_ADMIN']:
                send_mail(app.config['FLASKY_ADMIN'], 'New User', 'mail/new_user', user=user)
        else:
            session['known'] = True
        session['name'] = form.name.data
        form.name.data = ''
        return redirect(url_for('index'))
    return render_template('index.html', form=form, name=session.get('name'), current_time = datetime.utcnow(), known=session.get('known', False))
终端运行程序,新用户登录:
(flaskdev) user@snow:~/GitHubCodes/learnFlask$python hello.py runserver -d
 * Serving Flask app "hello" (lazy loading)
 * Environment: production
   WARNING: Do not use the development server in a production environment.
   Use a production WSGI server instead.
 * Debug mode: on
 * Running on http://127.0.0.1:5000/ (Press CTRL+C to quit)
 * Restarting with stat
 * Debugger is active!
 * Debugger PIN: 103-932-194
127.0.0.1 - - [18/Aug/2018 16:16:53] "GET / HTTP/1.1" 200 -
127.0.0.1 - - [18/Aug/2018 16:17:20] "POST / HTTP/1.1" 302 -
127.0.0.1 - - [18/Aug/2018 16:17:20] "GET / HTTP/1.1" 200 -
127.0.0.1 - - [18/Aug/2018 16:17:48] "POST / HTTP/1.1" 302 -
127.0.0.1 - - [18/Aug/2018 16:17:48] "GET / HTTP/1.1" 200 -
浏览器:
收邮箱:
以上就是关于使用flask-mail扩展发送邮件的实际操作
源码地址:https://github.com/miguelgrinberg/flasky.git;git checkout 6a