一、写在片头
作为一名刚毕业的java engineer来说,前台页面一直使用的都是jsp。确实,不管是老师的教学亦或网上的视频,无一不是使用jsp。直到今天在学习springboot时意外发现了Thymeleaf的存在,这是一个全新的模板。于是开启了新一波的百度之旅:web项目渲染页面数据其实是有很多模板引擎的,包括且不限于freemmark,velocity,Thymeleaf。根据业务场景的不同选择得模板也不一样。为什么用Thymeleaf?网上至今也没给出能说服我的答案,大部分都是说的springboot官方推荐使用Thymeleaf,他的原型即页面理念?毕竟我很少研究前端,不是很懂。
二、Thymeleaf的简单标签和语法
<td th:text="${food.name}">noodles</td>
如上图,后台传出的food.name会将静态数据“noodles”替换掉,若访问静态页面,则显示数据“noodles”。是不是和angular很像?下面我们就来换一种方式,不同于其他博客上的方式来介绍Thymeleaf。
当然,首先大家要先知道th简单表达式:
一、th简单表达式:
① ${...} 变量表达式:
<input type="text" name="userName" value="Beyrl" th:value="${user.name}" />
上述代码为引用user对象的name属性值。
② *{...} 选择表达式:
<div th:object="${session.user}">
     <p>Nationality: <span th:text="*{nationality}">XXXX</span>.</p>
</div>
选择表达式一般跟在th:object后,直接选择object中的属性。
③ #{...} 消息文字表达式:
<p th:utext="#{home.welcome}">Welcome to our grocery store!</p>
④ @{...} 链接url表达式:
<a href="details.html" th:href="@{/webPage/details(orderId=${o.id})}">view</a>
@{……}支持决定路径和相对路径。其中相对路径又支持跨上下文调用url和协议的引用(//code.jquery.com/jquery-2.0.3.min.js)。
当URL为后台传出的参数时,代码如下:
<img src="../../webPage/food/images/pizza.jpg" th:src="@{${path}}" alt="披萨" />
当理解了这四个表达式后,我就信心满满的去向下看文档,然后我发现我看不懂了。。。因为我不理解什么是th:field='';th:action='';诸如此类的好多好多,后来在一个博客上看到这一类的是所谓的Thymeleaf的属性,或者是常用的th:标签,下面我们就来整理学习一下这些标签:
这是在一个博客上看到的整理的较全的图片,还有一个更全的,那个太多了,会吓到初学者,不知道你们会不会,反正我是被吓到了。。。
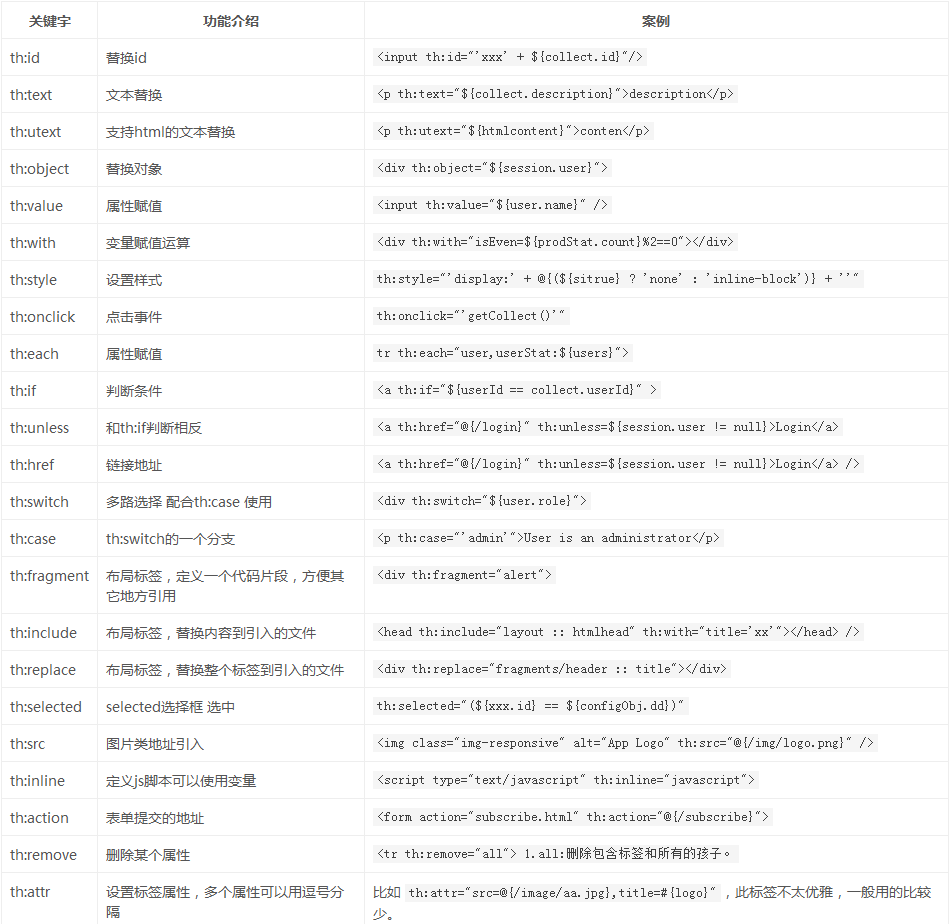
下面我们会详细介绍一些常用的标签:
二、th常用标签:
1.th:id:
类似html标签中的id属性。
<div class="student" th:id = "food+(${pizza.index}+1)"></div>
2.th:text:与th:utext:
即文本显示,可对表达式或变量求值,并将结果显示在其被包含的HTML标签内,替换原有HTML文本。这里需要与th:utext:区分开,th:text:例子如下:
若 restraunt.welcome=welcome to our <b>delicious</b>restaurant! 那么,用 <p h:text="#{restaurantt.welcome}"></p> 解析的结果为: welcome to our <b>delicious</b>restaurant! ,
也就是说,会输出 welcome to our <b>delicious</b>restaurant</> 当然,我们是不会希望页面上出现<和e>的,这时候,我们就需要使用th:utext:来进行转义,即用 <p h:utext="#{restaurant.welcome}"></p>
所以最终输出的结果为:welcome to our delicious restaurant!
3.th:object:
用于表单数据对象绑定,将表单绑定到后台controller的一个JavaBean参数,常与th:field一起使用进行表单数据绑定。选择表达式一般跟在th:object后,直接取object中的属性。
这里有一个需要注意的点:*{...}表达式的值是在选定的对象而不是整个context的map。也就是说,如果没有选定的对象,*{...}和${...}没有区别,请看下面的例子:
<div th:object="${session.user}">
    <p>姓名:<span th:text="*{Name}">noodles</span></p>
    <p>年龄:<span th:text="*{age}">24</span></p>
    <p>国籍:<span th:text="*{nationlity}">中国</span></p>
</div>
上面这段代码相当于:
<div>
    <p>姓名:<span th:text="${session.user.Name}">noodles</span></p>
   <p>年龄:<span th:text="${session.user.age}">24</span></p>
    <p>国籍:<span th:text="${session.user.nationlity}">中国</span></p></div>
4.th:field:上面提到了一个新标签,th:field:,常用于表单字段绑定。通常与th:object一起使用。 属性绑定、集合绑定。
<form th:action="@{/bb}" th:object="${user}" method="post" th:method="post">
    <input type="text" th:field="*{name}"/>
    <input type="text" th:field="*{msg}"/>
    <input type="submit"/>
</form>
5.th:action:定义后台控制器路径,类似<form>标签的action属性。
<form action="subscribe.html" th:action="@{/subscribe}">
6.th:href:定义超链接,类似<a>标签的href 属性。value形式为@{/logout}.

<!-- 输出: 'http://localhost:8080/gtvg/order/details?orderId=3' -->
<a href="details.html"
   th:href="@{http://localhost:8080/gtvg/order/details(orderId=${o.id})}">view</a>

<!-- 输出: '/gtvg/order/details?orderId=3' -->
<a href="details.html" th:href="@{/order/details(orderId=${o.id})}">view</a>

<!-- 输出: '/gtvg/order/3/details' -->
<a href="details.html" th:href="@{/order/{orderId}/details(orderId=${o.id})}">view</a>
7.th:src:用于外部资源引入,类似于<script>标签的src属性,常与@{}一起使用。
<script th:src="@{/js/jquery/jquery-2.4.min.js}">
8.th:value:用于标签赋值,类似<option>标签的value属性。
<option th:value="soup">soup</option>

<input  id="msg" th:value="${msg}" />
9.th:if or th:unless:条件判断,支持布尔值,数字(非零为true),字符,字符串等.
<div th:if="${restaurant.index} == 0">... I love eating(do something at here) ...</div>

<span th:if="${food.price lt 100}" class="offer">Special desert!</span>    /*不能用"<",">"等符号,要用"lt"等替代*/

<select class='form-control' name="skill[4].proficiency">
     <option >掌握程度</option>
     <option th:if="${skill.level eq '一般'}" th:selected="selected">一般</option>
     <option th:if="${skill.level eq '熟练'}" th:selected="selected">熟练</option>
     <option th:if="${skill.level eq '精通'}" th:selected="selected">精通</option>
</select>
这里有两个需要注意的点:先看下面两行代码,
<div th:if="${user.isAdmin()} == false"> ...
<div th:if="${user.isAdmin() == false}"> ...
在这个例子中,==false是写在了\({...}的外边,所以使Thymeleaf本身在支持它,如果写在了\){...}的里边,则变为由OGNL或SpringEL库来支持它。(***这里目前我还未明白是什么意思,希望明白的大神能告诉我这个问题***)
而null值也可以这么使用:
<div th:if="${variable.something} == null"> ...
th:if不光可以使用布尔值,以下规则都可以:
- 如果值不为空:如果值为null,th:if将为false
- 如果值为布尔型并且为true
- 如果值为数值型并且不为0
- 如果值为character并且不为0
- 如果值为String,并且不为"false","off"和"no"
- 如果值不为布尔型,数值型,character或String的任意类型
● 如果值为null,th:if将为false
th:if还有一个互逆的表达式为th:unless,还继续用之前的例子作一个演示:
<a href="comments.html"
th:href="@{/comments(prodId=${prod.id})}"
th:unless="${#lists.isEmpty(prod.comments)}">查看</a>
下面的是一个th:if 例子,大家可以照着套一下。
<table>
    <tr>
        <th>食物名称</th>
        <th>食物价格</th>
        <th>可现做</th>
        <th>食客评价</th>
    </tr>
    <tr th:each="prod:${prods}">
        <td th:text="${prod.name}">醋溜土豆丝</td>
        <td th:text="${#numbers.formatDecimal(prod.price,0,2)}">2.41</td>
        <td th:text="${prod.isReady}?#{true}:#{false}">yes</td>
        <td>
            <span th:text=${#lists.size(prod.comments)}>2</span>个评价
            <a href="comments.html" th:href="@{/product/comments(prodId=${prod.id})}"
            th:if="${not #lists.isEmpty(prod.comments)}">查看</a>
        </td>
    </tr>
</table>
如果产品有评论,那么我们就创建一个跳转到评论页面的超链接,并且使用产品ID作为参数。
10.th:switch 和th:case:选择语句。 th:case="*"表示default case。注意:一旦一个th:case被判断为真,那么其他的同等级的th:case都将被判断为假
<div th:switch="${user.role}">
  <p th:case="'admin'">超级管理员用户</p>
  <p th:case="#{roles.manager}">管理员用户</p>
  <p th:case="*">其他用户</p>
</div>
11.th:with:定义变量,th:with="isEven=${prodStat.count}%2 == 0",定义多个变量可以用逗号分隔。
<div th:with="firstPer=${persons[0]}">
  <p>
    The name of the first person is <span th:text="${firstPer.name}">Julius Caesar</span>.
  </p>
</div>
当th:with被处理,firstPer变量创建一个局部变量和变量添加到map自上下文,以便它是用于评估和其他上下文中声明的变量从开始,但只有包含< div >标记的范围内。
div th:with="firstPer=${persons[0]},secondPer=${persons[1]}">
  <p>
    The name of the first person is <span th:text="${firstPer.name}">Julius Caesar</span>.
  </p>
  <p>
    But the name of the second person is
    <span th:text="${secondPer.name}">Marcus Antonius</span>.
  </p>
</div>
th:with属性允许重用变量定义在相同的属性:
<div th:with="company=${user.company + ' Co.'},account=${accounts[company]}">...</div>
12.th:remove:移除除了第一个外的静态数据,用第一个tr标签进行循环迭代显示:
<tbody th:remove="all-but-first">
          //将后台传出的 productList 的集合进行迭代,用product参数接收,通过product访问属性值
                <tr th:each="product:${productList}">
            //用count进行统计,有顺序的显示
            <td th:text="${productStat.count}">1</td>
                    <td th:text="${product.description}">Red Chair</td>
                    <td th:text="${'$' + #numbers.formatDecimal(product.price, 1, 2)}">$123</td>
                    <td th:text="${#dates.format(product.availableFrom, 'yyyy-MM-dd')}">2014-12-01</td>
                </tr>
                <tr>
                    <td>White table</td>
                    <td>$200</td>
                    <td>15-Jul-2013</td>
                </tr>
                <tr>
                    <td>Reb table</td>
                    <td>$200</td>
                    <td>15-Jul-2013</td>
                </tr>
                <tr>
                    <td>Blue table</td>
                    <td>$200</td>
                    <td>15-Jul-2013</td>
                </tr>
      </tbody>
13.th:each:循环,<tr th:each="user,userStat:${users}">,userStat是状态变量,有 index,count,size,current,even,odd,first,last等属性,如果没有显示设置状态变量.thymeleaf会默认给个“变量名+Stat"的状态变量。
下面大家看下例子:

<form id="login-form" th:action="@{/addStudent}" th:object="${stuReqBean}" method="POST">

  <div class="student" th:each="stuIter,rowStat:${stuReqBean.students}">

    <input type="text" class="firstName" value="" th:field="*{students[__${rowStat.index}__].firstName}"></input>

    <input type="text" class="school" value="" th:field="*{students[__${rowStat.index}__].school}"></input>

  </div>

</form>
上面的例子中通过选择表达式*{}既能将表单绑定到后台的StudentRequestBean中的集合属性students,也能将Servlet上下文中的StudentRequestBean中的List类型的students变量回显,回显时通过th:each进行遍历。
注意1:绑定集合属性元素下标的用法*{students[__${rowStat.index}__].firstName}
注意2:如果List<Student> students为null,页面将无法显示表单,后台必须给students初始化一个值,即:
List<Student > stus = new ArrayList<Student >();

stus .add(new Student ());

StudentRequestBean.setStudents(stus );
注意3:stuIter代表students的迭代器。
还记得我们之前用过的这个例子吗?
<table>
    <tr>
        <th>食物名称</th>
        <th>食物价格</th>
        <th>可现做</th>
        <th>食客评价</th>
    </tr>
    <tr th:each="prod:${prods}">
        <td th:text="${prod.name}">醋溜土豆丝</td>
        <td th:text="${#numbers.formatDecimal(prod.price,0,2)}">2.41</td>
        <td th:text="${prod.isReady}?#{true}:#{false}">yes</td>
        <td>
            <span th:text=${#lists.size(prod.comments)}>2</span>个评价
            <a href="comments.html" th:href="@{/product/comments(prodId=${prod.id})}"
            th:if="${not #lists.isEmpty(prod.comments)}">查看</a>
        </td>
    </tr>
</table>
**prod:\({prods}**属性值的意思是,迭代\){prods}的每个元素并重复这个模板的这个片段。然后解释一下这两部分分别的意思:
- ${prods}被称为迭代表达式或迭代变量
- prod被称为重复变量或迭代值
注意:迭代值只可以用在tr节点上面(包括迭代里边包含的td标签)。
保持迭代状态:当使用th:each的时候,Thymeleaf会提供一个跟着迭代状态的机制:状态变量。状态定义被封装在th:each的属性中。并包含以下数据:
- 获取当前迭代的从0开始的下标,使用index属性
- 获取当前迭代的从1开始的下标,使用count属性
- 获取当前迭代元素的总量,使用size属性
- 获取迭代变量中的迭代值,使用current属性
- 当前迭代值是奇数还是偶数,使用even/odd的布尔值属性
- 当前的迭代值是不是第一个元素,使用first布尔值属性
- 当前迭代值是不是最后一个元素,使用last布尔值属性。
现在将上面的例子稍作修改:
<h1>产品列表</h1>
<table>
    <tr>
        <th>产品名称</th>
        <th>产品价格</th>
        <th>有现货</th>
    </tr>
    <tr th:each="prod,iterStat:${prods}" th:class="${iterStat.odd}?'odd'">
        <td th:text="${prod.name}">土豆</td>
        <td th:text="${prod.price}">2.41</td>
        <td th:text="${prod.inStock}?#{true}:#{false}">yes</td>
    </tr>
</table>
<p>
    <a href="../home.html" th:href="@{/}">返回首页</a>
</p>
可以看到,状态变量(即iterStat)的定义:将这个变量的名字作为属性写在迭代值之后,用逗号于迭代值隔开。产生了迭代值之后,他的状态值就可以也仅仅可以在th:each包含的代码段中使用。我们再来看一个例子:
<ol>
        <li>List循环:
            <table border="1">
              <tr>
                <th>用户名</th>
                <th>邮箱</th>
                <th>管理员</th>
                <th>状态变量:index</th>
                <th>状态变量:count</th>
                <th>状态变量:size</th>
                <th>状态变量:current.userName</th>
                <th>状态变量:even</th>
                <th>状态变量:odd</th>
                <th>状态变量:first</th>
                <th>状态变量:last</th>
              </tr>
              <tr  th:each="user,userStat : ${list}">
                <td th:text="${user.userName}">Onions</td>
                <td th:text="${user.email}">[email protected]</td>
                <td th:text="${user.isAdmin}">yes</td>
                 <th th:text="${userStat.index}">状态变量:index</th>
                <th th:text="${userStat.count}">状态变量:count</th>
                <th th:text="${userStat.size}">状态变量:size</th>
                <th th:text="${userStat.current.userName}">状态变量:current</th>
                <th th:text="${userStat.even}">状态变量:even****</th>
                <th th:text="${userStat.odd}">状态变量:odd</th>
                <th th:text="${userStat.first}">状态变量:first</th>
                <th th:text="${userStat.last}">状态变量:last</th>
              </tr>
            </table>
        </li>
        <li>Map循环:
            <div th:each="mapS:${map}">
            <div th:text="${mapS}"></div>
            </div>
        </li>
        <li>数组循环:
            <div th:each="arrayS:${arrays}">
            <div th:text="${arrayS}"></div>
            </div>
        </li>
        </ol>
现在对each有理解了吗?如果还没有的话,这里还有一个例子:
<div class="item active"  th:if="${iterStat.index==0}" th:each="img,iterStat:${pics}">

  <img th:src="${img.path}" style="width: 303px;height: 171px;"/>

</div>

/*对arrayList对象pics遍历,使用img作为接受参数接收,使用iterStat作为pics下标值,通过iterStat.index得到当前所处下标值;通过th:src="${img.path}"得到对象中图片路径设置图片显示图*/

<tr th:each="prod,iterStat : ${prods}" th:class="${iterStat.odd}? 'odd'">
    <td th:text="${prod.name}">Onions</td>
    <td th:text="${prod.price}">2.41</td>
    <td th:text="${prod.inStock}? #{true} : #{false}">yes</td>
  </tr>

/*判断下标是否为奇数,设置tr样式*/
14.th:fragment:我们经常会想让我们的模板包含一些其他模板,比较常见的用途如页眉,页脚,菜单等。为了做到这一点,Thymeleaf需要我们定义一些可用片段,我们能通过th:fragment属性来实现这一点。
例如:
声明模板片段/WEBINF/templates/footer. html
<div th: fragment=" copy" >

© 2011 The Good Thymes Virtual Grocery

</div>
引入模板片段:
<div th: include=" /templates/footer : : copy" ></div>

<div th: replace=" /templates/footer : : copy" ></div>
现在是不是对include replace有有疑问了呢?先看下 th:insert和th:replace的不同点(以及th:include)
- th:insert是将th:fragment标签的内容纳入宿主标签
- th:replace是使用th:fragment标签替换宿主标签
- th:include与th:insert类似,但是他插入的是片段的内容,而不是片段。
还是举个例子吧:
<div th:fragment="copy"> © 网络商店 </div>
导入到两个div标签中:
<body>
    ...
    <div th:insert="footer :: copy"></div>
    <div th:replace="footer :: copy"></div>
    <div th:include="footer :: copy"></div>
</body>
执行结果:
<body>
...
<div>
<footer>
© 网络商店
</footer>
</div>
<footer>
© 网络商店
</footer>
<div>
© 网络商店
</div>
</body>
14.th:attr:设置标签属性,多个属性可以用逗号分隔,比如th:attr="src=@{/image/aa.jpg},title=#{logo}" (很多大博客上都说这个标签不够优雅,很难看,所以,不常用。)
<form action="subscribe.html" th:attr="action=@{/subscribe}">
  <fieldset>
    <input type="text" name="email" />
    <input type="submit" value="订阅!" th:attr="value=#{subscribe.submit}"/>
  </fieldset>
</form>
用法很简单:th:attr将是一个值对应一个属性的表达式,在转换处理后,将会返回如下结果:
<form action="/gtvg/subscribe">
  <fieldset>
    <input type="text" name="email" />
    <input type="submit" value="subscribe me!"/>
  </fieldset>
</form>
除了更新了属性值,还可以看到,应用的已经自动将url更新为context前缀的url.如果,我们想在同时更新多个属性呢?xml的规则不允许在一个标签内设置两个同名的属性,所以,可以用逗号来分割th:attr的值,比如:
<img src="../../images/gtvglogo.png"
 th:attr="src=@{/images/gtvglogo.png},title=#{logo},alt=#{logo}" />
将转换为:
<img src="/gtgv/images/gtvglogo.png" title="这里是logo" alt="这里是logo" />