前言:
SpringBoot采用了构建生产就绪Spring应用程序的观点,旨在让程序快速启动和运行。在一般情况下,不需要做太多的配置就能够让SpringBoot程序正常运行。在一个特殊情况下,我们需要修改一些配置,或者需要有自己的配置。
正文:
一。自定义属性
(1)定义配置文件
my:
name: forezp
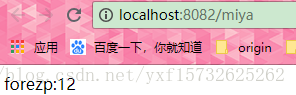
age: 12(2)使用注解读取配置文件信息-----@Value("${属性名}")
package com.forezp.helloworld;

import org.springframework.beans.factory.annotation.Value;
import org.springframework.web.bind.annotation.RequestMapping;
import org.springframework.web.bind.annotation.RestController;


@RestController
public class MiyaController {
    @Value("${my.name}")
    private String name;
    @Value("${my.age}")
    private int age;

    @RequestMapping(value = "/miya")
    public String miya() {
        return name + ":" + age;
    }
}
启动程序SpringBoot,访问:“http://localhost:8082/miya”:
二。将配置文件的属性赋给实体类
(1)定义配置文件---application.yml
my:
   name: forezp
   age: 12
   number: ${random.int}
   uuid: ${random.uuid}
   max: ${random.int(10)}
   value: ${random.value}
   greeting: hi,i'm ${my.name}
(2)创建JavaBean
package com.forezp.helloworld;

import org.springframework.boot.context.properties.ConfigurationProperties;
import org.springframework.stereotype.Component;

@ConfigurationProperties(prefix = "my")
@Component
public class ConfigBean {
    private int age;
    private String name;
    private int number;
    private String uuid;
    private int max;
    private String value;
    private String greeting;

    public int getAge() {
        return age;
    }

    public void setAge(int age) {
        this.age = age;
    }


    public String getName() {
        return name;
    }

    public void setName(String name) {
        this.name = name;
    }

    public int getNumber() {
        return number;
    }

    public void setNumber(int number) {
        this.number = number;
    }

    public String getUuid() {
        return uuid;
    }

    public void setUuid(String uuid) {
        this.uuid = uuid;
    }

    public int getMax() {
        return max;
    }

    public void setMax(int max) {
        this.max = max;
    }

    public String getValue() {
        return value;
    }

    public void setValue(String value) {
        this.value = value;
    }

    public String getGreeting() {
        return greeting;
    }

    public void setGreeting(String greeting) {
        this.greeting = greeting;
    }
}
(3)创建Controller,读取ConfigBean类的属性-----@EnableConfigurationPropertie({ConfigBean.class})
package com.forezp.helloworld;

import org.springframework.beans.factory.annotation.Autowired;
import org.springframework.boot.context.properties.EnableConfigurationProperties;
import org.springframework.web.bind.annotation.RequestMapping;
import org.springframework.web.bind.annotation.RestController;

@RestController
@EnableConfigurationProperties({ConfigBean.class})
public class LucyController {
    @Autowired
    ConfigBean configBean;

    @RequestMapping(value = "/lucy")
    public String miya() {
        return configBean.getGreeting() + "-" + configBean.getName() + "-" +
                configBean.getUuid() + "-" + configBean.getMax();
    }
}
启动工程,访问:“http://localhost:8082/lucy”:

三。自定义配置文件
1.自定义配置文件--test.properties
com.forezp.name=forezp
com.forezp.age=12
2. 创建JavaBean--User,读取配置文件属性和属性值:@Configuration、@PropertySource、@ConigurationProperties
package com.forezp.helloworld;

import org.springframework.boot.context.properties.ConfigurationProperties;
import org.springframework.context.annotation.Configuration;
import org.springframework.context.annotation.PropertySource;

@Configuration
@PropertySource(value = "classpath:test.properties")
@ConfigurationProperties(prefix = "com.forezp")
public class User {
    private String name;
    private int age;

    public String getName() {
        return name;
    }

    public void setName(String name) {
        this.name = name;
    }

    public int getAge() {
        return age;
    }

    public void setAge(int age) {
        this.age = age;
    }
}
3.创建一个类:LindaController,开启RestController功能,同时指明需要引用的JavaBean的类,开启引用配置属性的功能
package com.forezp.helloworld;
import org.springframework.beans.factory.annotation.Autowired;
import org.springframework.boot.context.properties.EnableConfigurationProperties;
import org.springframework.web.bind.annotation.RequestMapping;
import org.springframework.web.bind.annotation.RestController;
@RestController
@EnableConfigurationProperties({ConfigBean.class, User.class})
public class LindaController {
@Autowired
ConfigBean configBean;
@RequestMapping(value = "/linda")
public String miya() {
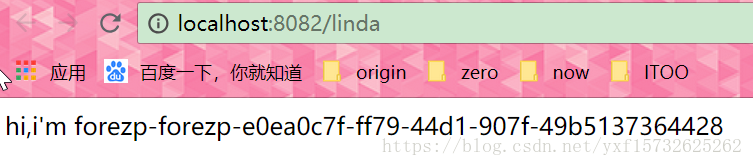
return configBean.getGreeting() + "-" + configBean.getName() + "-" +
configBean.getUuid() + configBean.getMax();
}
@Autowired
User user;
@RequestMapping(value = "/user")
public String user() {
return user.getName() + ": " + user.getAge();
}
}
启动工程,访问:http://localhost:8082/linda
四。多个环境的配置文件
SpringBoot支持程序启东时在配置文件application.yml中指定环境的配置文件,配置文件的格式为application-{profile}.properties,其中{profile}对应环境标识。
application-test.properties(yml)---测试环境
application-dev.properties(yml)---开发环境
application-prod.properties(yml)---生产环境
1.配置文件信息为:application.yml
spring:
  profiles:
    active: dev
2.application-dev.yml
server:
  port: 8082
工程默认端口为8080,以上所有例子访问8082是已经修改了环境,端口改变。
结语:
用自己的实力,索要自己的未来。