linux 中的 list (链表)
更新时间: <>
原创时间: <2016-12-26>
版权: 本文采用以下协议进行授权, 自由转载 - 非商用 - 非衍生 - 保持署名 | Creative Commons BY-NC-ND 3.0,转载请注明作者及出处.
一、简介:
linux中的链表使用两个指针,可以方便的构成双向链表,实际上,通常它都组织成双向循环链表,不同于数据结构书上的链表,这里的节点只有链表指针,没有链表的数据,下边我将对内核中使用的 include/linux/list.h 进行函数说明和生动的图形解释。
二、函数:
我们先来看看
1. 链表数据结构 list_head 的定义:
-
struct list_head {
-
struct list_head *next, *prev;
-
};
2. 声明和初始化:有两种方法
①声明的时候初始化一个链表 LIST_HEAD 宏:
-
#define LIST_HEAD_INIT(name) { &(name), &(name) } // 链表的pre和next指针都指向了节点自己的首地址
-
-
#define LIST_HEAD(name) \
-
struct list_head name = LIST_HEAD_INIT(name)
-
static inline void INIT_LIST_HEAD(struct list_head *list)
-
{
-
list->next =
list;
-
list->prev =
list;
-
}
注意:
此处说的声明的时候简单的理解为不在函数内部,而运行时指的就是在函数内部了
图形:

3. 插入/删除/合并
a) 插入
对链表的插入操作有两种:
在表头插入 list_add函数 和
在表尾插入 list_add_tail函数:
-
static inline void list_add(struct list_head *new, struct list_head *head) // new:要添加的新的链表的首地址,head:链表的中的位置
-
{
-
__list_add(
new, head, head->next);
-
}
-
static inline void list_add_tail(struct list_head *new, struct list_head *head)
-
{
-
__list_add(
new, head->prev, head);
-
}
-
static
inline
void __list_add(struct list_head *
new,
-
struct list_head *prev,
-
struct list_head *next)
-
{
-
next->prev =
new;
-
new->next = next;
-
new->prev = prev;
-
prev->next =
new;
-
}
图形:
- list_add 部分:

网络上的一张图更全面的展示了在使用中的链表的结构:

- list_add_tail 部分:

画图总结:

【1】上边图形的画法中,要前两步划在外边沿
【2】对list链表的头和尾的快速记忆的方法,我们可以看待内核中的链表为 向右行驶的贪吃蛇
b) 删除
对链表的删除操作函数有两种:
list_del函数和
list_del_init函数:
-
static inline void list_del(struct list_head *entry) // entry:要删除的链表的首地址
-
{
-
__list_del(entry->prev, entry->next);
// 这不就是 __list_del_entry(entry) 吗!!
-
entry->next = LIST_POISON1;
-
entry->prev = LIST_POISON2;
-
}
-
static inline void list_del_init(struct list_head *entry)
-
{
-
__list_del_entry(entry);
-
INIT_LIST_HEAD(entry);
// 运行中初始化链表节点
-
}
-
static
inline
void __list_del_entry(struct list_head *entry)
-
{
-
__list_del(entry->prev, entry->next);
-
}
他们调用了相同的 __list_del 函数:
-
static
inline
void __list_del(struct list_head * prev, struct list_head * next)
-
{
-
next->prev = prev;
-
prev->next = next;
-
}
图形:
我们来删除有3个元素的链表的中间的一个:list_del(&new)
list_del_init 函数不再画图,唯一的不同是把删除下来的图的next和prev指针指向了自己的首地址

c) 替换
对链表的替换操作有两个:
list_replace函数和
list_replace_init函数:
-
static inline void list_replace(struct list_head *old,
-
struct list_head *new)
-
{
-
new->next = old->next;
-
new->next->prev =
new;
-
new->prev = old->prev;
-
new->prev->next =
new;
-
}
-
-
static inline void list_replace_init(struct list_head *old,
-
struct list_head *new)
-
{
-
list_replace(old,
new);
-
INIT_LIST_HEAD(old);
-
}

list_replace_init函数的图形此处也不再画
d) 搬移
搬移的含义是将原本属于一个链表的节点移动到另一个链表的操作,有两个函数:
list_move函数和
list_move_tail函数:
-
/**
-
* list_move - 把从一个链表上删除的节点添加到另外的一个链表的头部
-
* @list: 我们要移动的节点
-
* @head: 要移动到的另外的一个链表头
-
*/
-
static inline void list_move(struct list_head *list, struct list_head *head)
-
{
-
__list_del_entry(
list);
-
list_add(
list, head);
-
}
-
-
/**
-
* list_move_tail - 添加到另外的一个链表的尾部
-
* @list: the entry to move
-
* @head: the head that will follow our entry
-
*/
-
static inline void list_move_tail(struct list_head *list,
-
struct list_head *head)
-
{
-
__list_del_entry(
list);
-
list_add_tail(
list, head);
-
}
图形:

e) 合并
合并在这里的意思就是合并了,是将两个独立的链表合并成为一个链表,合并的时候根据合并的位置的不同可以分为:
合并到头部的 list_splice函数和
合并到尾部的 list_splice_tail函数:(这两个函数有推荐使用的函数)
-
/**
-
* list_splice - join two lists, this is designed for stacks
-
* @list: the new list to add.
-
* @head: the place to add it in the first list.
-
*/
-
static inline void list_splice(const struct list_head *list,
-
struct list_head *head)
-
{
-
if (!list_empty(
list))
-
__list_splice(
list, head, head->next);
-
}
-
/**
-
* list_splice_tail - join two lists, each list being a queue
-
* @list: the new list to add.
-
* @head: the place to add it in the first list.
-
*/
-
static inline void list_splice_tail(struct list_head *list,
-
struct list_head *head)
-
{
-
if (!list_empty(
list))
-
__list_splice(
list, head->prev, head);
-
}
-
static inline void list_splice_init(struct list_head *list, // 推荐使用,防止混乱
-
struct list_head *head)
-
{
-
if (!list_empty(
list)) {
-
__list_splice(
list, head, head->next);
-
INIT_LIST_HEAD(
list); <--- 跟list_splice唯一的不同
-
}
-
}
-
static inline void list_splice_tail_init(struct list_head *list, // 推荐使用,防止混乱
-
struct list_head *head)
-
{
-
if (!list_empty(
list)) {
-
__list_splice(
list, head->prev, head);
-
INIT_LIST_HEAD(
list); <--- 跟list_splice_tail_init唯一的不同
-
}
-
}
-
static
inline
void __list_splice(
const struct list_head *
list,
-
struct list_head *prev,
-
struct list_head *next)
-
{
-
struct list_head *first = list->next;
-
struct list_head *last = list->prev;
-
-
first->prev = prev;
-
prev->next = first;
-
-
last->next = next;
-
next->prev = last;
-
}
图形:

这张图虽然画出来了,比起看程序,虽然好点,但是理解起来还是有很大的问题,此处就借鉴别人的一张图来说明这个list_splice函数实现了什么:
链表合并list_splice(&list1,&list2) (此图片引自:http://www.ibm.com/developerworks/cn/linux/kernel/l-chain/)
对于这张图的说明如下:
假设当前有两个链表,表头分别是list1和list2(都是struct list_head变量),当调用list_splice(&list1,&list2)时,只要list1非空,list1链表的内容将被挂接在list2链表上,位于list2和list2.next(原list2表的第一个节点)之间。新list2链表将以原list1表的第一个节点为首节点,而尾节点不变。
4. 找到链表中的数据
前边提到的函数都是操作的链表节点的入口,但是对于我们真正有意义的是节点上的数据,链表的头上没有数据,其他的节点上都是带有数据的。如何从一个链表节点的入口得到节点的数据呢?要用到以下的函数:
list_entry函数:
-
/**
-
* list_entry - 获得含链表入口的结构体首地址
-
* @ptr: member的首地址
-
* @type: 容器的类型
-
* @member: 要得到他的容器的某个成员
-
*/
-
#define list_entry(ptr, type, member) \
-
container_of(ptr, type, member)
-
-
#define container_of(ptr, type, member) ({ \
-
const typeof( ((type *)0)->member ) *__mptr = (ptr); \
-
(type *)( (char *)__mptr - offsetof(type,member) );})
-
-
#define offsetof(TYPE, MEMBER) ((size_t) &((TYPE *)0)->MEMBER) // 将数据结构体放到0地址处,天然的结构体中成员的首地址就是成员在结构体中的偏移量
一个简单的例子:
main.c
-
#include <stdio.h>
-
#include "list.h"
-
-
LIST_HEAD(device_list);
-
-
typedef
struct device_struct
-
{
-
unsigned
char *devname;
-
struct list_head entry;
-
} device_struct_s;
-
-
int main(int argc, const char *argv[])
-
{
-
device_struct_s led;
-
device_struct_s *led2;
-
-
led.devname =
"led";
-
-
/* 添加到链表的前边 */
-
list_add(&led.entry, &device_list);
-
-
/* 得到含有链表节点的数据结构体的首地址 */
-
led2 = list_entry(device_list.next, device_struct_s, entry);
-
-
printf(
"led2.devname = %s\n", led2->devname);
-
-
return
0;
-
}
led2.devname = led
5. 遍历链表
对linux内核的遍历可以分为遍历链表和遍历链表中的结构体:
从头开始遍历链表,list_for_each宏,
从头开始遍历链表中的结构体,list_for_each_entry宏:
-
/**
-
* list_for_each - 迭代/遍历 链表
-
* @pos: the &struct list_head to use as a loop cursor.
-
* @head: 要遍历的链表头
-
*/
-
#define list_for_each(pos, head) \
-
for (pos = (head)->next; pos != (head); pos = pos->next)
-
-
-
/**
-
* list_for_each_entry - 遍历含链表节点入口的结构体
-
* @pos: the type * to use as a loop cursor.
-
* @head: 要遍历的链表头
-
* @member: 结构体中链表入口的名字
-
*/
-
#define list_for_each_entry(pos, head, member) \
-
for (pos = list_entry((head)->next, typeof(*pos), member); \
-
&pos->member != (head); \
-
pos = list_entry(pos->member.next, typeof(*pos), member))
一个简单的例子:
-
#include <stdio.h>
-
#include "list.h"
-
-
LIST_HEAD(device_list);
-
-
typedef
struct device_struct
-
{
-
unsigned
char *devname;
-
struct list_head entry;
-
} device_struct_s;
-
-
int main(int argc, const char *argv[])
-
{
-
device_struct_s led, gpio, beep, *tmp;
-
-
led.devname =
"led";
-
gpio.devname =
"gpio";
-
beep.devname =
"beep";
-
-
/* 一个一个往链表的前边添加 */
-
list_add(&led.entry, &device_list);
-
list_add(&gpio.entry, &device_list);
-
list_add(&beep.entry, &device_list);
-
-
/* 1. 遍历链表的入口的首地值 */
-
struct list_head *i;
-
list_for_each(i, &device_list)
-
{
-
tmp = list_entry(i, device_struct_s, entry);
-
printf(
"tmp.devname = %s\n", tmp->devname);
-
}
-
-
/* 2. 遍历含链表的入口的结构体的首地值 */
-
device_struct_s *j;
-
list_for_each_entry(j, &device_list, entry)
-
{
-
printf(
"j.devname = %s\n", j->devname);
-
}
-
-
return
0;
-
}
tmp.devname = beep
tmp.devname = gpio
tmp.devname = led
j.devname = beep
j.devname = gpio
j.devname = led
另外:
- linux内核的链表中提供了反向遍历链表的宏list_for_each_prev和list_for_each_entry_reverse,他们分别是list_for_each和list_for_each_entry的反方向的实现,使用方法完全一样。
- 如果遍历不是从链表头开始,而是从已知的某个节点pos开始,则要使用list_for_each_entry_continue宏(使用方法同list_for_each_entry宏)。
- 如果想实现如果pos有值则从pos开始遍历,如果没有则从链表的头开始遍历,为此,Linux专门提供了一个list_prepare_entry(pos,head,member)宏,将它的返回值作为list_for_each_entry_continue()的pos参数,就可以满足这一要求。
我们将list_for_each_prev和list_for_each_entry_reverse的代码和执行结果也写下来:
-
printf(
"list_for_each_prev()\n");
-
/* 3. 反向遍历链表的入口的首地值 */
-
struct list_head *k;
-
list_for_each_prev(k, &device_list)
-
{
-
tmp = list_entry(k, device_struct_s, entry);
-
printf(
"tmp.devname = %s\n", tmp->devname);
-
}
-
-
printf(
"list_for_each_reverse()\n");
-
/* 4. 反向遍历含链表的入口的结构体的首地值 */
-
device_struct_s *g;
-
list_for_each_entry_reverse(g, &device_list, entry)
-
{
-
printf(
"g.devname = %s\n", g->devname);
-
}
【1】此部分是在上边的main.c中实现的
【2】结合上边代码整个的执行结果如下:
list_for_each()
tmp.devname =beep
tmp.devname =gpio
tmp.devname =led
list_for_each_entry()
j.devname = beep
j.devname = gpio
j.devname = led
list_for_each_prev() <— 可以看到遍历结果是从尾部遍历到头部
tmp.devname = led
tmp.devname = gpio
tmp.devname = beep
list_for_each_reverse() <— 可以看到遍历结果是从尾部遍历到头部
g.devname = led
g.devname = gpio
g.devname = beep
6. 安全性
只讲一点判断链表是不是为空:
list_empty宏:
-
static inline int list_empty(const struct list_head *head)
-
{
-
return head->next == head;
-
}
linux 中的 list (链表)
更新时间: <>
原创时间: <2016-12-26>
版权: 本文采用以下协议进行授权, 自由转载 - 非商用 - 非衍生 - 保持署名 | Creative Commons BY-NC-ND 3.0,转载请注明作者及出处.
一、简介:
linux中的链表使用两个指针,可以方便的构成双向链表,实际上,通常它都组织成双向循环链表,不同于数据结构书上的链表,这里的节点只有链表指针,没有链表的数据,下边我将对内核中使用的 include/linux/list.h 进行函数说明和生动的图形解释。
二、函数:
我们先来看看
1. 链表数据结构 list_head 的定义:
-
struct list_head {
-
struct list_head *next, *prev;
-
};
2. 声明和初始化:有两种方法
①声明的时候初始化一个链表 LIST_HEAD 宏:
-
#define LIST_HEAD_INIT(name) { &(name), &(name) } // 链表的pre和next指针都指向了节点自己的首地址
-
-
#define LIST_HEAD(name) \
-
struct list_head name = LIST_HEAD_INIT(name)
-
static inline void INIT_LIST_HEAD(struct list_head *list)
-
{
-
list->next =
list;
-
list->prev =
list;
-
}
注意:
此处说的声明的时候简单的理解为不在函数内部,而运行时指的就是在函数内部了
图形:
3. 插入/删除/合并
a) 插入
对链表的插入操作有两种:
在表头插入 list_add函数 和
在表尾插入 list_add_tail函数:
-
static inline void list_add(struct list_head *new, struct list_head *head) // new:要添加的新的链表的首地址,head:链表的中的位置
-
{
-
__list_add(
new, head, head->next);
-
}
-
static inline void list_add_tail(struct list_head *new, struct list_head *head)
-
{
-
__list_add(
new, head->prev, head);
-
}
-
static
inline
void __list_add(struct list_head *
new,
-
struct list_head *prev,
-
struct list_head *next)
-
{
-
next->prev =
new;
-
new->next = next;
-
new->prev = prev;
-
prev->next =
new;
-
}
图形:
- list_add 部分:
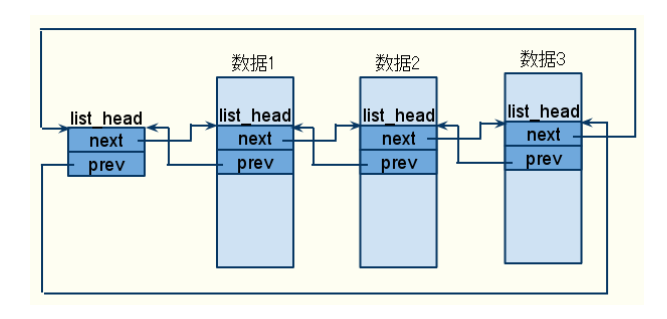
网络上的一张图更全面的展示了在使用中的链表的结构:
- list_add_tail 部分:
画图总结:
【1】上边图形的画法中,要前两步划在外边沿
【2】对list链表的头和尾的快速记忆的方法,我们可以看待内核中的链表为 向右行驶的贪吃蛇
b) 删除
对链表的删除操作函数有两种:
list_del函数和
list_del_init函数:
-
static inline void list_del(struct list_head *entry) // entry:要删除的链表的首地址
-
{
-
__list_del(entry->prev, entry->next);
// 这不就是 __list_del_entry(entry) 吗!!
-
entry->next = LIST_POISON1;
-
entry->prev = LIST_POISON2;
-
}
-
static inline void list_del_init(struct list_head *entry)
-
{
-
__list_del_entry(entry);
-
INIT_LIST_HEAD(entry);
// 运行中初始化链表节点
-
}
-
static
inline
void __list_del_entry(struct list_head *entry)
-
{
-
__list_del(entry->prev, entry->next);
-
}
他们调用了相同的 __list_del 函数:
-
static
inline
void __list_del(struct list_head * prev, struct list_head * next)
-
{
-
next->prev = prev;
-
prev->next = next;
-
}
图形:
我们来删除有3个元素的链表的中间的一个:list_del(&new)
list_del_init 函数不再画图,唯一的不同是把删除下来的图的next和prev指针指向了自己的首地址
c) 替换
对链表的替换操作有两个:
list_replace函数和
list_replace_init函数:
-
static inline void list_replace(struct list_head *old,
-
struct list_head *new)
-
{
-
new->next = old->next;
-
new->next->prev =
new;
-
new->prev = old->prev;
-
new->prev->next =
new;
-
}
-
-
static inline void list_replace_init(struct list_head *old,
-
struct list_head *new)
-
{
-
list_replace(old,
new);
-
INIT_LIST_HEAD(old);
-
}
list_replace_init函数的图形此处也不再画
d) 搬移
搬移的含义是将原本属于一个链表的节点移动到另一个链表的操作,有两个函数:
list_move函数和
list_move_tail函数:
-
/**
-
* list_move - 把从一个链表上删除的节点添加到另外的一个链表的头部
-
* @list: 我们要移动的节点
-
* @head: 要移动到的另外的一个链表头
-
*/
-
static inline void list_move(struct list_head *list, struct list_head *head)
-
{
-
__list_del_entry(
list);
-
list_add(
list, head);
-
}
-
-
/**
-
* list_move_tail - 添加到另外的一个链表的尾部
-
* @list: the entry to move
-
* @head: the head that will follow our entry
-
*/
-
static inline void list_move_tail(struct list_head *list,
-
struct list_head *head)
-
{
-
__list_del_entry(
list);
-
list_add_tail(
list, head);
-
}
图形:
e) 合并
合并在这里的意思就是合并了,是将两个独立的链表合并成为一个链表,合并的时候根据合并的位置的不同可以分为:
合并到头部的 list_splice函数和
合并到尾部的 list_splice_tail函数:(这两个函数有推荐使用的函数)
-
/**
-
* list_splice - join two lists, this is designed for stacks
-
* @list: the new list to add.
-
* @head: the place to add it in the first list.
-
*/
-
static inline void list_splice(const struct list_head *list,
-
struct list_head *head)
-
{
-
if (!list_empty(
list))
-
__list_splice(
list, head, head->next);
-
}
-
/**
-
* list_splice_tail - join two lists, each list being a queue
-
* @list: the new list to add.
-
* @head: the place to add it in the first list.
-
*/
-
static inline void list_splice_tail(struct list_head *list,
-
struct list_head *head)
-
{
-
if (!list_empty(
list))
-
__list_splice(
list, head->prev, head);
-
}
-
static inline void list_splice_init(struct list_head *list, // 推荐使用,防止混乱
-
struct list_head *head)
-
{
-
if (!list_empty(
list)) {
-
__list_splice(
list, head, head->next);
-
INIT_LIST_HEAD(
list); <--- 跟list_splice唯一的不同
-
}
-
}
-
static inline void list_splice_tail_init(struct list_head *list, // 推荐使用,防止混乱
-
struct list_head *head)
-
{
-
if (!list_empty(
list)) {
-
__list_splice(
list, head->prev, head);
-
INIT_LIST_HEAD(
list); <--- 跟list_splice_tail_init唯一的不同
-
}
-
}
-
static
inline
void __list_splice(
const struct list_head *
list,
-
struct list_head *prev,
-
struct list_head *next)
-
{
-
struct list_head *first = list->next;
-
struct list_head *last = list->prev;
-
-
first->prev = prev;
-
prev->next = first;
-
-
last->next = next;
-
next->prev = last;
-
}
图形:
这张图虽然画出来了,比起看程序,虽然好点,但是理解起来还是有很大的问题,此处就借鉴别人的一张图来说明这个list_splice函数实现了什么:
链表合并list_splice(&list1,&list2) (此图片引自:http://www.ibm.com/developerworks/cn/linux/kernel/l-chain/)
对于这张图的说明如下:
假设当前有两个链表,表头分别是list1和list2(都是struct list_head变量),当调用list_splice(&list1,&list2)时,只要list1非空,list1链表的内容将被挂接在list2链表上,位于list2和list2.next(原list2表的第一个节点)之间。新list2链表将以原list1表的第一个节点为首节点,而尾节点不变。
4. 找到链表中的数据
前边提到的函数都是操作的链表节点的入口,但是对于我们真正有意义的是节点上的数据,链表的头上没有数据,其他的节点上都是带有数据的。如何从一个链表节点的入口得到节点的数据呢?要用到以下的函数:
list_entry函数:
-
/**
-
* list_entry - 获得含链表入口的结构体首地址
-
* @ptr: member的首地址
-
* @type: 容器的类型
-
* @member: 要得到他的容器的某个成员
-
*/
-
#define list_entry(ptr, type, member) \
-
container_of(ptr, type, member)
-
-
#define container_of(ptr, type, member) ({ \
-
const typeof( ((type *)0)->member ) *__mptr = (ptr); \
-
(type *)( (char *)__mptr - offsetof(type,member) );})
-
-
#define offsetof(TYPE, MEMBER) ((size_t) &((TYPE *)0)->MEMBER) // 将数据结构体放到0地址处,天然的结构体中成员的首地址就是成员在结构体中的偏移量
一个简单的例子:
main.c
-
#include <stdio.h>
-
#include "list.h"
-
-
LIST_HEAD(device_list);
-
-
typedef
struct device_struct
-
{
-
unsigned
char *devname;
-
struct list_head entry;
-
} device_struct_s;
-
-
int main(int argc, const char *argv[])
-
{
-
device_struct_s led;
-
device_struct_s *led2;
-
-
led.devname =
"led";
-
-
/* 添加到链表的前边 */
-
list_add(&led.entry, &device_list);
-
-
/* 得到含有链表节点的数据结构体的首地址 */
-
led2 = list_entry(device_list.next, device_struct_s, entry);
-
-
printf(
"led2.devname = %s\n", led2->devname);
-
-
return
0;
-
}
led2.devname = led
5. 遍历链表
对linux内核的遍历可以分为遍历链表和遍历链表中的结构体:
从头开始遍历链表,list_for_each宏,
从头开始遍历链表中的结构体,list_for_each_entry宏:
-
/**
-
* list_for_each - 迭代/遍历 链表
-
* @pos: the &struct list_head to use as a loop cursor.
-
* @head: 要遍历的链表头
-
*/
-
#define list_for_each(pos, head) \
-
for (pos = (head)->next; pos != (head); pos = pos->next)
-
-
-
/**
-
* list_for_each_entry - 遍历含链表节点入口的结构体
-
* @pos: the type * to use as a loop cursor.
-
* @head: 要遍历的链表头
-
* @member: 结构体中链表入口的名字
-
*/
-
#define list_for_each_entry(pos, head, member) \
-
for (pos = list_entry((head)->next, typeof(*pos), member); \
-
&pos->member != (head); \
-
pos = list_entry(pos->member.next, typeof(*pos), member))
一个简单的例子:
-
#include <stdio.h>
-
#include "list.h"
-
-
LIST_HEAD(device_list);
-
-
typedef
struct device_struct
-
{
-
unsigned
char *devname;
-
struct list_head entry;
-
} device_struct_s;
-
-
int main(int argc, const char *argv[])
-
{
-
device_struct_s led, gpio, beep, *tmp;
-
-
led.devname =
"led";
-
gpio.devname =
"gpio";
-
beep.devname =
"beep";
-
-
/* 一个一个往链表的前边添加 */
-
list_add(&led.entry, &device_list);
-
list_add(&gpio.entry, &device_list);
-
list_add(&beep.entry, &device_list);
-
-
/* 1. 遍历链表的入口的首地值 */
-
struct list_head *i;
-
list_for_each(i, &device_list)
-
{
-
tmp = list_entry(i, device_struct_s, entry);
-
printf(
"tmp.devname = %s\n", tmp->devname);
-
}
-
-
/* 2. 遍历含链表的入口的结构体的首地值 */
-
device_struct_s *j;
-
list_for_each_entry(j, &device_list, entry)
-
{
-
printf(
"j.devname = %s\n", j->devname);
-
}
-
-
return
0;
-
}
tmp.devname = beep
tmp.devname = gpio
tmp.devname = led
j.devname = beep
j.devname = gpio
j.devname = led
另外:
- linux内核的链表中提供了反向遍历链表的宏list_for_each_prev和list_for_each_entry_reverse,他们分别是list_for_each和list_for_each_entry的反方向的实现,使用方法完全一样。
- 如果遍历不是从链表头开始,而是从已知的某个节点pos开始,则要使用list_for_each_entry_continue宏(使用方法同list_for_each_entry宏)。
- 如果想实现如果pos有值则从pos开始遍历,如果没有则从链表的头开始遍历,为此,Linux专门提供了一个list_prepare_entry(pos,head,member)宏,将它的返回值作为list_for_each_entry_continue()的pos参数,就可以满足这一要求。
我们将list_for_each_prev和list_for_each_entry_reverse的代码和执行结果也写下来:
-
printf(
"list_for_each_prev()\n");
-
/* 3. 反向遍历链表的入口的首地值 */
-
struct list_head *k;
-
list_for_each_prev(k, &device_list)
-
{
-
tmp = list_entry(k, device_struct_s, entry);
-
printf(
"tmp.devname = %s\n", tmp->devname);
-
}
-
-
printf(
"list_for_each_reverse()\n");
-
/* 4. 反向遍历含链表的入口的结构体的首地值 */
-
device_struct_s *g;
-
list_for_each_entry_reverse(g, &device_list, entry)
-
{
-
printf(
"g.devname = %s\n", g->devname);
-
}
【1】此部分是在上边的main.c中实现的
【2】结合上边代码整个的执行结果如下:
list_for_each()
tmp.devname =beep
tmp.devname =gpio
tmp.devname =led
list_for_each_entry()
j.devname = beep
j.devname = gpio
j.devname = led
list_for_each_prev() <— 可以看到遍历结果是从尾部遍历到头部
tmp.devname = led
tmp.devname = gpio
tmp.devname = beep
list_for_each_reverse() <— 可以看到遍历结果是从尾部遍历到头部
g.devname = led
g.devname = gpio
g.devname = beep
6. 安全性
只讲一点判断链表是不是为空:
list_empty宏:
-
static inline int list_empty(const struct list_head *head)
-
{
-
return head->next == head;
-
}