1.3 loC容器的初始化过程
简单来说, IoC容器的初始化是由前面介绍的refresh()方法来启动的,这个方法标志着IoC容器的正式启动。具体来说,这个启动包括BeanDefinition的Resouce定位、载入和注册三个基本过程。如果我们了解如何编程式地使用IoC容器,就可以清楚地看到l Resource定位和载入过程的接口调用。
在下面的内容里,我们将会详细分析这三个过程的实现。在分析之前,要提醒读者注意的是, Spring把这三个过程分开,并使用不同的模块来完成,如使用相应的ResourceLoader 、BeanDefinitionReader等模块,通过这样的设计方式,可以让用户更加灵活地对这三个过程进行剪裁或扩展,定义出最适合自己的IoC容器的初始化过程。
第一个过程是Resource定位过程。这个Resource定位指的是BeanDefinition的资源定位,它由ResourceLoader通过统一的Resource 接口来完成,这个Resource对各种形式的BeanDefinition的使用都提供了统一接口。对于这些BeanDefinition的存在形式,相信大家都不会感到陌生。比如.在文件系统中的Bean定义信息可以使用FileSystemResource来进行抽象,在类路径中的Bean定义信息可以使用前面提到的ClassPathResource来使用,等等。这个定位过程类似于容器寻找数据的过程,就像用水桶装水先要把水找到一样。
第二个过程是BeanDefinition的载入。这个载入过程是把用户定义好的Bean表示成IoC容器内部的数据结构,而这个容器内部的数据结构就是BeanDefinition。具体来说,这个BeanDefinition实际上就是POJO对象在IoC容器中的抽象,通过这个BeanDefinition定义的数据结构,使loC容器能够方便地对POJO对象也就是Bean进行管理。
第三个过程是向IoC 容器注册这些BeanDefinition 的过程。这个过程是通过调用BeanDefinitionRegistry接口的实现来完成的。这个注册过程把载入过程中解析得到的BeanDefinition 向IoC容器进行注册。通过分析,我们可以看到,在IoC容器内部将BeanDefinition注入到一个HashMap 中去, IoC容器就是通过这个HashMap来持有这些BeanDefinition数据的。
这里谈的是IoC容器初始化过程,在这个过程中,一般不包含Bean依赖注入的实现。在Spring IoC的设计中, Bean定义的载入和依赖注入是两个独立的过程。依赖注入一般发生在应用第一次通过getBean向容器索取Bean的时候.但有一个例外值得注意,在使用IoC容器时有一个预实例化的配置,通过这个预实例化的配置(具体来说, 可以通过为Bean定义信息中的lazyinit属性),用户可以对容器初始化过程作一个微小的控制,从而改变这个被设置了lazyinit属性的Bean的依赖注入过程。
1.3.1 BeanDefinition的Resource定位
以编程的方式使用DefaultListableBeanFactory时,首先定义一个Resource来定位容器使用的BeanDefinition。 这时使用的是ClassPathResource ,这意味着Spring会在类路径中去寻找以文件形式存在的BeanDefinition信息。
ClassPathResource res = new ClassPathResource("beans.xml"); 这里定义的Reso rce并不能由DefaultListableBeanFactory直接使用, Spring通过BeanDefinitionReader来对这些信息进行处理。在这里,我们也可以看到使用ApplicationContext相对于直接使用DefaultListableBeanFactory的好处。因为在ApplicationContext 中,Spring已经为我们提供了一系列加载不同Resource 的读取器的实现,而DefaultListableBeanFactory只是一个纯粹的IoC容器, 需要为它配置特定的读取器才能完成这些功能。当然,有利就有弊, 使用DefaultListableBeanFactory这种更底层的容器,能提高定制IoC容器的灵活性。
回到我们经常使用的ApplicationContext上来,例如FileSystemXmlApplicationContext 、ClassPathXmlApplicationContext以及XmlWebApplicationContext等。简单地从这些类的各字
上分析, 可以清楚地看到它们可以提供哪些不同的Resource 读入功能,比如
FilesystemXmlApplicationContext可以从文件系统载入Resource, ClassPathXmlApplicationContext可以从Class Path载入Resource, XmlWebApplicationContext可以在Web容器中载入Resource。
下面以FileSystemXmlApplicationContext为例,通过分析这个ApplicationContext的实现来看看它是怎样完成这个Resource定位过程的。
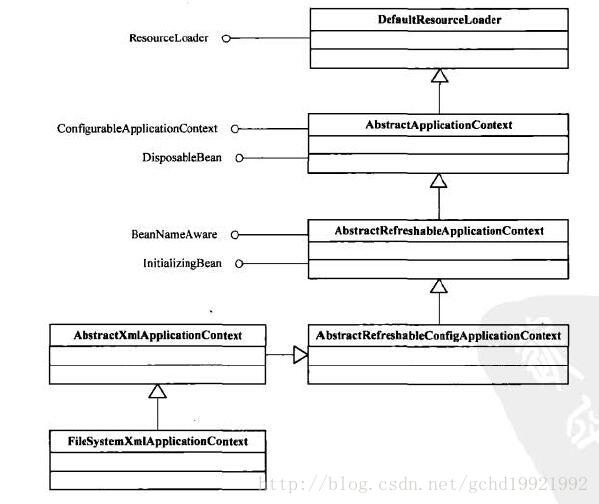
这个FileSystemXmlApplicationContext 已经通过继承AbstractApplicationContext具备了ResourceLoaderi卖入以Resource定义的BeanDefinition的能力,因为AbstractAppIiationContext 的基类是DefaultResourceLoader. 下面让我们看看源码:
public class FileSystemXmlApplicationContext extends AbstractXmlApplicationContext {

    public FileSystemXmlApplicationContext() {
    }

    /**
     * Create a new FileSystemXmlApplicationContext for bean-style configuration.
     * @param parent the parent context
     * @see #setConfigLocation
     * @see #setConfigLocations
     * @see #afterPropertiesSet()
     */
    public FileSystemXmlApplicationContext(ApplicationContext parent) {
        super(parent);
    }

    /**
     * Create a new FileSystemXmlApplicationContext, loading the definitions
     * from the given XML file and automatically refreshing the context.
     * @param configLocation file path
     * @throws BeansException if context creation failed
     */
    public FileSystemXmlApplicationContext(String configLocation) throws BeansException {
        this(new String[] {configLocation}, true, null);
    }

    /**
     * Create a new FileSystemXmlApplicationContext, loading the definitions
     * from the given XML files and automatically refreshing the context.
     * @param configLocations array of file paths
     * @throws BeansException if context creation failed
     */
    public FileSystemXmlApplicationContext(String... configLocations) throws BeansException {
        this(configLocations, true, null);
    }

    /**
     * Create a new FileSystemXmlApplicationContext with the given parent,
     * loading the definitions from the given XML files and automatically
     * refreshing the context.
     * @param configLocations array of file paths
     * @param parent the parent context
     * @throws BeansException if context creation failed
     */
    public FileSystemXmlApplicationContext(String[] configLocations, ApplicationContext parent) throws BeansException {
        this(configLocations, true, parent);
    }

    /**
     * Create a new FileSystemXmlApplicationContext, loading the definitions
     * from the given XML files.
     * @param configLocations array of file paths
     * @param refresh whether to automatically refresh the context,
     * loading all bean definitions and creating all singletons.
     * Alternatively, call refresh manually after further configuring the context.
     * @throws BeansException if context creation failed
     * @see #refresh()
     */
    public FileSystemXmlApplicationContext(String[] configLocations, boolean refresh) throws BeansException {
        this(configLocations, refresh, null);
    }

    /**
     * Create a new FileSystemXmlApplicationContext with the given parent,
     * loading the definitions from the given XML files.
     * @param configLocations array of file paths
     * @param refresh whether to automatically refresh the context,
     * loading all bean definitions and creating all singletons.
     * Alternatively, call refresh manually after further configuring the context.
     * @param parent the parent context
     * @throws BeansException if context creation failed
     * @see #refresh()
     */
    public FileSystemXmlApplicationContext(String[] configLocations, boolean refresh, ApplicationContext parent)
            throws BeansException {

        super(parent);
        setConfigLocations(configLocations);
        if (refresh) {
            refresh();
        }
    }


    /**
     * Resolve resource paths as file system paths.
     * <p>Note: Even if a given path starts with a slash, it will get
     * interpreted as relative to the current VM working directory.
     * This is consistent with the semantics in a Servlet container.
     * @param path path to the resource
     * @return Resource handle
     * @see org.springframework.web.context.support.XmlWebApplicationContext#getResourceByPath
     */
    @Override
    protected Resource getResourceByPath(String path) {
        if (path != null && path.startsWith("/")) {
            path = path.substring(1);
        }
        return new FileSystemResource(path);
    }

}
在FileSystemApplicationContext中,我们可以看到在构造函数中.实现了对configuration进行处理的功能。让所有配置在文件系统中的,以XML文件方式存在的BeanDefnition都能够得到有效的处理,比如,实现了getResourceByPath方法,这个方法是一个模板方法,是为读取Resource 服务的。对于IoC 容器功能的实现,这里没有涉及,因为它继承了AbstractXmlApplicationContext ,关于Ioc容器功能相关的实现,都是在FileSysternXmlApplicationContext中完成的,但是在构造函数中通过refresh来启动IoC容器的初始化,这个refresh方法非常重要,也是我们以后分析容器初始化过程实现的一个重要人口。
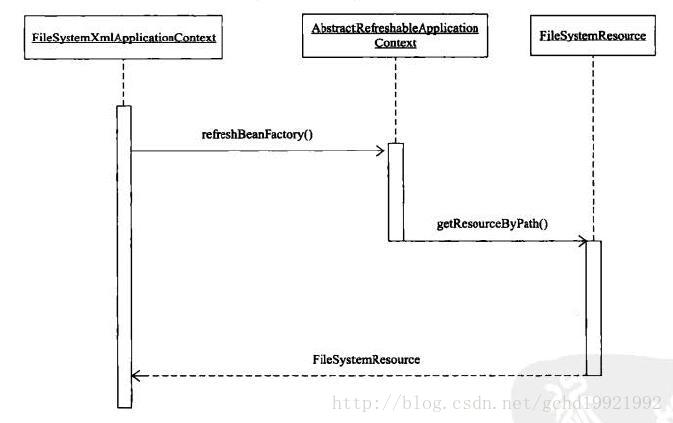
对BeanDefinition资源定位的过程,最初是由refresh来触发的,这个refresh的调用是在FileSysternXmlBeanFactory的构造函数中启动的,大致的调用过程如图:
在IoC容器的初始化过程中, B臼nDefinition资源的定位、读入和注册过程是分开进行的,这也是解娟的一个体现。关于这个读入器的配置,可以到FileSystemXmlApplicationContext的基类AbstractRefreshableApplicationContext中看看它是怎样实现的。
我们重点看看AbstractRefreshableApplicationContext的refreshBeanFactory方住的实现,这个refreshBeanFactory被FileSystemXmlApplicationContext构造函数中的refresh调用.在这个方法中,通过createBeanFactroy构建了一个IoC容器供ApplicationContext使用。这个IoC容器就是我们前面提到过的DefaultListableBeanFactory ,同时,它启动了loadBeanDefinitions来载入BeanDefinition ,这个过程和前面以编程式的方撞来使用IoC容器( XmIBeanFactory)的过程非常类似。
在初始化FileSystmXmlApplicationContext的过程中,通过IoC容器的初始化的refresh来启动整个调用,使用的IoC容器是DefultListableBeanFactory. 具体的资源载入在XmIBeanDefinitionReader 读入BeanDefinition 时完成,在
XmlBeanDefinitionReader的基类AbstractBeanDefinitionReader中可以看到这个载入过程的具体实现。对载入过程的启动,可以在AbstractRefreshableApplicationContext 的loadBeanDefinitions方法中看到,如代码所示。
public abstract class AbstractRefreshableApplicationContext extends AbstractApplicationContext {

    private Boolean allowBeanDefinitionOverriding;

    private Boolean allowCircularReferences;

    private DefaultListableBeanFactory beanFactory;

    private final Object beanFactoryMonitor = new Object();

    public AbstractRefreshableApplicationContext() {
    }

    public AbstractRefreshableApplicationContext(ApplicationContext parent) {
        super(parent);
    }

    public void setAllowBeanDefinitionOverriding(boolean allowBeanDefinitionOverriding) {
        this.allowBeanDefinitionOverriding = allowBeanDefinitionOverriding;
    }

    public void setAllowCircularReferences(boolean allowCircularReferences) {
        this.allowCircularReferences = allowCircularReferences;
    }

    @Override
    protected final void refreshBeanFactory() throws BeansException {
        if (hasBeanFactory()) {
            destroyBeans();
            closeBeanFactory();
        }
        try {
            DefaultListableBeanFactory beanFactory = createBeanFactory();
            beanFactory.setSerializationId(getId());
            customizeBeanFactory(beanFactory);
            loadBeanDefinitions(beanFactory);
            synchronized (this.beanFactoryMonitor) {
                this.beanFactory = beanFactory;
            }
        }
        catch (IOException ex) {
            throw new ApplicationContextException("I/O error parsing bean definition source for " + getDisplayName(), ex);
        }
    }

    @Override
    protected void cancelRefresh(BeansException ex) {
        synchronized (this.beanFactoryMonitor) {
            if (this.beanFactory != null)
                this.beanFactory.setSerializationId(null);
        }
        super.cancelRefresh(ex);
    }

    @Override
    protected final void closeBeanFactory() {
        synchronized (this.beanFactoryMonitor) {
            this.beanFactory.setSerializationId(null);
            this.beanFactory = null;
        }
    }

    protected final boolean hasBeanFactory() {
        synchronized (this.beanFactoryMonitor) {
            return (this.beanFactory != null);
        }
    }

    @Override
    public final ConfigurableListableBeanFactory getBeanFactory() {
        synchronized (this.beanFactoryMonitor) {
            if (this.beanFactory == null) {
                throw new IllegalStateException("BeanFactory not initialized or already closed - " +
                        "call 'refresh' before accessing beans via the ApplicationContext");
            }
            return this.beanFactory;
        }
    }

    protected DefaultListableBeanFactory createBeanFactory() {
        return new DefaultListableBeanFactory(getInternalParentBeanFactory());
    }

    protected void customizeBeanFactory(DefaultListableBeanFactory beanFactory) {
        if (this.allowBeanDefinitionOverriding != null) {
            beanFactory.setAllowBeanDefinitionOverriding(this.allowBeanDefinitionOverriding);
        }
        if (this.allowCircularReferences != null) {
            beanFactory.setAllowCircularReferences(this.allowCircularReferences);
        }
        beanFactory.setAutowireCandidateResolver(new QualifierAnnotationAutowireCandidateResolver());
    }

    protected abstract void loadBeanDefinitions(DefaultListableBeanFactory beanFactory)
            throws BeansException, IOException;

}
前面我们看到的getResourceByPath会被子类FileSystemXmlApplicationContext实现,这个方法返回的是一个FileSystemResource对象,通过这个对象, Spring可以进行相关的I/O操作,完成BeanDefinition的定位。它实现的就是对path进行解析,然后生成一个FileSystemResource对象并返回,如代码所示。
@Override
    protected Resource getResourceByPath(String path) {
        if (path != null && path.startsWith("/")) {
            path = path.substring(1);
        }
        return new FileSystemResource(path);
    }
如果是其他的ApplicationContext ,那么会对应生成其他种类的Resource 。作为接口的Resource定义了许多与I/O相关的操作。
我们以FileSystemXmlApplicationContext的实现原理为例子, 了解了Resource定位问题的解决方案,即以FileSystem方式存在的Resource的定位实现。在BeanDefinition定位完成的基础,上,就可以通过返回的Resource对象来进行BeanDefinition的载入了。在定位过程完成以后,为BeanDefinition的载入创造了I/O操作的条件,但是具体的数据还没有开始读人。这些数据的读人将在下面介绍的BeanDefinition的载入和解析中来完成。
1.3.2 BeanDefinition的载入和解析
这个载入过程,相当于把定义的BeanDefinition在IoC容器中转化成一个Spring内部表示的数据结构的过程。IoC容器对Bean的管理和依赖注入功能的实现,是通过对其持有的BeanDefinition进行各种相关操作来完成的。这些BeanDefinition数据在IoC容器中通过一个HashMap来保持和维护。当然这只是一种比较简单的维护方式,如果需要提高IoC容器的性能和容量,完全可以自己做一些扩展。下面,从DefauItListaleBeanFactory 的设计入手,看看IoC 容器是怎样完成BeanDefinition载入的。在开始分析之前,先回到IoC容器的初始化入口,也就是看一下refresh方法。这个方法的最初是在FileSystemXmlApplicationContext的构造函数中被调用的,
它的调用标志着容器初始化的开始,这些初始化对象就是BeanDefinition数据,初始化入口如代码如下
public FileSystemXmlApplicationContext(String[] configLocations, boolean refresh, ApplicationContext parent)
            throws BeansException {

        super(parent);
        setConfigLocations(configLocations);
        if (refresh) {
            refresh();
        }
    }
对容器的启动来说, refresh是一个很重要的方法,下面介绍一下它的实现。该方法在AbstractApplicationContext类(它FileSystemXmlApplicationContext的基类)中找到.它详细地描述了整个AppIicationContext 的初始化过程,比如BeanFactory 的更新,MessageSource和PostProcessor的注册,等等。这里看起来更像是对ApplicationContext进行初始化的模板或执行提纲,这个执行过程为Bean的生命周期管理提供了条件。IoC容器的refresh过程如代码所示。
public void refresh() throws BeansException, IllegalStateException {
synchronized (this.startupShutdownMonitor) {
// Prepare this context for refreshing.
prepareRefresh();
// Tell the subclass to refresh the internal bean factory.
ConfigurableListableBeanFactory beanFactory = obtainFreshBeanFactory();
// Prepare the bean factory for use in this context.
prepareBeanFactory(beanFactory);
try {
// Allows post-processing of the bean factory in context subclasses.
postProcessBeanFactory(beanFactory);
// Invoke factory processors registered as beans in the context.
invokeBeanFactoryPostProcessors(beanFactory);
// Register bean processors that intercept bean creation.
registerBeanPostProcessors(beanFactory);
// Initialize message source for this context.
initMessageSource();
// Initialize event multicaster for this context.
initApplicationEventMulticaster();
// Initialize other special beans in specific context subclasses.
onRefresh();
// Check for listener beans and register them.
registerListeners();
// Instantiate all remaining (non-lazy-init) singletons.
finishBeanFactoryInitialization(beanFactory);
// Last step: publish corresponding event.
finishRefresh();
}
catch (BeansException ex) {
if (logger.isWarnEnabled()) {
logger.warn("Exception encountered during context initialization - " +
"cancelling refresh attempt: " + ex);
}
// Destroy already created singletons to avoid dangling resources.
destroyBeans();
// Reset 'active' flag.
cancelRefresh(ex);
// Propagate exception to caller.
throw ex;
}
}
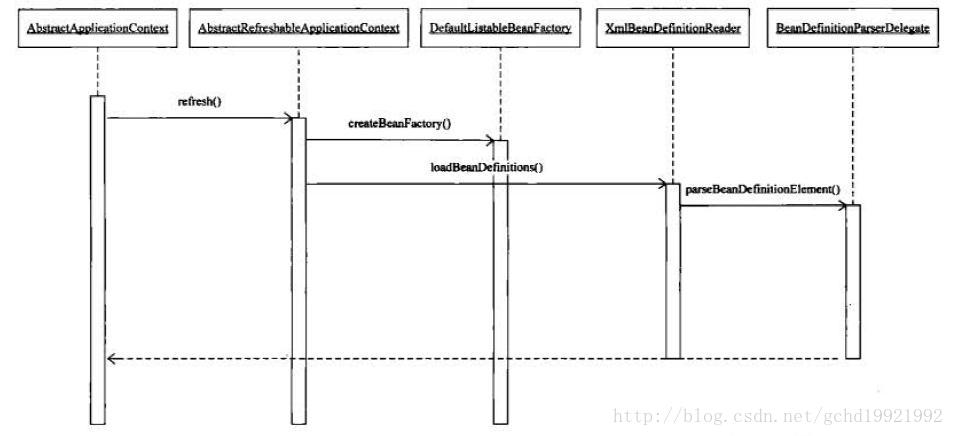
} 进入到AbstractRefresbableApplicationContext的refresbBeanFactory()方注中,在这个方法中创建了BeanFactory. 在创建loC容器前,如果已经有容器存在,那么需要把已有的容器。销毁和关闭,保证在refresh以后使用的是新建立起来的IoC容器。这么看来,这个refresh非常像重启动容器,就像重启动计算机那样。在建立好当前的IoC容器以后,开始了对容器的初始化过程,比如BeanDefinition的载入,具体的交互过程如图所示。
可以从AbstractRefreshableApplicationContext的refreshBeanFactory方法开始,了解这个Bean定义信息载入的过程,具体实现如代码所示。
@Override
    protected final void refreshBeanFactory() throws BeansException {
        if (hasBeanFactory()) {
            destroyBeans();
            closeBeanFactory();
        }
        try {
            DefaultListableBeanFactory beanFactory = createBeanFactory();
            beanFactory.setSerializationId(getId());
            customizeBeanFactory(beanFactory);
            loadBeanDefinitions(beanFactory);
            synchronized (this.beanFactoryMonitor) {
                this.beanFactory = beanFactory;
            }
        }
        catch (IOException ex) {
            throw new ApplicationContextException("I/O error parsing bean definition source for " + getDisplayName(), ex);
        }
    }
这里调用的loadBeanDefinitions实际上是一个抽象方法,我们看看前面提到的loadBeanDefinitions在AbstractRefreshableApplicationContext的子
类AbstractXmlApplicationContext中的实现,在这个loadBeanDefinitions中,初始化了读取器XmlBeanDefinitionReader ,然后把这个读取器在IoC容器中设置好(过程和编程式使用XmlBeanFactory是类似的),最后是启动读取器来完BeanDefinition在IoC容器中的载入,如代码所示。
@Override
    protected void loadBeanDefinitions(DefaultListableBeanFactory beanFactory) throws BeansException, IOException {
        // Create a new XmlBeanDefinitionReader for the given BeanFactory.
        XmlBeanDefinitionReader beanDefinitionReader = new XmlBeanDefinitionReader(beanFactory);

        // Configure the bean definition reader with this context's
        // resource loading environment.
        beanDefinitionReader.setEnvironment(this.getEnvironment());
        beanDefinitionReader.setResourceLoader(this);
        beanDefinitionReader.setEntityResolver(new ResourceEntityResolver(this));

        // Allow a subclass to provide custom initialization of the reader,
        // then proceed with actually loading the bean definitions.
        initBeanDefinitionReader(beanDefinitionReader);
        loadBeanDefinitions(beanDefinitionReader);
    }
接着就是loadBeanDefinitions调用的地方,首先得到BeanDefinition信息的Resource定位,然后直接调用XmlBeanDefinitionReader来读取,具体的载入过程是委托给BeanDefinitionReader完成的。因为这里的BeanDefinition是通过XML文件定义的,所以这里使用XmlBeanDefinitionReader来载入BeanDefinition到容器中,如代码所示。
protected void loadBeanDefinitions(XmlBeanDefinitionReader reader) throws BeansException, IOException {
        Resource[] configResources = getConfigResources();
        if (configResources != null) {
            reader.loadBeanDefinitions(configResources);
        }
        String[] configLocations = getConfigLocations();
        if (configLocations != null) {
            reader.loadBeanDefinitions(configLocations);
        }
    }
通过以上对实现原理的分析,我们可以看到,在初始化FileSystmXmlApplicationContext的过程中是通过调用IoC容器的refresh来启动整个BeanDefinition的载入过程的,这个初始化是通过定义的XmlBeanDefinitionReader来完成的。同时,我们也知道实际使用的IoC容器是DefuItListabIeBeanfactory ,具体的Resource载入在XmlBeanDefinitionRcader读入BeanDefinition时实现。因为Spring可以对应不同形式的BeanDefinition. 由于这里使用的是XML 方式的定义,所以需要使用XmlBeanDefinitionReader 。如果使用了其他的BeanDefinition方式,就需要使用其他种类的BeanDefinitionReader来完成数据的载入工作。在XmlBeanDefinitionReader的实现中可以看到,是在reader.loadBeanDefinitions 中开始进行BeanDefinition的载入的,而这时XmlBeanDefinitionReader的父类AbstractBeanDefinitionReader已经为BeanDefinition的载入做好了准备,如代码所示。
public int loadBeanDefinitions(Resource... resources) throws BeanDefinitionStoreException {
        Assert.notNull(resources, "Resource array must not be null");
        int counter = 0;
        for (Resource resource : resources) {
            counter += loadBeanDefinitions(resource);
        }
        return counter;
    }
这里调用的是loadBeanDefinitions(Resourceres)方法, 但这个方法在AbstractBeanDefinitionReader类里是没有实现的,它是一个接口方法,具体的实现在XmlBeanDefinitionReader中。在读取器中,需要得到代表XML文件的Resource ,因为这个Resource对象封装了对XML文件的I/O操作,所以读取器可以在打开I/O流后得到XML的文件对象。有了这个文件对象以后,就可以按照Spring的Bean定义规则来对这个XML的文档树进行解析了.这个解析是交给BeanDefinitionParserDelegate来完成的,看起来实现脉络很清楚。具体可以
参考代码实现,如代码所示。
public int loadBeanDefinitions(Resource resource) throws BeanDefinitionStoreException {
        return loadBeanDefinitions(new EncodedResource(resource));
    }

public int loadBeanDefinitions(EncodedResource encodedResource) throws BeanDefinitionStoreException {
        Assert.notNull(encodedResource, "EncodedResource must not be null");
        if (logger.isInfoEnabled()) {
            logger.info("Loading XML bean definitions from " + encodedResource.getResource());
        }

        Set<EncodedResource> currentResources = this.resourcesCurrentlyBeingLoaded.get();
        if (currentResources == null) {
            currentResources = new HashSet<EncodedResource>(4);
            this.resourcesCurrentlyBeingLoaded.set(currentResources);
        }
        if (!currentResources.add(encodedResource)) {
            throw new BeanDefinitionStoreException(
                    "Detected cyclic loading of " + encodedResource + " - check your import definitions!");
        }
        try {
            InputStream inputStream = encodedResource.getResource().getInputStream();
            try {
                InputSource inputSource = new InputSource(inputStream);
                if (encodedResource.getEncoding() != null) {
                    inputSource.setEncoding(encodedResource.getEncoding());
                }
                return doLoadBeanDefinitions(inputSource, encodedResource.getResource());
            }
            finally {
                inputStream.close();
            }
        }
        catch (IOException ex) {
            throw new BeanDefinitionStoreException(
                    "IOException parsing XML document from " + encodedResource.getResource(), ex);
        }
        finally {
            currentResources.remove(encodedResource);
            if (currentResources.isEmpty()) {
                this.resourcesCurrentlyBeingLoaded.remove();
            }
        }
    }
protected int doLoadBeanDefinitions(InputSource inputSource, Resource resource)
            throws BeanDefinitionStoreException {
        try {
            int validationMode = getValidationModeForResource(resource);
            Document doc = this.documentLoader.loadDocument(
                    inputSource, getEntityResolver(), this.errorHandler, validationMode, isNamespaceAware());
            return registerBeanDefinitions(doc, resource);
        }
        catch (BeanDefinitionStoreException ex) {
            throw ex;
        }
        catch (SAXParseException ex) {
            throw new XmlBeanDefinitionStoreException(resource.getDescription(),
                    "Line " + ex.getLineNumber() + " in XML document from " + resource + " is invalid", ex);
        }
        catch (SAXException ex) {
            throw new XmlBeanDefinitionStoreException(resource.getDescription(),
                    "XML document from " + resource + " is invalid", ex);
        }
        catch (ParserConfigurationException ex) {
            throw new BeanDefinitionStoreException(resource.getDescription(),
                    "Parser configuration exception parsing XML from " + resource, ex);
        }
        catch (IOException ex) {
            throw new BeanDefinitionStoreException(resource.getDescription(),
                    "IOException parsing XML document from " + resource, ex);
        }
        catch (Throwable ex) {
            throw new BeanDefinitionStoreException(resource.getDescription(),
                    "Unexpected exception parsing XML document from " + resource, ex);
        }
    }
照Spring的Bean语义要求.进行解析并转化为容器内部数据结构的,这个过程是在registerBeanDefinitions(doc, resource)中完成的。具体的过程是由BeanDefinitionDocumentReader来完成的, 这个registerBeanDefinition
还对载人的Bean的数量进行了统计。具体过程如代码所示。
public int registerBeanDefinitions(Document doc, Resource resource) throws BeanDefinitionStoreException {
        BeanDefinitionDocumentReader documentReader = createBeanDefinitionDocumentReader();
        documentReader.setEnvironment(getEnvironment());
        int countBefore = getRegistry().getBeanDefinitionCount();
        documentReader.registerBeanDefinitions(doc, createReaderContext(resource));
        return getRegistry().getBeanDefinitionCount() - countBefore;
    }
BeanDefinition的载入分成两部分,首先通过调用XML的解析器得到document对象,但这些document对象并没有按照Spring的Bean规则进行解析。在完成通用的XML解析以后,才是按照Spring的Bean规则进行解析的地方,这个按照Spring的Bean规则进行解析的过程是在documentReader中实现的。这里使用的documentReader是默认设置好的DefaultBeanDefinitionDocumentReader。这个DefaultBeanDefinitionDocumentReader的创建是在后面的方法中完成的,然后再完成BeanDefinition的处理,处理的结果由BeanDefinitionHolder对象来持有。这个BeanDefinitionHolder除了持有BeanDefinition对象外,还持有其他与BeanDefinition的使用相关的信息,比如Bean 的名字、别名集合等。这个BeanDefinition-Holder的生成是通过对Document文档树的内容进行解析来完成的,可以看到这个解析过程是由BeanDefinitionParserDelegate来实现(具体在processBeanDefinition方法中实现)的,同时这个解析是与Spring对BeanDefinition的配置规则紧密相关的。具体的实现原理如代码所示。
protected BeanDefinitionDocumentReader createBeanDefinitionDocumentReader() {
        return BeanDefinitionDocumentReader.class.cast(BeanUtils.instantiateClass(this.documentReaderClass));
    }
具体的Spring BeanDefinition的解析是在BeanDefinitionParserDelegate中完成的.这个类里包含了对各种Spring Bean定义规则的处理。在这里会看到对那些熟悉的BeanDefinition定义的处理,比如id 、name 、aliase等属性元素。把这些元素的值从XML文件相应的元素的属性中读
取出来以后,设置到生成的BeanDefinitionHolder中去.这些属性的解析还是比较简单的。对于其他元素配置的解析,比如各种Bean的属性配置,通过一个较为复杂的解析过程,这个过程是由parseBeanDefinitionElement来完成的。解析完成以后.会把解析结果放到BeanDefinition对象中并设置到BeanDefinitionHolder中去,如代码所示。
public BeanDefinitionHolder parseBeanDefinitionElement(Element ele, BeanDefinition containingBean) {
        String id = ele.getAttribute(ID_ATTRIBUTE);
        String nameAttr = ele.getAttribute(NAME_ATTRIBUTE);

        List<String> aliases = new ArrayList<String>();
        if (StringUtils.hasLength(nameAttr)) {
            String[] nameArr = StringUtils.tokenizeToStringArray(nameAttr, MULTI_VALUE_ATTRIBUTE_DELIMITERS);
            aliases.addAll(Arrays.asList(nameArr));
        }

        String beanName = id;
        if (!StringUtils.hasText(beanName) && !aliases.isEmpty()) {
            beanName = aliases.remove(0);
            if (logger.isDebugEnabled()) {
                logger.debug("No XML 'id' specified - using '" + beanName +
                        "' as bean name and " + aliases + " as aliases");
            }
        }

        if (containingBean == null) {
            checkNameUniqueness(beanName, aliases, ele);
        }

        AbstractBeanDefinition beanDefinition = parseBeanDefinitionElement(ele, beanName, containingBean);
        if (beanDefinition != null) {
            if (!StringUtils.hasText(beanName)) {
                try {
                    if (containingBean != null) {
                        beanName = BeanDefinitionReaderUtils.generateBeanName(
                                beanDefinition, this.readerContext.getRegistry(), true);
                    }
                    else {
                        beanName = this.readerContext.generateBeanName(beanDefinition);
                        // Register an alias for the plain bean class name, if still possible,
                        // if the generator returned the class name plus a suffix.
                        // This is expected for Spring 1.2/2.0 backwards compatibility.
                        String beanClassName = beanDefinition.getBeanClassName();
                        if (beanClassName != null &&
                                beanName.startsWith(beanClassName) && beanName.length() > beanClassName.length() &&
                                !this.readerContext.getRegistry().isBeanNameInUse(beanClassName)) {
                            aliases.add(beanClassName);
                        }
                    }
                    if (logger.isDebugEnabled()) {
                        logger.debug("Neither XML 'id' nor 'name' specified - " +
                                "using generated bean name [" + beanName + "]");
                    }
                }
                catch (Exception ex) {
                    error(ex.getMessage(), ele);
                    return null;
                }
            }
            String[] aliasesArray = StringUtils.toStringArray(aliases);
            return new BeanDefinitionHolder(beanDefinition, beanName, aliasesArray);
        }

        return null;
    }
上面介绍了对Bean元素进行解析的过程,也就是BeanDefinition依据XML的 bean标签定义被创建的过程。这个BeanDefinition可以看成是对 bean标签定义的抽象,如图所示。
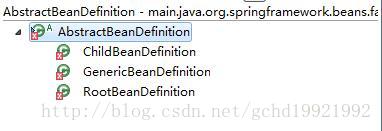
这个数据对象中封装的数据大多都是与 bean标签定义相关的,也有很多就是我们在定义Bean时看到的那些Spring标记,比如常见的init-method 、destroy-method 、factory-method , 等等,这个BeanDefinition数据类型是非常重要的,它封装了很多基本数据,这些基本数据都是IoC容器需要的。有了这些基本数据, IoC容器才能对Bean配置进行处理, 才能实现相应的容器特性。
beanClass 、description 、lazylnit这些属性都是在配置bean时经常碰到的,都集中在这里。这个BeanDefinition是IoC容器体系中非常重要的核心数据结构。通过解析以后,这些数据已经做好在IoC容器里大显身手的准备了。对BeanDefinition元素的处理如代码所示,
public AbstractBeanDefinition parseBeanDefinitionElement(
            Element ele, String beanName, BeanDefinition containingBean) {

        this.parseState.push(new BeanEntry(beanName));

        String className = null;
        if (ele.hasAttribute(CLASS_ATTRIBUTE)) {
            className = ele.getAttribute(CLASS_ATTRIBUTE).trim();
        }

        try {
            String parent = null;
            if (ele.hasAttribute(PARENT_ATTRIBUTE)) {
                parent = ele.getAttribute(PARENT_ATTRIBUTE);
            }
            AbstractBeanDefinition bd = createBeanDefinition(className, parent);

            parseBeanDefinitionAttributes(ele, beanName, containingBean, bd);
            bd.setDescription(DomUtils.getChildElementValueByTagName(ele, DESCRIPTION_ELEMENT));

            parseMetaElements(ele, bd);
            parseLookupOverrideSubElements(ele, bd.getMethodOverrides());
            parseReplacedMethodSubElements(ele, bd.getMethodOverrides());

            parseConstructorArgElements(ele, bd);
            parsePropertyElements(ele, bd);
            parseQualifierElements(ele, bd);

            bd.setResource(this.readerContext.getResource());
            bd.setSource(extractSource(ele));

            return bd;
        }
        catch (ClassNotFoundException ex) {
            error("Bean class [" + className + "] not found", ele, ex);
        }
        catch (NoClassDefFoundError err) {
            error("Class that bean class [" + className + "] depends on not found", ele, err);
        }
        catch (Throwable ex) {
            error("Unexpected failure during bean definition parsing", ele, ex);
        }
        finally {
            this.parseState.pop();
        }

        return null;
    }
在这个过程中可以看到对Bean定义的相关处理,比如对元素attribute值的处理,对元素属性值的处理,对构造函数设置的处理,等等。
上面是具体生成BeanDefinition的地方。在这里,我们举一个对property进行解析的例子来完成对整个BeanDefinition载入过程的分析,还是在类BeanDefinitionParserDelegate的代码中, 一层一层地对BeanDefinition中的定义进行解析,比如从属性元素集合到具体的每一个属性元素,然后才是对具体的属性值的处理。根据解析结果,对这些属性值的处理会被封装成PropertyValue对象并设置到BeanDefinition对象中去,如代码所示。
public void parsePropertyElements(Element beanEle, BeanDefinition bd) {
        NodeList nl = beanEle.getChildNodes();
        for (int i = 0; i < nl.getLength(); i++) {
            Node node = nl.item(i);
            if (isCandidateElement(node) && nodeNameEquals(node, PROPERTY_ELEMENT)) {
                parsePropertyElement((Element) node, bd);
            }
        }
    }
public void parsePropertyElement(Element ele, BeanDefinition bd) {
        String propertyName = ele.getAttribute(NAME_ATTRIBUTE);
        if (!StringUtils.hasLength(propertyName)) {
            error("Tag 'property' must have a 'name' attribute", ele);
            return;
        }
        this.parseState.push(new PropertyEntry(propertyName));
        try {
            if (bd.getPropertyValues().contains(propertyName)) {
                error("Multiple 'property' definitions for property '" + propertyName + "'", ele);
                return;
            }
            Object val = parsePropertyValue(ele, bd, propertyName);
            PropertyValue pv = new PropertyValue(propertyName, val);
            parseMetaElements(ele, pv);
            pv.setSource(extractSource(ele));
            bd.getPropertyValues().addPropertyValue(pv);
        }
        finally {
            this.parseState.pop();
        }
    }
public Object parsePropertyValue(Element ele, BeanDefinition bd, String propertyName) {
String elementName = (propertyName != null) ?
"<property> element for property '" + propertyName + "'" :
"<constructor-arg> element";
// Should only have one child element: ref, value, list, etc.
NodeList nl = ele.getChildNodes();
Element subElement = null;
for (int i = 0; i < nl.getLength(); i++) {
Node node = nl.item(i);
if (node instanceof Element && !nodeNameEquals(node, DESCRIPTION_ELEMENT) &&
!nodeNameEquals(node, META_ELEMENT)) {
// Child element is what we're looking for.
if (subElement != null) {
error(elementName + " must not contain more than one sub-element", ele);
}
else {
subElement = (Element) node;
}
}
}
boolean hasRefAttribute = ele.hasAttribute(REF_ATTRIBUTE);
boolean hasValueAttribute = ele.hasAttribute(VALUE_ATTRIBUTE);
if ((hasRefAttribute && hasValueAttribute) ||
((hasRefAttribute || hasValueAttribute) && subElement != null)) {
error(elementName +
" is only allowed to contain either 'ref' attribute OR 'value' attribute OR sub-element", ele);
}
if (hasRefAttribute) {
String refName = ele.getAttribute(REF_ATTRIBUTE);
if (!StringUtils.hasText(refName)) {
error(elementName + " contains empty 'ref' attribute", ele);
}
RuntimeBeanReference ref = new RuntimeBeanReference(refName);
ref.setSource(extractSource(ele));
return ref;
}
else if (hasValueAttribute) {
TypedStringValue valueHolder = new TypedStringValue(ele.getAttribute(VALUE_ATTRIBUTE));
valueHolder.setSource(extractSource(ele));
return valueHolder;
}
else if (subElement != null) {
return parsePropertySubElement(subElement, bd);
}
else {
// Neither child element nor "ref" or "value" attribute found.
error(elementName + " must specify a ref or value", ele);
return null;
}
}这里是对property子元素的解析过程, Array 、List 、Set 、Map 、Prop等各种元素都会在这里进行解析,生成对应的数据对象,比如ManagedList 、ManagedArray 、ManagedSet等。这些Managed类是Spring对具体的BeanDefinition的数据封装。下面以对Property的元素进行解析的过程为例,通过它的实现来说明具体的解析过程是怎样完成的,如代码所示。
public Object parsePropertySubElement(Element ele, BeanDefinition bd, String defaultValueType) {
        if (!isDefaultNamespace(ele)) {
            return parseNestedCustomElement(ele, bd);
        }
        else if (nodeNameEquals(ele, BEAN_ELEMENT)) {
            BeanDefinitionHolder nestedBd = parseBeanDefinitionElement(ele, bd);
            if (nestedBd != null) {
                nestedBd = decorateBeanDefinitionIfRequired(ele, nestedBd, bd);
            }
            return nestedBd;
        }
        else if (nodeNameEquals(ele, REF_ELEMENT)) {
            // A generic reference to any name of any bean.
            String refName = ele.getAttribute(BEAN_REF_ATTRIBUTE);
            boolean toParent = false;
            if (!StringUtils.hasLength(refName)) {
                // A reference to the id of another bean in the same XML file.
                refName = ele.getAttribute(LOCAL_REF_ATTRIBUTE);
                if (!StringUtils.hasLength(refName)) {
                    // A reference to the id of another bean in a parent context.
                    refName = ele.getAttribute(PARENT_REF_ATTRIBUTE);
                    toParent = true;
                    if (!StringUtils.hasLength(refName)) {
                        error("'bean', 'local' or 'parent' is required for <ref> element", ele);
                        return null;
                    }
                }
            }
            if (!StringUtils.hasText(refName)) {
                error("<ref> element contains empty target attribute", ele);
                return null;
            }
            RuntimeBeanReference ref = new RuntimeBeanReference(refName, toParent);
            ref.setSource(extractSource(ele));
            return ref;
        }
        else if (nodeNameEquals(ele, IDREF_ELEMENT)) {
            return parseIdRefElement(ele);
        }
        else if (nodeNameEquals(ele, VALUE_ELEMENT)) {
            return parseValueElement(ele, defaultValueType);
        }
        else if (nodeNameEquals(ele, NULL_ELEMENT)) {
            // It's a distinguished null value. Let's wrap it in a TypedStringValue
            // object in order to preserve the source location.
            TypedStringValue nullHolder = new TypedStringValue(null);
            nullHolder.setSource(extractSource(ele));
            return nullHolder;
        }
        else if (nodeNameEquals(ele, ARRAY_ELEMENT)) {
            return parseArrayElement(ele, bd);
        }
        else if (nodeNameEquals(ele, LIST_ELEMENT)) {
            return parseListElement(ele, bd);
        }
        else if (nodeNameEquals(ele, SET_ELEMENT)) {
            return parseSetElement(ele, bd);
        }
        else if (nodeNameEquals(ele, MAP_ELEMENT)) {
            return parseMapElement(ele, bd);
        }
        else if (nodeNameEquals(ele, PROPS_ELEMENT)) {
            return parsePropsElement(ele);
        }
        else {
            error("Unknown property sub-element: [" + ele.getNodeName() + "]", ele);
            return null;
        }
    }
下面看看List这样的属性配置是怎样被解析的,依然是在BeanDefinitionParscrDelegate中,返回的是一个List对象,这个List是Spring定义的ManagedList,作为封装List这类配置定义的数据封装,如代码所示。
public List parseListElement(Element collectionEle, BeanDefinition bd) {
        String defaultElementType = collectionEle.getAttribute(VALUE_TYPE_ATTRIBUTE);
        NodeList nl = collectionEle.getChildNodes();
        ManagedList<Object> target = new ManagedList<Object>(nl.getLength());
        target.setSource(extractSource(collectionEle));
        target.setElementTypeName(defaultElementType);
        target.setMergeEnabled(parseMergeAttribute(collectionEle));
        parseCollectionElements(nl, target, bd, defaultElementType);
        return target;
    }
经过这样逐层地解析,我们在XML文件中定义的BeanDefinition就被整个载入到了IoC容器中,并在容器中建立了数据映射。在IoC容器中建立了对应的数据结构,或者说可以看成是POJO对象在loC容器中的抽象,这些数据结构可以以AbstractBeanDefinition为入口,让IoC容器执行索引、查询和操作。简单的POJO操作背后其实蕴含着一个复杂的抽过程,经过以上的载入过程, IoC容器大致完成了管理Bean对象的数据准备工作(或者说是初始化过程)。但是,重要的依赖注入实际上在这个时候还没有发生,现在,在IoC 容器BeanDefinition 中存在的还只是一些静态的配置信息。严格地说,这时候的容器还没有完全起作用,要完全发挥容器的作用,还需完成数据向容器的注册。
1.3.3 BeanDefinition在lo容器中的注册
前面已经分析过BeanDefinition在IoC容器中载入和解析的过程。在这些动作完成以后,用户定义的BeanDefinition信息已经在IoC容器内建立起了自己的数据结构以及相应的数据表示,但此时这些数据还不能供IoC容器直接使用,需要在IoC容器中对这些BeanDefinition数据进行注册。这个注册为IoC容器提供了更友好的使用方式,在DefaultListableBeanFactory中,是通过一个HashMap 来持有载入的BeanDefinition 的,这个HashMap 的定义在DefaultListableBeanFactory中可以看到,如下所示。
private final Map<String, BeanDefinition> beanDefinitionMap = new ConcurrentHashMap<String, BeanDefinition>(64); 将解析得到的BeanDefinition 向IoC容器中的beanDefiniti o nMap注册的过程是在载入BeanDefinition完成后进行的,注册的调用过程如图所示。
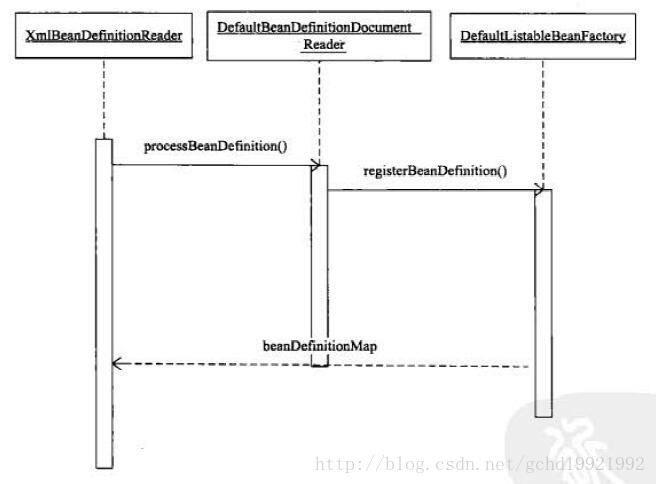
在DefaultListableBeanFactoryr和实现了BeanDefinitionRegistry的接口,这个接口的实现完成BeanDefinition向容器的注册。这个注册过程不复杂,就是把解析得到的BeanDefinition设置到JhashMap中去。需要注意的是,如果遇到同名的BeanDefinition , 进行处理的时候需要依据allowBeanDefin itionOverriding的配置来完成。具体的实现如代码所示。
public void registerBeanDefinition(String beanName, BeanDefinition beanDefinition)
            throws BeanDefinitionStoreException {

        Assert.hasText(beanName, "Bean name must not be empty");
        Assert.notNull(beanDefinition, "BeanDefinition must not be null");

        if (beanDefinition instanceof AbstractBeanDefinition) {
            try {
                ((AbstractBeanDefinition) beanDefinition).validate();
            }
            catch (BeanDefinitionValidationException ex) {
                throw new BeanDefinitionStoreException(beanDefinition.getResourceDescription(), beanName,
                        "Validation of bean definition failed", ex);
            }
        }

        BeanDefinition oldBeanDefinition;

        synchronized (this.beanDefinitionMap) {
            oldBeanDefinition = this.beanDefinitionMap.get(beanName);
            if (oldBeanDefinition != null) {
                if (!this.allowBeanDefinitionOverriding) {
                    throw new BeanDefinitionStoreException(beanDefinition.getResourceDescription(), beanName,
                            "Cannot register bean definition [" + beanDefinition + "] for bean '" + beanName +
                            "': There is already [" + oldBeanDefinition + "] bound.");
                }
                else {
                    if (this.logger.isInfoEnabled()) {
                        this.logger.info("Overriding bean definition for bean '" + beanName +
                                "': replacing [" + oldBeanDefinition + "] with [" + beanDefinition + "]");
                    }
                }
            }
            else {
                this.beanDefinitionNames.add(beanName);
                this.frozenBeanDefinitionNames = null;
            }
            this.beanDefinitionMap.put(beanName, beanDefinition);
        }

        if (oldBeanDefinition != null || containsSingleton(beanName)) {
            resetBeanDefinition(beanName);
        }
    }
完成了BeanDefinition的注册,就完成了IoC容器的初始化过程。此时,在使用的IoC容器DefaultListableBeanFactory中已经建立了整个Bean的配置信息,而且这些BeanDefinition 已经可以被容器使用了, 它们都在beanDefinitionMap里被检索和使用. 容器的作用就是对这些信息进行处理和维护。这些信息是容器建立依赖反转的基础,有了这些基础数据, 下面我们看一下在IoC容器中,依赖注入是怎样完成的。